Engineering Thursday: LED Light Boxes
With some LEDs, some acrylic, and a little know-how, you can create your very own LED light box.

Way back when, I worked on a project to create smart phone controlled LED cubes. Although the project never really got past the prototyping stage, it was a great learning experience. Since then I've created dozens of LED light cubes and bars all with different methods of control. The process is relatively simple, and today, I'm going to walk you through the steps for making one yourself.
Building the Body
All of these light boxes have one thing in common: milky white, diffusing acrylic. The sizes and shapes may vary, but the same type of acrylic is used in every one of my designs. This type of acrylic can be found at any local plastics supplier. Here at SparkFun, we are very fond of the folks down at Colorado Plastics in Louisville, CO, and I gathered all the acrylic I could find there to make the bodies of the LED boxes. There are variations of this plastic, so makes sure you pick out a style that works well for you and diffuses the light to your liking. The 1/8" thickness works very well and is what I have used in all of my projects. Once you have procured the plastic, it's time to make some shapes. If you don't have access to a laser cutter, many of the plastics suppliers have one on hand and can make custom cuts for you. If you go this route, make sure you have your dimensions already laid out before you go to buy. I started off with a simple 6" x 6" x 6" cube for my first prototype. Since I wanted the cube to be 6" on all sides, I had to model four of the planes to be 1/8" x 1/4" shorter than the others for joining the four walls of the cube. It always helps to make a model beforehand.

A 3D model of the cube created in Google SketchUp. Notice the edges created around the four walls to get an exact 6" dimension.
Once you have all your pieces, it's time to start the assembly. Using an acrylic bonding agent, or acrylic weld, I attached the four walls to what would be the top of the cube. Make sure you work fast, since some acrylic bond has a very fast drying time, and, once it's dry, you have a very solid bond. This left just one 6" x 6" plane to be used as the bottom. This is where the electronics will go.
Choosing the Right Electronics
Deciding which electronics to choose will depend on how you want to control your light box. The simplest version I created was a cube that just plugs in and fades through the colors without any user control. I made a lot of these for my not-so-tech-savvy family members for Christmas this past year. They're simple to make, and they make great gifts.
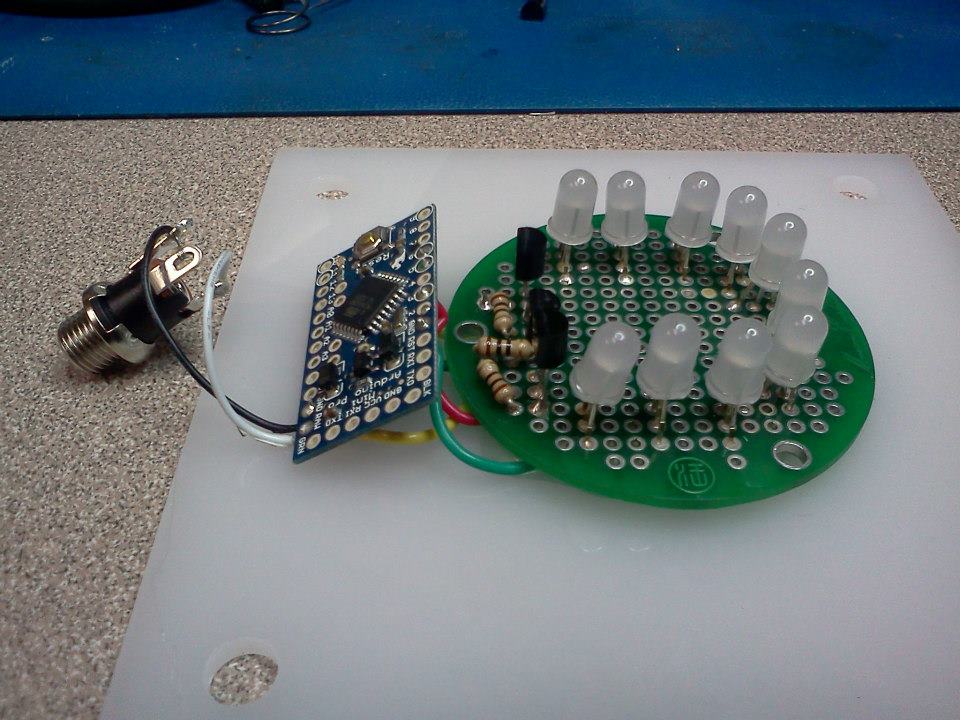
Here we have the guts used in one of the simple cubes. An Arduino Pro Mini is used to control the transistors and thus the RGB LEDs on the protoboard, and a panel mount barrel jack is attached to the back wall to provide power.
To take it up a notch, I decided to add user interfaces in later models. Wanting to use my phone to control the lights, I sought out a simple solution that required as little app developing as possible. I used Amarino to accomplish this on an Android phone. The site and the toolkit have not been updated in awhile, but they still work great on most models of android phones. They have detailed tutorials on how to set up all the software development tools, and, although it takes some time and effort to get everything installed if you've never done any Android developing, it's easy to add their app to any Android device once you've got the software setup. Their Multi Colored Lamp project just so happened to be perfect for what I was doing. Using a Bluetooth Mate attached to the Pro Mini, the phone was able to connect to the cube and offer a smooth user interface for controlling the lights.
For my latest and greatest LED light box, I wanted to go for total control as well as added features. The original cube had a nice fade function, and I liked the ability to control the colors individually that the Amarino app offered. So this time, I wanted to be able to do all of the above and then some. While the Bluetooth worked well as a wireless interface, I wanted this light be controlled from any device, not just an Android phone. I opted to go with WiFi and created a protocol that would allow me to change modes and colors on the boxes. I used a WiFly Shield to act as my point of communication for the box, and this time I used RGB LED strips instead of soldering individual LEDs together. Soldering everything together was the easy part. Talking to it was the challenge.
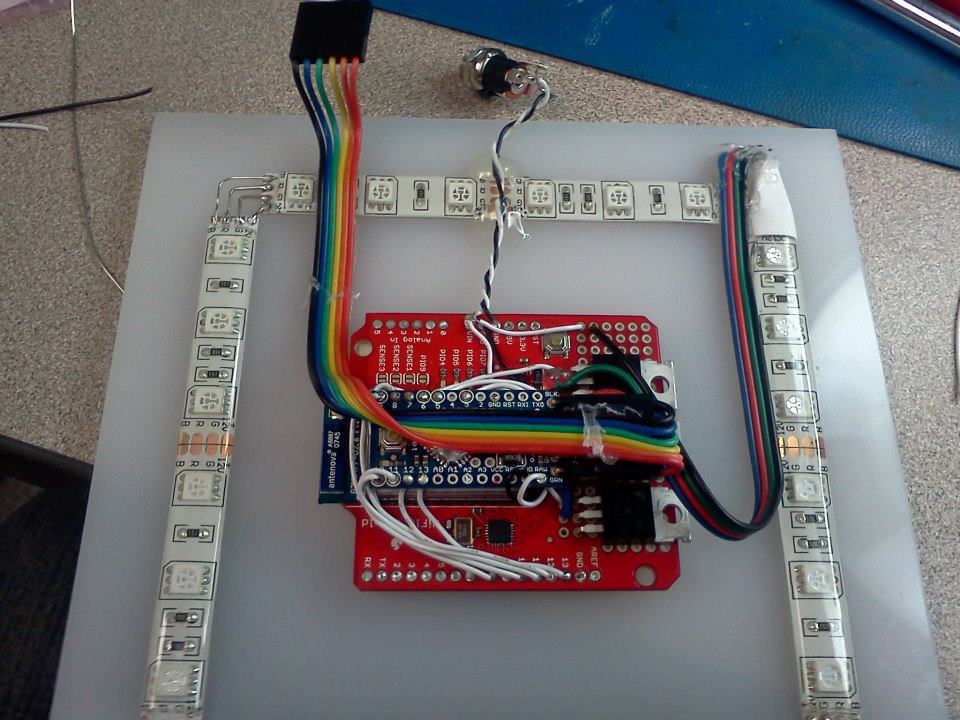
The WiFi prototype. N-channel MOSFETs were used to control the LEDs in the strips. I connected a 6-pin jumper wire to the pro mini to allow for reprogramming once the cube was fully assembled. Maintaining a low profile was also important so the electronics wouldn't interfere with the light dispersal.
The code was written so that I was able to send a string of numbers after the IP address of the WiFly Shield, and the Arduino would parse out those numbers and use them to set RGB values, set the luminosity, control the speed, and trigger certain modes like fade or pulse. For some added fun, I etched some designs on the acrylic and also cut out some mounting holes on the backside. The video below shows the fade mode in one of the rectangular models I built.
ReplaceMeOpen
ReplaceMeClose
Taking it to the Next Level
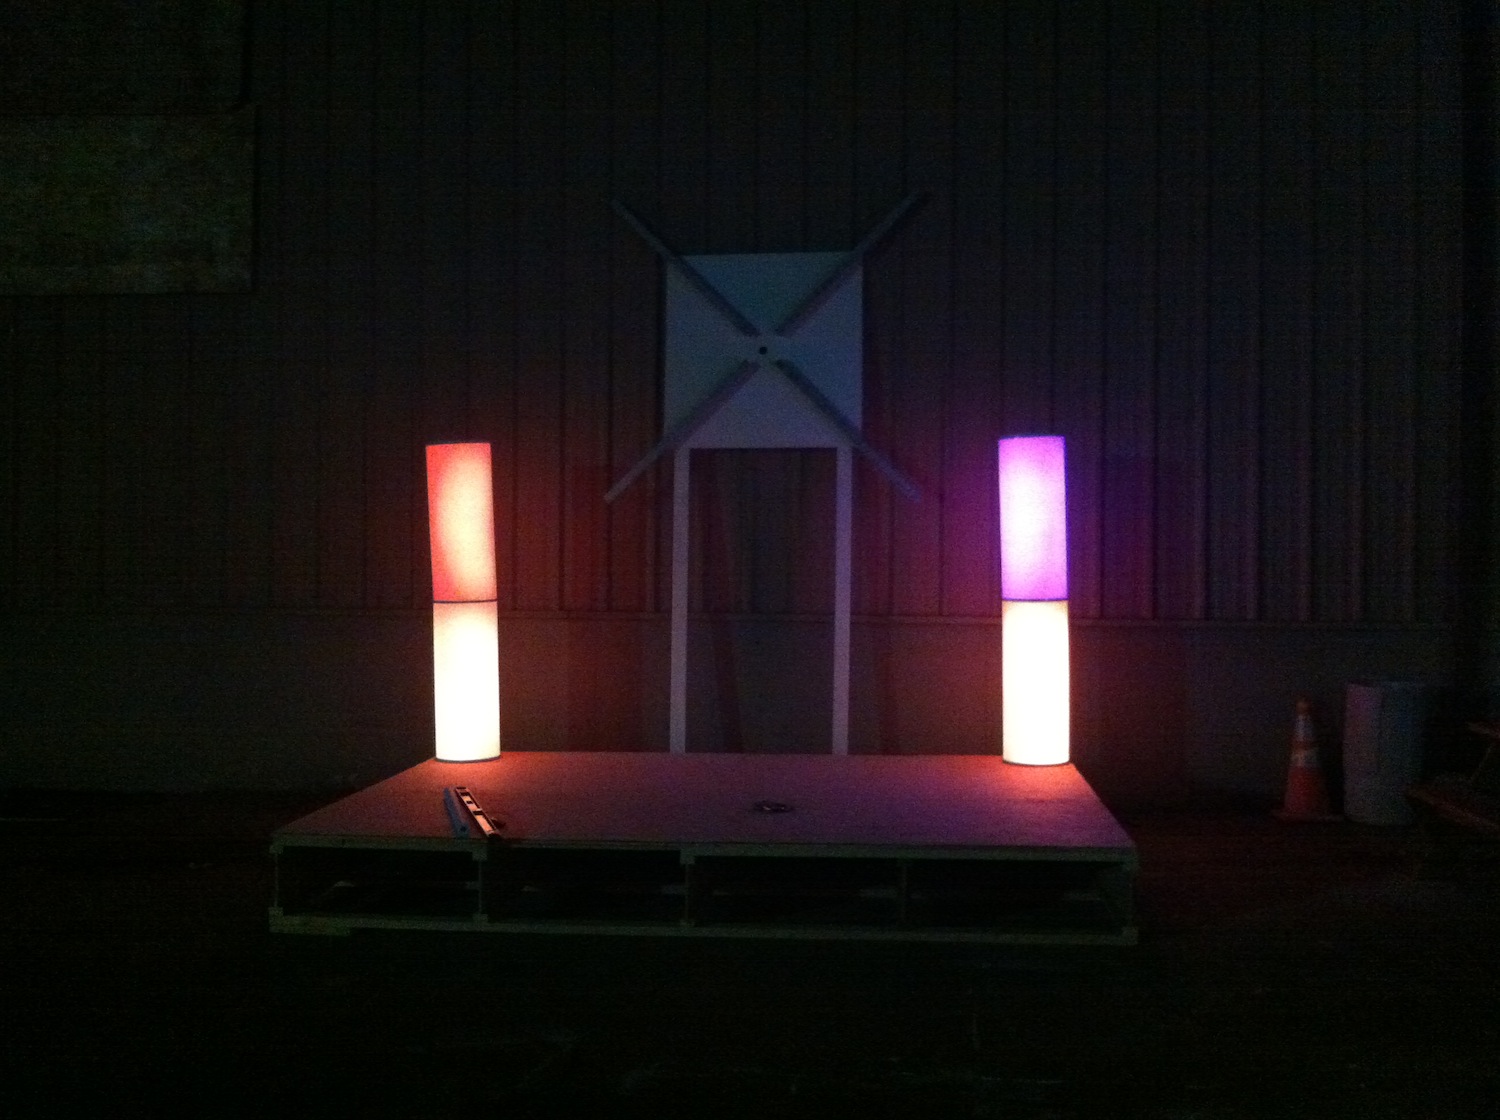
This project is far from complete, and there are numerous ways to control these boxes. You could use the IOIO board to control the LEDs and build your own apps in Processing. Using multicast over WiFi, several boxes could be controlled at once. I've even thought of using IR LEDs and remotes to build remote control boxes. And, the form factors can vary wildly. For our grand opening at Solid State Depot, we built two cylindrical light towers to accompany our RedBull Encabulatrix project. These were also controlled over WiFi to create the ultimate user-controlled lighting experience.
There are endless possibilities when it comes to making cool LED light projects. I'd love to see what you guys have created using LEDs and what kinds of enclosures you've used to house them.
Interested in learning more about LEDs?
See our LED page for everything you need to know to start using these components in your project.


I would love to have a simple tutorial on how to build enclosures... Once I've installed Sktechup, what tools should I use in the program to design the walls, what thickness, how I make sure it goes together into a box that would snap together, etc. The electronics I can get to work, most of the time... but learning how to make a proper enclosure would be awesome. :)
And I'd love one on connectors...especially in-line connectors for wiring harnesses so that you can take your own things apart and put them back together again. How does this crimping thing work? How does one choose what type of connector to use? All that good stuff. I love making my electronics projects, but I hate servicing them...all because I use no connectors. Help educate me!
If you can't figure out crimping, electronics/electrical may not be your thing.
Personally, I cheat. I just buy some of our long jumper wires with pigtails and solder the pigtails into one side, and then use the mating connector on the other side. no crimping needed. Like these. Check out the images from the Leiger I made, everything has jumpers on it. It could be completely torn down (for images or for testing) in about a minute, and put together in about the same time. It's all modular. For me, I just JST (SH or PH series) for low voltage stuff (sensors, buttons, etc) and screw terminal connection for power (if it's higher-current or voltage). But realistically, unless you're drawing an amp or so, the stuff I listed above is fine for everything. If you look at this picture the main board has a 4-pin header on the left, a 3-pin on the right, and underneath it has a 2-pin (power and ground). It's really hard to screw it up since they can only be plugged into one place. and they are molex connectors, whereas the GPS is a JST SH, and the geiger tube connects via a screw terminal. using a variety is nice so things only fit in one way.
We do have a tutorial on connectors, though it doesn't go over wiring harnesses. And our Working with Wire tutorial goes over the crimping process. If you have any suggestions on how to make those tutorials better, please leave some feedback or start a discussion on the respective tutorial pages.
I'm with Robert though. I usually just use cables from whatever I have lying around. Old serial and USB cables are great for making lots of connections in in a single cable. I will just drill a hole in the enclosure, feed that cable through, solder up the connections, and then use a zip-tie on the inside to prevent the cable from getting yanked on and ruining the solder joints.
If I do need to have a connector that will be disconnected and reattached, I usually go with the polarized connectors. In that case, you will need to do some crimping.
The small molex connectors are also my default choice. You can even crimp the pins with pliers if you don't have a crimper.
I agree. One of the biggest hurdles I've stumbled on is casing a project. There seems to be tutorials for everything except that.
A few friends and I built this for burning man 2011. It consists of 63 mirrored acrylic panels cut by the plastic supplier which we hand drilled and welded. All electronics are custom (this was designed before the WS2801 was so easy to get). It runs by itself, but has a control panel with an arcade stick, buttons, and a big red button. Gamers knew how to access the easter eggs (Konami code anyone?) Tetris, Snake, Master blaster, and even a wedding proposal!
And some prototype images
For those wanting a tutorial on making acrylic boxes, head on over to my local (Portland, OR) plastics supplier, Tap Plastics. They have a wide variety of materials, custom cutting, and instructional videos online.
http://www.tapplastics.com/ http://www.tapplastics.com/product_info/videos http://www.tapplastics.com/product_info/videos/how_to_build_a_box_with_plastic
There is an amazing board called the Rascal Micro that is an Ethernet enabled microcontroller. All you would have to do is configure a wi-fi dongle and use the pre-installed example and you could conrol the LEDs with a nice graphical knob interface!
www.rascalmicro.com
On a larger scale I made a variety of these which used six 3W RGB's mounted on an aluminum cube that hung suspended inside the shape: first stellation icosahedron (They were also controlled by Mega48's on a serial bus.)
This is another one I did a few years back-- I used a single ~3W RGB on a star board (per cube) and controlled it with a Mega48 on a multidrop serial bus: gameshow boxes
Another kind neat effect my placing the LEDs close to the plastic: white chaser
While not my video, you can see the big 'pendant' lamps in this as well as some illuminated tables and fiber optic effects I built as well: Ground Kontrol
Here's a similar one I made for V-Day 2012. It's got manual mode with manual control over all 3 colors (R, G and B) and an auto mode with manual control over the fade cycling speed. I plan to expand it to add a temp sensor and a "baby" mode. This will work similar to some baby lights you see where they'll change color based on room temp to indicate perfect temp for baby. :)
YouTube
For the next next level, add some laser cut wood panels for shadow boxes ... for example http://www.flickr.com/photos/mauimakers/8943384930/in/set-72157633913601143/lightbox/
As far as wireless communication links, have you tried using the 434MHz Tx/Rx combo you guys sell? A WiFi unit in every light would add up quickly, and since you only need uni directional communication, these should, in theory, work. You could put a cheap receiver in every light, and assign every light an address. Then you would only need a single base station - connect it to your computer/phone via WiFi, and then transmit the data from WiFi over the 434MHz link. Could something like that work for a setup like this? I haven't really played with the Tx/Rx modules yet, but would like to.
My latest LED project was a scoreboard for Ultimate Frisbee games. Here's a tour: http://youtu.be/Q-YWABsCgqs The enclosure is a custom made wood case with the screen being white styrofoam that has been router-ed where required to show the numbers. I then glued some 1mm depron (super thin/light foam) on top of the router-ed foam to diffuse the light from the LEDs. It works amazing for indoor games in the winter, and for evening games in the fall. In summer on bright sunny days it's a little hard to read though. You need to find a shady spot to place the scoreboard.
If you want cool matching notches for assembly but don't want to do the tedious work yourself, this site is great http://boxmaker.rahulbotics.com/
Just put in box dimensions, the material thickness and download a pdf with your box. Then import that into your favorite CAD program for cleanup, mounting holes, decoration, etc,
I just finished a project very similar to this for an art class I took at school http://tinkeringetc.blogspot.com/2013/07/adjustable-rgb-led-color-cube.html