Enginursday: Adventures in Building My Own Workbench
Designs for a custom, DIY electronics workbench, and some lessons I learned in the process.

I wouldn't call woodworking my forte by any stretch of the imagination. But, like any good DIYer, I felt the need to try it (at least once).
When I moved to Boulder back in August, I did not take much furniture with me. I had a basic (read: cheap) desk that I used for many years prior to my move, and sadly, I had to leave it behind. I disassembled it and left it in the "free furniture-slash-disposal" pile in my apartment complex (I noticed that it had vanished before trash collection day, so I assume that someone in Virginia is now happily using a perfectly good, secondhand desk).
Part of the decision to rid myself of my well-used desk was the burning desire to upgrade (naturally). Most desks are designed to satisfy basic computing, reading, and writing needs. You need to spend extra cash to get something that goes beyond those needs, such as a drafting table or an engineering workbench. Being an engineer, I opted for the latter. Upon my initial search, I was shocked by how expensive decent electronics workbenches could be. Name brand workbenches like Lista and Edsal could easily run $1000+ (as a side note, if you live near a university, you might be able to procure their old workbenches for free or cheap if they are in the process of upgrading).
I thought I could do better for cheaper. So, I set out to design a workbench that met my needs. I started researching what others had done, and they ranged from the simple to the elaborate. I stumbled upon plans for a "$50 Workbench" and used it as a starting place for my design, which I created in Sketchup.
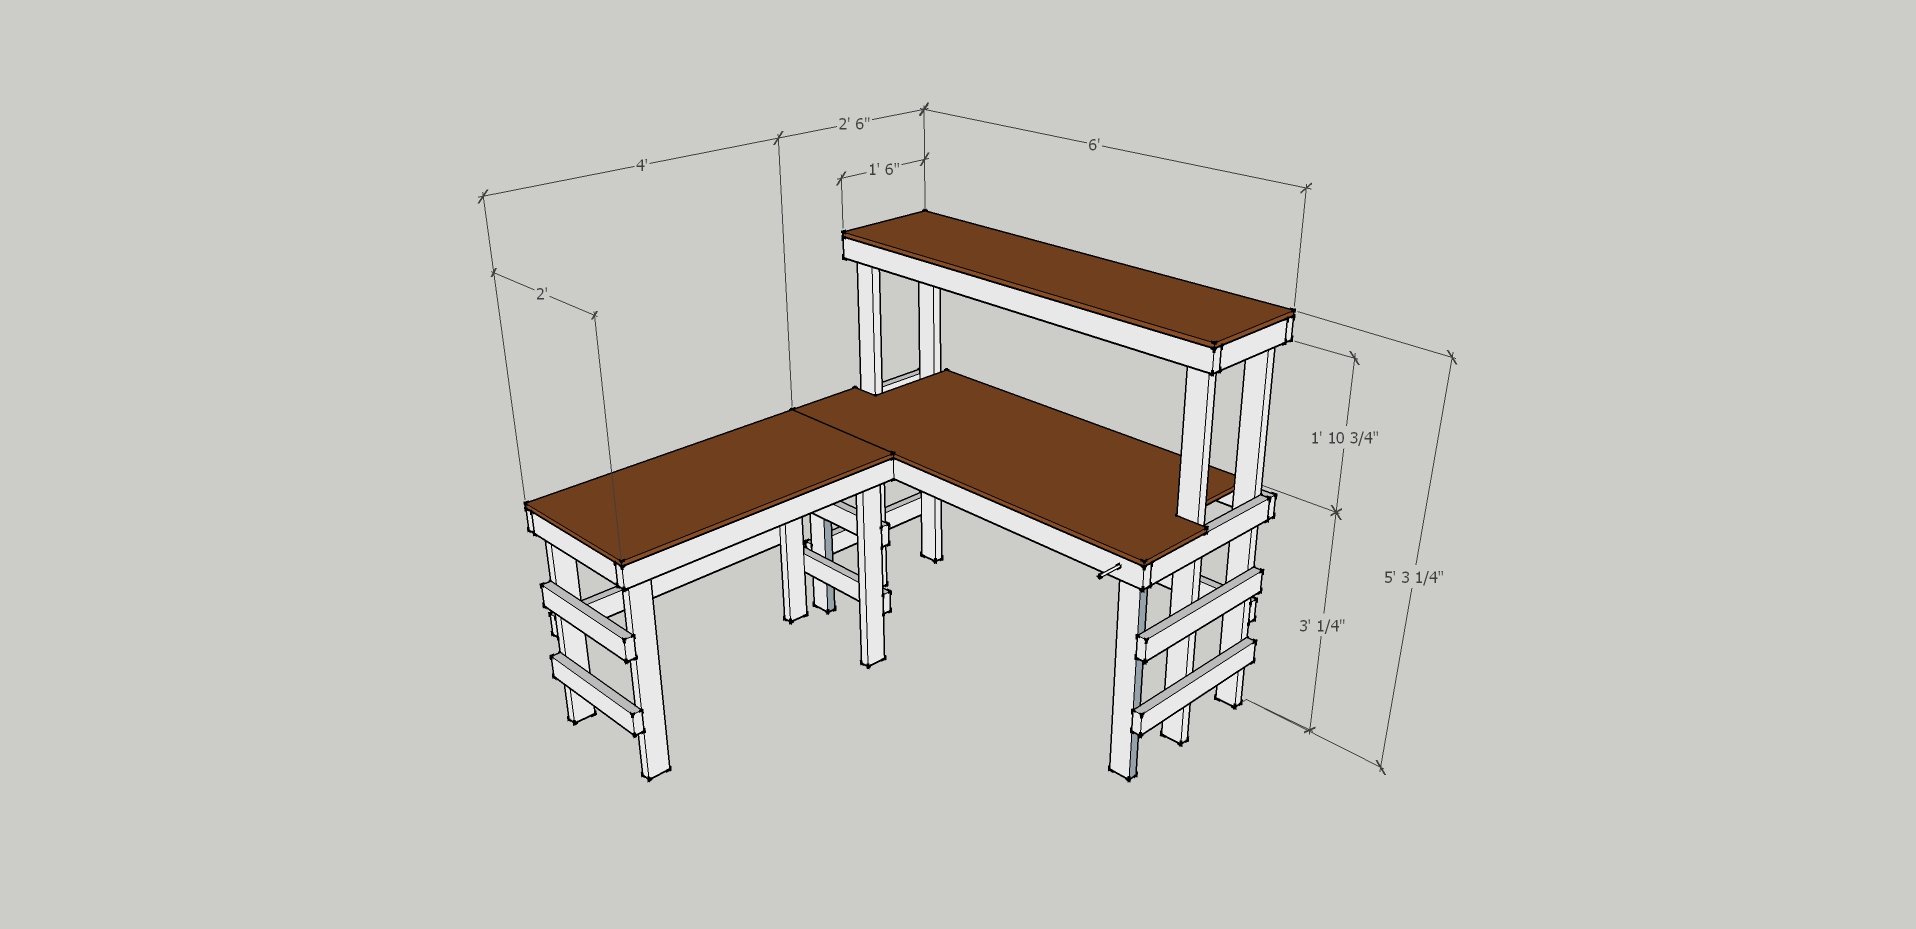
Because I was designing the desk to be primarily used for electronics work, I had a number of requirements:
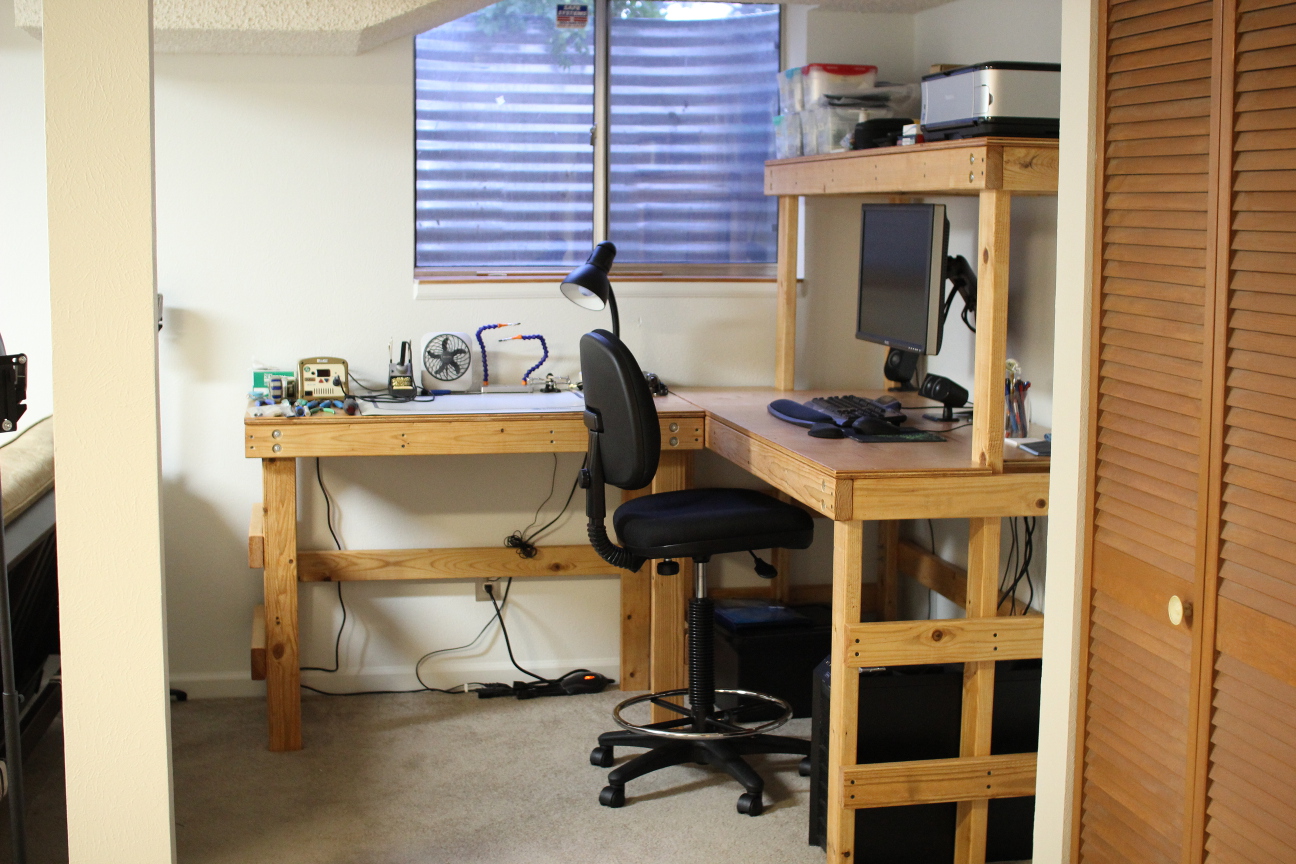
- Usable while standing
- One area for the computer and another for soldering
- At least one upper shelf
- At least one shelf must be 18 inches deep to hold electronics equipment (e.g. oscilloscope)
- 24-inch monitor must fit under hutch
- Bolted (not screwed) together so I can disassemble and re-assemble the whole desk
- Sturdy enough so as not to shake while typing or soldering
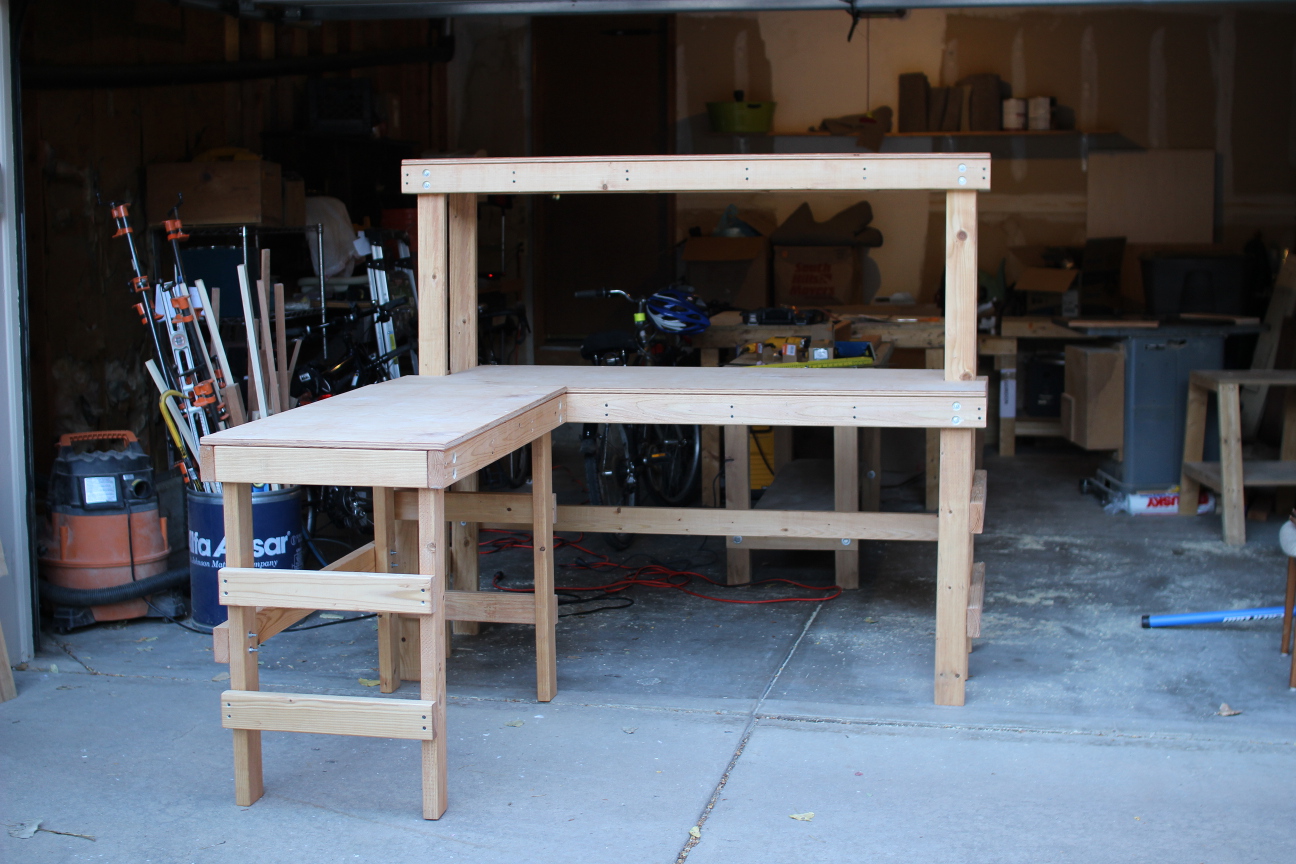
As a result, I modified the workbench design from The Family Handyman article to suit my needs. I put the desk top at kitchen counter top height (about 36 inches) and ensured ample space under the hutch (about 23 inches) for the monitor. The legs would be screwed together as subassemblies and bolted to the top sections. This modular approach would allow for easy disassembly and re-assembly (so I can take the desk with me when I move out of my current apartment).

Additionally, I wanted to stain and seal the desk (completely optional, but it made for a much nicer finish). So, I purchased sealer, polyurethane, sandpaper, steel wool, a nice brush, and some tarps as well. In the end, everything cost around $200. You can save some money if you don't opt for the staining and sealing.
My girlfriend visited for the weekend, so I was more than happy to have the extra help. We had Home Depot make the necessary cuts of wood out of 2x4s and birch plywood. Once home, all the pieces were sanded to remove any burrs and round out the edges. After, the pieces were stained with a "pecan" stain to give the wood a warmer, richer color.
We assembled the legs and top pieces separately. Each of the subassemblies were held together with wood screws.
I spent the next week sealing the project. I applied only one coat of sealer to the legs, but the tops got two coats and copious sanding. While the desk looks like 2x4s screwed together (because, well, it is), the tops were fairly smooth (more sealing and sanding would make for an even smoother finish).
The whole thing was assembled in a nook in my apartment...
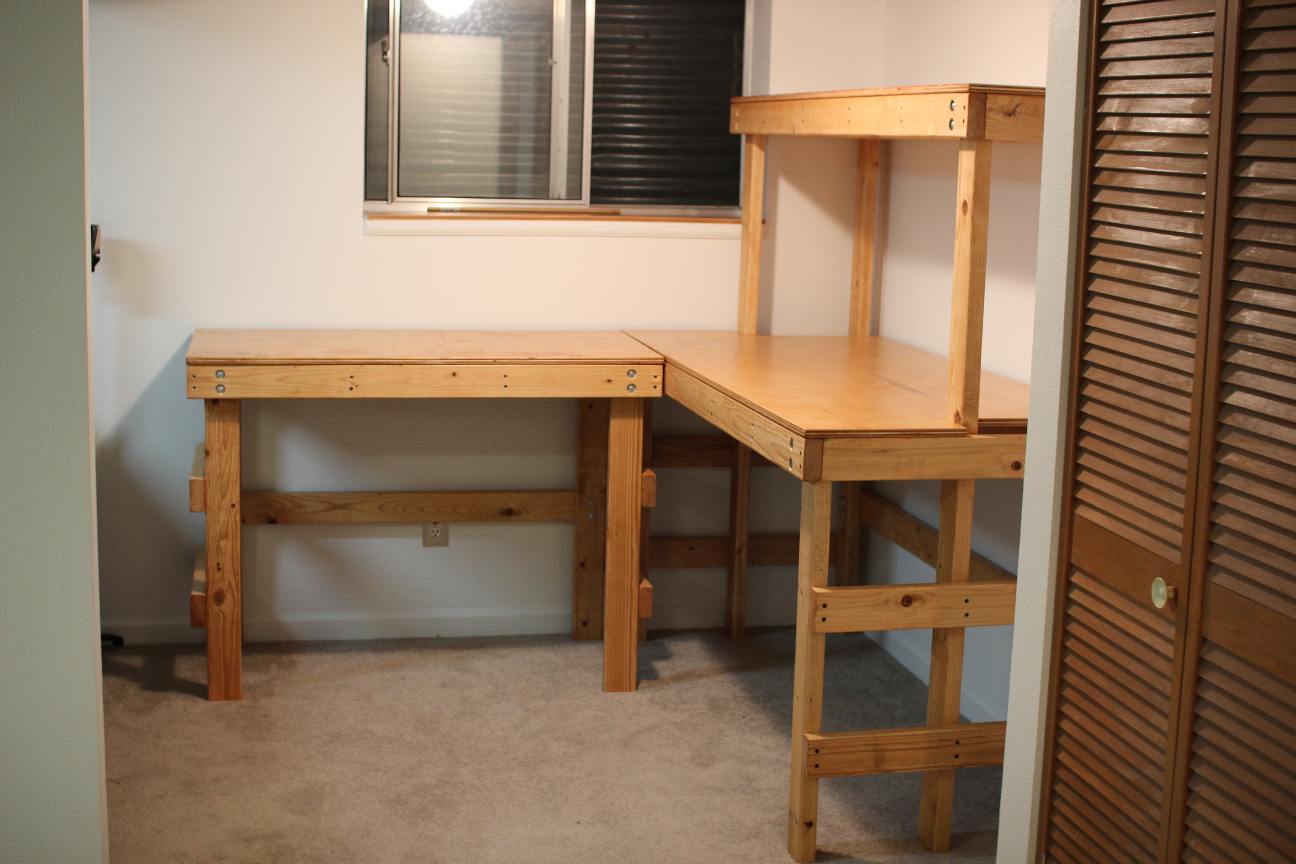
...and furnished with my stuff.
I have since added drawers underneath the soldering desk to house tools and some drawers on the desk to hold electronic components. Eventually, I would like to add an oscilloscope and perhaps a second monitor.
My question to those of you with more experience: I noticed that because it is a tall desk, there is a fair amount of wobble. The desk is braced in a corner for now, but I would like to make it more stable on its own. Can you suggest any good ways to make it more stable? Use 4x4s? Put diagonal beams up the sides? I'm open to any ideas!
My Sketchup plans can be found here.
When I make changes, I will update my GitHub repository.


Only ONE monitor? C'mon man! I run with 4 minimum!
You must be so proud of yourself ;)
Very much so. :)
Measure height of electrical outlets on wall before setting cross brace placement. There is no standard I know of except the disabilities act in the US. If it is a new house/apartment they should be 15 inches to bottom of the receptacle plate. But don't count on it.
I'll keep it in mind - didn't even think about that. Thanks!
For the desktop surface, check out Shower Board (aka white hardboard). It is essentially masonite with a smooth white surface on one side. It sells for about $17 for a 4x8 sheet... not that much different than the brown stuff. The big plus of this stuff is you can use it as a white board for dry erase markers. Yes it will stain over time as you use it (especially when you leave notes on it for long periods) but so will the Expensive White Board. I did my electronics bench and desk with it and its quite useful for making quick notes, marking out temp areas for parts, etc.
I know this is now a 10-year old article. However i am attempting to build your bench but not able to open your Sketch-up files in version 8 or the current one. Is there a trick to it?
Need to be more expert in woodworking for me to do this one. There are various online shops, store and link sites to choose from when buying DIY or easy assemble furniture including doors but I always ended up buying ready made one from Caldwells.
Someone may have posted the suggestion already, but mortise & tenon joinery would make your bench very solid. I bought a router table top from Rockler and then proceeded to build the base using douglas fir 2x4's. To make sure the base would be sturdy (and to provide a shelf under the router), I designed the base with two levels of horizontal rails just like you've done here for the base of your workbench.
The only difference is that I took some extra time to mortise the legs and put tenons on the horizontal rails. That's 16 mortises in total and far more time at the drill press than I realized. The resulting base is rock solid and does not move or flex when I'm using it. The reason I made the base instead of buying one? So I could make it the same height as my table saw and use it as an impromptu out-feed table. I also put levelers under the legs so I could eliminate potential wobble.
You can get a very good tutorial on building a good sturdy work bench over at finewoodworking.com they have a video tutorial here....http://www.startwoodworking.com/getting-started/season-one
I can tell you the secret to building a sturdy work bench is making the unit bind together tightly. To do this you must use basic woodworking joints such as a mortise and tenon OR do like the tutorial I mentioned, and use some modern techniques such as tieing it together with threaded bars. Bolting pieces of wood to each will not give you that stability you desire.
I built the starter work bench in that tutorial and I tell you it WILL NOT wobble or move. It is rock solid... a car can probably hit it with minimal damage to the bench lol.
I have founf bolting and screwing wood together rarely works for tables or work benches though.
I don't really have the tools to make a decent mortise and tenon (yes, I know there are basic hand tools I could get), but I'll probably put in some of the threaded bars or diagonal turnbuckles to add some stability.
Today, I don't use anything fancy for mortises. A simple hand held drill and a mortise chisel is all that I use. It's very fast - with some practice you can do a mortise in under 20 minutes start to finish. I do still use a table saw for tenons, but only because it's faster than any other method.
Since it is already built, diagonals should do well :)
Wow you're organized.... My workbench is cluttered 100% of the time... If it's like that all the time, sir you have a gift! :-)
LOL....nope! That picture was taken just after I had assembled it and started to put things on it. It's a bit more cluttered these days :)
Haha still a lot more organized than mine I'm sure! :-)
not bad but...
I bought 1 of these:
http://www.samsclub.com/sams/seville-classics-lighted-hardwood-top-workbench/prod3460484.ip?navAction=push
and 3 of these so far for my home office:
http://www.samsclub.com/sams/ultra-heavy-duty-workbench/prod1490086.ip?navAction=push
They are very well made and are the perfect height for standing.
One of them is getting the lower enclosed in Optix acrylic to store servers.
umm the best way to fix the wobble is to brace the bottom with the top.... my bench has a raised platform off the floor that looks just like your bench top and then bolts onto the legs and firms it right up.... I can send pics.... I have a vice mounted on it ... :)
Awesome! I did this EXACT thing recently. I sketched it up in sketchup maker edition, then got to cutting. I went a little overboard, but I like the end result. it's not 100% done, but the majority of it is.
recent picture with workbench covered in RC stuff (was building new short course truck for racing)
Pic 1
the design in sketchup. far left section not done yet, so my replicator 2 is sitting on the floor :(
Pic 2
somewhat assembled and not painted. (by the way, it's easier to paint BEFORE assembly, I came to find out)
Pic 3
painted!
Pic 4
picture of it with a somewhat clean work surface (which is rare)
Pic 5
I have more pictures, including the PWM fans I put in the instrument rack for heat exhaust, the power strip I mounted back there, and other detailed pictures. My main reason for the corner design: HUGE desk space, and no legs in the front to bang my legs into. it does make for a slightly wobbly design, so I plan on adding diagonal braces and more bracing along the floor between the legs, but for now, it works fine.
Wow....that's quite an impressive build! The paint job looks really good, too.
Thanks! The wife basically said there's no way I can put it in the office unless I make it look like it was store bought, so that's the best I could do. Cheap matte black paint from walmart. I really didn't sand or prep any of the surfaces, but since it's black, it hides my poor woodworking skills.
Now if I could only get it to stop wobbling... (let me know if you find a good wobble fix for yours, I'm still pondering a fix for mine)
We have one of those $1k benches at work and from what I can tell they use bracing on the sides to keep them from wobbling. It's similar to the wood that holds your floor. It's tall because that provides the most strength. Where you're going to run into trouble is that you can really crank down on a bolt to remove all the play when you're working with metal, not so much on wood.
Since you're working with wood you could either add a diagonal cross brace or cover the back and sides with finished plywood and screw them all the way around which will accomplish the same thing.
Wonderful! Any thoughts on sharing plans on sketchup?
I don't mind at all. Just keep in mind that it's very wobbly, so you'd want to add some support bracing to make it more stable if you build it to spec.
Keep in mind I'm new to 3d design using CAD software, I'm just old enough that I had MANUAL drafting class on paper, so this is new to me. I made the first sketch as one giant manifold. It was a nightmare to adjust or rearrange. I basically had to start over and remake it to where each piece of wood on the project is its own "component", and grouped the components up into groups. This still might not be the correct way of designing but it's better than my first go-around. (I can post that if you need a good laugh)
http://5ky.me/media/workbench/finalbench_e.skp
If the landlord will permit it, you can use a couple of long screws to fix the bench to studs in the wall. That's how I get my free-standing bench to be stable enough to hammer on. Put the screws through the 2x4 just underneath the benchtop in the back. You could do the same for the top shelf or use masonite. Of course, plug the holes when you move out! :-D
LOL, fair enough. I might consider that if I get (i.e. buy) my own place :)
The easiest way to prevent your desk from wobbling without adding to much weight and having to over tighten the nuts and bolts is to add a strip of thin plywood to the back of the desk 12" wide will work or 24" if you want to make it sturdier, it is a much lighter alternative and efficient than adding diagonal braces
How do you mean? If it's only 12" wide, then it won't reach both sides of the desk. I must be imaging this wrong...
Cut a strip 12" or 24" inches wide measured floor to top of the desk that is what I called "wide" you can use very light plywood 1/4 of an inch and add screws every 6 inches to compensate for the lightness of the plywood, if you use thicker plywood 1/2 an inch you just need to add screws at the corners and it will get your structure very sturdy. If you trace a diagonal line between the corners of your strip you will see that you are really adding diagonal bracing which is the only way to prevent the wobbling. Geometrically a rectangle can always be made into a diamond if you push opposite corners, with a triangle it is impossible, thus the diagonal bracing, I hope this make sense. It is also important to brace one side of your desk to the other. The "L" shape is also sturdier than 2 independent desks (someone else also pointed this out) if there is a way to add drawings to this comments I can send you some, just let me know how
'Wide' means 'high' in this case. So a strip 12" or 24" high across the back of the bench.
I have a suggestion to kill two birds with one stone:
First, to kill the wobbler - I would have put a 1/2 inch plywood Sheet -6 feet wide by 4 foot tall on the back side of the taller part of the desk (against the right wall), with the top of the 4 foot width attached with drywall screws to the upper shelf (2x4) and all cross 2X4s. That will stop the left and right wobble on that part. I would then do the same for the left part of the desk but using the left over from the 6'x4'. Also I would bolt the two desk together making an solid "L" using large washers and two bolts. - side note- I saw how you bolted your desk together- I would have done one other thing- I would have used larger washers and two of them in each hole. Reason being is that it would distribute the force more evenly around the hole, which will help in preventing cracking of the wood. As my civil engineer grandfather would say: This may not be an issue in the short term, but it may be an issue in the long term.
Second Wobbler you didn't even knew you had: By putting that plywood on the back of your desk you prevent things (screws, pencils, ect) from falling down behind your desk -making you have to go spelunking for them. Trust me, your back and head will thank you for doing it, while saving time.
ALSO- WHY I suggest 1/2 inch plywood is because you can screw hooks into the plywood to hold for things like your Binocular Headband Magnifier, a cup holder for all your pins and pencils, a cup holder for your screw drivers and maybe your soldering iron too and other tools you want out of your way when your not using them.
Don't forget you can use the 2x4 under your disk to attach your power bars, or you can attach a power bar to that 1/2 inch plywood in the back of your desk.
I do have a question for you: Why didn't you cut your plywood sheet for the main desk to go between the uprights (2x4)? Yeah it's works the way you have them, and you can run your wires through them, But your going to find things doing a dive through those holes. I am thinking about time that your going to be wasting diving for the wayward screw driver or screw.
I know this one is over kill- but I hate spilling things on my desk like your coffee, tea, milk, water, ect. (and other things the kids will spill on it) and I hate burning holes into the desk top from a missed drop of molten solder or even the soldering iron. And before you hound me, I know it was expensive, and you will chip it at least once, but I still suggest going down to your local glass shop and buying a cut sheet of glass for the surface area of the desk top, and they can cut holes into it for your cables too. Plastic will melt so your not going to want Plexiglas on your desk top. I had my glass sanded so it would not cut me, and it's worked great for 4 years now. Re: having them rounding the glass- I am not sure that is a good idea, more likely to chip.
Also if your worried about running wires- If you look at the expensive disk they have holes in the desk with caps that have a big "U" in the cap that your wire can go through (Google: Grommet Cable Hole Cover Black for Computer Desk Table). All you have to do is go down to your local hardware store and ask if they have them (They have them on Amazon if they don't) and buy the correct hole saw for your drill and cut the appropriate hole.
Here's my desk >> DESK picture 1
and >> DESK picture 2
Good suggestions - thank you. The sheet of plywood in the back seems to be popular - I'm just worried about having to un-screw it when it's time to move and putting screws back into the same holes aren't as strong in my experience.
To answer your question: mostly because I'm lazy. It was easier to cut rectangular notches out of the corners rather than perfectly line up small notches for 2x4s. Because they're on the edges of the desk, I haven't had any issues with things falling through them. If anyone replicates my design, they're certainly welcome to use smaller notches to leave the large holes covered :)
I wouldn't be too worried about re-screwing. How many times are you planning to move? Will this desk fit in a room in every place you live?
You can replace the plywood with each move and you can always drill new holes for the screws. By the time you run out of places to put screws, I'm pretty sure you'll be ready to build a new workbench ;-) No one will know that there are other holes in the back except you.
Probably a couple moves with the desk. But that is true - no one else would see the holes :)
If you drill a pilot hole before you put your screws you can unscrew and re-screw safely, maybe you will just need to add a toothpick to the hole to give it a little extra grip when you re-screw
Nice work. I half noticed this when we stopped by your place en route to the bar. I am looking to do something very similar in the basement of our new place. ...I am also baffled that you are able to cope with a single monitor.
Thanks! As for the monitors....it works for now. I used to have 2, but I gave the second away to a friend. It also slightly irritates me when they're not the same make/model (yay OCD). I don't know if I want to buy another Dell 2405 or just get 2 new monitors. :)
Ha. I had one of a pair go bad. I couldn't handle having two different (even same size) screens, so I got rid of the working one and replaced both. I can dig it.
Hard to believe it now takes a MS to get into Sparkfun. You won't need the workbench after 30. If women are talking to you in your 20's, you'll be raising kids & never touching a soldering iron.
I also think all of the moms and dads out there teaching their small children to solder would also have to disagree. It's an activity the whole family can enjoy!
I think all of the couples working at SparkFun (while raising kids and building great projects together) might disagree with you.
Is that ... MEGA DESK???
You mean Home Depot actually cut your wood to the right length? Amazing... I gave up on having my local Home Depot cut the wood that I bought there, since they'd cut it to the wrong length every time.
Sorry, but you play a role inthat. Didn't you watch them measure and cut (or better yet, measure and mark it yourself)? I rarely let them cut, because I have the tools and a vehicle for 8-ft sheets, studs, etc., but when I do, it only take moments to make sure they get it right.
As others have mentioned, adding diagonal braces will solve nearly all the wobble problems and you can remove all the center-connected vertical/horizontal struts as they're redundant. Something like this should work: http://img229.imageshack.us/img229/3319/90312485wi2.jpg
This is another decent design:
http://i40.photobucket.com/albums/e218/expert244/workbench-1.jpg
As in the second picture, you can put that bottom center straight piece in there to provide additional rigidity. Usually it doesn't affect your chair's movement as it won't go that far under the workbench anyway.
For your hutch, just put some diagonals on the sides, and shorter corner braces (e.g. http://www.theenglishjoinerycompany.com/images/brackets/Gallows-Bracket.jpg) near the top so they're out of the way.
Basically, put diagonal braces wherever your structure suffers shearing.
For the bench surface: consider buying some heavier material for the surface so that you don't suffer as many vibrations and you could even drill/clamp into it. A plywood surface is sometimes a bit too thin. Solid wood is nice, and you can round off the corners somewhat. Also consider adding hard-points for heavier equipment such as bench vises.
I was in a similar boat and found a great solution from Simpson Strong Tie in the form of a simple kit they sold at Home Depot - http://www.strongtie.com/products/diy/kwb.html
The nice thing is that it includes all the brackets and screws you need to build a nice bench and even provides a cut list. Changing the dimensions is very easy. The finished project can be seen here:
http://www.flickr.com/photos/robert_boerner/sets/72157621625645635/
Update...I just checked and Home Depot still sells the kit, but only Online or Ship to Store:
http://www.homedepot.com/p/Simpson-Strong-Tie-Workbench-Hardware-Kit-KWB1/100375388?N=5yc1vZc2gy
I'll second the vote for the Simpson strong tie brackets; they are very reasonably priced, and they build great benches (and shelves, as it turns out). They can easily be pulled down and rebuilt (I've done it several times with one of my benches). I used 3/4 MDF for the bench top, and laminated it with formica (surprising easy to do, and doesn't take anything more complicated than a paint roller and j roller).
Good to know. I've heard of them, but never used them. I'll definitely check it out. Thanks!
I also went through this same exact thing. I had a desk for computer work, but needed more of an engineering desk on a budget. I kept my cost under $200 and repurposed an old flat and heavy "corporate" wood door as the bench top. I am new to DIY wood desks, but felt I would get a more stable bench with 4x4 by doubling up my 2x4s for the legs. No wobble going on here and have slightly uneven floors.
I am impressed with how you thought of using bolts to take apart the bench to move later. I didn't think of that and instead built the bench to fit through a doorway and around stair corners in two pieces, shelf top and bench. Awsome job!
Thanks! It took me a while to figure out how to place the bolts :)
Did you use any diagonals? Or just doubling 2x4s to get the needed stability?
I did not use any diagonals, just doubled up on the 2x4s for the legs. I also added a bottom shelf about half the width of the bench to add more storage room for...well anything. I currently store larger misc. parts (power supplies, things I want to take apart) in quart plastic totes and have a couple of desktop towers sitting on that bottom shelf.
You forgot your embedded power strip!
LOL....those are always handy! I forgot to mention - I did add an 8-port power strip to the far beam. It's mounted vertically on some screws, and it seems to do the trick.
A sheet or two of masonite on the floor will protect the carpet and let your chair move more easily.
Use scraps of plywood to make triangle bracing to stop the wobbles - even thin/light pieces will work well.
http://www.homedepot.com/p/Unbranded-3-16-in-x-48-in-x-8-ft-Tempered-Hard-Board-832780/202404545
Good idea with the plywood. That might be easier (and save some space) over using 2x4s for diagonals.
Diagonal bracing will fix most of your wobble problems. Just put the bracing in the same plane as the direction of the wobble you want to control.
Here's an example, from which you can extrapolate: http://www.howtospecialist.com/finishes/furniture/simple-desk-plans/
Thanks for the link! That definitely helps!
I have built a few of these as workbenches for my basement and garage. The 4x4 for legs is definitely a help. But adding adjustable feet to the legs might be enough. Even rubber feet might do. Floors are not as flat as we all think. Bracing with a diagonal will help, but for me, the floors are not level and putting on adjustable feet was the trick.
What kind of feet did you add? Do you recommend something specifically for 2x4s?
Excellent project and write up! Took me back a few years to my first 'lab bench' - also build in an apartment. I started with two utility tables (Formica over wood tops, metal frame and legs, ordered from the Sears catalog back when Disco was mainstream). Quickly discovered the 'L' format is best for two tables with one chair. I modified a desk lamp like this one to cover both wings.
Diagonal bracing is the secret to cure the wobbles.
Also, add a couple of electrical outlet strips that are accessible from your seated position. They're bring a smile as you add equipment and those plug in projects.
Having a single 'Master Power On/Off switch' is handy for shutting everything down when you're away.
Thanks! Glad you liked it. The 'L' desk seems to be working great for times when I need to switch between computer and soldering (or another desk to hold electronics).
I'll definitely look at adding either a diagonal brace or some kind of solid paneling to fix the wobbling.
And I didn't mention it, but I have since added a power strip to the far leg (between the desk and the hutch). Definitely a plus to have!
I can't tell if the two waist height desks are bolted together or not. If not, join them with two or three bolts. That may be the easiest and/or cheapest fix for the instability.
They are not - good idea, though. Would it help side-to-side wobble if the side desk is also a bit wobbly in that direction, too?
Given the problems of joinery without woodworking tools, perhaps paneling the back and side rectangles with hardboard (Masonite) would be the most feasible path to stiffness. Use plenty of glue and screws to get a good shear connection
Rich L.
Thanks! Is there a way to add plywood/masonite to the back while keeping it modular? E.g. be able to remove the paneling when it's time to move the desk.
Screws
Side-to-side wobble could be reduced by adding a sheet of thin plywood to the back between the desktop and the upper shelf. It would also give you a space to tack things up, hang things, etc.
Good idea, thanks. I'm thinking possibly some pegboard, as it has holes pre-drilled for that kind of stuff.
You mentioned a requirement for an 18" shelf to hold a scope. Looking at the height of your shelf, I would question placing a scope that high above the work surface. The closer you can get that screen to what you're probing, the better. What about a small shelf on the left side of the existing shelf, about 10" up or so, and about 12" long? That could hold the scope and probes, and keep them out of the way. Things like a bench power supply could go under the shelf, or storage bins.
Do you mean that having a screen too high makes it difficult to see? I could put it on the far side of the monitor (to the left if you're facing the monitor). I've got bins for parts there now, but those are easily moved.
Well the screen may be hard to see, but it's a pain in the neck after awhile to keep looking down at the circuit and then up at the scope.
A diagonal board along the backs of each rectangle will remove wobble. I built an 8ft high queen sized bunk bed from scratch using the same approach as your desk. Once I added a couple of diagonal boards the thing would probably outlast my apartment!
Good to know, thanks! Do you mean along the back of the desk, or up the sides of the legs?
Both would be best, but at least the back.
What you've built can be considered a parallelogram with axes at the corners, that's why it wobbles. (The horizontal brace simply turns it into a pantograph). The bolts act as axles and the wood as bearings, even though you used 2 bolts at each corner.
Diagonals will resist the rotation mostly through tension. You're converting your parallelogram into a pair of stacked right triangles, which are a more stable shape, the same way that a tripod is more stable than a 4-legged stool. It's actually 2 sets of virtual triangles - one set for wobble left, the other for wobble right.
A sheet of masonite will act as a web of infinite continuous diagonals. You can use something as weak as masonite instead of plywood because the strength needs to be in tension, not compression and because the load is distributed over the whole sheet.
For the same reason, you can use pegboard because even with the holes there is enough tensile strength to handle the distributed load. You could even staple on a bedsheet, as long as you stretched it tightly enough, and that would get rid of the wobble.
Have fun
PS- why does a milking stool have only 3 legs? Cuz the cow's got the udder
Do you have any photos of the drawers? Inquiring minds want to know! I just made a bed frame and a steel-and-redwood shelving thing (in my kitchen!), and a desk is next on my list!
That's a sturdy bed frame. But your bedroom needs raking.
I built (more like put together) some desks for a workshop room in the basement for Nick and myself, however, it's no where near as nice as the desk that Shawn and Jeff made. I'd cheated, and raided Ikea's scrap section for the components (which has a wealth of random thick counter wood/glass/metal tops, meant for kitchen and living room furniture, that are ideal for easy DIY projects). I found some gigantic finished wood and glass slabs, drilled in some metal legs, and had a long and short desk for around $40. Yeah...I'm a cheapo comparing that Ikea desks aren't that spendy. :P
Hmm, good idea. Garage is too cold for my sanding (and eventually refinishing) project. But the kitchen is nice and toasty! Although it might make it harder to get a roommate!
How do you do the hyperlink thing in the comments?!
Click on the little "formatting help" link under the reply box for some syntax help. We use markdown for formatting comments throughout the site.
Nice. What did your roommates think about the woodwork in the kitchen? Perhaps you should build a garage next?
I like the pipe work! I was thinking of something like that, originally. :) No photos of the drawers yet, but I used 4 of these with ESD and plastic bags to hold the parts. For tools, I got some of these from the Container Store. They're OK, I would honestly recommend looking at a real tool chest first.
I made my desk at SFE.
Yeah, but you, like, welded it and stuff. I'm not that elite yet.
Diagonals, definitely. I have something similar with diagonals and absolutely no wobble.
Another possibility is to close the sides. Something as simple and cheap as a sheet of masonite on each side will form a web and give you continuous diagonal bracing. If you use the stuff with pre-drilled holes, it'll work every bit as well and give you a place to hang things (tools, clip leads, etc.)
Have fun
That's a great idea! Could I use pegboard instead of masonite? Do you think that would be strong enough?
I've done that before. Works like a charm. As BlackLab1 said, it prevents things from rolling off the edge, plus it gives you plenty of places to hang tools and plenty of flexibility to change that arrangement later.
Yes, pegboard. That's what I meant by "the stuff with the pre-drilled holes". Sorry, English as a second language thing going on here.
Peg board would be just fine, shear reinforcement doesn't need to be very strong at all to give a lot of benefit.
Pegboard would be just fine, just don't try to haul a 4x8 sheet home on a roof rack. I ended up with multiple pieces after the wind yanked the front end up and cracked it in several places.
Oh Snap! My ride home with a full sheet of Masonite and plywood ended at bottom of the highway exit ramp. I stopped, the stuff on the ski rack broke the twine I got from the lumberyard, and it suddenly it all went dark inside my SUV... Embarrassing!
I can't find anywhere to get pre-drilled holes. Portable holes yes. The big ones even fold up for storage. Pre-drilled? none!
Did you check the acme catalog?
That's because you can't buy them as a single item (probably not marked for individual resale), you have to buy them pre-installed in a piece of masonite.
Are you talking about something other then a sheet of pegboard at the local HomeDepot/Lowes?