- Home
- Product Categories
- 3-axis
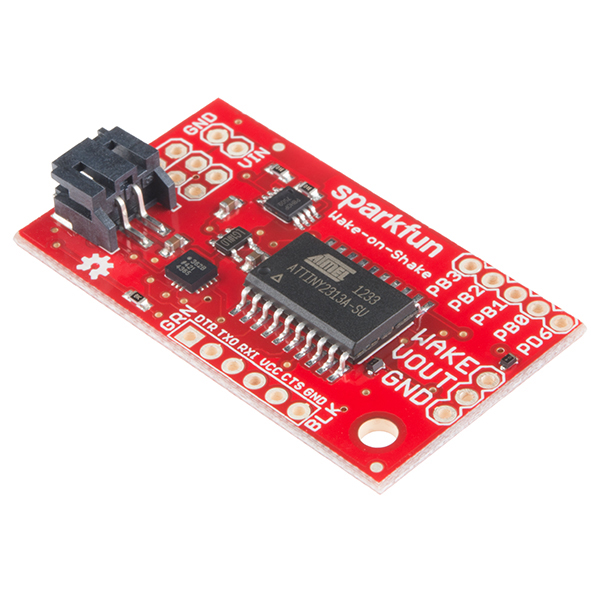
- SparkFun Wake on Shake


SparkFun Wake on Shake
Have you ever wanted your project to just "hibernate" until someone picks it up or moves it? It's a great strategy for dramatically extending the battery life of a widget that doesn't need to be active all the time. The SparkFun Wake-on-Shake board is designed to make it really simple to do just that!
The Wake-on-Shake, based on a concept by Nitzan Gadish of Analog Devices, combines the ATTiny2313A with the ADXL362 low-power MEMS accelerometer to cut power to your project for long periods of time, all the while waiting for a shake or a bump and sipping < 2uA @ 3.7V! With power consumption that low, the limiting factor for lifespan in most devices will be aging-related self-discharge of the batteries.
The board is easy to use, you basically connect it as a power switch between your device and a power source (2.0-5.5V). By default, the board will activate the load when it experiences a mild bump or tilt; the load will be powered for five seconds after that. Using a serial data connection, the sensitivity can be increased or decreased, as can the delay time. Additionally, the “WAKE” pin allows the load to control when it goes back to sleep. By pulling the wake signal high (to at least 2.7V), the load will remain energized until it releases the pin.
Note: While it is possible to connect the load to the on-board serial port, allowing the load to access the ADXL362 and EEPROM storage of the ATTiny2313A, caution must be exercised when doing this to avoid sourcing current to the load through the serial port data lines on the ATTiny2313A, which could damage the ATTiny2313A as well as causing excessive off-state power dissipation.
- Supply Voltage: 2.0 - 5.5VDC
- Power Consumption in Hibernation: < 2uA @ 3.7V
- Wake Signal: 2.7 - 15V
- Serial Header for Configuration is FTDI Basic Breakout Compatible
- ISP Header for ATTiny2313A is Broken Out, No Bootloader is Available
- 2mm JST Connector for LiPo Battery Input
- Schematic
- Eagle Files
- Hookup Guide
- Project Tutorial
- Datasheet (ADXL362)
- Datasheet (ATTiny2313)
- GitHub (Example Code & Design Files)
SparkFun Wake on Shake Product Help and Resources
Wake-on-Shake Hookup Guide
March 13, 2015
A basic hookup guide for getting started with the SparkFun Wake-on-Shake. The board gives you the ability to put your project into hibernation until bumped or shaken awake using the ADXL362 accelerometer. This means you can design projects meant to stay inert for long periods of time, possibly even several years, depending on the battery type used to power the project.
Hackers in Residence - Sound and Motion Reactivity for Wearables
October 3, 2014
How to consciously wear light-up and and sound reactive clothing.
The Uncertain 7-Cube
March 8, 2013
The Uncertain 7-Cube is a non-committal, less-than-helpful, but also entirely honest fortune teller. Simply ask it a yes or no question, give it a nudge, and the 7-Cube will dutifully inform you that it doesn’t have all the facts and doesn’t feel comfortable making a guess.
Helpful Tips
You MUST have a battery attached for this to function correctly. Also, when setting the sensitivity or delay, the current config dumps whenever you press 'd' or 't' but the board is still listening for numeric input. The enter key must send <cr>|<lf> for the board to receive the input.
Core Skill: Soldering
This skill defines how difficult the soldering is on a particular product. It might be a couple simple solder joints, or require special reflow tools.
Skill Level: Noob - Some basic soldering is required, but it is limited to a just a few pins, basic through-hole soldering, and couple (if any) polarized components. A basic soldering iron is all you should need.
See all skill levels
Core Skill: Programming
If a board needs code or communicates somehow, you're going to need to know how to program or interface with it. The programming skill is all about communication and code.
Skill Level: Rookie - You will need a better fundamental understand of what code is, and how it works. You will be using beginner-level software and development tools like Arduino. You will be dealing directly with code, but numerous examples and libraries are available. Sensors or shields will communicate with serial or TTL.
See all skill levels
Core Skill: Electrical Prototyping
If it requires power, you need to know how much, what all the pins do, and how to hook it up. You may need to reference datasheets, schematics, and know the ins and outs of electronics.
Skill Level: Noob - You don't need to reference a datasheet, but you will need to know basic power requirements.
See all skill levels
Comments
Looking for answers to technical questions?
We welcome your comments and suggestions below. However, if you are looking for solutions to technical questions please see our Technical Assistance page.
Customer Reviews
0 out of 5
Based on 0 ratings:
I just bought two of these and I have to say I'm QUITE disappointed to find that they work exactly the way they are named. What I mean by this is that I expected them to keep a device awake as long as they are accelerating. However, what they actually do is wake up for a pre-set period of time when accelerated, and then remove power after this time has passed (whether they are still moving or not). They then ignore any movement for a few seconds. This is very inconvenient for a project like mine (which I'll bet is similar to what lots of folks would like to use these for): a remote control that sleeps until you pick it up, and stays powered until you put it down. The only workaround -if you can call it that!- is to guess how long the remote will be in use, and set the off-delay a little longer than that. Which in my view defeats much of the purpose of the board! If anyone has done any work on the firmware to fix this, I'd sure appreciate hearing about it. Thanks!
What you want to do to get around that is have your device pull the WAKE pin high while it's doing it's thing. As long as WAKE is kept high, power will remain on even if the Wake On Shake signals a shutdown. When your device wants to go back to sleep, pull WAKE low and the power will shut off and stay off until shaken again.
Check the hardware hookup and code sections of our guide for a better explanation how this works.
If you have any technical questions, our Technical Assistance page will get you to someone that can help answer those for you.
Looking at the ADXL362 datasheet, the 6th bit of the status register (0x0B) is the AWAKE flag. This seems to indicate whether the accelerometer is still moving and hasn't triggered the sleep threshold. So we just need to change the timer interrupt to check if the ADXL362 is still awake, and if so, reset the timer. So this is a basic check for movement when the timer runs out and does not update the timer every time there is movement, but this works for me.
interrupts.c:
I just bought the wake-on-shake and, I do have the exact same comment to the first person in this post: I would like to have "a remote control that sleeps until you pick it up, and stays powered until you put it down". and of course, it does not do this, " what they actually do is wake up for a preset period of time when accelerated, and then remove power after this time has passed". (as suggested in the following post, the solution proposed to include this in my main coding body is not very elegant!!) Would it be possible to have a full coding example that implement the "AWAKE flag" byte check to leave my projet "on" untill that are no movement (and not based on a preset time)?
There is a nice person that did this a portion of this solution in this post, however, it is incomplete and not for Arduino developers? Thank in advance.
Does anyone know the amp limit of this? I see a voltage range but no amps.
Hi there, it sounds like you are looking for technical assistance. Please use the link in the banner above, to get started with posting a topic in our forums. Our technical support team will do their best to assist you.
That being said, the current draw is probably going to be use case specific. You can estimate the current draw using the schematic and datasheets.
I would like to see an updated version of this board with a built in charger.
You should be able to just use this board for your lipo charging needs with the wake on shake.
That is definitely a good option, thanks. I am working on something pretty small so the combo would be too big for my application.
Hi How can i change the polarity of wake up signal So the wake up signal will be '0' instead of '1' ?
I have never coded, never done any of this so I am a complete newbie and don’t even know If I am capable of doing the sample project they show. Here’s my situation: I am working on a project that needs to turn off when tilted up beyond 90 degrees and then turn on when tilted down past 90 degrees. Make sense? The motion of a wrist going up for off and down for on. Can this be programmed for that? If so, is there code already available somewhere for that?i say that like I know how to code haha. Please help, experts!
A little late to the question, but it seems like you're looking for one of these which give you 30° sensitivity, but combine several at different angles, then connect their leads in parallel. There's also these.
This is really just designed to wake up when moved. It can't turn off on another action. You'll need another accelerometer for your project, and it's likely going to be a fairly difficult project for someone who has never coded.
I can't find any information about what MOSFET that is used for this design, anyone knows?
It's an IRF7509.
Does spark fun sell something like wake on shake but is "wake on timer" where instead of an accelerometer being the trigger it is a timer alarm?
Not directly; however, most RTC modules include an alarm feature which will probably do exactly what you're looking for. You could then use a PMOSFET to turn the power to your system on.
AWESOME!!! We can now make all of our elecronics behave like older TV sets! Just bang the top of the device and it starts working! :)
I am sure nobody in this group would have a problem figuring it out, but the manual says it communicates at 2400 bps. In reality it seems to be 9600 bps.
It is working great and I am looking forward to using it. Thanks, Mike, for saving me a lot of programming that I was planning to do.
When the Wake-On-Shake detects movement, it will power the load. The WAKE pin can be connected to an I/O pin to keep the Wake-On-Shake on longer. If you keep the WAKE pin HIGH in the code, the load will be held high until the WAKE pin is pulled LOW.
For a quick test, I added a LiPo battery to the board and tried powering a RedBoard and used part of the example code in the Uncertain 7 Cube tutorial:
I like the black JST, do you have a part# for that?
To configure the settings of the Wake on Shake, you must power the Wake on Shake with a LiPo or some other power source. A 3.3V FTDI connected will not provide power because the 3.3V pin is not connected. The engineer that designed it this way so that two power sources would not conflict with each other. Your serial terminal output will constantly look like this if you do not power it sufficiently:
After powering the Wake on Shake and connecting it to your computer's serial terminal at 9600, 8-none-1-none, it will be actively listening for commands to change the settings. Just start typing the commands and values to configure the settings.
For example, if you are changing the threshold value as stated in the tutorial, you would start typing "t10010" and hit the enter button (essentially the carriage return or line feed) on the keyboard. Once the Wake on Shake receives the commands, it will return with the happy face:
If the command is not properly sent to the Wake on Shake, it will not respond too well and output an unhappy face:
After a certain period of time, the microcontroller will go back to sleep and respond with this character output:
I'm trying to adjust the threshold value of the wake on shake. I've connected to it with my 3.3v FTDI breakout, and it seems that I can indeed communicate with it at 9600bps. The problem is that I don't know how to enter in my terminal (tera term VT), the suggested command "t<0-248><cr>|<lf>" required to change the threshold. I tried typing "t10010", but every keystroke in the terminal just bounces back the following:
00150 05000 :-) z
I'm not sure what is wrong here, but I am definitely lost! Thanks!
-K
I'm not sure what's wrong, either. That response indicates that the device is waking up, responding, and going back to sleep. Do you have external power connected to the board? If you don't, it's trying to power it via the TX pin on the FTDI and that's definitely not okay.
Power is not connected to the FTDI header because that would bypass the power switching mechanism if you were to connect the load device to that header, as well as possibly contend with the onboard regulator.
that was the ticket! thanks!!! once i supplied power to the wake on shake board, i was able to send commands. although, using tera term, i had to enter slightly different commands that what was put on the website description above. for anyone who cares, i did the following:
plug in ftdi board and power supply. shake device to wake it up. type in "t00030" and then hit enter let board goto sleep
when i shook it again, the threshold value had changed from the default of 00150 to 00030
-K
I think I just responded to your email in tech support after testing it out. You should read my comment https://www.sparkfun.com/products/11447#comment-55d616ab757b7fe5058b4567.
This board looks like it is over-engineered to me. Using a $5 accelerometer when a 3¢ vibration switch would do seems a little strange (unless you are a company that makes accelerometers).
I tried designing an analog circuit that would handle more output power and work over a wider output range on a smaller standby power budget: https://gasstationwithoutpumps.wordpress.com/2015/03/28/ideas-about-vibration-detection/
I've not tried building it, though (too many SMD parts). If anyone tries it, please leave a comment on my blog!
Can someone explain how to change the parameters of the wake-on-shake, as to change the time before resuming sleep, etc.? I'm trying to reverse engineer the code in the Github Repo but so far have had no luck compiling in the Arduino IDE. I'm not sure how to setup the IDE for programming the wake on shake board, i.e. what board do I choose, etc?
I see this is partially explained below. But an example Arduino sketch would be great.
Thanks!
Is there a way to tap into the accelerometer outputs (the ADXL362 looks like a 3-axis sensor) once the Arduino is awake? I'm building a battery-powered device that also has an accelerometer to detect orientation that could benefit from having a Wake and Shake for power management, and it'd be sweet if I could do away with the other sensor.
Or - is it possible to program the WaS so that it only wakes the unit up when a certain orientation is detected? That might also work in my project.
The entire contents of the ADXL362 register space is available to the user for both read and write. To read a register from the ADXL 362, issue an ASCII 'r' over the serial interface, then the register's address, then a carriage return or line feed. The 8-bit contents of that register will come back across the the serial line. X, Y, and Z data are in registers 0x08, 0x09, and 0x0A, respectively.
To change the wake-up parameters is somewhat harder; I'm not going to try and explain it here. You'll have to dig into the datasheet to figure out what register settings are required. To change a register, first write the new value over the serial port by sending ASCII 'b', the new value, and CR or LF. Then, issue ASCII 'w', the register address, and CR or LF. Using that method, you can set the wake-up parameters to arbitrary new values. The new settings will not persist through a power cycle, of course.
Please see my question above. Can you provide a small example sketch? Thanks!
The code for the Wake-on-Shake wasn't developed in Arduino, and can't be compiled with the Arduino IDE.
It was developed with WinAVR, as a standard C project. There were two reasons for that: first, integrating the chip into Arduino proved more of a hassle than I wanted, and second, the Arduino IDE includes a lot of "cruft" which is unnecessary to functionality but would've bloated the executable size beyond what can be fit into the limited memory of the device on the board. As it is, the memory is 100% full.
The user's guide (link above) explains how to connect to the board via serial connection (using, say, an FTDI Basic) and change the thresholds and timeouts. If you want to work on the firmware for the board itself, that's a more involved process. You should be able to do it from within AVRStudio.
Thanks for the response! (Edit)
I don't want to do anything fancy. I just want to adjust the "Time after wake-up before returning to sleep mode" parameter.
From the user guide:
"EEPROM Memory Space Reference The Wake-on-Shake uses on-board EEPROM memory to store configuration parameters even if power is removed. The EEPROM is exposed through the serial interface; users can alter these values as they see fit."
And apparently the address for this param on the EEPROM is 2-3. I should be able to set this address to a number between 0 - 65535.
But exactly how? What software and hardware do I need? What are the exact serial commands to do this?
Thanks.
Still looking for help with this. I'd think there should be a way of changing the thing's basic parameters. In fact is says you can in the user guide but doesn't explain "how".
I'd think one could program an arduino to issue the appropriate serial commands to set the wake on shake's eeprom with the desired parameters.
Can someone provide a sample sketch?
Thanks.
Check the User Manual again, page 3 is a list of commands to change the basic parameters.
OK. I had to read it a few times. I think I see where the info is. Thanks for your reply!
A want to be able to reliably read before attempting to write. I have the wake on shake's serial connection connected to Serial 1 on an Arduino Mega 2560. I'm writing a read command 'E', for reading the EEPROM, on Serial 1 and printing the reply to the serial monitor (serial 0). Here's the code:
(edit) The following works to some degree but not completely. You really have to dig into the source code to figure out how to read parameters from the wake on shake.
It turns out writing (to change) a parameter is much easier. See my reply to this post.)
Here is what is printed to the serial monitor:
I'm getting closer. I'm seeing the default values for the 1st 2 parameters. But why am I not seeing the others?
Any help with what I'm missing is appreciated. Thanks!
OK. HERE IS THE ANSWER I WAS LOOKING FOR!!
Can I read raw analog outputs from it as with plain accelerometer breakouts or do I need to talk to it over serial? I'm aiming to keep the cost down on a portable device and would rather avoid having to include a serial board of some kind.
No, the analog outputs are not available. The ADXL362 is an SPI-only device; the analog outputs of the various axes are not available on the pins under any circumstances.
That's excellent - since I can read from the accelerometer, this will do everything I need.
I can't get the Wake-On-Shake to wake up on its own. 3.7v is going in, but there is nothing coming out of VOUT unless the Wake pin is jumped.
Contact tech support and they'll help you figure out whether you got a bad board. Shouldn't happen but it IS possible.
Could this work in an "Oh Fudge" to replace the arduino and accelerometer?
in theory yes, but I think this would actually be too sensitive for an "Oh Fudge" application. You'd be setting off the alarm every time the box got moved.
Will it activate if i move the board along the x axis only. I want to put it in a shopping trolley, when the trolley moves, i want it to activate
On the next version, perhaps you could breakout the Vreg En line to allow for more seamless energy harvester hackery.
I'm curious about this idea- what is the advantage of pulling out the enable pin? Why disable the circuitry when it draws less than a microamp?
I'm totally willing to consider this, but I don't fully understand the point. Any circuitry that would enable the wake on shake is liable to draw much more power than the wake on shake does.
Wow! Best commented code I've seen SparkFun produce.
Aww, shucks. Thanks.
I'm really confused here, can this module supply 5V system that requires about 200mA to operate?. I reviewed the schematic to double check and it seems to me it provides only 3.3V. Am I correct?
It should do that just fine. The VOUT pin is connected to VIN through a PMOSFET, so you'll see a small voltage drop across that FET. The biggest limitation is that the nanopower regulator can only handle a 5.5V input voltage, so you need to be careful about that.
Just how sensitive is this? Could it possibly be used in place of the Arduino and accelerometer in the Oh Fudge? Just put it in the box along with the beefcake and horns and maybe a small 555 arming circuit?
Oh yes, easily. There's a painting on the wall outside my office that turns on when you thump the wall. The sensitivity is variable, but picking it up will almost certainly trigger it.
Will the unit remain on constantly when under motion? for example would it remain on while driving a car and turn off when the car is stopped?
No. It will turn off after the designated time, and then reset once the module has remained still for approximately 2.5 seconds.
The code is all available on GitHub (https://github.com/sparkfun/Wake_on_shake) and if you have Arduino installed, you have the tools you need to change and build a new executable.
Since the load has control over the power, as well, you could use the serial port to query the accelerometer and then release when acceleration stops. That's probably easier, since it doesn't require any programming; the flash on the uC on this baby is full.
I reviewed the code, but couldn't understand how to make it wake while the circuit is moving,i.e walking and sleeps when it the circuit stops moving. Any guidelines you may suggest?
The ADXL362 datasheet is a better place to look for help with that than the code is. Truthfully, I haven't had the time to fully explore the capabilities of the ADXL362's motion detection abilities; once I figured out how to do what I wanted here, I had to move on to other projects.
Thats funny it doesn't look like a battery.
It might be in the wrong category.
There's about a dozen items in the category already that aren't batteries. What's the problem?
Yea, is this in the wrong category sfun?
Anyone else have those tin cans as a kid that when picked up and turned over would "mooo"? Flashbacks.
http://m.youtube.com/watch?v=DsiayV5LuD0