- Home
- Product Categories
- 7-Segment
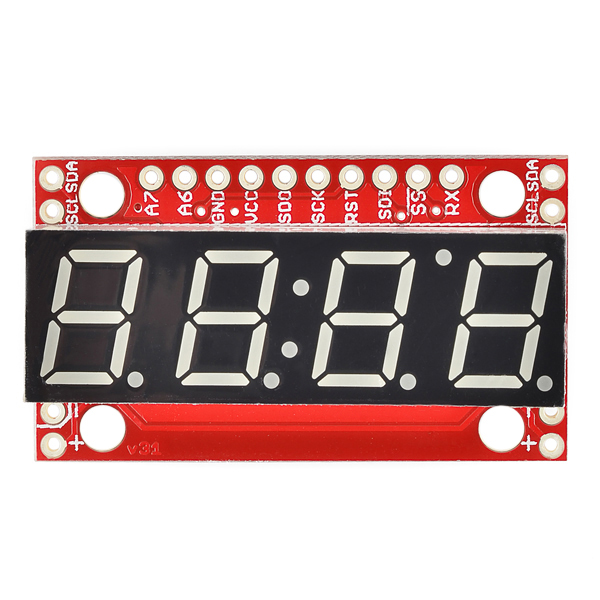
- SparkFun 7-Segment Serial Display - White


SparkFun 7-Segment Serial Display - White
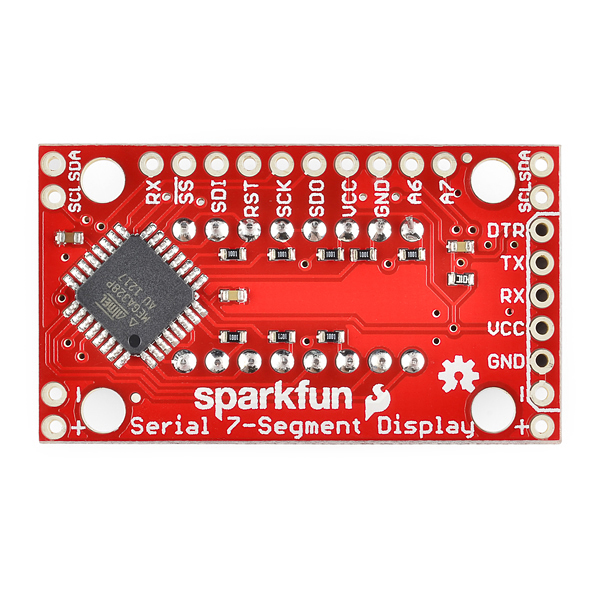
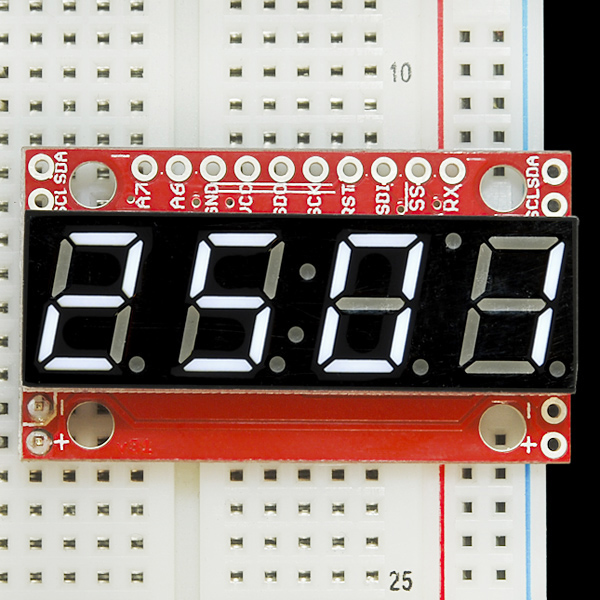
4-digit 7-segment displays are really neat little devices, it's a shame that they can be so cumbersome to control. Well we've solved that problem by making them a little bit "smarter." The SparkFun 7-Segment Serial Display combines a classic 4-digit 7-segment display and an ATMega328 microcontroller allowing you to control every segment individually using only a few serial lines.
The Serial 7-Segment Display can be controlled in one of three ways: Serial TTL communication, SPI serial communication or I2C serial. You can even program it for stand-alone operation since the ATMega328 comes pre-loaded with the Arduino bootloader! There is also an FTDI header on board and we've provided a hardware profile for the Arduino IDE to make it even easier to program.
We've made some layout changes to this design as well which will make it easier to incorporate these into your project. We've moved the power and I2C pins to the sides of the board such that you can chain them together in order to display longer strings of digits. We've also added mounting holes to the boards so you can mount them on standoffs (no more hot glue!)
- 4 digit white alpha-numeric display with TTL, SPI or I2C Serial Interface
- Display numbers, most letters, and a few special characters
- Individual control of decimal points, apostrophe, and colon
- Selectable baud rate
- Selectable brightness
- Baud rate and brightness values retained in non-volatile memory
- Individual segment control for each digit
- 41mm x 23mm (1.6in x 0.9in)
SparkFun 7-Segment Serial Display - White Product Help and Resources
Dungeons and Dragons Dice Gauntlet
August 13, 2013
A playful, geeky tutorial for a leather bracer that uses a LilyPad Arduino, LilyPad accelerometer, and seven segment display to roll virtual 4, 6, 8, 10, 12, 20, and 100 side dice for gaming.
Using the Serial 7-Segment Display
August 13, 2013
How to quickly and easily set up the Serial 7-Segment Display and the Serial 7-Segment Display Shield.
Raspberry Pi SPI and I2C Tutorial
October 29, 2015
Learn how to use serial I2C and SPI buses on your Raspberry Pi using the wiringPi I/O library for C/C++ and spidev/smbus for Python.
Qwiic GPS Clock
September 14, 2020
What time is it? Time for you to... Qwiic-ly build a GPS clock and output it to a display! This project provides you with the current date and time using GPS satellites. Read the date and time as a digital or analog clock. Or even configure the clock for military, your time zone, or automatically adjust the time for daylight savings time!
Core Skill: Soldering
This skill defines how difficult the soldering is on a particular product. It might be a couple simple solder joints, or require special reflow tools.
Skill Level: Noob - Some basic soldering is required, but it is limited to a just a few pins, basic through-hole soldering, and couple (if any) polarized components. A basic soldering iron is all you should need.
See all skill levels
Core Skill: Programming
If a board needs code or communicates somehow, you're going to need to know how to program or interface with it. The programming skill is all about communication and code.
Skill Level: Rookie - You will need a better fundamental understand of what code is, and how it works. You will be using beginner-level software and development tools like Arduino. You will be dealing directly with code, but numerous examples and libraries are available. Sensors or shields will communicate with serial or TTL.
See all skill levels
Core Skill: Electrical Prototyping
If it requires power, you need to know how much, what all the pins do, and how to hook it up. You may need to reference datasheets, schematics, and know the ins and outs of electronics.
Skill Level: Noob - You don't need to reference a datasheet, but you will need to know basic power requirements.
See all skill levels
Comments
Looking for answers to technical questions?
We welcome your comments and suggestions below. However, if you are looking for solutions to technical questions please see our Technical Assistance page.
Customer Reviews
4.3 out of 5
Based on 4 ratings:
1 of 1 found this helpful:
Works great
No complains. It works very well. I recommend it.
Really easy to use
I'm not doing anything too advanced and the 7 segment display has been really easy to get up and running. The hookup guide was all I needed to get it going. I've displayed text, timers, and counters, without any problems at all. I've used the red, blue, and white versions so far, and love them.
0 of 1 found this helpful:
It works but It is so easy to break
All you have to do is plug-in power in reverse and it is fried and is an easy mistake to make when you are playing around with it. Burned 2 of them in a week.
experience to repeat
the items purchased are very functional from all points of view; from electronic and a mechanical point of view because they can be placed side by side. In addition to this the delivery was delayed due to the courier and SparkFun sent me again the displays with another courier, that is, I did not expect so much, certainly SparkFun will be the number 1 of my suppliers.
gli oggetti acquistati sono molto funzionali da tutti i punti di vista. sia di quello della visualizzazione sia da quello logistico perchè possono essere alloggiati uno di fianco all'altro. oltre a questo la consegna ha subito ritardi per via dello spedizioniere e SparkFun me li ha rispediti con altro spedizioniere, che dire non mi aspettavo tanto, di certo SparkFun sarà il numero 1 dei miei fornitori.
My idea to use the chip as the main mc in a timer project. The module works well when I use the hookup guide and I2C, but I am having a tough time programming it with FTDI. I double-checked the orientation and the soldering, but I get a sync error like when I used the reset pin for I/O once. Any ideas on how to bypass this error? I could try tying reset low when I program it, but I don't want to potentially harm the chip.
This guy is a little tough to see in a brightly lit room or daylight. If you need a display for that environment, I would suggest getting a different color. I know the blue one is easy to see in daylight. Otherwise, this dude is pretty cool.
Mind you that if you want to use I2C with this on a breadboard you won't be able to since the SCL and SDA pins are perpendicular to the VCC and GND pins. This makes them "share" the same rail on the breadboard. I understand that this makes daisy chaining is easier but I wish they hadn't designed it like this.
Could the sketch be made to fit on an ATtiny?
I ordered this one as my second 7Segment. Before i ordered yellow one which is fine, but i wanted white. But i am very disapointed with brightness, it is so weak so You cant see it on sunlight as i can see it on yellow one. Brightness is set to 250, so this is not the case.
Anyway, i am satisfied, easy to use display, works like charm, small size which i need as a clock. Dusan
How much is possible if using this module standalone? Would it be possible to use its i2c to read an RTC?
I did not make a thermometer but I did make a clock. You can see what I did about half way down this page: http://blog.planetbuckley.com/2011/02/cant-have-too-many-clocks.html
Whoa @ the clock that plays life!
I'm thinking of making this into an indoor/outdoor thermometer. Seems like a rather trivial task, since there are two spare ADC-capable pins. Anyone else tried this?
Why are some of the pictures yellow but others white?
Yup, #144668 has it right. They look yellow when they're off because you're seeing the color filter. When they're lit, they shine white.
I never thought of that. Just grabbed a sample of regular round white LEDs and can't seem to notice the yellow color - is it coating that little dimple in the center?
That's how white LEDs work. They're a UV LED with a yellow phosphor coating. Look at any white LED carefully and you'll see the yellow. When it turns on, the UV stimulates the phosphor and it makes white!
Same thing as the Phillips AmbientLED and L Prize bulbs. The difference between the orange and yellow casing in those two bulbs is the L Prize bulb has some red LED's to help with color and energy.
Because taking pictures takes time