- Home
- Product Categories
- Arduino Shields
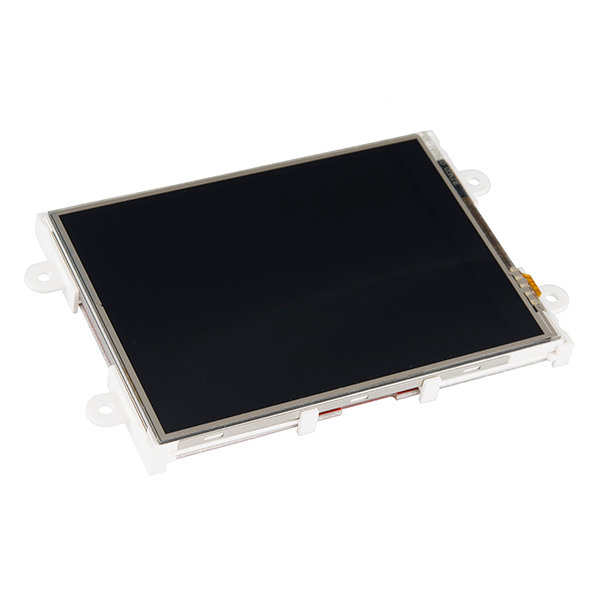
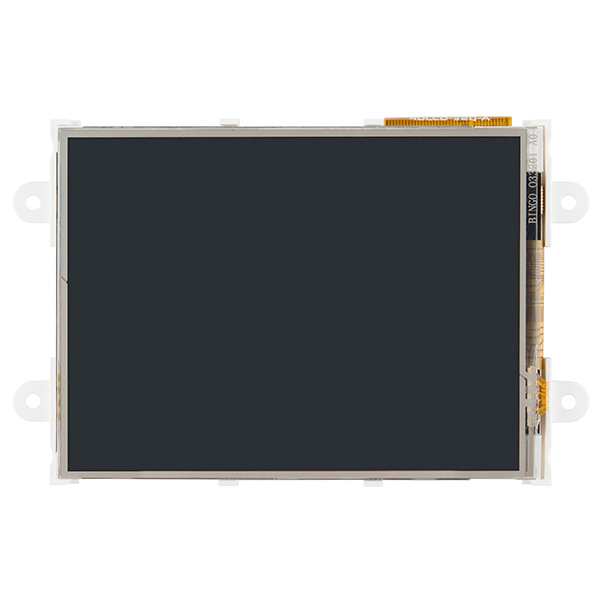
- Arduino Display Module - 3.2" Touchscreen LCD


Arduino Display Module - 3.2" Touchscreen LCD
Most widgets could benefit from a shiny touchscreen interface. Unfortunately, it's usually not easy to hook up a touchscreen and driving a display is often too taxing on your controller. 4D Systems has solved this problem by creating a series of touchscreens with on-board controllers then combining them with adapters for popular platforms like Raspberry Pi and Arduino!
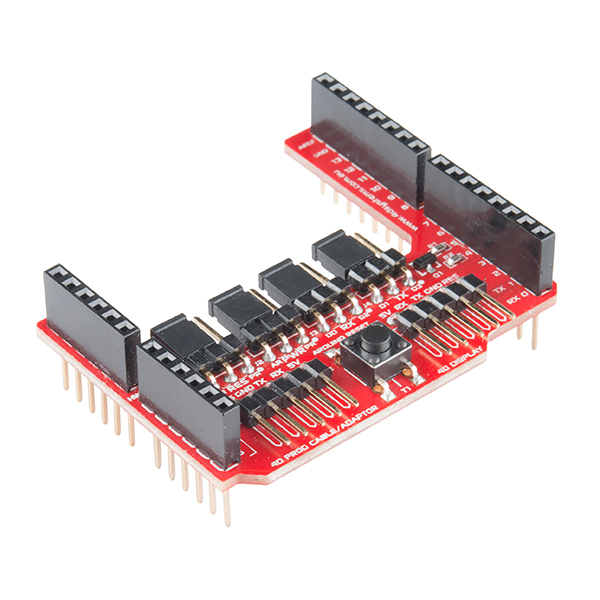
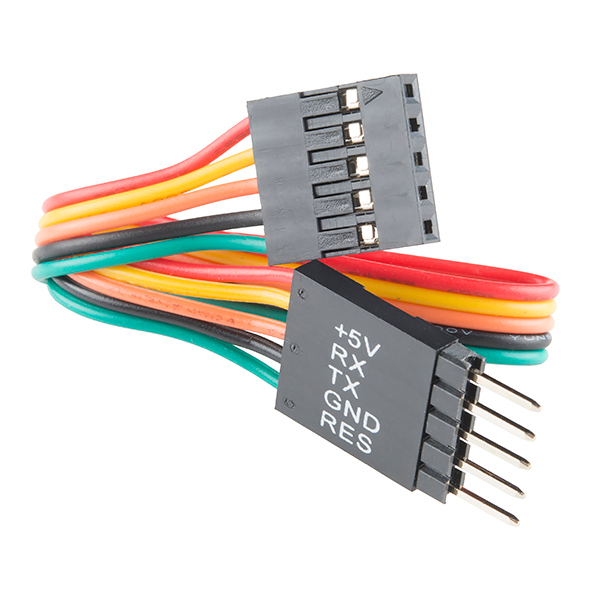
The Arduino Display Module customizes the uLCD-32-PTU Display specifically for interfacing with the Arduino, to provide a quick and easy interface without any wiring hassles. It enables you to quickly connect the 4D Arduino Adapter Shield to their Arduino, connect the 5 way cable between the Adapter and the Display Module, and be connected in seconds to start programming!
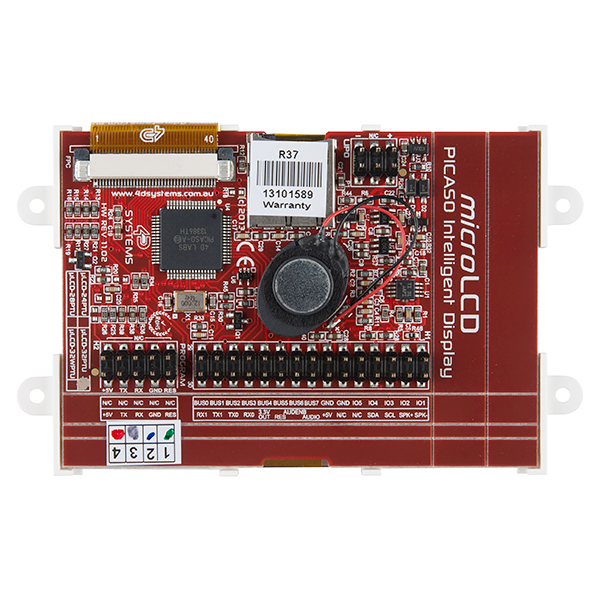
The uLCD-32-PTU-AR has a comprehensive range of serial commands ready to be received from the Arduino, to draw primitives such as lines, rectangles, circles and text, displaying images, playing sound and logging data to uSD card. You can also use the Visi-Genie in Workshop 4 combined with the Arduino Library to create a graphical interface in minutes!
Like the other displays from 4D Systems you will need a USB Serial adapter to program this module. Unfortunately, our FTDI Basic Breakout won't work. Check the Recommended Items section below for 4D Systems' µUSB-PA5.
- uLCD-32-PTU Display Module with Resistive Touch
- 4D Arduino Adaptor Shield
- 5 way ribbon cable (this is not the Programming Cable)
- Display Module powered directly off the Arduino 5V bus
- Serial commands from the Arduino
- Comprehensive Arduino Library (see Description tab for more information)
Arduino Display Module - 3.2" Touchscreen LCD Product Help and Resources
Core Skill: Programming
If a board needs code or communicates somehow, you're going to need to know how to program or interface with it. The programming skill is all about communication and code.
Skill Level: Competent - The toolchain for programming is a bit more complex and will examples may not be explicitly provided for you. You will be required to have a fundamental knowledge of programming and be required to provide your own code. You may need to modify existing libraries or code to work with your specific hardware. Sensor and hardware interfaces will be SPI or I2C.
See all skill levels
Core Skill: Electrical Prototyping
If it requires power, you need to know how much, what all the pins do, and how to hook it up. You may need to reference datasheets, schematics, and know the ins and outs of electronics.
Skill Level: Rookie - You may be required to know a bit more about the component, such as orientation, or how to hook it up, in addition to power requirements. You will need to understand polarized components.
See all skill levels
Comments
Looking for answers to technical questions?
We welcome your comments and suggestions below. However, if you are looking for solutions to technical questions please see our Technical Assistance page.
Customer Reviews
No reviews yet.
I couldn't get the display to work properly with Blackboard C until I set the jumpers J3 and J4 on the display adapter to use D2/D3 for RX/TX. Use SoftwareSerial in my sketch.
As of 4/22/2017 the link to the reference manual is broken. I found it here... https://www.sos.sk/microsite_docs/4D%20SYSTEMS/ViSi-Genie-Reference-Manual-REV1.3.pdf
-------------------- Tech Support Tips/Troubleshooting/Common Issues --------------------
4D Arduino Adaptor Shield II: Arduino Display Adaptor Module Shield
The 4D Arduino Adaptor Shield II just routes the pins to the the Arduino footprint => [ pg 6 - http://www.4dsystems.com.au/productpages/4D-Arduino-Adaptor-Shield-II/downloads/4D-Arduino-Adaptor-REV2.xx_datasheet_R_1_3.pdf . There is an additional button that extends the Arduino Reset button to the shield. Additionally, there is a transistor and resistor attached between the reset pin and Arduino's pin 4.
Unfortunately, we do not sell the 4D Arduino Adaptor Shield II individually from the kit.
Arduino Library
There is GitHub repository for the Arduino Library [ https://github.com/4dsystems/ViSi-Genie-Arduino-Library ].
No Arduino Shield?
If you do not have an Arduino shield, you can still connect the 4D Systems touchscreen LCD to an Arduino microcontroller. To connect to your Arduino microcontroller, you just need a serial UART and power. Try looking at this general tutorial when using a hardware UART => https://learn.sparkfun.com/tutorials/serial-communication#wiring-and-hardware . The example code in the GitHub repository provided links to connect and get started when using the LCD with an Arduino. Try looking at 4D Systems App Note or more information => http://www.4dsystems.com.au/downloads/Application-Notes/4D-AN-00017_R_1_01.pdf .
A "warranty void if removed" sticker!? Just who does that company think their target market is?
They think you want to use a windows-only software in order to be able to use their device anyway...
Can the icons in the 4D Arduino Display Module - 3.2" Touchscreen LCD software be custom designed by the user? ie. Custom graphics on an on/off switch to insert on the touch screen.
For the shield that comes with the uLCD-32PTU, it breaks the 5V TX RX GND and RES separately. My question is if i didn't want to use the shield and wanted to connect the display directly would I need to add anything else since there looks to be two resistors and something else Q1.
Hi, I have the same problems. I would like to connect the LCD without the shield. Have you figured it out yet, is it possible? Please, help.
Is it possible to control the backlight through a switch or by touching the screen itself? I need the ability to shut the screen off without resetting the functions... like an IPhone when the screen sleeps after inactivity... Just need to be able to cut the brightness on cue
Here's a library I made for Eagle.
https://db.tt/Xr7bnoex
Anyone have any success mounting one of these in an enclosure/case? Any pre-fab cases out there?
If I wanted to put this in a case, how would I do it? Do I have to make a custom case?
It looks like the included shield is meant for an Uno or similar board; what about the Mini? Also, can I use the touchscreen as an input (configure a linear trim pot to send back 0-255 to the board)?
Does anyone else have uploading issue with the 4D Arduino Adaptor Shield while connected to Mega 2560? I have to disconnect it to upload or else I get timeouts.
Edit: it was a jumper, I needed to move it to jump D2 and RX (it's in the shield documentation). Well maybe this will help someone and save them some head scratching. Cheers :)
Any idea what the pixel density on the uLCD-32PTU is?
anyone used this display with an arduino leonardo? arduino uno works fine ... but no chance with arduino leonardo...
use Serial1.begin(115200); ... works fine
one question .. can i program this display without using USB-to-Serial Bridge - µUSB-PA5 ??? can i program this trought arduino?
Can the LCD be connect without the shield to a Arduino Uno? I ask because the project i have has a height restriction. I looked at the datasheet and it doesn’t say anything other then to connect it with the shield. Thank you for any replies.
Can the LCD be connect without the shield to a Arduino Uno? I ask because the project i have has a height restriction. I looked at the datasheet and it doesn't say anything other then to connect it with the shield. Thank you for any replies.
Is it compatible with Arduino Due?
I just got mine in the mail for christmas and it's missing the arduino breakout board =(
Hi, send us an email@techsupport@sparkfun.com and we'll get you taken care of.
Hi, I was actually wondering which of these retail options (uLCD-32-PTU-GFX, uLCD-32-PTU-AR or the uLCD-32PTU starter kit) would be most suitable for programming the screen using VisiGenie and subsequently using it as a standalone module (without interfacing with an Arduino, etc) for interacting with sensors, etc?
Is there a max length to the connecting ribbon cable? would 4 feet be ok?
What is the recommended replacement cable/connectors?
Thanks! -Rob
Can DEV-09718 (FTDI Cable 5V) be used to program the LCD? This cable is based on FT232RQ which is mentioned as required breakout.
As the FTDI cable has the same pinout as our FTDI basic, it will likely lock up your screen as well. I've seen customers use them with some work arounds and pin swapping, but generally your best bet is to just get the FT232RQ board.
So what does it take to get this up and running? I ordered one and thought I would, as a newbie, read up on their site for the install instructions. Installed the Workshop software fine. The process for installing the Arduino library was interesting. I pathed to the ZIP file from the Sketch- Import Library...but it wouldn't, so I just unzipped the file in the Library sub directory. Now in the PDF with the install guide, it mentions installing the cable driver, which goes to a busted link on 4D Can you educate me on this section...and what's next? Pretty excited to take a crack at this.
This is a totally viable concept - have the LCD do the heavy lifting. I just would like to ask whether that pretty bad lag is caused by the baud rate or the Arduino or the LCD itself? Is there any way to improve on latency? May be the code is doing just too many things including reading objects from the display?
The spec sheet doesn't have the physical dimensions. What the overall size and what's the display area size?
That's because the datasheet is only for the kit :) Datasheet for the display, at this time: uLCD-32-PTU.
From that datasheet:
Screen Dimensions: 54.34 x 77.70 x 3.70mm
Viewing Area: 48.60 x 64.80mm
Resolution: 240 x 320
Pixel Pitch: 0.2025 x 0.2025mm
Please find my review at http://forum.sparkfun.com/viewtopic.php?f=14&t=34339 done on Dec 18, 2012.
Resolution: 240 x 320 for the uLCD-32-PTU by the way.
The datasheet link wont resolve. Rather, the link times out.
I moved the datasheet to our server. The link worked fine here, I think the traffic was hard on them.