- Home
- Product Categories
- LilyPad
- LilyPad Arduino USB - ATmega32U4 Board

LilyPad Arduino USB - ATmega32U4 Board
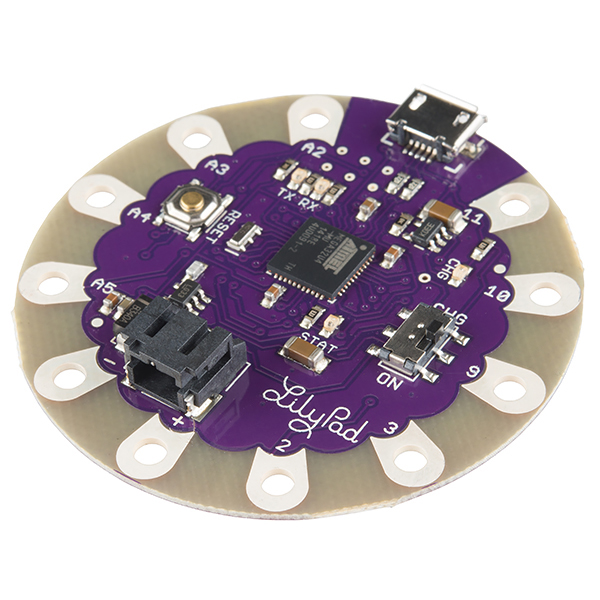
This is the LilyPad Arduino USB board, controlled by an ATmega32U4 with the Arduino bootloader. It has a built in power supply socket and an on/off switch with the only extra piece of hardware you need to program the LilyPad USB is a micro-USB cable, since the new IC has built-in USB support. Any of our LiPo batteries can be plugged right into the JST socket to provide you with easy, on-the-go power. That LiPo battery is even rechargeable through the board, no more special external LiPo chargers required!
Just like the LilyPad Simple, this board operates at 3.3V and features a JST socket so you can directly connect a Li-Po battery for power and an on-board power switch so you can turn it off when you're not feeling particularly blinky. The LilyPad Arduino USB was designed to streamline your next sewable project by keeping things simple and giving you more room to work while eliminating the need to sew a power supply.
LilyPad is a wearable e-textile technology developed by Leah Buechley and cooperatively designed by Leah and SparkFun. Each LilyPad was creatively designed to have large connecting pads to allow them to be sewn into clothing. Various input, output, power, and sensor boards are available. They're even washable!
Note: A portion of this sale is given back to Dr. Leah Buechley for continued development and education of e-textiles and also to Arduino LLC to help fund continued development of new tools and new IDE features.
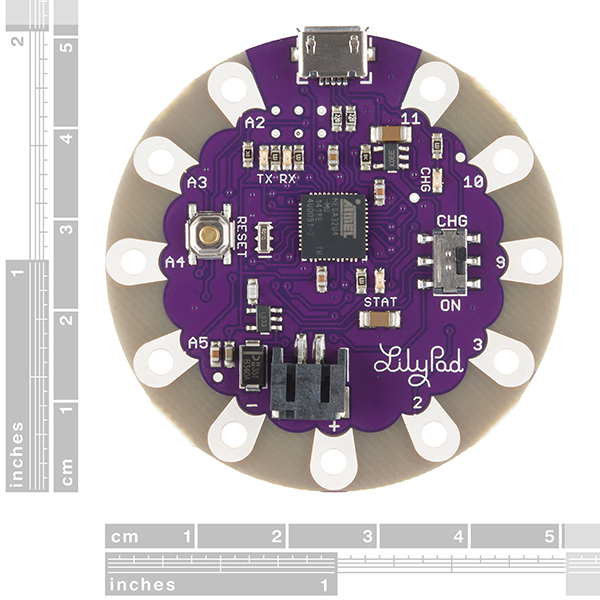
- 50mm outer diameter
- Thin 0.8mm PCB
- Schematic
- Eagle Files
- Datasheet (ATMega32U4)
- Firmware Note
- Arduino Hardware Page
- Arduino Quickstart Guide
- Arduino Add-on Files
- GitHub (Design Files & Example Code)
LilyPad Arduino USB - ATmega32U4 Board Product Help and Resources
Marquee Party Bag
June 2, 2017
This tutorial provides everything you need to know to make your own Marquee Party Bag!
Choosing a LilyPad Arduino for Your Project
October 27, 2015
Not sure which LilyPad Arduino is right for you? We'll discuss the features of each and help you decide.
Getting Started with LilyPad
October 27, 2017
An introduction to the LilyPad ecosystem - a set of sewable electronic pieces designed to help you build soft, sewable, interactive e-textile projects.
LilyPad Light Sensor V2 Hookup Guide
June 7, 2018
How to hook up the LilyPad Light Sensor as well as some project ideas and example code.
LilyPad Vibe Board Hookup Guide
January 16, 2019
The LilyPad Vibe Board is a small vibration motor that can be sewn into projects with conductive thread and controlled by a LilyPad Arduino. The board can be used as a physical indicator on clothing and costumes for haptic feedback.
Heating Pad Hand Warmer Blanket
January 21, 2013
DIY Project Idea: Create a custom hand warmer blanket using heating pads.
Pro Micro & Fio V3 Hookup Guide
November 8, 2013
An overview of the Atmega32U4-based Pro Micro and FioV3, how to install it, and how to use it with Arduino.
Coin Cell and LilyPad Arduino USB
LilyPad Arduino USB with the Atmega32U4 probably won't last that long with coin cells. It's usually powered with LiPo batteries or a usb port. Testing it out, it worked until the coin cell reached a certain voltage and it would constantly reset probably because of the brown out detection. It's better to use a different battery or power supply. The + and - pins go to the 3.3V traces in the board layout and schematic. Therefore, the design of the Lilypad Arduino USB is not good for a 3V coin cell battery.
Software Reset
By connecting to the FioV3 at a baud rate of 1200 and closing the COM port, this will initiate a software reset with the Atmega32U4 just like the Arduino Leonardo (as stated in the Automatic (Software) Reset and Bootloader Initiation for a Leonardo => https://www.arduino.cc/en/Main/ArduinoBoardLeonardo ) .
serialEvent() and serialEventRun()
The serialEvent() function is not compatible with the Esplora, Leonardo, or Micro” that uses the Atmega32U4 https://www.arduino.cc/en/Reference/SerialEvent.
There was a customer that was able to resolve this by using the serialEventRun(). For more information, try looking through this forum that helped the customer resolve the issue => https://forum.sparkfun.com/viewtopic.php?f=14&t=41515.
Bricked Atmega32U4
Timing Issues w/ USB Communication through CDC
Interrupts Atmega32u4's built in CDC driver for USB communication can have timing issues when messing with the watchdog timer, sleep modes, and timer interrupts. I am unsure of how to fix this issue if you continue to use code that interferes with the CDC. I recommend trying a different method than using the interrupt timers.
Wrong Bootloader It's possible to brick your LilyPad Arduino USB w/ Atmega32U4 if you used the wrong board selection with the wrong frequency. If you upload the wrong frequency, the IC will not be able to understand any new code that is being uploaded. It expects to have code that is compiled for another bootloader, instead of using the 8MHz frequency with the oscillator.
When either of these cases happens, the device manager is not able to recognize the device and is usually seen as an "unknown device" when the microcontroller runs the sketch. There are ways to recover the an Atmega32U4 (i.e. LilyPad Arduino USB - Atmega32U4 board, FioV3 - Atmega32U4, Pro Micro 5V/16Mhz, Pro Micro - 3.3V/8Mhz, etc) if this happens. Check below for more information:
A.) Upload when LilyPad USB with Atmega32U4/Pro Micro/FioV3 is still in Bootloader Mode
You can try the double reset method by tapping the RST pin to GND twice (since there is no reset button on the board) as explained in the Troubleshooting sections labeled as Reset to Bootloader and How to Revive a "Bricked" Pro Micro => https://learn.sparkfun.com/tutorials/pro-micro--fio-v3-hookup-guide/troubleshooting-and-faq.
1.) Open the Arduino IDE.
2.) Choose a simple code to upload on the Arduino. I used the Arduino blink test code [ https://www.arduino.cc/en/Tutorial/Blink ] to upload.
3.) Check your Tools>Port menu for the list of COM ports when the Arduino is connected. You will probably not see it in the list.
4.) Click somewhere else to stop viewing the list of COM ports.
5.) Hit the reset button twice.
6.) Re-open the Tools>Port menu to view the list of COM ports again to see what the LilyPad Arduino USB enumerates to when its in its bootloader. There is an 8 second window to view the COM port when the board is in bootloader mode.
Note: Feel free to use the device manager at this step. Opening up the device manager on your operating system will help to see when the Arduino pops up and disappears.
7.) Select the COM port that the LilyPad Arduino USB is on before it disappears again.
8.) Hit the Upload button to compile and upload.
9.) Wait a few seconds for the Arduino IDE to compile code. The progress bar should be just over the halfway mark.
Note: On Windows, this takes about 20 seconds to compile and upload. The device will show up as "Arduino LilyPad USB Bootloader (COM##)". Trying this on a Mac seemed a little faster to compile and upload.
10.) Hit the reset button twice again to place the LilyPad Arduino USB in bootloader mode while the Arduino IDE is uploading.
11.) If successful, you will have no error messages the Arduino IDE will tell you that it is "Done uploading."
After selecting the correct board definition and timing the double reset method correctly, I was able to upload successfully. It took me a couple of tries before I could get this right because of the timing. You should not need to go through this recovery procedure for subsequent uploads unless you brick the Atmega32U4 again.
---------------------------------------------------------------------------------------------------
B.) Outdated or Corrupt drivers
If board is showing up as Arduino Micro (COM##) or Pro Micro (COM##), try the double reset method and updating the drivers while still in bootloader mode:
1.) Use the double reset method while having the device manager open.
2.) When the board entered the bootloader mode, I right-clicked on the Arduino board in the device manager as shown in this screen shot: [ http://puu.sh/iaYYC/d45153914c.png ]
3.) I updated the driver for the board.
4.) Once the update was completed, I compiled and uploaded the code. When the uploading status bar was half-way through, I did double reset again and the problem was fixed.
---------------------------------------------------------------------------------------------------
C.) Reinstalling the Bootloader
As a last result, you can always try to reinstall the bootloader. The tutorial is designed for the Arduino Uno, but it should work for Atmega32U4's bootloaded with Arduino. The idea is the same but the specifics are different. Start by reading the tutorial => https://learn.sparkfun.com/tutorials/installing-an-arduino-bootloader. The first thing you are going to need is an AVR programmer. You can use a standard AVR programmer or any Arduino with the ISP code on it (the standard code will not work with the Leonardo). Unfortunately, the pins on the LilyPad Arduino USB are not using the standard 0.1" sized ICSP pins. You will need to solder wires to the ICSP pins or make an adapter board for access. You will then need to connect it to the target device (i.e. LilyPad Arduino USB, Pro Micro, Fio V3, Makey Makey, or Leonardo) to reflash the bootloader. Don’t worry about the fuse bits or even the avrdude commands (they’re great, if you are installing third party stuff, but this will work just fine).
1.): Get a programmer
This you can do by following the directions in the tutorial.
2): Connect the programmer/Arduino as ISP to the Target Device
You will need to connect to the same pins to your target device (i.e. LilyPad Arduino USB, Pro Micro, Fio V3, Makey Makey, or Leonardo). On the Leonardo you can connect it just like the Uno. The LilyPad Arduino - USB has small ICSP pins. I managed to solder wires directly to the pins for access. The Pro Micro does not have an ISP header and the pin numbers are different. Check the tutorial for location of the pins on the programmer. Here are the pins for the Pro Micro Board:
ICSP Pins <=> Pro Micro Pin
   GND    <=>      GND
   RST    <=>      RST
   VCC    <=>      VCC
   MISO   <=>      D14
   SCK    <=>      D15
   MOSI   <=>      D16
Note: There is a silkscreen error and D17 is labeled D14 on the Pro Micro.
3.) Program
Using Arduino v1.6+ go under Tools and select the correct programmer (if your programmer uses a COM port select that too), and the correct board (LilyPad Arduino - USB, Pro Micro, FioV3, Makey Makey, or Leonardo). Then select Burn Bootloader. For the Pro Micro, this will use the bootloader in the addon file, so make sure you have the correct addon file installed.
Core Skill: DIY
Whether it's for assembling a kit, hacking an enclosure, or creating your own parts; the DIY skill is all about knowing how to use tools and the techniques associated with them.
Skill Level: Noob - Basic assembly is required. You may need to provide your own basic tools like a screwdriver, hammer or scissors. Power tools or custom parts are not required. Instructions will be included and easy to follow. Sewing may be required, but only with included patterns.
See all skill levels
Core Skill: Programming
If a board needs code or communicates somehow, you're going to need to know how to program or interface with it. The programming skill is all about communication and code.
Skill Level: Rookie - You will need a better fundamental understand of what code is, and how it works. You will be using beginner-level software and development tools like Arduino. You will be dealing directly with code, but numerous examples and libraries are available. Sensors or shields will communicate with serial or TTL.
See all skill levels
Core Skill: Electrical Prototyping
If it requires power, you need to know how much, what all the pins do, and how to hook it up. You may need to reference datasheets, schematics, and know the ins and outs of electronics.
Skill Level: Rookie - You may be required to know a bit more about the component, such as orientation, or how to hook it up, in addition to power requirements. You will need to understand polarized components.
See all skill levels
Comments
Looking for answers to technical questions?
We welcome your comments and suggestions below. However, if you are looking for solutions to technical questions please see our Technical Assistance page.
Customer Reviews
4.6 out of 5
Based on 7 ratings:
1 of 1 found this helpful:
Great board
I love that it's rechargeable. A snapping version of this would get 5 stars.
I soldered snaps onto mine so it is both rechargeable and easily reusable without having to re-sew the circuits each time.
3 of 3 found this helpful:
My students LOVE using the LilyPad Arduino USB - Atmega32U4 Bd!!!
I have tried to grow the number of participants in a middle school coding club for about 2 years, yet the numbers remained less than 8 students. After introducing the LilypPad to 21 middle school students the first Saturday morning in January 2015 at a workshop, the word got out to friends and parents about the fun and ease of learning, and WoW! Now, I am introducing middle school students to programming via the LilyPad Arduino every week. I have had to double the size of orders placed for LilyPad compatible components (LEDs, buzzers, temperature..). According to the students, "It's so cool and easy to learn!" One student entered a science fair (Greene Scholars Program, San Jose) and changed her science project the week before the fair after learning how to program the arduino.
The LilyPad is a great tool for encouraging students to learn to code!
Really interesting learning how it works and how it can be used
It has introduced me to a new way on thinking when designing and making activities for students.As I continue to explore its possiblities it is exciting to see uses for students.
Fantastic board
I've gotten a number of these from SparkFun and they have all worked perfectly. Not only is the LilyPad fun and educational, but its form factor and on-board micro USB makes it a great alternative when an Uno might be too big or bulky for your project.
Hi, I would like to control the TX LED pin on Pin 22 however the schematic does not show it mapped as a digital IO. does anyone know the digital pin number for the TX LED pin?
I would like to upload the 8MHz firmware compatable boot loader onto another ATmega32U4. Does anyone know the correct fuse settings used on this board?
Low fuse: 0xff High fuse: 0xd8 Extended fuse: 0xd8
Those are what we use in the factory.
Can i still use ATMELs FLIP application to boot a .hex program into the ATmega32U4 or has the Arduino bootloader replaced the default ATMEL USB boot loader on these boards?
I think it's safe to assume that the USB bootloader that ships with the part has been clobbered by the Arduino bootloader.
That said, it's still relatively easy to program the part without going through Arduino using AVRDUDE, and you may be able to do it with FLIP. The bootloader is simply a somewhat stripped down implementation of the AVR109 (I think) compliant bootloader example.
I can't understand if it can work at 3V using a coin cell battery. I'd like to use a safe power source, so something different from Li-Po batteries.
This board actually has a 3.3V regulator and is designed to run at that voltage (3V should be fine although you'll probably want to bypass the regulator). Also, keep in mind that coin cell batteries are still Lithium (Lithium metal as opposed to Lithium ion), and actually have stricter shipping regulations that Li-Po batteries. Now I'm not saying that people writing regulations know what they are talking about, but using coin cells does not automatically put you in the clear. The truth is no battery is completely safe. When you store a bunch of energy in a device and release it slowly it is called a battery. When you store a bunch of energy in a device and release it quickly it is called a bomb. No matter what type of battery you use you want to use it safely and short it or find other ways to potentially release the energy too quickly. In other words, Lithium Ion (Li-Po), Lithium Metal (coin cells), NiMH, and Alkalines all have their dangers. Choose the battery that best fits your application and be careful with whatever battery you choose.
What boot loader is used in this board? Can I flash Leonardo? Will it work? Thanks.
NO! Do not treat this as a Leonardo; that will cause it to stop responding. It's (relatively) easy to get it out of that state, but it's better not to get into it in the first place!
As of v1.0.6, the Arduino IDE includes the LilyPad USB as an official board, so you should be able to select it in the IDE without adding any additional support files. It uses a derived version of the Caterina bootloader that the Leonardo uses, but, again, do not select "Leonardo" for programming!
I bought this a week ago and the usb port has snapped off! What can I do to reattach it? Or should I just get another board?
Contact tech support @ techsupport@sparkfun.com. They'll help you out.
I really wish this electronic had an under voltage lockout between the battery and the mainboard. This would prevent the device from running the lipo down to destruction when the user accidentally leaves the device on.
A suitable component would be the MIC841.
Sparkfun, it would be awesome if you could integrate the MIC841 into your LIPO chargers!!!!!
Lithium Battery Charge Current:
In case anyone is interested in the charger current that this Arduino provides, according to the data sheet this Arduino uses a 10k resistor on the MCP charging component. According to the MCP data sheet, this results in a 100mA maximum charge rate.
Hi, can i use the bluetooth mate gold (https://www.sparkfun.com/products/12580) with this board?
Yes; you'll need to use SoftwareSerial but it will work.
This board has a built-in JST-PH socket. Being an RC enthusiast, I had a 1S LiPo with a JST-RCY plug. When soldering a JST-RCY socket to the board, I did one major error. The big + and - written on the board is for the pin-outs, not the JST-PH socket. And, by murphys law, it turns out the JST-PH socket pins are opposite of these (the left one, near negative pin-out, is the positive. the right one, near the positive pin-out, is the negative one). Connecting a 1S LiPo battery the wrong way created famous blue smoke.. (not sure what broke. I can still program the board over USB and, when getting the socket right, power the board with the LiPo battery). I have two recommendations: 1) Print small + and - on the board for the JST-PH socket pins (I fried a v1.1 board, but the v1.2 board is similiar) 2) Label the JST socket as JST-PH. In the RC community, which I guess has a significant overlap with the arduino community, JST is JST-RCY.
We'll take a look at this. Thanks!
Will I be able to connect the BlueSmirf silver to this? I'm new to this - it does not appear to have tx/rx dedicated connections like the Uno, but the research I did it appears I can configure one of the digital pins to do it? Thanks in advance for advice!
when my lilypad is plug on a mobile charger or a PC via usb nothing happend, there is no led on, no driver installation (when plug on pc) is it normal ? else what can I do ? sorry for my English -----------------------------------------------FRENCH-------------------------------------------------- quand je branche mon lilypad sur un chargeur de portable ou un pc, rien ne se passe, aucune led ne s'allume et aucun driver n'essaye de s'installer (quand branché au pc) est-ce normal ?sinon que puis-je faire ?
Did you get an answer for your problem?
It should work. Contact Tech Support (techsupport@sparkfun.com) for more help and a replacement if the board can't be fixed.
I connected a battery the wrong way around and saw some smoke. The board is still working when powered over USB. Can somebody tell me if there is a component that I can replace to make operation over battery possible again?
Can I run this board of 6v?
The quick answer is NO. The board is 3.3V to 5V. You can look at the schematic and see that U2 is the MIC5219 that can take up to 12V. The only drawback is that there is U1 (MCP73831) in the way. I am not sure what happens when you apply 6V on Vbat of the MCP73831. You will have to make some modification to the board and you will lose some functionality. You could also buy the Arduino Pro Micro!
How is the bootloader programmed? Via USB or ICSP? Only Windows support? Thank you.
The bootloader is programmed over ICSP, we do that here for you. Once the bootloader is installed you can just program over USB.
Thank you. The last question: I don't see the ATMEGA32U4 pad on footprint. Is there a reason for that?