- Home
- Product Categories
- Robotics Kits
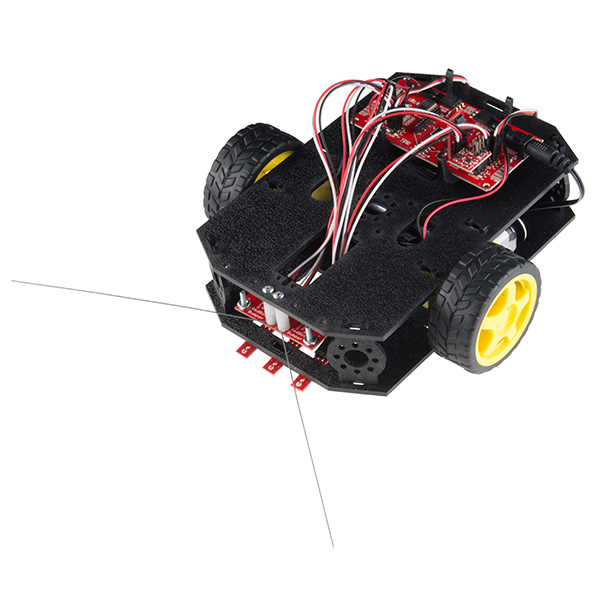
- SparkFun Inventor's Kit for RedBot

SparkFun Inventor's Kit for RedBot
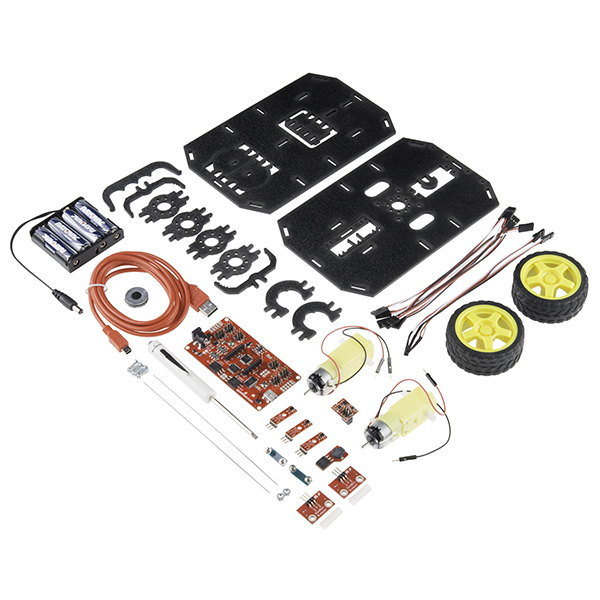
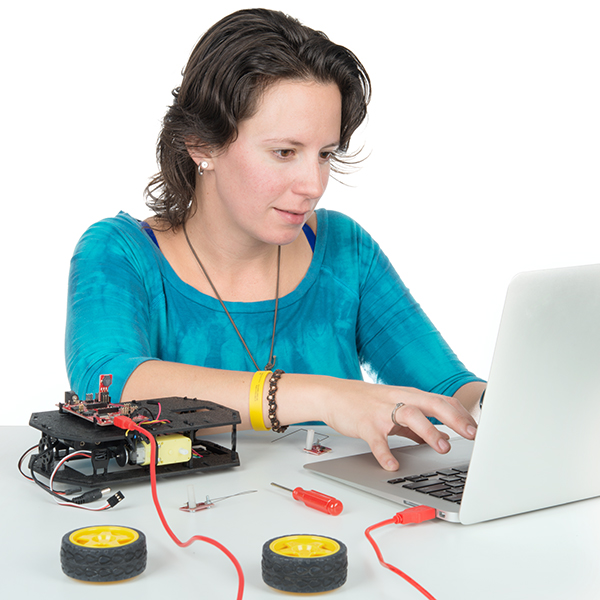
The SparkFun Inventor’s Kit for RedBot is a great way to get started with two motor robotics and sensor integration using the Arduino programming language. The SIK for RedBot includes everything you need to complete nine circuits that will teach you how to drive your RedBot, have it follow lines, control it remotely, and more. This kit doesn't require previous programming or electronics experience but it is recommended that you possess an understanding of or desire to learn about robotics.
The SparkFun RedBot is a great way to get your feet wet in the world of robotics. However, once you have assembled your RedBot, you may be at a loss as to where to go from there. The on-line SIK for RedBot Digital Guide (in the Documents section below) contains step by step instructions of how to connect each circuit and assemble the kit into a full-fledged robot with all of the included parts. Full example code is provided and explained and even includes troubleshooting tips if something goes wrong. Once you’ve mastered each experiment, you can take what you’ve learned and apply it to creating your own robot platform.
The kit does not require any soldering and is recommended for anyone curious about robotics or if you have used the original SparkFun Inventor's Kit and are looking for the next step in programming education.
Note: The Experiment Guide in the Documents section below includes full example to code to get your RedBot functioning and moving as quickly as possible.
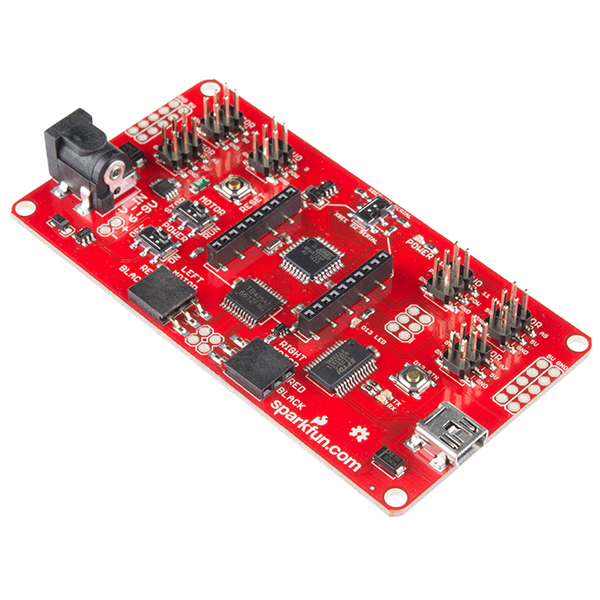
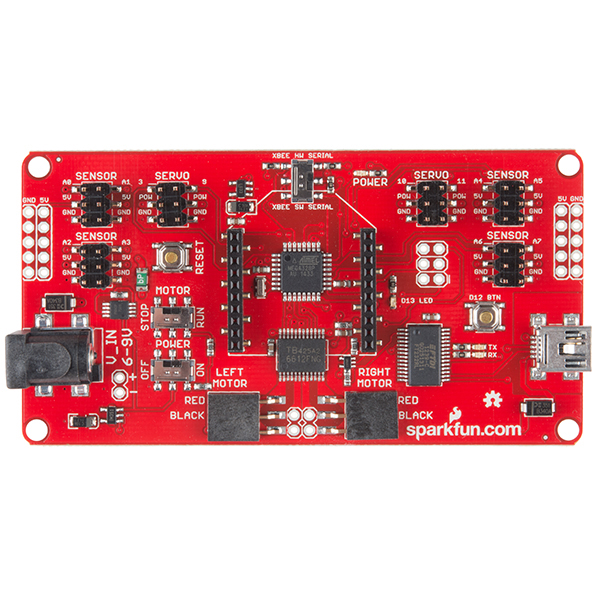
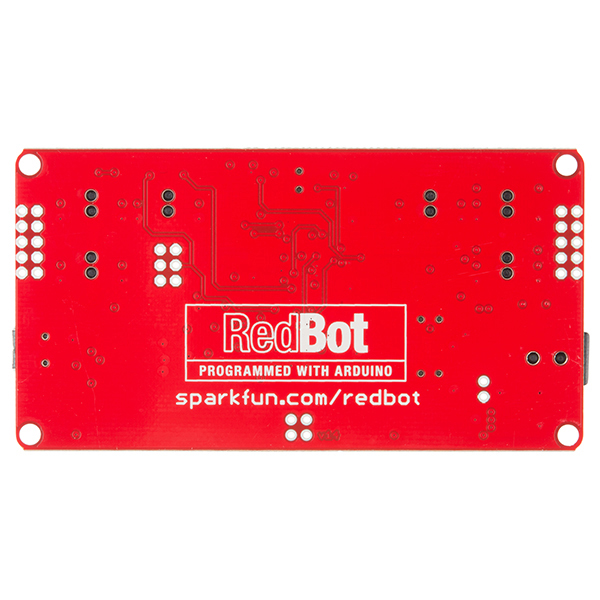
- 1x SparkFun RedBot Mainboard
- 1x Shadow Chassis
- 1x SparkFun RedBot Sensor - Accelerometer
- 2x SparkFun RedBot Sensor - Mechanical Bumper
- 3x SparkFun RedBot Sensor - Line Follower
- 1x SparkFun RedBot Buzzer
- 2x Hobby Gearmotor - 140 RPM
- 2x Wheel - 65mm (Rubber Tire)
- 1x Wheel Encoder Kit
- 5x Jumper Wire - 3-pin, 6"
- 1x SparkFun USB Mini-B Cable - 6 Foot
- 1x SparkFun Mini Screwdriver
- 4x AA Alkaline Battery - 1500 mAh
- Circuit 1: Software Install and Basic Test
- Circuit 2: Drive Forward
- Circuit 3: Turning
- Circuit 4: Push to Start & Making Sounds
- Circuit 5: Bumpers
- Circuit 6: Line Following with IR Sensors
- Circuit 7: Encoder
- Circuit 8: Accelerometer
- Circuit 9: Remote Control
SparkFun Inventor's Kit for RedBot Product Help and Resources
Assembly Guide for RedBot with Shadow Chassis
May 28, 2015
Assembly Guide for the RedBot Kit. This tutorial includes extra parts to follow to go along with the RedBot Inventor's Kit tutorial.
Wireless RC Robot with Arduino and XBees
March 12, 2019
In this tutorial, we will expand on the SIK for RedBot to control the robot wirelessly with XBee radios! We'll explore a different microcontroller and wirelessly control the RedBot at a distance.
SparkFun Line Follower Array Hookup Guide
October 15, 2015
Learn how to connect the RedBot Line-Following Sensor Bar to an Arduino-type microcontroller. Use the example sketches to read data from the bar, and try out a simple line-following algorithm.
Experiment Guide for RedBot with Shadow Chassis
May 28, 2015
This Experiment Guide offers nine experiments to get you started with the SparkFun RedBot. This guide is designed for those who are familiar with our SparkFun Inventor's Kit and want to take their robotics knowledge to the next level.
Wireless Gesture Controlled Robot
April 25, 2019
Control the RedBot wirelessly based on the movement of your hand using an accelerometer, Arduino, and XBees!
Core Skill: Robotics
This skill concerns mechanical and robotics knowledge. You may need to know how mechanical parts interact, how motors work, or how to use motor drivers and controllers.
Skill Level: Noob - You will be required to put together a robotics kit. Necessary parts are included and steps will be easy to follow. You also might encounter basic robotics components like bearings, mounts, or other hardware and need a general idea of how it goes together.
See all skill levels
Core Skill: DIY
Whether it's for assembling a kit, hacking an enclosure, or creating your own parts; the DIY skill is all about knowing how to use tools and the techniques associated with them.
Skill Level: Noob - Basic assembly is required. You may need to provide your own basic tools like a screwdriver, hammer or scissors. Power tools or custom parts are not required. Instructions will be included and easy to follow. Sewing may be required, but only with included patterns.
See all skill levels
Core Skill: Programming
If a board needs code or communicates somehow, you're going to need to know how to program or interface with it. The programming skill is all about communication and code.
Skill Level: Rookie - You will need a better fundamental understand of what code is, and how it works. You will be using beginner-level software and development tools like Arduino. You will be dealing directly with code, but numerous examples and libraries are available. Sensors or shields will communicate with serial or TTL.
See all skill levels
Core Skill: Electrical Prototyping
If it requires power, you need to know how much, what all the pins do, and how to hook it up. You may need to reference datasheets, schematics, and know the ins and outs of electronics.
Skill Level: Competent - You will be required to reference a datasheet or schematic to know how to use a component. Your knowledge of a datasheet will only require basic features like power requirements, pinouts, or communications type. Also, you may need a power supply that?s greater than 12V or more than 1A worth of current.
See all skill levels
Comments
Looking for answers to technical questions?
We welcome your comments and suggestions below. However, if you are looking for solutions to technical questions please see our Technical Assistance page.
Customer Reviews
4.2 out of 5
Based on 25 ratings:
4 of 4 found this helpful:
Fun Kit for Experimentation (with some room for improvement)
I picked up this kit to start exploring robotics with my kids. We've assembled the kit and run through several of the example sketches, plus a few of our own. Great documentation from the SparkFun team. It's probably best to consider this kit a platform for experimentation and learning, not a great bot for any specific purpose.
The chassis itself is pretty solid, though installing the battery pack requires a degree of digital dexterity typically reserved for stenographers and pickpockets. A few minor notes on how this kit could be better:
1: The discs for the hall effects sensors were losing their rubber backing and required some CA glue to repair before installing.
2: Our bot consistently hooks to the right when driving forward. I understand this is pretty common for two motor robots, but we can't seem to resolve the issue (no undue friction to be found).
3: The IR (line following) sensors are pretty temperamental. Just using the serial monitor, we can barely get them to register a difference in reading when they pass over a black line. Not confident that they will actually work for line following.
4: The suggested method for attaching the bumper "whiskers" is pretty hokey and prone to being torqued out of alignment. A few additional screws, washers and nuts produce a much more solid mounting. Photos here: http://bit.ly/1h1lb1r AND http://bit.ly/1fBZsw4
Despite these gripes, this has been a fun kit and great learning experience for me and my kids. Looking forward to more experimentation.
Hi, Thanks for the tips. A couple responses for you. 1) Great tip. I had to do this too. 2) This is commonly because the tolerances on lower cost motors is not very tight. There for one may move a bit smoother than another. The best way to work around this is to figure out which one is running faster, and then slow it down ever so slightly in code. Just play with some different speed settings and you can find the sweet spot. 3) These are good little line follower sensors. It does work. But the trick I learned when building competition line follower bots was to put a skirt around the sensors. This will block unwanted light from effecting the outputs. I used electrical tape and cut it to fit in a way that makes a box around the sensors. 4) Nice. Really nice! I hope this helps!
1 of 1 found this helpful:
Very easy to assemble from the thorough instructions. I hope to find additional hardware to add to it. Will redbot handle a small camera?
The Redbot should have no problem handling a small camera. I don't have a camera with me today for testing, but it just carried around my 12 oz. can of seltzer water like an Olympian!
1 of 1 found this helpful:
Great value
Lots of bang for the buck. I also purchased the XBee experimenter kit and control mine via an arduino with a joystick shield. Only things missing is access to the unused digital pins and the stabilizer on the rear hangs on things when turning, would be nicer if it had a caster wheel. Despite those things it is still a great buy and will provide hours of learning.
1 of 1 found this helpful:
Totally awesome and educational! A lot of fun & idea stimulating!
I'm a total noob, and this kit and its accompanying Experiment Guide were a great intro to robotics for me. Already planning a search-and-rescue (for dust bunnies?) mod--the possibilities are endless. This bot will get you hooked!
The motors seem to really eat up alkaline batts, so I'd suggest buying at least the Li battery pack or equiv--the bigger the better. Also the Xbee option is a must for complete wireless control.
3 of 3 found this helpful:
Easy and quick way to build a first robot
I assembled the redbot in 2 hours with no problems, and had the drivers installed and was running the example programs about 25 minutes later. The instructions and photos were crystal clear (and I have never assembled any other electronic project). The experiment guide is also clearly written and makes it easy to pick up basic programming.
My only hesitation --> I eventually want to learn how to use an arduino to control a robot that I've built from basic components (not a kit). The redbot relies on using its own library of packaged subroutines to drive the motors and sensors. It's a great learning tool but just gets me a small step toward my goal.
When you are ready to build a robot from scratch, take a look at this tutorial I wrote up. It talks about how to use the Ardumoto board. And I keep all of the functions in the code and not hidden in a library - http://techdesktidbits.blogspot.com/2012/05/ardumoto-example-code.html
1 of 1 found this helpful:
Fun for a senior citizen
Have assembled RedBot and am working through the experiments having lots of fun. Just on experiment 3 now. Don't ever want to grow up. (78 in 2 weeks) Only one problem in that the motors are not matched very well so have to reprogram using motors left and motors right by trial and error
1 of 1 found this helpful:
So far, everything we needed for STEM Academy 2016
Our funds were very limited and we wanted to create a comprehensive curriculum for teens that will introduce them to the world of embedded computing, programming and robotics. So far this bot has met all our expectations. There is one concern, though, and has to do with the Whiskers. Since it will be handled by young teens, the whiskers are a potential risk. Perhaps covering the sharp ends may mitigate the risk.
1 of 1 found this helpful:
This is a good learning tool
The kit goes together well with some patience. No hammers required :-) Example 9 does not match the output expected from the web page. The two pages on assembly and coding worked very well. I would prefer to have something more than just a piece of plastic for the rear support, like a small roller caster. The foot just acts as a drag brake.
4 of 4 found this helpful:
Nicely Done!
I received my kit and found it a "snap" (pun intended) to put together. It is designed well and worked immediately without having to resort to any modifications or head scratching. Not having to solder or use special tools is also a plus.
I do have one minor criticism. It was not clear where to exactly mount the bumper sensor assembly. The unit I received is somewhat different from the pictures in the assembly instructions. I used the slot instead of the holes and it worked perfectly.
Love it!
I'm really having fun playing with this thing. I'm a mechanical engineering senior and this is perfect for me to dive a little deeper into robotics!
Great robot. Assembly was really a drag.
It's a sturdy, chunky and capable bot, but pinching the parts together required more hand strength than is reasonable. Kids would give up on assembly (I nearly did). Forget about snapping in the battery pack unless you do it before putting on the top surface. I much prefer the earlier versions of the Redbot with the spacers and little screws. This BlackBot really tested my patience.
Good starter kit, poor quality control for included parts
This is a pretty good kit for someone like me who's interested in getting into robotics but has little experience with electronics. The instructions were very good and I was able to get some things working with one day's effort. If there's anything that the instructions undersold, it was the amount of effort it takes to snap-together some of the plastic chassis pieces. I really had to force some of them, to the point that I was afraid I was going to break something (but I didn't). The accompanying software library is easy to pick up and understand if you have have some prior programming experience (especially Arduino programming).
My main complaint about this kit is the lack of quality control for some of the parts. One of the rubber hubs in the wheel encoder kit did not have a hole pre-drilled and so I had to fix that so that it could be attached to the motor. One of the standoffs for the mechanical bumpers was not threaded properly, so it couldn't hold the screw that would have kept that part in place. Seemingly small quality issues like these made it difficult to complete some of the experiments, which was frustrating. I guess I'll have to order replacement parts if I ever want those to work.
Sorry to hear that there were some parts issues. If you get in touch with our tech support team, they should be able to resolve those issues for you.
Good Foundation
I bought one with the purpose of teaching 8th graders robotics. The chassis is stiff to put the tabs in, and I'm not sure about longevity, I doubt I'll have students assemble and disassemble year after year. The wiring and features are straight forward. The only reason I fail to give this 5 stars, is the touch sensors are fairly cludged together. I'm designing a 3d printed bracket to keep them from wobbling all over the place. Barring that, I have several cheap spring loaded switches that can replace these.
Great with one exception
My daughter and I put this together and have been going through the experiments. The kit has been great so far with one exception: the wheel encoder kit that came with it. One of the discs that is meant to attach to the motor doesn't have a hole for the shaft to go through, and the rubber is too thick to just punch through. This means we can't do any of the experiments that require the wheel encoder which is disappointing.
Hello Brian, sorry to hear about the issue with the encoder disc. Have you reached out to our technical support @ techsupport@sparkfun.com ? They should be able to help set you up with another wheel encoder disc if you contact them.
Best robot kit I have ever known
This is a very well designed and manufactured robot and I could recommend it to anyone who wants to get into robots. The RN Bluetooth module works well with the RedBot board. One issue I had was the plastic standoff for the bumpers, because I managed to cross thread it and it no longer tightens.
Did not move
we put it together and checked and rechecked but it did not respond. Only thing I can think of is the motors are defective.
Sorry about your troubles; head over to https://www.sparkfun.com/returns to initiate a return, or https://forum.sparkfun.com/ to post for help troubleshooting
Sparkfun has done it again!!
Once assembled, the robot provides you with a very precise way to make a program interact with the physical world.
0 of 1 found this helpful:
Very nice and complete kit.
I found the kit to be very complete and the instructions on line to be very clear and easy to follow. I truly enjoyed the build process. The end result is a very nice little robot kit that I can use to get me going in robotics (which is why I bought this kit).
Unfortunately, I have not had a chance to do very much with this kit since completing the build. I have followed a couple of the online sketches to make the robot move. But I have not had time yet to really get into doing something.
However, I am very excited and looking forward to working through more of the online tutorials and then expanding on things and seeing where it takes me.
What would really help me is if there were a tutorial on how to convince the folks at my day job to not expect me to show up or do any real work yet still send me my paycheck. That would definitely be something useful.
That tutorial exists. It was made in 1999 and it wears 15 pieces of flare. https://www.youtube.com/watch?v=_OJMIqWWrjs
League Of Amazing Programmers Robot Workshop
The League Of Amazing Programmers (www.jointheleague.org), an after-school program that teaches kids computer programming starting in the 5th grade, used the RedBot kit in a week-long workshop. The kids built the robot and then programmed it. It worked very well and the kids learned and loved the workshop. Nice work SparkFun!
Excellent kit to introduce my six year old son to robotics
My six year old son enjoyed building this kit with some help from me. Some of the struts and mounts are very tight fitting into the top and bottom plates of the Shadow chassis, so he required my help joining these parts together. The motors included in the kit provide a lot of speed under minimal load. The SparkFun Inventor’s Kit for RedBot Experiment Guide(SIK REG) is nice. I wish that I could print it out to look similar to the Sparkfun Inventor Kit manual. That being said, I understand why it is formatted to be viewed online. All of the embedded links help to provide further instruction on each of the components in the kit.
Not bad - but...
This is a redux of a system that's been around for several years - I have a four wheel drive version that I built a couple of years ago - but it doesn't run w/o a connection to the programming computer. This one DOES run independently - however it does not accept commands remotely (well, why not, no wifi, bluetooth, zigbee, tinfoilhat comm, whatever).
Works OK with the demo/experimental software but that's it - not much on GitHub beyond that.
And, as I have whined and otherwise pointed out in other post the Arduino development environment is severely lacking - no trace, no way to see what's going on in the CPU, etc. It's so 1970s that I'm looking at my Z80 builds and remembering how did hand-builds of binary code using the Z80 instruction set docs. This is not quite so painful but I would like a more 'useful' environment. Has anyone working with Arduino heard of Ecipse? CCS? It's been around for dog's years and is a most pleasant development environment - I use it to do serious real time development with various TI devices - and people pay me to do that - and pay me a lot, too...
Not that I'm looking for a paying deal with this gizmo - I'm more interested in teaching 4-5-6th graders how to do development in a 'real' environment.
OK, I can bash this kit to make it work - like following, object avoidance, etc. but I'm not seeing much else in terms of using the capabilities of the 'duino devices - and that's where I say 'meh' - nice try but there are lots of things under the sun to mess with - and this is NOT one of the ones I'm spending my time with - or my student's time with.
Give us an RTOS - then I'm ready to go.
No RTOS = useless gizmo.
ss/wb
High quality kit, runs well. 4 stars
I am developing a robot system for teaching simple programming to middle school children, and this robot would work well for that. Compared to the mbot from MakeBlock, the RedBot is better made, the line follower board is better (3 sensors rather than only two) and using the wheel encoders you can control how far it moves (not an option for the mbot). What is lacking is the block-oriented programming available for the mbot, so it will be a challenge for beginning school kids to make programs for it. If someone reading this could adapt the MakeBlock (open-source) program to run the RedBot, it would clearly be the better choice. Should be fairly easy, as both bots use the arduino. Any takers?
Great FUN !!!
My son (age 10) and I are having a really great time putting this thing together. The instructions are clear and we already have the little-bot rolling around and chirp'n like R2D2!
I upgraded the RedBots for my class with the 3/8" metal caster which improves performance on different surfaces, and doesn't make that scraping sound. It fits right into the slots already in place, so it's very easy to adapt. Ball Caster Metal - 3/8" ROB-08909 RoHS
Awesome suggestion! Thanks for the feedback.
It would be nice if the Sparkfun red box that comes with the kit were large enough to hold the assembled kit. I'd like to be able have my students stack the boxes on a shelf, closet, etc. Something 9" x 9" x 4" would be great. Perhaps there's a Sparkfun box of that size available?
About to place a large order for this summer's CU Science Discovery Programming and Robotics STEM Academy camps
Thanks, Wayne (wayne.seltzer@colorado.edu)
While we do have boxes that size, using those boxes would increase the inventory space as well as shipping costs for most customers. If you are looking for these specifically for your camp let your sales rep know and we should be able to work with you to find a solution.
The "See essentials" link said you needed the wheel encoders, so I got one, but the kit already includes them!
Is there a CAD model/Drawing File available for the Shadow Chassis Components?
Two questions: - Is there a GPS module that is recommended/compatible with this kit? E.g. to geo navigate. - Could the brains be replaced by an Arduino Yun at some point? Any pinout conflicts?
We don't have a GPS recommendation, but generally GPS modules just output serial data so any should work. The main differences are voltage, the number of satellites they can search for, price, etc. Pick one with a voltage, physical interface, and price you like and you should be good to go. As for the brains if you remove the Redbot main board you will need a microcontroller and motor driver, but you can use a Yun or any other microcontroller. There aren't really any connections for a pinout conflict. If you are planning on using the redbot library you will need to make sure your motor drivers are the same and have the same configurations. You may also have to play with the pins some of the sensors use to make sure you have the PWM, I2C, and interrupts where you want them.
Looks great! But I'm curious, why is not red?
The included PCB (Made by Sparkfun) is red. The chassis is probably not made by or for Sparkfun. It looks very nice though!
I am guessing that since the chasis is made by Actobotics, it will not follow the traditional red color given to SparkFun originals.
What's the main difference with this one? https://www.sparkfun.com/products/13166
This kit also has the wheel encoders, buzzer, and bumper sensors. And because it is designed as an all in one kit you also get a screwdriver, AA batteries and USB cable.
I am planning to run this off of a 10,000mAh USB power pack that can supply 1.5A. Will this setup work longer or shorter than the included 4 AA batteries? Is this a good plan?
For reference, here is the power pack (see 10,000mAh version): http://www.amazon.com/AmazonBasics-Portable-Power-Bank-000/dp/B00LRK8JDC/
The 4 AA batteries are rated at 1500 mAh. In series, this is still 1500 mAh of "energy" to the robot. Your 10,000 mAh power pack will run for considerably longer.
Thanks. I did not think of it that way!