- Home
- Product Categories
- Robotics Kits
- Shadow Chassis

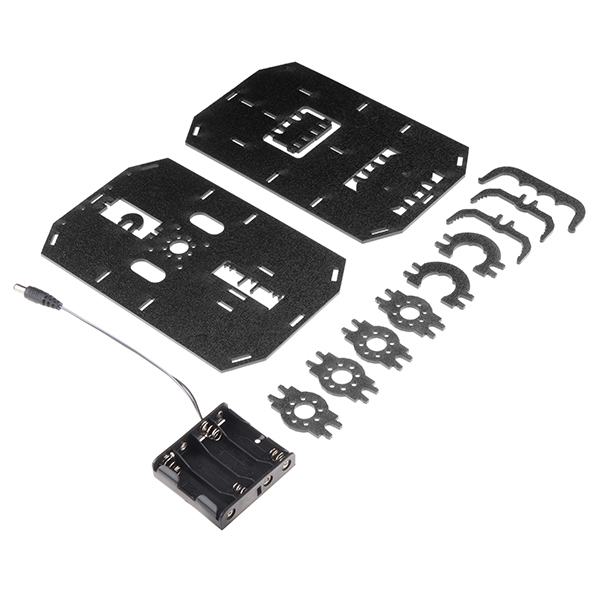
The Shadow Chassis is a marvelously durable and modular robot platform from RobotZone. The chassis plates and mounts are cut from ABS plastic and utilize the Actobotics 0.77" and 1.50" hub patterns for sensors, controllers, power, etc. Simply snap each panel together and you'll be able to attach your motors and favorite robotics controller. With the included "snap on” micro-controller mounts, you can attach an Arduino, Raspberry Pi, SparkFun RedBoard, or SparkFun RedBot Mainboard! This kit even has a mounting hole for a standard size servo as well as a 4xAA battery holder with barrel jack termination.
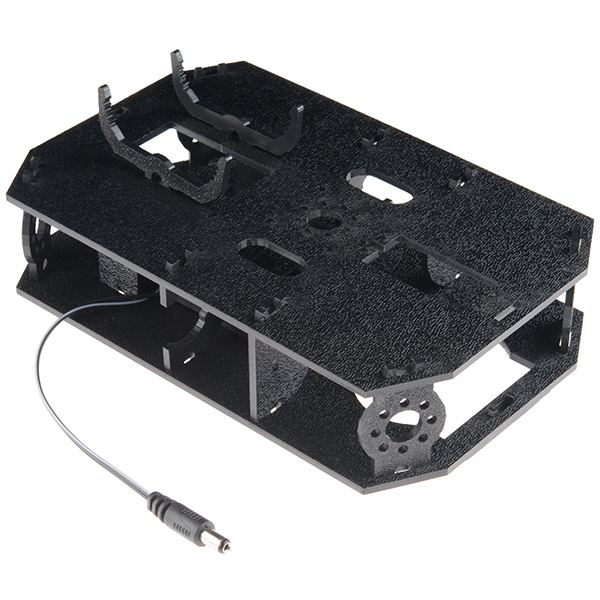
Unlike its predecessor, the Shadow Chassis does not require you to use any additional tools. Everything snaps soundly into place!
Note: The Shadow Chassis does require assembly. You can find detailed instructions in the Documents section below.
- 1x Top Chassis Plate
- 1x Bottom Chassis Plate
- 2x Front Motor Mount
- 2x Rear Motor Mount
- 4x Side Strut
- 2x Encoder Mount
- 2x Micro-Controller Mount
- 1x Battery Pack Clip
- 1x Line Follower Mount
- 1x Line Follower Mount Plate
- 1x Nub Caster
- 1x 4xAA Battery Holder
- 196mm L x 126mm W x 44mm H (53.25mm w/ Nub Caster)
Shadow Chassis Product Help and Resources
Experiment Guide for RedBot with Shadow Chassis
May 28, 2015
This Experiment Guide offers nine experiments to get you started with the SparkFun RedBot. This guide is designed for those who are familiar with our SparkFun Inventor's Kit and want to take their robotics knowledge to the next level.
Wireless RC Robot with Arduino and XBees
March 12, 2019
In this tutorial, we will expand on the SIK for RedBot to control the robot wirelessly with XBee radios! We'll explore a different microcontroller and wirelessly control the RedBot at a distance.
Assembly Guide for RedBot with Shadow Chassis
May 28, 2015
Assembly Guide for the RedBot Kit. This tutorial includes extra parts to follow to go along with the RedBot Inventor's Kit tutorial.
ReconBot with the Tessel 2
October 13, 2016
Build a robot with the Tessel 2 that you can control from a browser on your phone or laptop.
Serial Controlled Motor Driver Hookup Guide
November 17, 2016
Hookup guide for the Serial Controlled Motor Driver
SparkFun Line Follower Array Hookup Guide
October 15, 2015
Learn how to connect the RedBot Line-Following Sensor Bar to an Arduino-type microcontroller. Use the example sketches to read data from the bar, and try out a simple line-following algorithm.
WiFi Controlled Robot
May 2, 2018
This tutorial will show you how to make a robot that streams a webcam to a custom website that can be remotely controlled.
Wireless Gesture Controlled Robot
April 25, 2019
Control the RedBot wirelessly based on the movement of your hand using an accelerometer, Arduino, and XBees!
micro:bot Kit Experiment Guide
February 20, 2020
Get started with the moto:bit, a carrier board for the micro:bit that allows you to control motors, and create your own robot using this experiment guide for the micro:bot kit.
Wireless Remote Control with micro:bit
January 21, 2019
In this tutorial, we will utilize the MakeCode radio blocks to have the one micro:bit transmit a signal to a receiving micro:bit on the same channel. Eventually, we will control a micro:bot wirelessly using parts from the arcade:kit!
**Assembly hints**
Instead of putting in each piece individually, try loading up the bottom with all the vertical supports and then placing the top plate on, and pressing the whole thing together (against a table or something). Instead of pressing the small pieces into the big pieces, press big pieces INTO the smaller ones. Likewise, for getting it apart, use a spare piece from the kit and press it against the 'clip' and it will snap right out.
Core Skill: Robotics
This skill concerns mechanical and robotics knowledge. You may need to know how mechanical parts interact, how motors work, or how to use motor drivers and controllers.
Skill Level: Noob - You will be required to put together a robotics kit. Necessary parts are included and steps will be easy to follow. You also might encounter basic robotics components like bearings, mounts, or other hardware and need a general idea of how it goes together.
See all skill levels
Core Skill: DIY
Whether it's for assembling a kit, hacking an enclosure, or creating your own parts; the DIY skill is all about knowing how to use tools and the techniques associated with them.
Skill Level: Noob - Basic assembly is required. You may need to provide your own basic tools like a screwdriver, hammer or scissors. Power tools or custom parts are not required. Instructions will be included and easy to follow. Sewing may be required, but only with included patterns.
See all skill levels
Comments
Looking for answers to technical questions?
We welcome your comments and suggestions below. However, if you are looking for solutions to technical questions please see our Technical Assistance page.
Customer Reviews
3.9 out of 5
Based on 7 ratings:
Liked the chassis kit.
Easy to assemble. Very sturdy considering no screws or bolts were needed. The only problem I had was that I ordered the wheel encoder kit to use on this chassis since the motors that came with the encoder would not fit the motor mounts in the right direction needed. No way to adapt them except to start modifying the chassis. The motors were DAGU mini with the gear drive at 90 degree angle. The encoder kit should come with straight thri drive with shaft extension for mounting the mag wheel. Will use the chassis for my next project. Cranes.
Disappointment
I was really looking forward to an improvement on the Magician Chassis so I could improve the summer camp that I help run, but this chassis turned out to be even worse. It takes a good deal of force to snap together (enough that I am not willing to bet my 5th graders could easily do it), and it is not modular what so ever because it is a pain to take apart, and you will most likely break pieces if you try (I did and broke a few studs, email me if you take it apart without breaking). Overall a disappointment, I'm not sure why it is so hard to make a decent chassis.
We're pretty happy with the upgrade from the old chassis. I'm sorry this won't fit your needs. However, for the price point of this chassis, it is a fairly solid little device.
Brought shadow chassis for experimenting
I brought the shadow chassis, so I could use it instead of the cardboard box for use with the Ardumoto shield kit. I am planning to use the shadow chassis with the Redbot board in the future since the motors will be already mounted
Great platform for beginning robotics!
I bought the Shadow Chassis, some time back, to replace the Magician Chassis I had, and it has been a much better platform for building my robot. It snaps together much more easily and is a better platform to attach the Arduino controller with shields and breadboards for custom circuits. I was able to swap over the motors that came with the Magician chassis and I added the wheel encoders as well (you will want to purchase the motors if you are using this chassis, they fit everything perfectly).
My only issue has been that I broke one of the side struts when trying to unsnap things. Apparently you can't get replacement parts, so I created my own part as a replacement that can be 3D printed (http://www.thingiverse.com/thing:1196071).
I would recommend this chassis for anyone starting robotics.
Does not repond well to weight load.
My team has loaded two battery packs onto the chassis (one to power the arduino and one to power the motors) and no matter how we arrange them, the plastic piece a the front develops so much friction when moving that the wheels sometimes do not move.
Easy to assembly
This chassis has a big space to accommodate the processor, battery and others components to mount your robot. Easy to assembly and easy to use.
Hard to assemble if you aren't strong
I had difficulty in assembling this thing. I actually needed to get my dad to help me to snap all of the parts in - I just wasn't strong enough (even though I'm an adult). It isn't just an easy "snap into place" chassis - it requires a lot of brute strength in my opinion. I have bought "snap-in to assemble" plastic kits before and in my opinion, this one was quite hard to work with compared to past experiences with plastic kits. After everything is assembled though, I'm confident nothing in it will budge even a bit. I mounted my Raspberry Pi, and it fit perfectly.
Also, one thing to note was that my fingers became black due to the material residue. (Not a big deal). You just got to clean your fingers after.
A good thing is that in terms of "real-estate" (a.k.a. the amount of space between the two plates), there is a lot of room compared to the previous Magician chassis.
All in all, I would say it's "ok" in quality. I recommend this product for anyone who is on a budget, and does not want to build their own chassis that can mount whatever popular microcontroller/computer they have (Arduino, Raspberry Pi, etc.).
Is there a CAD file of this chassis?
Looks great but the color is wrong.
+1
Magician goodbye my dear friend. the new, it seems that you can not put creative, everything is done.
Even without a kit, a list of required & optional parts (motor, wheels, etc) with part numbers would be appreciated. Links to an encoder an line sensor won't make it move. It also looks like everything uses 3 wire jumpers - where are these? Thanks.
Links were added to the non-shadow chassis parts in the Assembly Guide (see the "Materials" section in the Introduction). Hope that helps!
Thanks. I also just discovered that the Redbot is available as a complete kit. Is it possible to put the rest of the components for a complete Shadow in a separate kit? (For student-friendly orders, out of stock components can make ordering complete sets of "works" a challenge.)
Keep an eye on the new products this Friday :)
Will a kit be coming, like a replacement for the RedBot?
Maybe.........
I have the previous Redbot with the Magician chassis. Can I take all the parts from it and install them on the Shadow? Going to be teaching a class in the spring and want to use the Redbot Shadow chassis but want to see if first. Would rather move me existing parts than buy a new Redbot.
What's the size of the screw holes of the servo mounting hole?
Is there a ball caster that could replace the nub caster on this?
Replying to my own question... This ball caster seem to work great with this chassis. This now turns much smoother and without a cringing noise!
I have one of the old magician chassis red bots, are the wheels and motors the same?
Nice Chassis. The ABS is nice and tough, but how are you laser cutting it and getting rid of the smell?
We aren't... We are actually sourcing these from somewhere else, so we get them all nice and packaged.
Just a FYI to all of those who may just buy the chassis. I bought just the chassis because I bought the Make:It Robotics Greer motors form a Radio Shack that closed. I found out upon receiving my chassis that they aren't 100% compatible. The Radio Shack motors do not have the extended shaft for the encoders. The front motor mount would have to be be modified to fit the Radio Shack motor. I thought I would put this is information out there for other people who might have this same idea.
The magician is a better buy, it comes with motors. Also, I modified the pololu magnetic encoder: https://www.pololu.com/product/2598 You need to drill the center out to 3/32 on the PCB and 5/64 on the magnet to fit the magician motors. The magnet is three pole so you get 12 QEP per rev. The motor is 48/1 so you end up with 576 pulses per rotation of the wheel. The wheel is ~2.56 inches in diameter or roughly 8 inches in circumference aka ~72 QEP per inch of travel. Cheers!
Dimensions please !
Good call, 196mm L x 126mm W x 44mm H (53.25mm w/ Nub Caster). They are now in the description as well. Thanks!