- Home
- Product Categories
- Teensy
- Teensy 3.5

Teensy 3.5
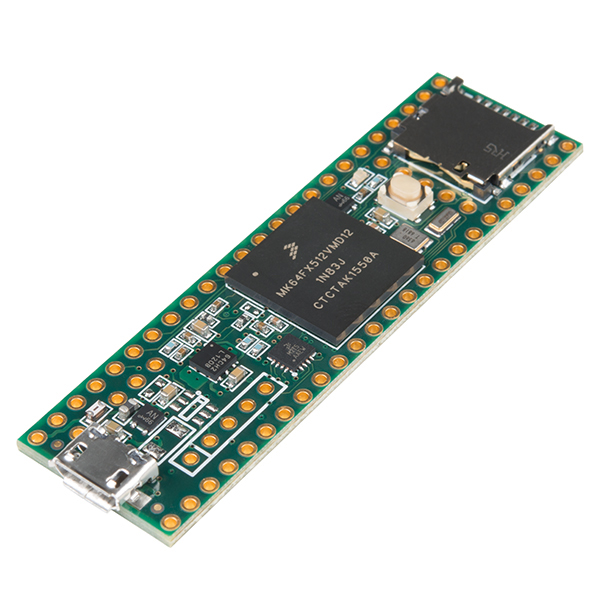
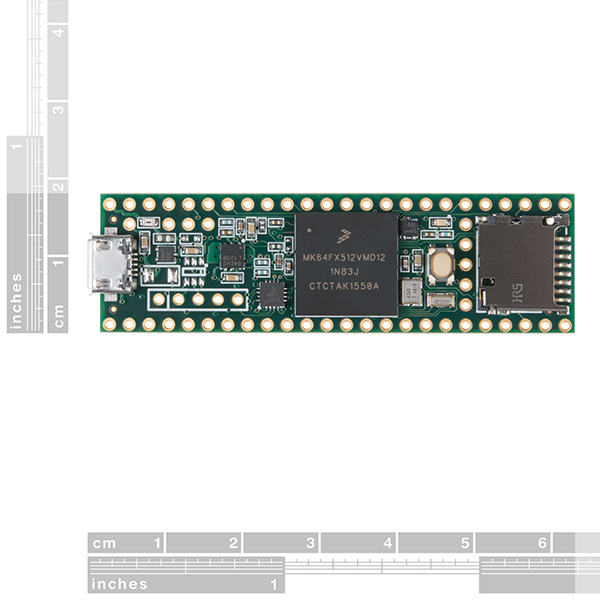
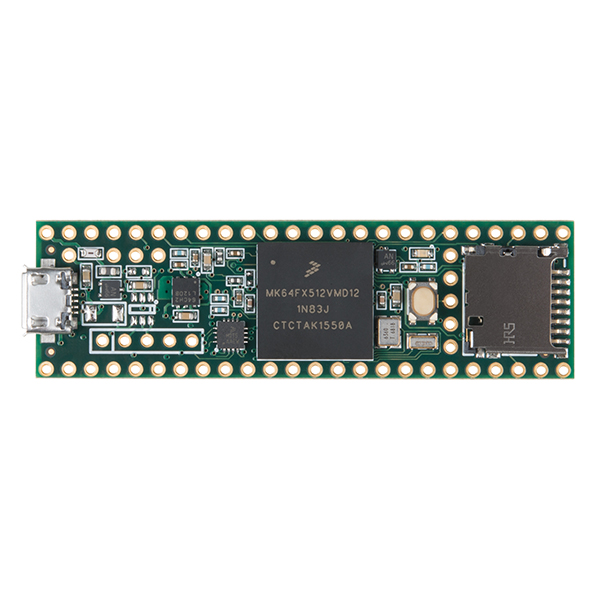
The Teensy is a breadboard-friendly development board with loads of features in a, well, teensy package. Each Teensy 3.5 comes pre-flashed with a bootloader so you can program it using the on-board USB connection: no external programmer needed! You can program for the Teensy in your favorite program editor using C *or *you can install the Teensyduino add-on for the Arduino IDE and write Arduino sketches for it!
The processor on the Teensy also has access to the USB and can emulate any kind of USB device you need it to be, making it great for USB-MIDI and other HID projects. The 32-bit, 120MHz processor brings a few other features to the table as well, such as multiple channels of Direct Memory Access, several high-resolution ADCs and even an I2S digital audio interface! There are also four separate interval timers, plus a delay timer! Oh yeah, and all digital pins have interrupt capability and are 5V tolerant.
All of this functionality is jammed into a 62.3mm x 18.0mm board with all solder points on a 0.1" grid so you can slap it on a breadboard and get to work! The Teensy 3.5 (as well as its sibling, the Teensy 3.6) is larger, faster and capable of more projects, especially with its onboard micro SD card port. An upgraded ARM Cortex MCU (120MHz from 72MHz), more memory (512K from 256K), as well as more RAM, EEPROM and accessible pins make up the key new features of this "teensy" board. The Teensy 3.5 is slightly scaled down from the Teensy 3.6 but is offered at a cheaper price point, comparatively.
Note: This does not come with a USB cable; please check below for an appropriate one.
Attention: Due to supply constraints, orders may not be filled immediately; orders not allocated to immediately, will be placed on backorder and filled as inventory allows. If you are a business, distributor, or reseller, please contact sales to place your order: sales@sparkfun.com.
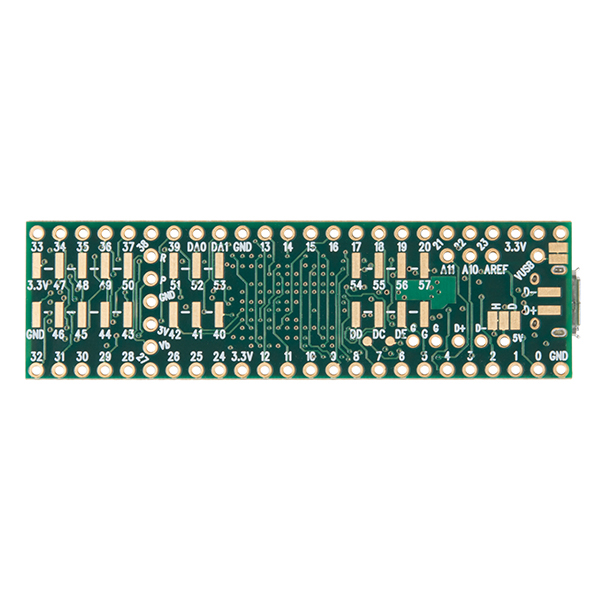
- 120MHz ARM Cortex-M4 with Floating Point Unit
- 512K Flash, 256K RAM, 4K EEPROM
- Microcontroller Chip MK64FX512VMD12
- 1 CAN Bus Port
- 16 General Purpose DMA Channels
- 5V Tolerance on All Digital I/O Pins
- 62 I/O Pins (42 breadboard friendly)
- 25 Analog Inputs to 2 ADCs with 13-bit resolution
- 2 Analog Outputs (DACs) with 12-bit resolution
- 20 PWM Outputs (Teensy 3.6 has 22 PWM)
- USB Full Speed (12Mbit/sec) Port
- Ethernet mac, capable of full 100Mbit/sec speed
- Native (4-bit SDIO) micro SD card port
- I2S Audio Port, 4-Channel Digital Audio Input & Output
- 14 Hardware Timers
- Cryptographic Acceleration Unit
- Random Number Generator
- CRC Computation Unit
- 6 Serial Ports (2 with FIFO and Fast Baud Rates)
- 3 SPI Ports (1 with FIFO)
- 3 I2C Ports
- Real-Time Clock
- 62.3mm x 18.0mm x 4.2mm (2.5in x 0.7in x 0.2in)
- Datasheet (MK64FX512VMD12)
- Manual (MK64FX512VMD12)
- Teensy Quick Start
- Teensyduino Software
- Pin Assignment Charts
- Using the RTC
- Teensy Help Page and FAQ
Teensy 3.5 Product Help and Resources
Vox Imperium: Stormtrooper Voice Changer
October 25, 2016
Add some flair to your Imperial uniform by changing your voice using a Teensy 3.2 and Prop Shield.
Getting Started with the SmartLED Shield for Teensy
November 9, 2018
In this tutorial, we will connect different RGB LED matrix panels to PixelMatix's SmartLED shield and Teensy.
Getting Started with the Teensy
June 18, 2015
Basic intro to the Teensy line of products, with soldering and programming suggestions.
How to Load MicroPython on a Microcontroller Board
September 4, 2018
This tutorial will show you how to load the MicroPython interpreter onto a variety of development boards.
Core Skill: Soldering
This skill defines how difficult the soldering is on a particular product. It might be a couple simple solder joints, or require special reflow tools.
Skill Level: Rookie - The number of pins increases, and you will have to determine polarity of components and some of the components might be a bit trickier or close together. You might need solder wick or flux.
See all skill levels
Core Skill: Programming
If a board needs code or communicates somehow, you're going to need to know how to program or interface with it. The programming skill is all about communication and code.
Skill Level: Rookie - You will need a better fundamental understand of what code is, and how it works. You will be using beginner-level software and development tools like Arduino. You will be dealing directly with code, but numerous examples and libraries are available. Sensors or shields will communicate with serial or TTL.
See all skill levels
Core Skill: Electrical Prototyping
If it requires power, you need to know how much, what all the pins do, and how to hook it up. You may need to reference datasheets, schematics, and know the ins and outs of electronics.
Skill Level: Rookie - You may be required to know a bit more about the component, such as orientation, or how to hook it up, in addition to power requirements. You will need to understand polarized components.
See all skill levels
Comments
Looking for answers to technical questions?
We welcome your comments and suggestions below. However, if you are looking for solutions to technical questions please see our Technical Assistance page.
Customer Reviews
4.8 out of 5
Based on 8 ratings:
2 of 2 found this helpful:
Teensy 3.5 is another great PJRC product!
So much power and so many features in a small Teensy package!
NOTE: The T_3.5 actually has 256K RAM - just like the T_3.6.
Initial processor docs were not clear - but all units have verified been with PJRC (and TeensyDuino software updated) - to have shipped with 256 KB usable RAM not the listed 192K, so the features tab could be updated to agree with https://pjrc.com/teensy/techspecs.html
Fabulous board
Paul and Robin hit it out of the park. I've used the 3.1 and 3.2 in the past, but this one is better. It is pin-compatible in the same footprint as the 3.1 (the extra pins extend off the end of the 3.1 footprint), and best of all, it is still 5V tolerant on the digital pins. The Teensyduino libraries for the Arduino IDE are great and so far I've never run into a problem with them.
So far so good.
Fired it up, but haven't had time to do more than verify that it boots and communicates after soldering the pins up.
I got the Teensy 3.5 to act as a peripheral to my Raspberry Pi Zero W. It's beefy enough to handle a bunch of JSON messages (I upgraded from an Arduino Mega). I haven't finished the project yet (a distibuted system of microcontrollers running an escape room, in which the Teensy acts as a 'router' between the Pi & a bunch of 8-bit controllers), but I'm super happy with how it's shaping up. The teensyduino addon can be a bit finicky, but it's still truckloads better than using the mega
Amazing board!
The only regret I had so far is I didn't buy the 3.6 for the extra clock. The 5V tolerant pins payout a lot though. This board is amazing. One of the best things I've brought to my lab in the recent years. Can't wait to buy more...
powerful stuff
i am excited, it has all, what i want
Good job PJRC
I'm using the T3.5 as the brains for a 2x load cell datalogger for measuring tension forces in parafoil control lines. My favorite parts about using these ARM boards is the truckload of RAM/Flash and PJRC's awesome development work on the Arduino core. I don't have to worry about designing code around a small amount of RAM or Program Flash, or getting basic functions like the RTC to work consistently, which lets me spend more time getting the project done, instead of working around chip limitations. This chip has multiple I2C buses, which makes it easy to use 2 or 3 of Sparkfun's NAU7802 Load Cell ADC breakouts, which have fixed I2C addresses, without an I2C multiplexer. The T3.5 integrates an SD card slot, to log data to, and a decent RTC with a very convenient library that automagically sets the time when code is uploaded! The power circuit is well-designed so that it's relatively safe to just plug in a Li-ion battery to the Vin port (after cutting the Vusb jumper trace). Between the input protection diodes and LDO regulator, a safe 3.3V or less is applied to the processor. I'm using one of Sparkfun's 2000 mAh li-ion batteries, and a Pesky Products STBC08 li-ion charger, and I have it wired so that I can select between the battery and USB for Teensy Vin, but plugging in USB will always charge the battery. The pin drive current is a bit low at under 10mA, but that's enough to light a few LEDs for user feedback. The complete system draw with LEDs, the two NAU7802 ADCs and the Teensy running at 120 MHz was under 90mA, with about 50mA of that going to the Teensy. Dropping to 48 MHz, the Teensy draws about 30mA, which is manageable.
I need this thing with soldered pins. Do you have one?
We currently only have ones without the pins, but we do plan on getting ones with pins soldered on soon, I believe the manufacture is just building and shipping these first. Keep checking back.
The video mentions using the 'octows2812' library. From what I've been able to find on PJRC website/forums/rest of the interent, the octows2811 library currently doesn't explicitly support the teensy 3.5/6 but I'd love to be proven wrong. I've been waiting with bated breath for the octo library to come to the newest teensy's. Any chance Nick (or anyone) could post up a link to the library used in the video and maybe even the code for running the animation shown in the video?
OctoWS2811 was updated for Teensy 3.5 and 3.6 on October 21, 2016.
https://github.com/PaulStoffregen/OctoWS2811/commit/d51e6a65c63e1d8b4539c7a93fc3c1c42ccdbd4b
This link isn't quite the video demo you wanted, but hopefully the source code and github commit log can give you some confidence it does indeed support 3.5 and 3.6.
In comparing the 3.5. and 3.6 write-ups, please confirm that the 3.5 IO pins are 5 volt tolerant; and the 3.6 IO pins are 3.3 volt tolerant. I just want to make sure there wasn't a typo. :)
It's not a typo.
Kinetis MK64 are 5v tolerant on digital pins (not analog ones!) Kinetis MK66 are only VDD+0.3v tolerant (so not even 3.3v tolerant it VDD < 3v).
Hint: check datasheet asbolute ratings for VDDIO.