- Home
- Product Categories
- Arduino Shields
- SparkFun Qwiic Shield for Arduino

SparkFun Qwiic Shield for Arduino
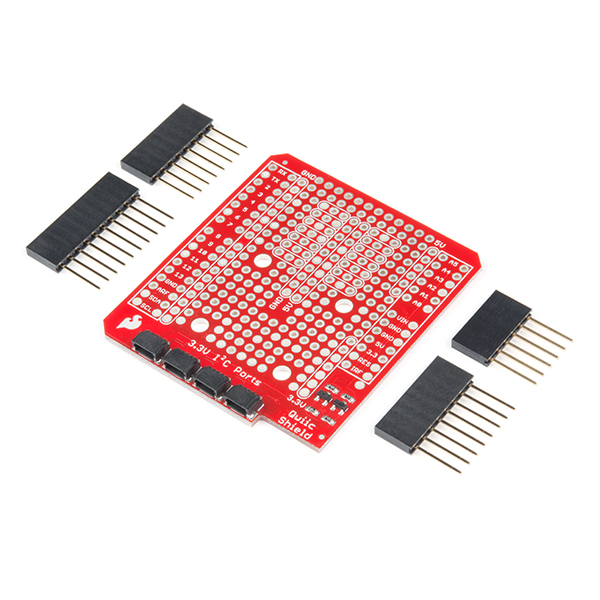
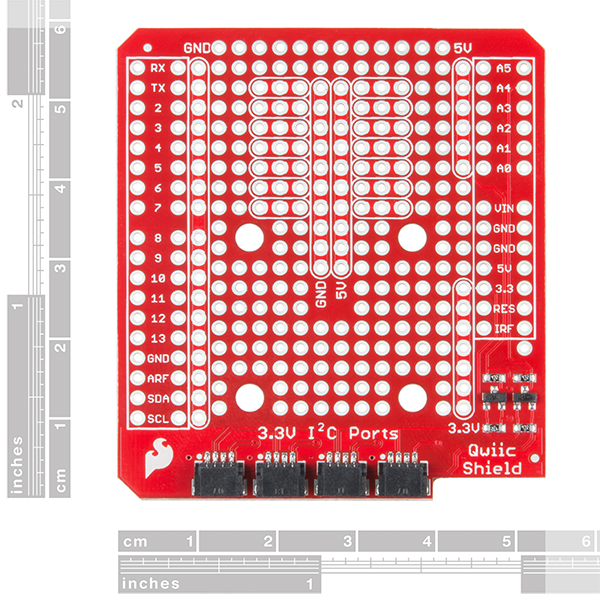
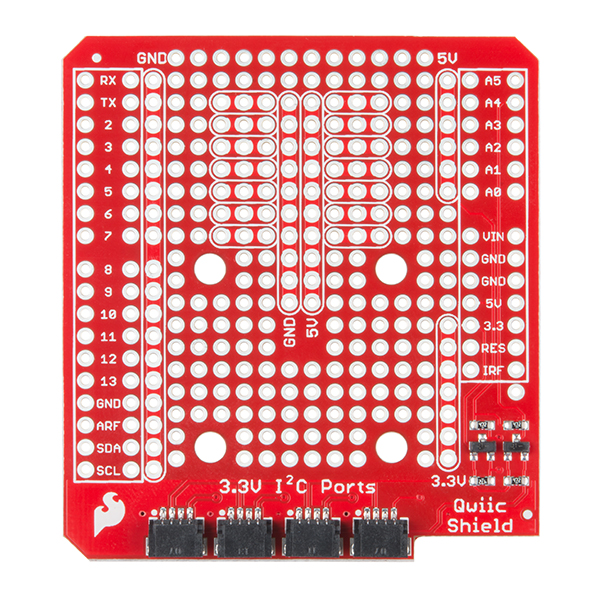
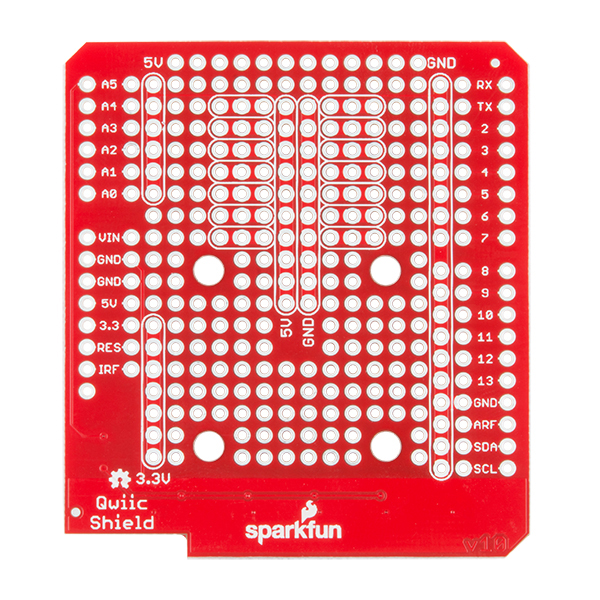
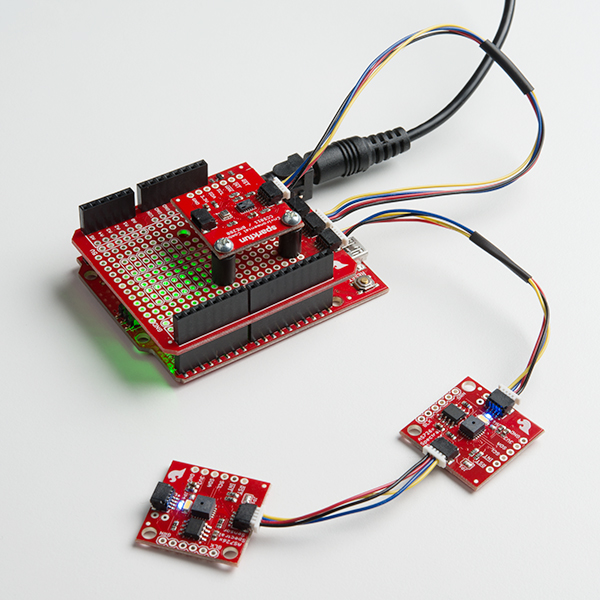
The SparkFun Qwiic Shield is an easy-to-assemble board that provides a simple way to incorporate the Qwiic Connect System with your Arduino Uno. This shield connects the I2C bus on your Arduino to a series of SparkFun Qwiic connectors and provides the circuitry to convert the 5V given to the 3.3V required by I2C boards in our Qwiic system. As long as your devices are on different addresses, the Qwiic system allows for daisy chaining, meaning you can stack as many sensors as you’d like to create a tower of sensing power!
The Qwiic Shield has four Qwiic connection ports, all on the same I2C bus, as well as a large prototyping area to design and make your own unique circuits. The shield also has a few 3-by-1 rails to help with prototyping, as well as buses for ground, 5V and even 3.3V. We have included four mounting ports in the same design as our Qwiic sensors, allowing you to affix your small board to the top of the shield.
This shield is a great retrofit for any Uno you may have. What a solder free solution? Skip the shield and checkout the SparkFun BlackBoard which has the Qwiic system built in!
The SparkFun Qwiic Connect System is an ecosystem of I2C sensors, actuators, shields and cables that make prototyping faster and less prone to error. All Qwiic-enabled boards use a common 1mm pitch, 4-pin JST connector. This reduces the amount of required PCB space, and polarized connections mean you can’t hook it up wrong.
Note: This includes R3 Arduino headers, but they are not pre-soldered onto the board, so some assembly will be required when putting the shield together.
- 1x SparkFun Qwiic Shield for Arduino
- 1x Arduino Stackable Header Kit -- R3
- 4x Qwiic Connection Ports
- Large Prototyping Area
- 3-by-1 Prototyping Rails
SparkFun Qwiic Shield for Arduino Product Help and Resources
AS726X NIR/VIS Spectral Sensor Hookup Guide
October 19, 2017
It's now easier than ever to measure and characterize how different materials absorb and reflect different wavelengths of light. The AS726X spectral sensors allow you to detect wavelengths in the visible range (VIS) and near infrared range (NIR)!
SparkFun GPS Breakout - XA1110 (Qwiic) Hookup Guide
October 19, 2017
Figure out where in the world you are with the Qwiic SparkFun GPS Breakout - XA1110.
Qwiic Shield for Arduino & Photon Hookup Guide
October 19, 2017
Get started with our Qwiic ecosystem with the Qwiic shield for Arduino or Photon.
Qwiic Magnetometer (MLX90393) Hookup Guide
May 3, 2018
Figure out how magnetic fields are oriented, all without having to solder a thing.
Core Skill: Soldering
This skill defines how difficult the soldering is on a particular product. It might be a couple simple solder joints, or require special reflow tools.
Skill Level: Noob - Some basic soldering is required, but it is limited to a just a few pins, basic through-hole soldering, and couple (if any) polarized components. A basic soldering iron is all you should need.
See all skill levels
Comments
Looking for answers to technical questions?
We welcome your comments and suggestions below. However, if you are looking for solutions to technical questions please see our Technical Assistance page.
Customer Reviews
3.8 out of 5
Based on 9 ratings:
4 of 4 found this helpful:
Nice concept, but under-delivered on promises
Granted, I failed to see that this was designed for the Arduino Uno's specifically. However, the design choice to route QWIIC I2C bus's SDA and SCL to A4 and A5 (respectively) was, in my opinion, a bad move. This design choice essentially limits use of this shield to strictly the UNO platform. If you are a DUE user, such as myself, then this shield IS NOT for you. I had to utilize the protyping area to create my own I2C bus, and then tie back into the DUE's SDA and SCL. If the I2C bus was routed to the SDA and SCL pins, instead of A4 and A5, then the DUE's SDA1 and SCL1 could have been used. A jumper to allow the user to select either the SDA/SCL or A4/A5 pins on the headers would be nice for future revisions.
1 of 1 found this helpful:
Jumpers/bypasses please!
I have two of these, using them to interface an OpenCR to over a dozen Qwiic (or other i2c) sensors/components.
I echo one of the other comments (the Due user who asked for jumpers to select between the SDA/SCL pins and the A4/A5 pins). Yes, please on that. I manually soldered air wires from the SDA/SCL pins to where the SDA/SCL traces meet the BSS138's.
If doing so, an additional switch/set of jumpers to set whether the Arduino (or other) is running at 5V or whether the i2c lines are already at 3.3V (as the OpenCR), thus to use or bypass the level shifter.
2 of 2 found this helpful:
My first I2C/Qwiic experience
The stackable headers are good quality, similar to the Uno (unlike the relay shield v2.0 flimsy header pins). The shield works, tested with Qwiic OpenLog so far, and passes through at least ground and 5v pins that I have tested.
One bad note: this is clearly tested on the Redboard, not the Uno with the large USB jack. There is a slight cutout on the board to avoid resting on the power barrel jack (where it says Qwiic shield printed on the PCB), but no such cutout on the other side for the USB jack. The board rests directly on this jack and prevents it from mounting evenly across all pins.
good substitute for a proto shield
I actually needed a proto shield at the time but they were on back order. So I purchased the qwiic shield as a good substitute and it worked great. Not using the qwiic bus at this time, but can now easily use it in the future and maybe free up a few more pins on the Arduino, which is controlling heating/cooling in an environmental chamber, reading & displaying temps, controlling a stepper motor driven metering pump, and recording bucket tips on a digital rain gauge in the chamber, all under a "multitasking" sketch.
Could have been thought-out and tested better
This shield does not stack evenly because of interference with USB and / or power connectors on the Arduino, and does not work with Mega and Duo because it is hard-wired for Uno I2C pins only. Product description should at least mention that this is not for Mega or Duo.
Does what's on the label
It's fine. Does exactly what's on the label. Nice to have the proto space in addition to the Qwiic ports. It would have been nice to have more buses/groups-of-3 and accommodations for TO-92 transistors, and perhaps to have both 5V and GND near both sets of IO port headers.
really useful
I'm building a control unit for a camera slider that has multiple pots, buttons, and other controls and needs lots of 5V and ground connection points, and this is really useful.
Easy to assemble and works great!
After only a few minutes of soldering (even with my limited soldering skills) I was able to interface this shield with both my SparkFun Redboard and my Arduino Uno and collect data using the atmospheric sensor and 3-axis accelerometer Qwiic sensors that I purchased along with this. I've been using this set up for a few weeks now, and everything is working great.
No complaints, but can be improved
This shield worked perfectly fine on an UNO board, as it should.
However, I wanted to use it on a Mega (due to memory and pin availability limits of my intended project) and, like another review mentioned, quickly realized the minute difference in pins between the UNO and Mega. Again, this is only a problem because I'm using it on a board it wasn't explicitly intended to function on, though making use of the common SDA/SCL pins, instead of A4/A5 specifically, would have been nice.
It would be nice to eventually see an updated board that is a little more universal, but until then I'll just buy another and rewire it, since they're cheap enough.
Agree with the above. There's also the problem that the HV SDA and SCL signals are connected to A4 and A5, not the SDA and SCL pins meant to be used since the R3. Using A4 and A5 means that this shield won't work with the Leonardo and the Mega.
Am I missing something? Why doesn't this use IOREF for the high-side voltage, which is put there specifically to allow shields to be used interchangeably with 3V3 an 5V Arduino varieties? Sure, I can rewire some things, but it makes no sense to do it this way.
I'm not aware what UNO is, I read arduino shield, so it is it a pitty that this board is not an universal shield... I strongly suggest to make that clear that you use non-standard SDA/SCL pins for whatever reasons. But even better make a V2.0 where you have both option with solder jumper selectable. Thanks!
"This shield is a great retrofit for any Uno you may have." I have tried this on several genuine Unos, and it doesn't fit right. The larger USB connector on older Unos prevents this shield from seating properly. This board would be SO much better if it had considered the USB connector cutout on most shields, and using the dedicated SDA/SCL pins instead of A4/A5.
"This shield is a great retrofit for any Uno you may have." is simply not true. This doesn't work as a Qwiic shield on boards like the Turbo. However, I think the prototyping area is better than what is provided on the actual ProtoShield that is sold.