- Home
- Product Categories
- LED Drivers
- SparkFun ESP32 Thing Plus DMX to LED Shield

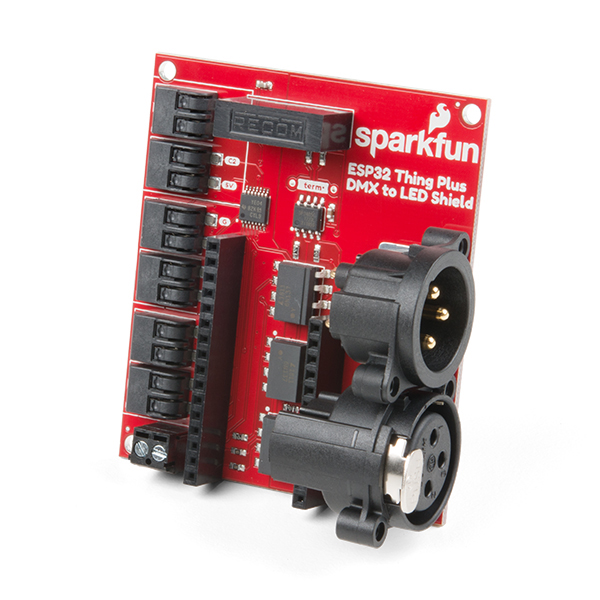
SparkFun ESP32 Thing Plus DMX to LED Shield
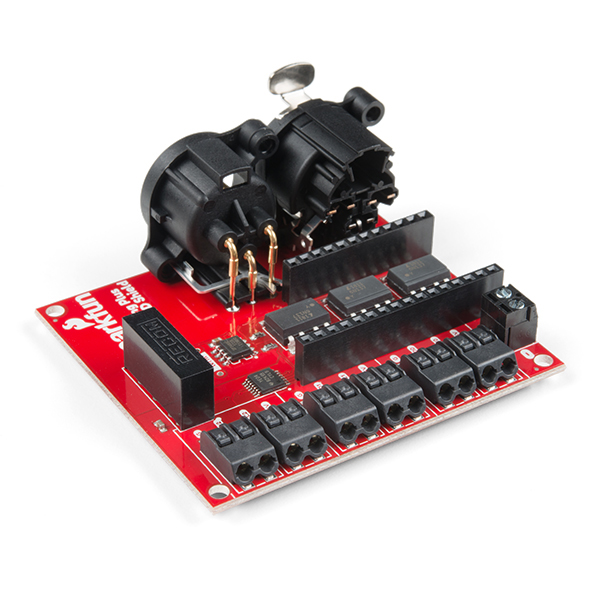
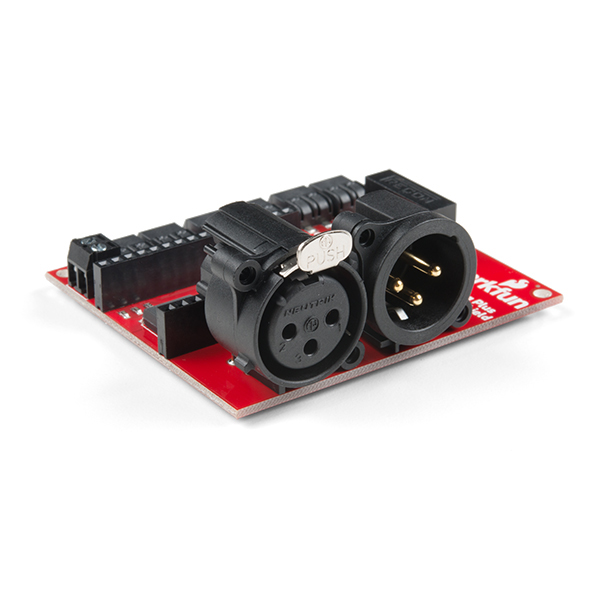
The SparkFun ESP32 Thing Plus DMX to LED Shield is the perfect way to send and receive DMX data. Whether it's coming in via the onboard XLR-3 jack or ArtNet, or outputting over the XLR-3 Jack/ArtNet, this shield has you covered! It's the perfect way to get started developing your own custom DMX fixtures, or even adding ArtNet capabilities to a current fixture. It also holds up to the DMX standard which requires electrical isolation between the controller and communication side to avoid ground loops.
The DMX to LED Shield can be powered either through the screw terminals or the USB connection from your microcontroller that's plugged into the shield. The screw terminal is a 2-pin 3.5 mm screw terminal capable of accepting 26-16 AWG wire with a strip length of ~5-6mm. Please note that you should always power the shield with 5V to provide proper power for RS485.
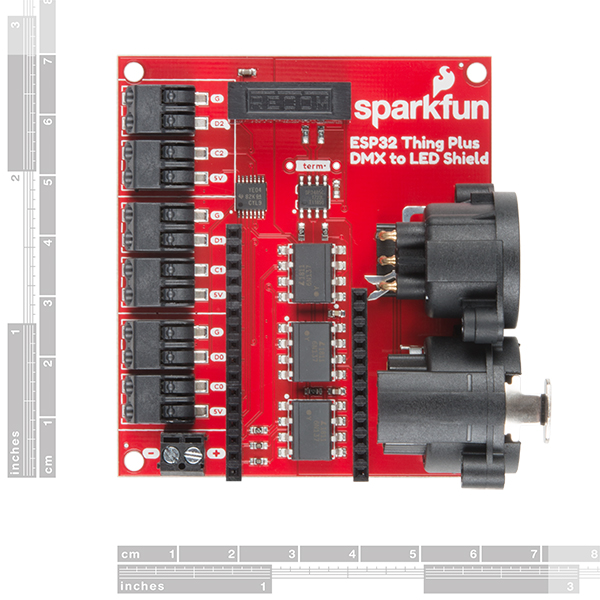
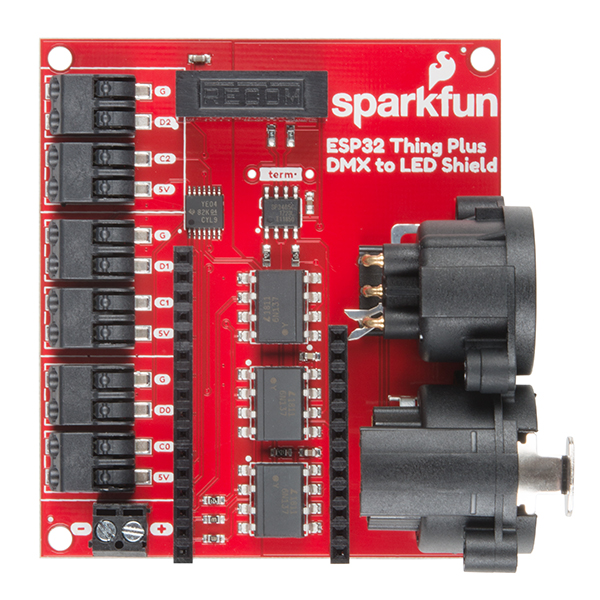
The outputs are broken out to poke home connectors ordered to match up with APA102 LED strips and LuMini devices. The DMX to LED shield is designed to work with the SparkFun Thing Plus - ESP32 WROOM or any board with a Feather footprint, so Feathers and Feather-Wings will fit it. Since many Feather boards are 3.3V logic, there is a logic level converter between the microcontroller and LED data pins to bring the poke home connectors up to 5V logic.
- Sizing (approx): 2.625 (L) x 2.7 (W) x 1.375 (H)
- 3 mounting holes for 4-40 screws
- Populated female headers for the ESP32 Thing Plus to interface to
- Screw terminal for 5VDC power input
- Compatible with 26-16 AWG wire
- 3-Pin XLR connections
- XLR-3 female connector
- XLR-3 male connector
- Poke-home connector allows for sturdy but temporary addressable LED connection without soldering
- Compatible with 24-18 AWG wire
- Optocouplers for power isolation
- Common Mode Rejection (CMR) at 1000V/ μs
- 5V DC-DC converter with isolation for ground loops
- Output: 5V at 200 mA
- Isolation voltage of 1 kVDC (1 min.)
- Isolation resistance of 1 GΩ
- 3.3 V to 5 V Logic converters between LED poke-home connectors and Feather headers
SparkFun ESP32 Thing Plus DMX to LED Shield Product Help and Resources
ESP32 Thing Plus Hookup Guide
March 7, 2019
Hookup guide for the ESP32 Thing Plus (Micro-B) using the ESP32 WROOM's WiFi/Bluetooth system-on-chip in Arduino.
SparkFun ESP32 DMX to LED Shield
March 28, 2019
Learn how to utilize your DMX to LED Shield in a variety of different ways.
Core Skill: Programming
If a board needs code or communicates somehow, you're going to need to know how to program or interface with it. The programming skill is all about communication and code.
Skill Level: Competent - The toolchain for programming is a bit more complex and will examples may not be explicitly provided for you. You will be required to have a fundamental knowledge of programming and be required to provide your own code. You may need to modify existing libraries or code to work with your specific hardware. Sensor and hardware interfaces will be SPI or I2C.
See all skill levels
Core Skill: Electrical Prototyping
If it requires power, you need to know how much, what all the pins do, and how to hook it up. You may need to reference datasheets, schematics, and know the ins and outs of electronics.
Skill Level: Rookie - You may be required to know a bit more about the component, such as orientation, or how to hook it up, in addition to power requirements. You will need to understand polarized components.
See all skill levels
Comments
Looking for answers to technical questions?
We welcome your comments and suggestions below. However, if you are looking for solutions to technical questions please see our Technical Assistance page.
Customer Reviews
4 out of 5
Based on 2 ratings:
4 of 4 found this helpful:
Works Mostly Well, but Beware of Stray Capacitance
I'm using this board to drive WS2812s that are separated from this board by about 8 feet of cable. The cable has decent stray capacitance, which causes the TXB0104 level shifter to freak out as it can't source or sink enough current to give nice sharp edges. This causes my LEDs to strobe out.
To fix this problem, I've added another WS2812 immediately off the board, which is always written blank, then wire the remaining LEDs to the cable. The extra LED acts as a buffer to clean up the signal. The WS2812s have a much stronger drive than the TXB0104. The TXB0104 is designed to be a signal level shifter, not a line driver...
Not the most elegant of solutions, but it works.
Other than that, works great.
My recommendation for the next revision would be to add a 7400 series buffer to the outputs, allowing for longer cables between boards and LEDs. Depending on the chip, you might be able to get away with using it as the level shifter.
Worked GREAT for making your own Art-Net node.
I recommend using the newer hideakitai/ArtNet library with the SparkFunDMX library to make your own Art-Net node, as it supports ArtPoll and ArtPollReply, very important for Art-Net lighting software compatibility (such as Lightkey). The board is great, does what it supposed to do.
Nice work, Tiny Dancer! Looks like a solid product.
Any suggestions for libraries/sketches to get started with a MQTT->DMX bridge? More specifically, I want to pass through DMX data from a master to the slaves and inject commands from MQTT.
Nice product, which I'm using with an ESP32. Would love to see a new version with some minor enhancements. 1. A wider input voltage tolerance, certainly to cover the range 5V-12V. 2. Use one of the otherwise unused GPIOs to control termination. 3. Move the feather headers so that the "Thing Plus" doesn't hang over the edge of the board. 4. Add a QUIIC connector, so that the I2C bus is accessible.
I love the idea of 12V compatibility and using GPIO to control termination. I didn't use a Qwiic connector on the board as SparkFun's ESP32 Thing Plus has one on board but I think it's a great idea if people are using a non-SparkFun Thing Plus board. Thanks for the tips!
hy , did anyone managed to control a profesional dmx fixture whit tis shield ? or had it controled whit a profesional dmx fader console ? i just bought a esp32 thing plus and this shield and i can't manage to make the examples work..
Hello, we managed to get control of a professional DMX fixture with this shield. However, we didn't have access to a professional DMX fader console so we used an ESP32 Thing Plus and a shield as a stand in. Have you tried updating your library? Or even using the LXESP32DMX Library?
Just to note, this does not hold up to or follow DMX512 standards. DMX explicitly disallows 3-pin XLR - see section 7.1.2. It must be 5-pin XLR to be DMX. The only other connector allowed is RJ-45 for fixed or permanent installs. For more, see https://en.wikipedia.org/wiki/DMX512#Connectors. You should remove the term 'DMX' from this product to eliminate confusion.
If there is a future rev of this board, might it be possible to use dual pads, so that either 5 or 3 pin connectors could be fitted?
Since this product uses XLR-3 connectors, I'll point out that Tri-Tek Electronics has a dizzying array of XLR connectors, cables, and adapters. For another use, I needed to "break out" the conductors so I could make measurements, and used a Male XLR to Phoenix cable and Female XLR to Phoenix cable adapters, and put simple wire jumpers between them, connecting the measurement instruments in lieu of my jumper wires as needed.
I'll admit I've never done mail (or internet) order business with Tri-Tek, since they're "local" for me, but I have been a customer since about 1985, and have always been satisfied.
Awesome! I was hooking my scope up to some pretty interesting spots on that board to make measurements. We'll be releasing some DMX Cables to connect these guys next week, but for now thanks for the alternative!