- Home
- Product Categories
- DC/Gearmotor Driver
- SparkFun Motor Driver - Dual TB6612FNG (1A)


SparkFun Motor Driver - Dual TB6612FNG (1A)
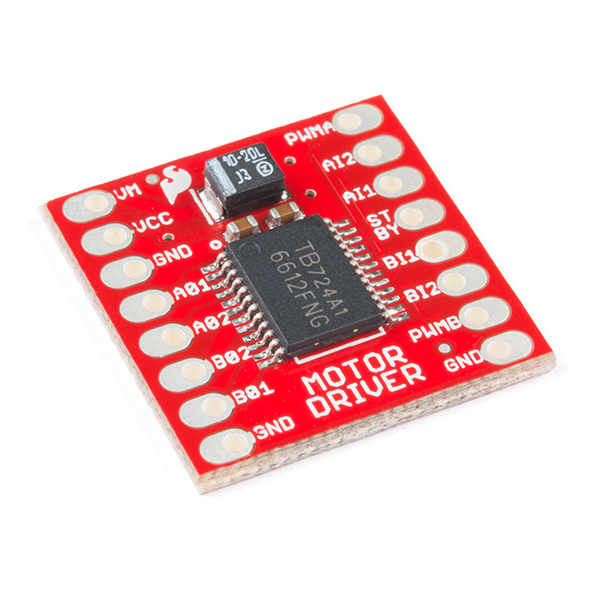
The TB6612FNG Motor Driver can control up to two DC motors at a constant current of 1.2A (3.2A peak). Two input signals (IN1 and IN2) can be used to control the motor in one of four function modes: CW, CCW, short-brake and stop. The two motor outputs (A and B) can be separately controlled, and the speed of each motor is controlled via a PWM input signal with a frequency up to 100kHz. The STBY pin should be pulled high to take the motor out of standby mode.
Logic supply voltage (VCC) can be in the range of 2.7--5.5VDC, while the motor supply (VM) is limited to a maximum voltage of 15VDC. The output current is rated up to 1.2A per channel (or up to 3.2A for a short, single pulse).
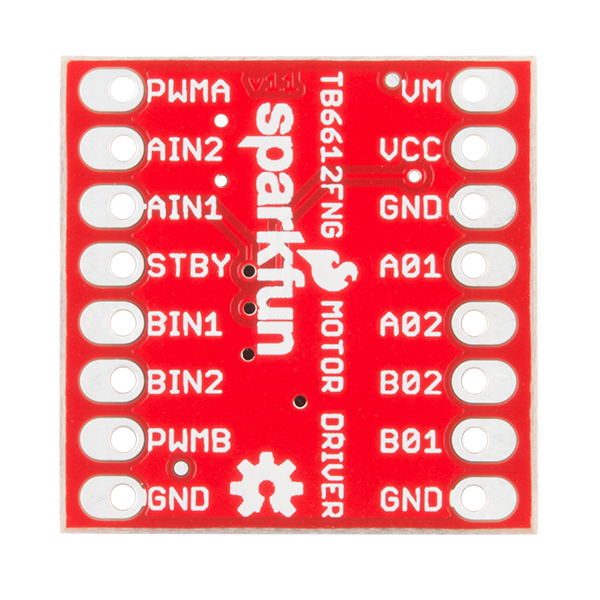
This little board comes with all components installed as shown. Decoupling capacitors are included on both supply lines. All pins of the TB6612FNG are broken out to two 0.1" pitch headers; the pins are arranged such that input pins are on one side and output pins are on the other.
Note: If you are looking for the SparkFun Motor Driver with headers, it can be found here or in the Similar Products below.
- Power supply voltage: VM = 15V max, VCC = 2.7--5.5V
- Output current: Iout = 1.2A (average) / 3.2A (peak)
- Standby control to save power
- CW/CCW/short-brake/stop motor control modes
- Built-in thermal shutdown circuit and low-voltage detecting circuit
- All pins of the TB6612FNG broken out to 0.1" spaced pins
- Filtering capacitors on both supply lines
- Schematic
- Eagle Files
- Hookup Guide
- Datasheet (TB6612FNG)
- GitHub (v1.1c)
SparkFun Motor Driver - Dual TB6612FNG (1A) Product Help and Resources
Light-Seeking Robot
November 28, 2017
We use parts from the SparkFun Inventor's Kit v4.0 to create a light-seeking robot that mimics the behavior of single-celled organisms.
Wireless RC Robot with Arduino and XBees
March 12, 2019
In this tutorial, we will expand on the SIK for RedBot to control the robot wirelessly with XBee radios! We'll explore a different microcontroller and wirelessly control the RedBot at a distance.
ReconBot with the Tessel 2
October 13, 2016
Build a robot with the Tessel 2 that you can control from a browser on your phone or laptop.
Experiment Guide for the Johnny-Five Inventor's Kit
June 28, 2016
Use the Tessel 2 and the Johnny Five Inventors kit to explore the world of JavaScript enabled hardware through 14 awesome experiments!
Red Box Robot Hookup Guide
November 23, 2016
Turn an iconic SparkFun red box into an obstacle-avoiding robot.
SparkFun Inventor's Kit Experiment Guide - v4.0
November 15, 2017
The SparkFun Inventor's Kit (SIK) Experiment Guide contains all of the information needed to build all five projects, encompassing 16 circuits, in the latest version of the kit, v4.0a.
TB6612FNG Hookup Guide
September 29, 2016
Basic hookup guide for the TB6612FNG H-bridge motor driver to get your robot to start moving!
Core Skill: Soldering
This skill defines how difficult the soldering is on a particular product. It might be a couple simple solder joints, or require special reflow tools.
Skill Level: Noob - Some basic soldering is required, but it is limited to a just a few pins, basic through-hole soldering, and couple (if any) polarized components. A basic soldering iron is all you should need.
See all skill levels
Core Skill: Robotics
This skill concerns mechanical and robotics knowledge. You may need to know how mechanical parts interact, how motors work, or how to use motor drivers and controllers.
Skill Level: Rookie - You will be required to know some basics about motors, basic motor drivers and how simple robotic motion can be accomplished.
See all skill levels
Core Skill: Programming
If a board needs code or communicates somehow, you're going to need to know how to program or interface with it. The programming skill is all about communication and code.
Skill Level: Rookie - You will need a better fundamental understand of what code is, and how it works. You will be using beginner-level software and development tools like Arduino. You will be dealing directly with code, but numerous examples and libraries are available. Sensors or shields will communicate with serial or TTL.
See all skill levels
Core Skill: Electrical Prototyping
If it requires power, you need to know how much, what all the pins do, and how to hook it up. You may need to reference datasheets, schematics, and know the ins and outs of electronics.
Skill Level: Rookie - You may be required to know a bit more about the component, such as orientation, or how to hook it up, in addition to power requirements. You will need to understand polarized components.
See all skill levels
Comments
Looking for answers to technical questions?
We welcome your comments and suggestions below. However, if you are looking for solutions to technical questions please see our Technical Assistance page.
Customer Reviews
4.8 out of 5
Based on 6 ratings:
Satisfied
Using to run a throttle program on an electric train mounted on my Christmas tree. Hookup seems more complicated than it needs to be but function has been flawless.
Good Purchase
I soldered on the headers, plugged it into my breadboard and hooked up to my Arduino and the motors. It works great. I use two of them to control four motors on my project. Thanks, SparkFun!
Jaime
Excellent Purchase
Excellent motor driver board, makes getting your project up and running easy. Thanks SparkFun
Very Small Size, Very Big Performance
This driver card works great. I use it to make small, two motor vehicles and it works great. Its easy to wire up, and it works very well with an Arduino. A couple of notes - 1) don't connect a 9 V battery to VCC. It will take out the card. 2) Remember to pull Standby high 3) Remember to turn VM on or the output drivers don't do anything. Yep, all things I did along the way.
Works well
Easy to install. I’m not sure why VM and Vcc have to be different sources but I was able to use a single 9v battery by putting the 9v to VM and using a 5v regulator output to the Vcc. A 293 I used in an earlier circuit worked more simply just using the 5v regulator out.
Solid DC motor controller
The TB6612 is a solid dual H bridge motor controller. I'm not driving it particularly hard, but I've had zero issues thus far while driving two DC motors from a ESP32.
@Sparkfun, Can the 2 outputs be tied together to allow for 2A motor driving, or would the potential for delayed back-current cause trouble? I am looking for a cheap solution to drive multiple 1.5A LED strips and I prefer having considerably more current than necessary since they may be left on for hours at a time (or set to pulse).