
Tweeting Kegerator

Fancy a pint?
Filling A Need
It's a not-so-well kept secret that SparkFun has a keg in its breakroom. At any given time (ok, really just in the late afternoons) you can find a wayward employee filling his or her pint class with a tasty lager or ale. It help keeps us sane, improves company morale, and gives us something to brag about to our friends. However, the drinking habits of SparkFun employees can be tough to track. One keg might last us three weeks, or three days (if we're under a lot of stress). Rather than trek down to the breakroom to check if the keg is empty, we wanted a way to monitor the keg remotely from the comfort of our desks.

This is the weight-sensing apparatus - a force sensor, some scrap PCB, and a furniture coaster.
So what's the easiest way to tell if there is anything left in a keg? Why, picking it up of course! If you hoist the keg up in the air and don't feel the tell-tale swishing of liquid inside the keg, you've got an empty keg in your hands. And of course, the heavier the keg is, the more nectar is contains. However, when your keg is delicately placed inside a kegerator with a tank of C02 alongside, it's not always so easy to pick up the keg and gauge the contents. Plus, we all know what happens when you shake a container of suds and foamy beer is not our friend. So what we did was use four 100-lb. force sensors, which were sandwiched in some furniture coasters with scrap PCB. We threw some hot glue in there as well to help support the force sensors a little more.

A LilyPad temperature sensor taped inside the door.
Now that we can gauge how much brew is left, what else would be good to know? Let's see...temperature would be nice, just in case the fridge goes on the fritz for some reason. We used the LilyPad temperature sensor because it's fairly easy to interface with its analog output and using it minimized the number of wires in our system.
Taking It a Step Further
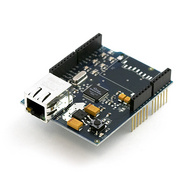
Communicating via the Arduino Ethernet Shield.
So, we have these five sensors and need a way to read their outputs remotely. We are using an Arduino as our computing workhorse, but how do we remotely access the Arduino variables? Connecting the Arduino to a PC via USB crossed our minds, but that sure seems like a magnificent amount of overkill. Now, we don't often shy away from overkill in a project, but we can't always go that route. Fortunately we carry a nifty gadget called the Arduino Ethernet Shield.

The sensors would need to be somewhat more permanent than wires just sticking into the Ethernet Shield's header. We put together a "Keg Shield" that had six Three Pin Screw Terminals - each three pin screw terminal would have a power, ground and analog input that connected to one of the Arduino's analog inputs. Near each terminal, there were empty places for resistors to bias individual analog inputs. This was needed for the force sensors, as they were only two terminal resistive devices. With the Keg Shield designed and sent off through BatchPCB, we could start work on getting the Arduino serving up the analog measurements. Here's what the webpage looks like:

Not too shabby for an 8-bit microcontroller!
Just Add Twitter
Like any other project we do, it's never truly complete. One day, Prashanta, one of the folks over in purchasing, suggested we make the keg "tweet." With that goal in kind, we set out to see just how much we could make our Arduino do.
At that time, the keg used the Arduino Duemilanove with an ATmega168 instead of the ATmega328. If we wanted to add Twitter capabilities to this project, we needed a little more "oomph" in our microcontroller. But, as the saying goes, waste not, want not. We tried to massage the code, to use PROGMEMs and the string library, but to no avail. We could not get the chip to properly work. Rather, it would Twitter some manner of unintelligible mush. So finally, we gave in and switched to the ATmega328. Success - you can follow the Twitter feed here!
When to Twitter?
Initially, the Twitter code had the Arduino only tweet when it was reset - great for debugging or knowing if there was a power-outage, but not truly tweeting. With the use of a reed switch, some magnets, and a dose of fiddling, we added the capability of knowing when the tap handle is pulled. When a thirsty SparkFun employee pulls a pint, the Arduino lets the world know.
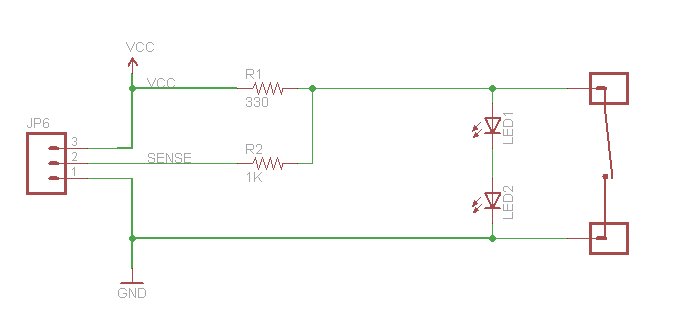
The schematic for the reed-based tap switch.

The long blue-green piece of glass is the reed switch which closes when a magnetic field is near by.

When the tap is in the closed position, the group of magnets creates a large enough magnetic field to close the reed switch.


When the tap handle is pulled, the reed switch opens, the LEDs light up, and the Arduino tweets its status.
Now For the Nitty Gritty: Code
The code for this project can be found here and is released as beerware.
The Twitter code itself is pretty straight forward. We used the String library to form the Twitter status that was then passed to Twitter where it was formed into a tweet. These three sites were very helpful in getting the kegerator to sweet like a champ:
http://pratham.name/post/39551949/twitter-php-script-without-curl
http://www.arduino.cc/cgi-bin/yabb2/YaBB.pl?num=1234028200/1
http://www.mats-vanselow.de/2009/02/08/arduino-lernt-twittern/
Eventually, it became apparent that we would need more than 8 bits to store the pull count in the EEPROM. According to this page, we would overflow an 8-bit counter early into the third keg. There were many ways to store the data, but this way was the easiest and actually worked. When the count is incremented, the EEPROM is read four bytes at a time and pieced together to make a 32 bit number, incremented, broken into individual bytes that are then written back into the EEPROM. The EEPROM will cease to properly write before this counter overflows.
Things to do
Well the first thing we noticed is that the value from the weight sensors is...really wrong. This is probably caused by a number of factors such as worn out sensors, the hot glue transmitting too much force around the sensors, the sensors not being directly under the kegerator legs and the values from the sensors are not linearly related to the force through the sensors. So our numbers are off and it could be because of a variety of reasons. Further investigation is in order.
Another known issue is with the way the force sensor is read. The resistance of the force sensor is linearly related to the force through the sensor. However, the force sensor makes up one-half of a voltage divider circuit that creates a voltage readable by the Arduino's ADC. Due to the nature of the voltage divider:
Vout = 5V x R1 / (Rforce + R1)
We will not have a linear relationship between Vout and Rforce. This further complicates things when we just add the voltage measurements together to get a total force reading. We can fix this one of two ways, change the math in the Arduino or we can change the circuit we use to relate the force sensor's resistance to a voltage.
Final Thoughts
Thanks goes out to Brennen in IT for the assistance with webpages and IP help. Hopefully this helps you create you with your project! Cheers!
You guys have been serving some pretty warm beer lately ;)
Have you thought about ?Pinging? your keg to check the contents? I own a gas grill that has a neat idea for checking the gas left in the tank. The tank sits on an ultrasonic transducer that pings the tank and then derives the amount of the contents from the return pulse. It also gives a very (surprisingly) accurate estimation of how much ?burn? time is left at the current rate of consumption. I don?t imagine they have a powerful processor in there for what I paid for the grill. I just know the manual says there has to be a tight mechanical fit between the tank and the sensor for it to work right, but the tank just simply sits on the sensor, nothing fancy. I would imagine that the tank offers a different resonance depending on the level of fuel in it, and being that is LP or liquid petroleum, the same idea would work for beer. I suggest someone with access to an ultrasonic sensor (maybe one of the maxbotix models) with a proportional output give it a try. I?d do a little averaging of the return data to get rid of any spurious errors. Just in case
Please tell me more about your ultrasonic transducer project for measuring the contents of a tank. I may attempt this for a kegerator.
is there a twitter account that we can subscribe to?
No tweets since March 10th. Either it suffered a catastrophic failure, or SFE employees decided they didn't want the world to know how much they drink on any given day. :)
I've had a few hits on my own project, and people sent me the link to this. I thought I'd share my own version.
It's not running at the moment, but that's probably because it spent a year working perfectly fine... :)
KegMonitor
Now that the twitter api no longer supports basic authentication and requires oAuth, how will the keg tweet?
I was wondering the same thing. It looks like the Keg's Twitter feed hasn't been updated since March. Does anyone have a solution using OAuth?
How about instructions for adding a camera to capture a snap shot of the person pulling the tap?
I just finished my own version of this, check it out here:
http://keg.maager.com
It uses the reed switch to calculate the volume left in the keg. It isn't 100% accurate, but is less expensive than ~$100 in flexiforce sensors :-)
Thanks for the inspiration guys!
Hey e12pilot, I'm a newbie, I was wondering if you could help me understand how you used the "reed switch" as a scale (I need to weight the volume difference in a water pond project). Thanks in advance!
lol, "Out O' Beer When? At This Rate: March 2nd, 2010" Awesome. Methinks keg updates are going to be better than watching network television...
is this hard to do. Would a beginner be able to do this?
Austin,
This project requires some knowledge of electronics and computer programming.
If you have at least a ham radio operator's proficiency with electronics and can write programming code to manage the data coming from the external device, then you can figure this out.
My first web-based external data control project took a year to figure out and make reliable. The second project took only a week or two.
Good luck. You can do it with patience and sticktuitiveness.
Santa
I am in the process of trying to do exactly this...can you post circuit diagrams or pictures of your setup? I'm working on the Flexiforce part of this and would love to see exactly how yours was set up.
What about putting the pressure sensors in between pieces of particle board?
You could sandwich them in between two pieces, with the kegerator itself sitting on the top piece, and the bottom piece on the floor. This would give a more accurate reading I think.
Awesome! Especially for in an office.
chansuke: What about putting the pressure sensors in between pieces of particle board?
I was thinking about this too, although particle board might be a bit soft/flexible. I was thinking some perspex or simular discs inside the fridge as I would need to measure up to 2 kegs and a CO2 bottle. All to be displayed on a 20x4 LCD with temp, beer names and % left, and CO2 % left. Next project idea - an autonomous vehicle to deliver a beer to any location in the office?
How about a spring and a linear pot instead of a force sensor? If all you are looking for is a percentage, you really don't need it down to the ounce.
also you could have the arduino just post updates to a webapp which could graph the data, instead of hosting the webserver on the arduino.
The Arduino is arguably posting to a webserver - twitter in this case. I get what you're saying though. Posting to a mySQL box would allow us to do all sorts of neat graphing, but for our purposes, we need simple updates.
Nice job, guys! I love the use of non-invasive force sensors. Maybe your keg and mine can be twitter-buddies? :-)
http://twitter.com/kegbot
Arudino (and SparkFun) powered, to boot :) All drinks are logged to a database, and authentication/access control is supported.
I'm still working on improving the documentation, but if you are interested, you can find an overview of the firmware below. It supports reading from two flow meters, as well as DS18B20 temperature sensors.
http://kegbot.org/docs/kegboard-guide/index.html
cheers,
mike
i like what you guys have done here. i use a custom built out freezer with a johnson controls thermostat on it, but i want to get a one wire temp sensor and some relays to control it instead. having that plus what you guys have done would be freakin' awesome.
amazing.....just amazing, i must have