
VoiceBox Shield Quickstart Guide
"Hello World" never sounded so good
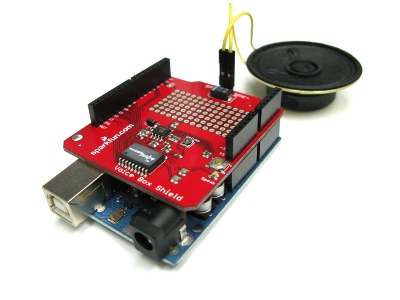
The VoiceBox shield is a unique component that lets your Arduino-compatible system speak in a robotic voice. It consists of a SpeakJet speech-synthesizer chip and an audio amplifier that can directly drive a small speaker. In addition to forming speech from commands sent to it, the SpeakJet chip has many other features such as the ability to synthesize tones and other "robot" noises. It can also be set up to say pre-stored phrases when its input pins are triggered. See the SpeakJet User's Guide for detailed technical information.
Requirements:
For the this guide you'll need the following:
How it Works:
Arbitrary text-to-speech generation is a difficult problem.* Think back to when you learned to speak and spell (maybe with a Speak & Spell). As you learned, proper pronunciation is governed by numerous (actually hundreds) of arcane rules and exceptions to those rules. The SpeakJet chip on the VoiceBox shield can't quite turn arbitrary text into speech, but if you're willing to enter the sounds that make up words rather than the letters, the SpeakJet chip is quite capable of synthesizing them.
The SpeakJet chip contains a specialized audio synthesizer capable of generating all the individual sounds of speech, called allophones. These are different than letters - the letter 'a' will have a different sound in "parrot" than in "part". Unlike letters, there are different allophones for those two sounds. Here are those words spelled out in allophones:
parrot= \PE \EYRR \UX \TT
part= \PO \AWRR \TT
Each allophone has a text representation (as shown above), and a numeric code, which is what is stored in the example code below. In addition to the allophones, there are inline commands like \SLOW and \FAST that add cadence, emphasis and other effects that make the resulting speech much more natural.
So does this mean that I need to learn a whole new language?
Sort of. But it's really not difficult, and you'll quickly get used to it. The SpeakJet User's Guide lists all of the available allophones, along with tips on how they're best used, and the SpeakJet Dictionary is a text file of hundreds of words already broken down into their allophones. If you have a limited number of words that need to be spoken, it's easy to copy them out of the dictionary into your code. If you need to build new words that aren't in the dictionary, start with a similar-sounding word in the dictionary to see how it's constructed, and play around with the allophones until it sounds right.
How to Use it:
Assembly
To plug your VoiceBox shield into an Arduino, you'll need to solder the included stackable headers to the board. If you've never soldered before, don't worry, it's easy (although you may want to practice on something else if this is your very first time soldering). The six and eight-pin headers go into the matching groups of six and eight holes on the edges of the board. The socket side of the header goes on the component (top) side of the board, and and the pins stick out the bottom. The easiest way to solder these headers to the board is to insert all four headers into the holes in the board, then flip the assembly upside down and place it on a flat surface. Then you can solder the joints from the bottom (now facing up) side of the board.
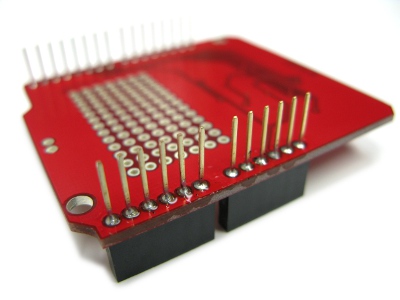
It's important for the headers to be soldered on straight so that they will easily plug into an Arduino (and other boards can plug into them). A good way to ensure this is to first solder only one pin on each header, then check the alignment. If something's not right, remelt the joint and straighten up the header before the solder cools. Once the header is straight, solder all the joints. Try not to get too much solder on the long pins that are sticking up, as these need to be clean in order to plug into the sockets on your Arduino.
You'll also need to connect a speaker (such as our 0.5W model, COM-09151) or an amplifier (such as our KIT-09612) to the speaker header, SPK+ and SPK-. The easiest way to do this is to solder short lengths of wire from the speaker header to the terminals on your speaker or amplifier. For speakers, it usually doesn't matter which terminals you connect to which side (but if you're using multiple speakers, you'll want them all wired the same way). If you're using an external amplifier, connect the minus side (SPK-) to the ground or minus side of the amplifier's input.
Usage
Once you have a speaker connected, upload the below example code to your Arduino and give it a try. The board will say "ready" when reset, then say "all your base are belong to us" followed by some robotic beeps and chirps. If the volume isn't to your liking, you can adjust the tiny potentiometer on the board. You'll need an equally tiny Phillips screwdriver to turn it, and please be gentle as tiny pots are fragile.
/*
Voice Box Demo Sketch
Written by Ryan Owens
SparkFun Electronics

Uses the Voice Box Shield from SparkFun to send the message "All your base are belong to us" and a series
of robot sounds to the SpeakJet chip on the shield.

A speaker can be plugged directly into the SPK+ and - pins on the shield.

*/

//Soft serial library used to send serial commands on pin 2 instead of regular serial pin.
#include <SoftwareSerial.h>

//Define the Pin Numbers for the sketch.
#define E0  5
#define E1  6
#define E2  7
#define E3  8
#define E4  9
#define E5  10
#define E6  11
#define E7  12

#define RDY  13
#define RES  3
#define SPK  4

#define txPin  2

//Create a SoftSerial Objet
SoftwareSerial speakjet = SoftwareSerial(0, txPin);

//The message array contains the command for sounds to be sent in order to inunciate the words "All your base belong to us." Check the SpeakJet Manual for more information
//on producing words
                                                  //All              Your         Base                 Are     Belong                       to          us
char message[] = {20, 96, 21, 114, 22, 88, 23, 5, 8, 135, 8, 146, 5, 128, 153, 5, 170, 154, 8, 188, 5, 152, 5, 170, 8,128,146,8,135,8,144,5,8,191,162,5,8,134,187};

//The sounds array contains the commands to send robot sounds to the SpeakJet chip.
char sounds[] = {200, 201, 202, 203, 220, 221, 222};

void setup()
{
  //Configure the pins for the SpeakJet module
  pinMode(txPin, OUTPUT);
  pinMode(SPK, INPUT);

  //Set up a serial port to talk from Arduino to the SpeakJet module on pin 3.
  speakjet.begin(9600);

  //Configure the Ready pin as an input
  pinMode(RDY, INPUT);

  //Configure Reset line as an output
  pinMode(RES, OUTPUT);

  //Configure all of the Event pins as outputs from Arduino, and set them Low.
  for(int i=E0; i<=E7; i++)
  {
    pinMode(i, OUTPUT);
    digitalWrite(i, LOW);
  }

  //All I/O pins are configured. Reset the SpeakJet module
  digitalWrite(RES, LOW);
  delay(100);
  digitalWrite(RES, HIGH);

}

void loop()
{
  //Send "All Your Base are Belong to Us" to the SpeakJet module
  speakjet.print(message);
  //Wait before sending the next string.
  delay(3000);
  //Send the robotic sounds to the module.
  speakjet.print(sounds);
  while(1);
}
By default, a three-pad solder jumper connects the SpeakJet's serial input to Arduino pin D2. As D2 isn't the standard Arduino TX pin, you'll need to use a software serial library to talk to the SpeakJet chip through D2 (the advantage of this arrangement is that it leaves the standard serial pins D0 and D1 free for other serial use). If you'd rather use the standard TX pin, you can modify solder jumper JP2 to do so (but note if you do this, the SpeakJet chip may make gibberish noises while you're uploading code unless you unplug the VoiceBox shield first). To change the position of the solder jumper, first completely remove the existing solder from the jumper using solder wick (TOL-09327), then add solder to the other side of the jumper to bridge the new connection.
Other resources:
For a more advanced project, check out our tutorial on interfacing a VoiceBox shield to a WiFly shield: WiFly Wireless SpeakJet Server.
Have fun!
If you need help, don't hesitate to contact us at techsupport@sparkfun.com, or get advice from other users in our forums. We also love hearing about your projects, so let us know what you're building!
-Your friends at SparkFun.
*If you really need arbitrary text-to-speech generation, SparkFun sells a chip which can do it - the TTS256 (COM-09811). This chip knows 600 rules which let it do a pretty good (but not always perfect) job of translating arbitrary text to allophones (and generally you can fix any problems by "phonetically" spelling the words it's having trouble with). It's even possible to add this chip to the VoiceBox shield, see our tutorial on how to do this (the tutorial is for an earlier version of the VoiceBox board, but the process is the same).
There exist some way to make it speak in other language, spanish for example? can i create and add my own phonemes?
That's a great question. The allophones in the SpeakJet are fixed, so unfortunately you can't change them. They were presumably chosen primarily to accommodate the English language, but because they cover a wide variety of individual sounds, I don't see why you couldn't form reasonably understandable Spanish or other languages with them. I just googled and didn't immediately find any Spanish SpeakJet dictionaries, so it would take some work - for each word you'd need to look through the list of allophones and play with the grouping to perfect the pronunciation, and it may fall short with certain words or complex languages. But if you have a limited number of voice messages you need to formulate I think it's doable. Good luck and let us know how it goes!
Hello! I want to voice out all information displayed on an 16x2 LCD using the voice box shield. can someone help me with the programming? thanks!
Cool... I didn't know it was this simple to use this shield. I think I might try it out!
Hello ..!! can the Voicebox reproduce a woman voice,?? I nedd one to my project
Sort of. You do have control over the pitch and inflection of the allophones, and can play with those values to emulate a female voice. But note that it will always sound somewhat robotic - think Steven Hawking's voice synthesizer. Good luck!