
Making Your Own Solder Paste Stencils
Overview
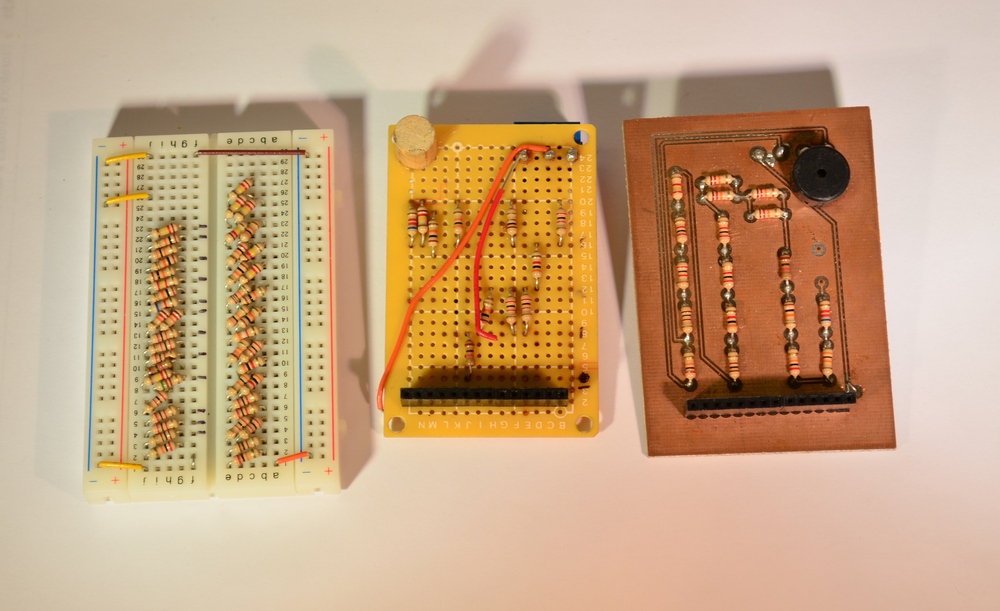
Surface mount components often intimidate people. For me, making the jump from breadboards and perforated PCB to creating schematics in Altium and using a PCB mill was huge. I no longer had to spend an entire day soldering jumper wires around a perf board, crossing wire after wire, only to find out that something wasn’t working. All that was very frustrating.
When I was hired at SparkFun, I made the switch from Altium to Eagle, and instead of milling my PCBs, I had easy access to BatchPCB.
Recently, however, I started designing a PCB that has lots of LEDs, lots of rotary encoders, and lots of outputs to relays. Trying to pack this board with through-hole components like resistors and transistors was challenging and resulted in having to increase the board size larger than I would have liked. The increased area of the board also drove the cost of the board up, very high. If only there was a way to make the board smaller, but still get the functionality that I needed. But of course! Use surface mount components. Surface Mount Devices (SMD) are very small and take up less space! I had never considered using surface mount components before, but since I had the resources available to do so, the time had come to learn.
There was still one problem though, how to solder the SMD components. I didn't want to have to solder each component on by hand. That would be very tedious and time consuming. I needed to be able to apply solder paste quickly and easily. I needed a stencil. At SparkFun, we use metal stencils. They are strong and last for thousands of builds. They're expensive though. Not very practical for building one or two boards. Especially if they are prototypes and their design could change.
We had heard rumor of people creating their own stencils using vinyl sheeting and a plotting cutter. But what was the secret? How did they do it? Well in no time at all, I had my answer.
In this tutorial we are going to talk about making solder paste stencils out of board files in Eagle.
Requirements
For this tutorial, I will be using the following software:
- Eagle 6.2.0 – PCB design
- Bullzip PDF Printer – A free PDF printer
- Adobe Illustrator CS5
- Cutting Pro (included with the Robo Pro)
And hardware:
- Graphtec CE5000-40 Craft Robo Pro Vinyl Cutter
- HP Matte Polypropylene
- Skillet (or anything to reflow the board)
Note: Adobe Illustrator is not required. Craft Robo Pro has made a plug-in for Illustrator that makes it easy to orient your files to be cut. If you wanted something free, Inkscape would do the trick. Be warned though, it will take some practice to get your files to cut out in the orientation and location you want without using the plugin.
Step 1 – Design your PCB and get it made
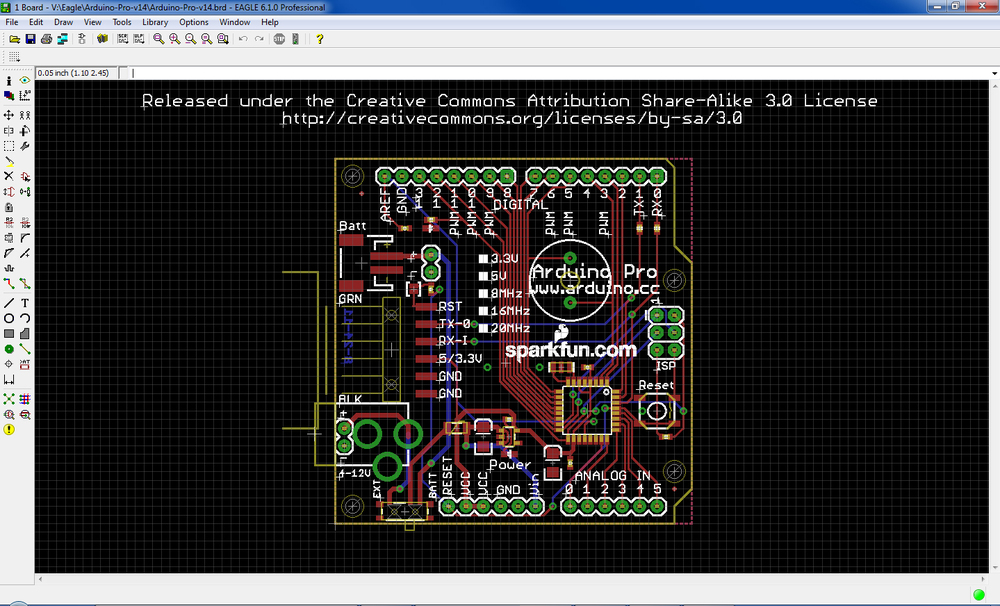
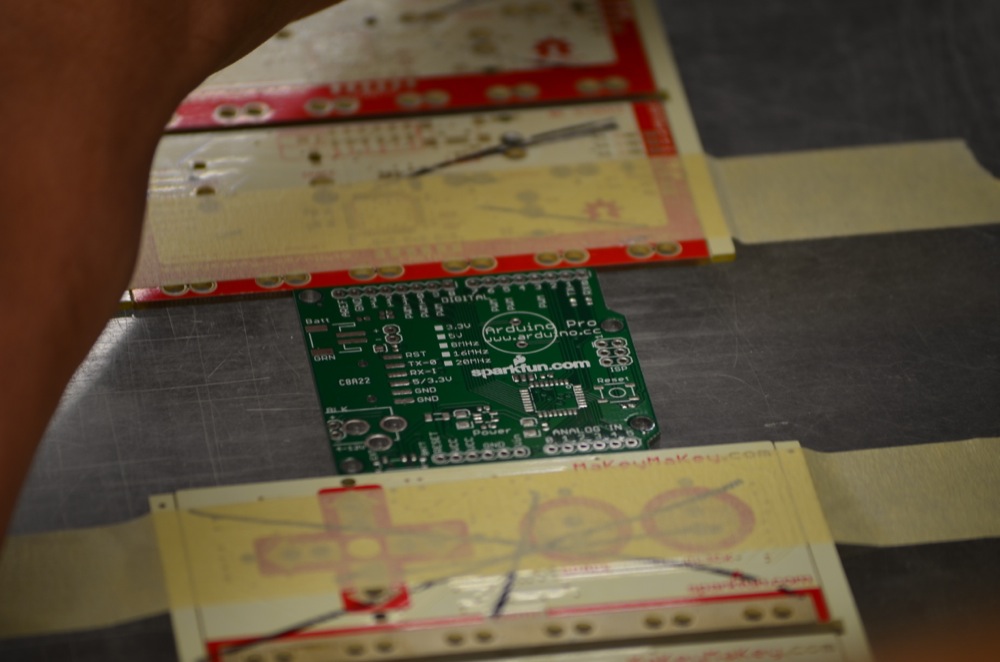
For convenience, I am going to use the Arduino Pro eagle files found on the SparkFun website. If you have never used Eagle, there is a great series of tutorials right here that will get you going! I am going to skip over all of that and get right to the goods though. I have submitted my files to BatchPCB and, in the blink of an eye, have a plain Arduino Pro board. You don’t have you use BatchPCB. You can get your board made however you would like.
Step 2 – Isolate the paste layer
Now we want to prepare a file to be cut out. Open up the .brd file from your project. If you use SparkFun hotkeys, F8 and F11 will get you our ‘standard’ layers view. Don’t worry about it if you don’t have the hot keys. We don’t need to see these layers for long anyways.
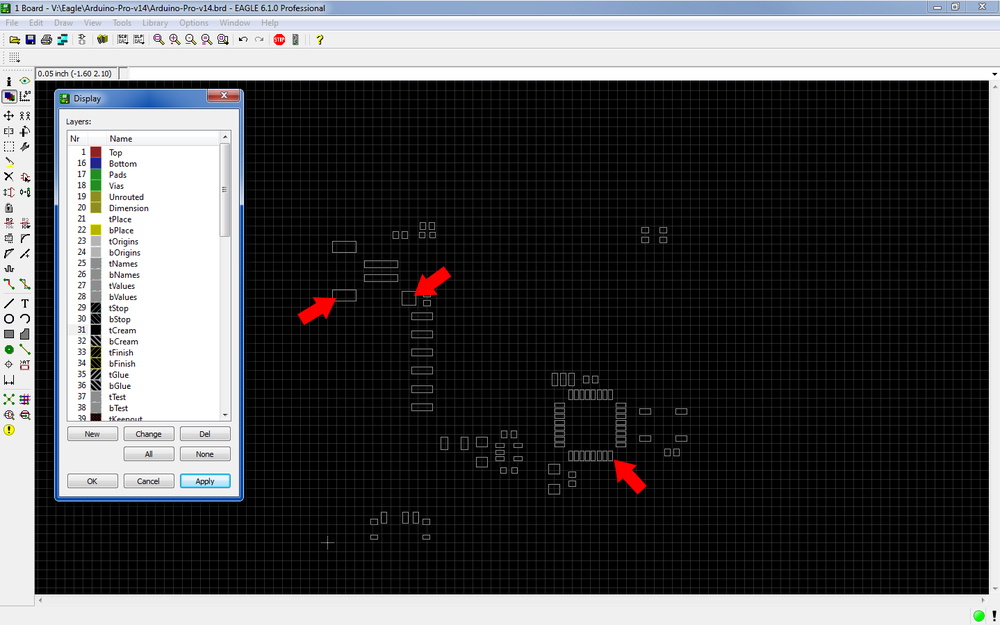
Click on the images for a closer view
Next, go to the Display button (also under View -> Display/hide layers.) Turn off every layer except for tCream. You should see something like the picture below. These are the pads that the paste will go on.
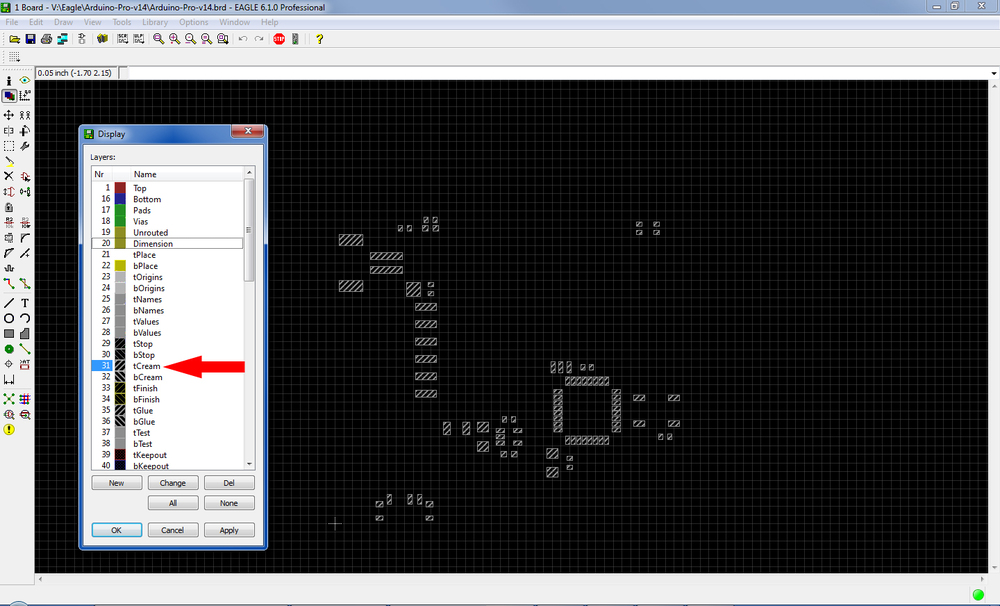
This is good, but we don't want the cross hatching fill. If we leave it there, the cutter will cut along all of those lines. To remove them, select the tCream layer and hit the Change button. Click the Fillstyle option and change it to solid. Go ahead and hit Ok.
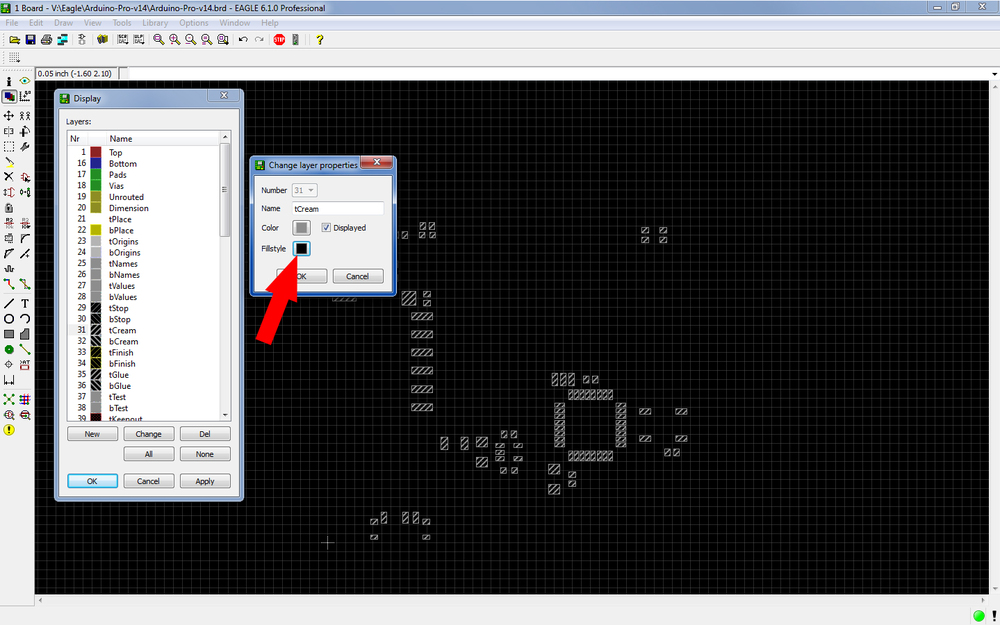
If everything worked correctly, you should see the tCream layer with no fill inside the boxes!
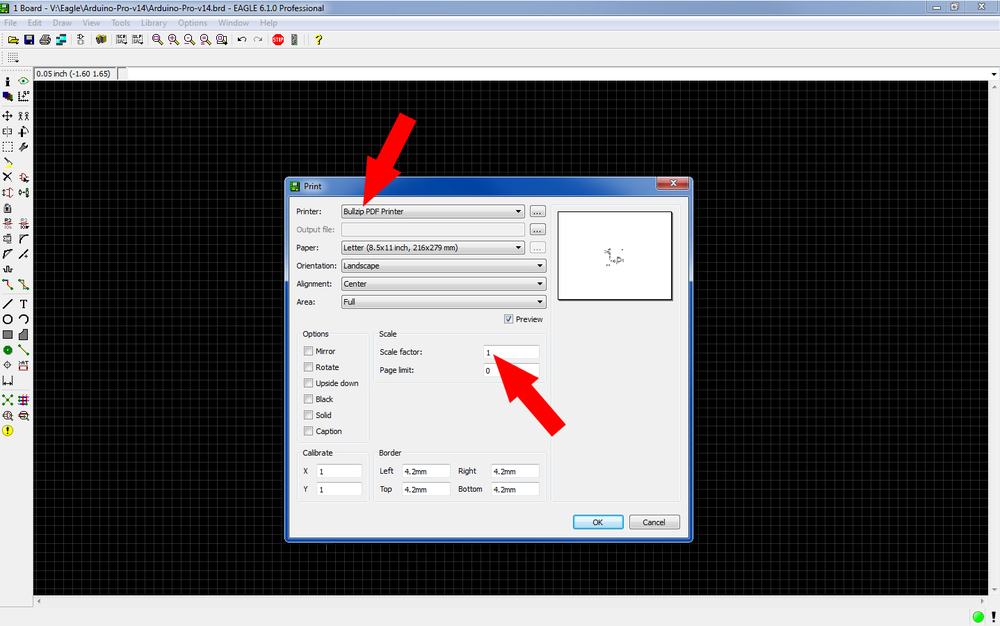
At this point you will need a .pdf printer. There are several free ones out there. You can use any one that you would like. I choose Bullzip for no particular reason. Head over to their website, and get a copy installed on your computer. Once it is installed, open your board file back up. Go to File -> Print and choose Bullzip PDF Printer. Be sure that the ‘Scale Factor’ is 1. Otherwise your stencil will not fit on your board correctly.
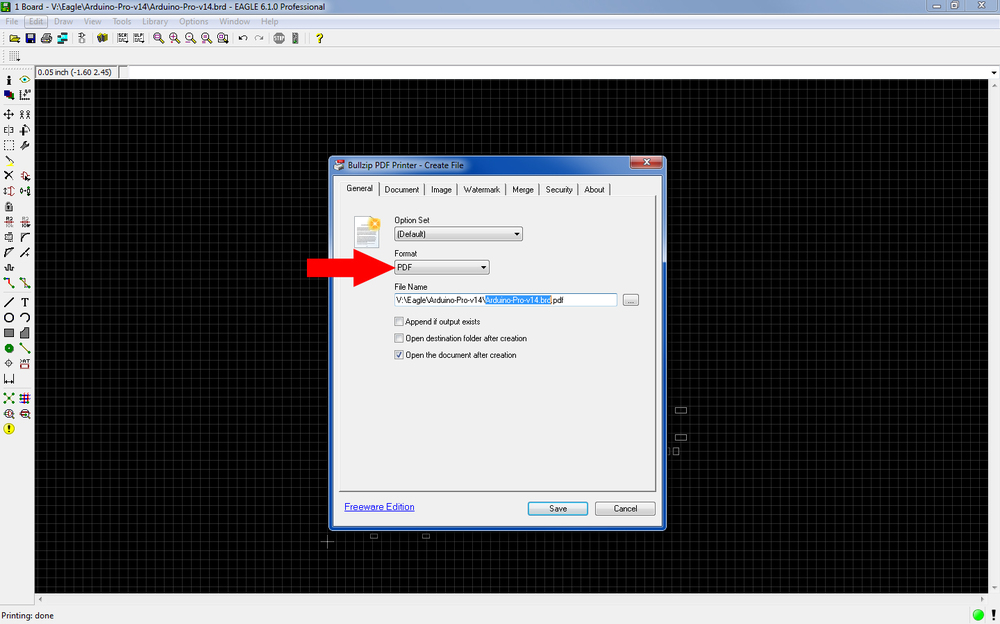
Hit OK and wait for the next window to appear.
Make sure the format is PDF and hit Save. Also, be sure to pay attention to where you are saving it!
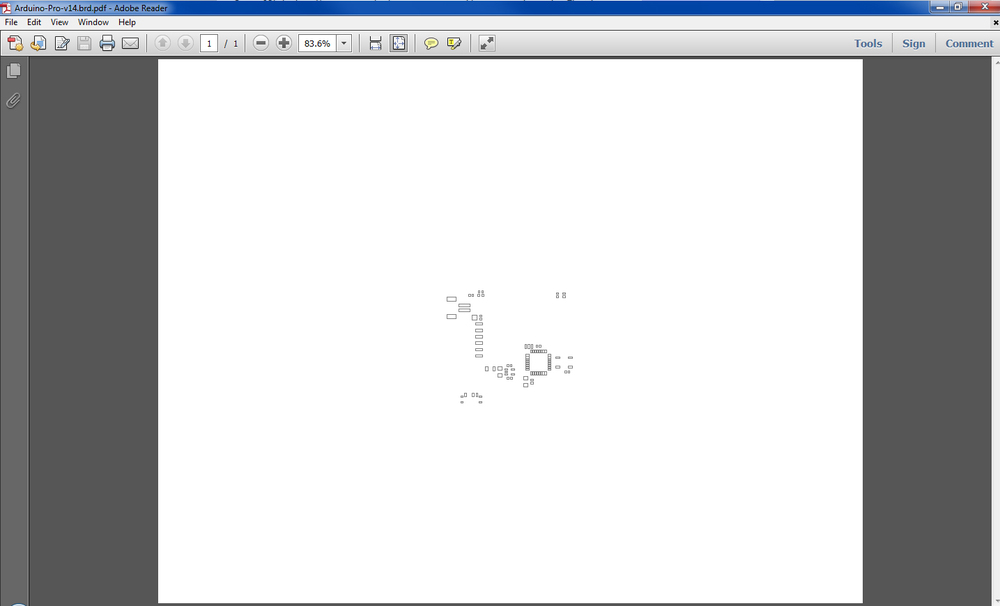
After it finishes, you should have a .pdf that looks like this:
Step 3 – Meet the Machine
This is our Graphtec 15" CE5000-40 Craft Robo Pro Vinyl Cutter. Basically, it is a knife with a brain. It essentially works like an inkjet printer: a combination of very precise X and Y movements allow it to cut very complicated shapes.
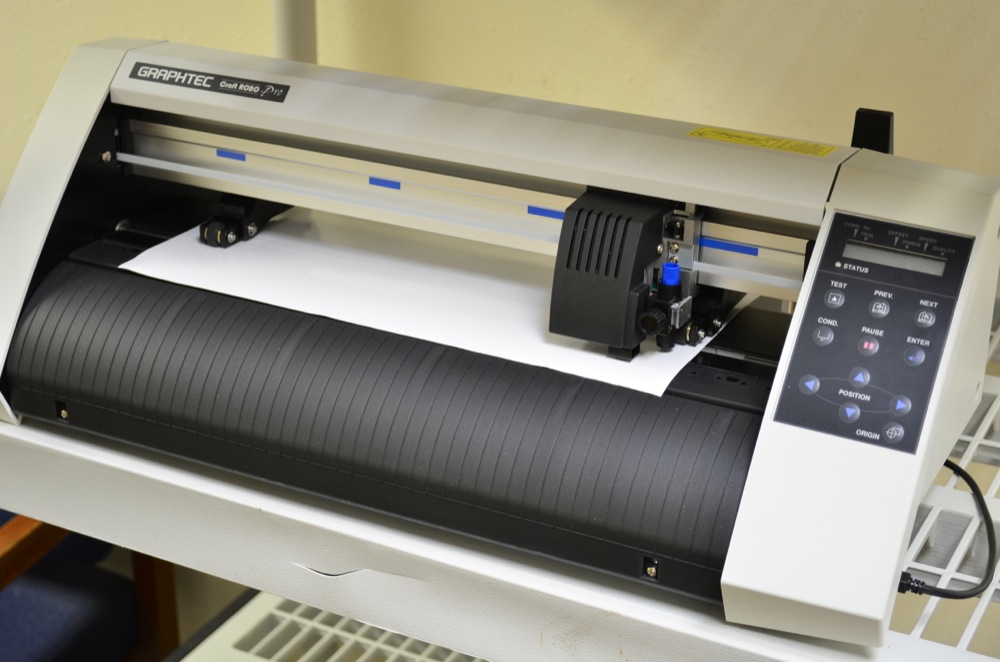
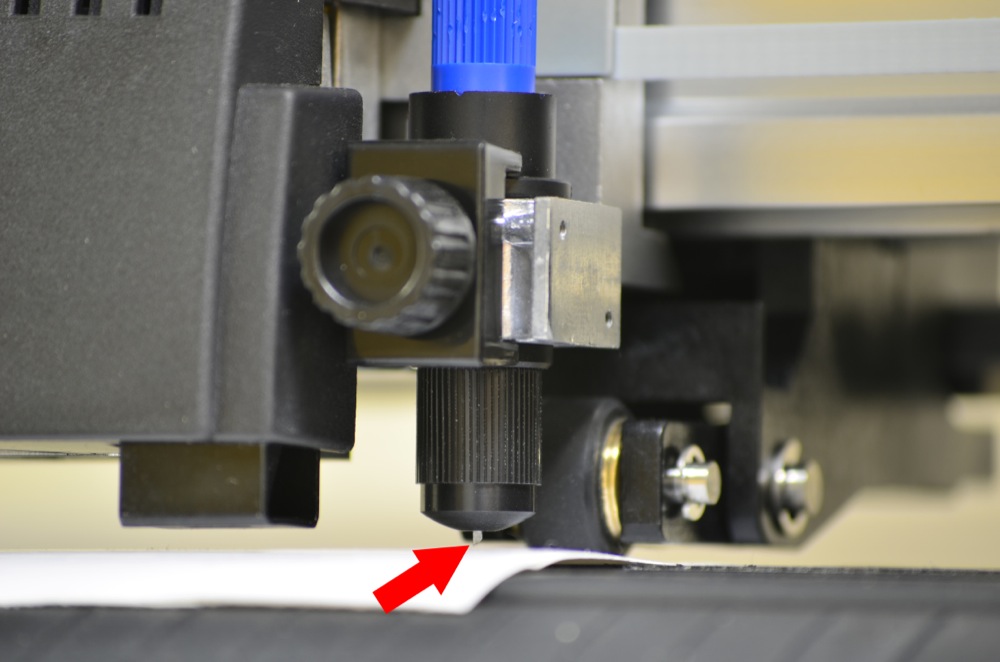
Here you can see the tiny cutting blade.
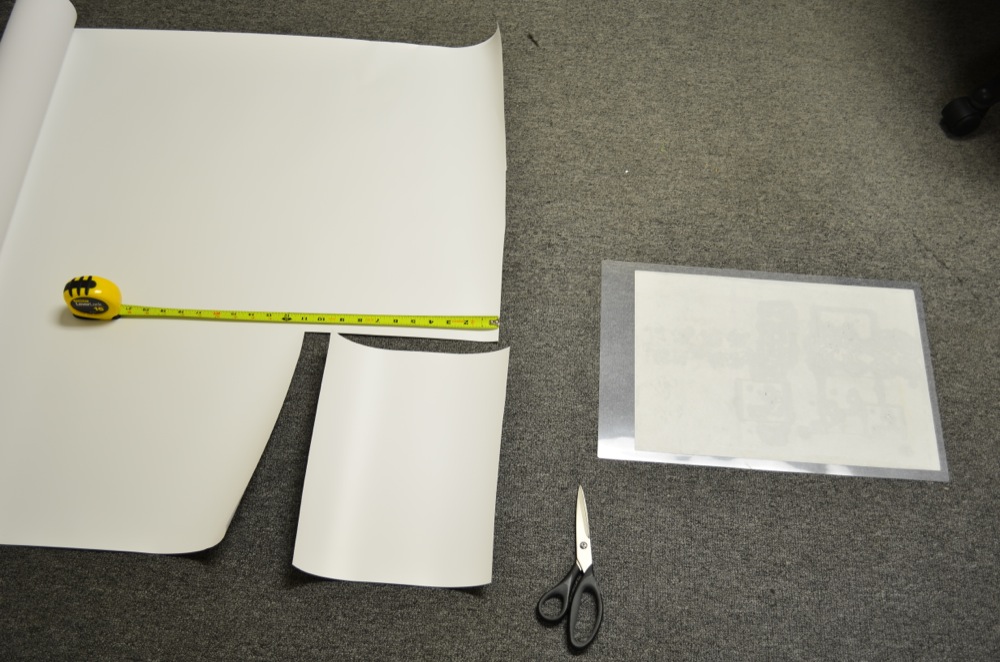
Step 4 – Prepare the Media
No, we aren’t going to alert the newspapers and magazines. I’m talking about your stencil material. Here at SparkFun, we have a jumbo roll of vinyl. Since this material requires a sticky backer, we need to cut a section of vinyl that will fit in the machine. The sticky backer holds the vinyl in place while it is being cut.
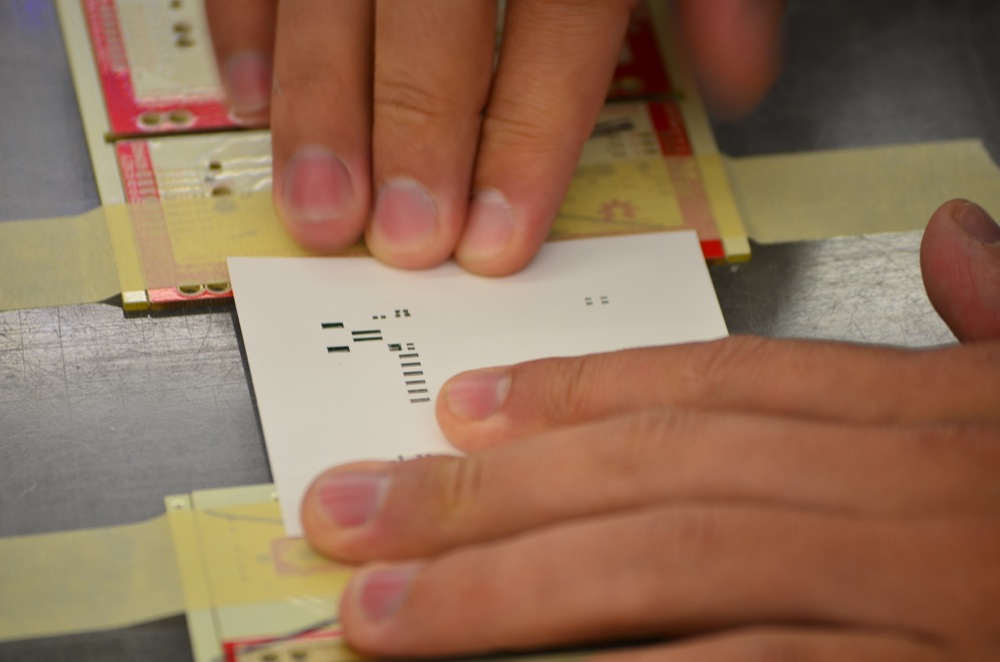
We need a piece that will fit on the sticky backer, like so:
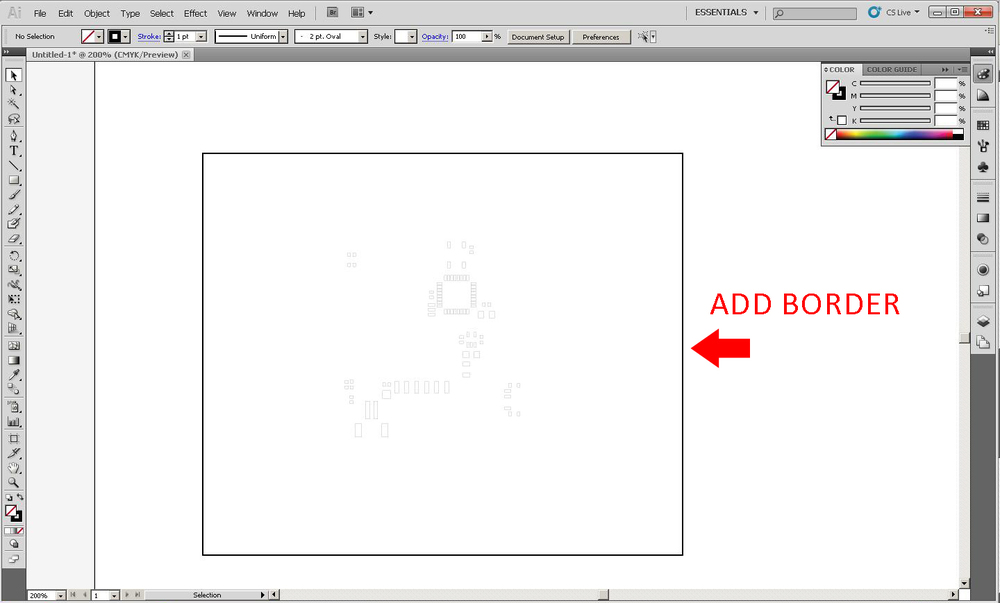
Step 5 – Prepare the PDF
At this point we could just print it to the cutting plotter. Notice how the tCream layer came out in the center of the page though? That will create a lot of wasted material. Since we are all about being scrappy, let's edit the file a bit. You can also adjust the alignment in the printing options, but I like to know exactly how my file is placed before I cut it out. This will also be useful if you want more than one copy or different stencils cut out at the same time.
I’m going to use Illustrator because as I mentioned before, it has a nice plug-in that makes it easy to use. CorelDraw also has a plug-in for this cutter but I wasn't having much luck getting it to work. If you don’t have Illustrator, Inkscape will work just fine. Best of all: it’s free! Be warned though, I have found it to be difficult to know exactly where the file will be cut out on the vinyl in relation to where is it on your screen without the plug-in. However, with a little practice it shouldn't be a problem.
Open up the .pdf in the program of your choice. I have found that it helps to set your page size to the match the size of the vinyl you will be cutting on. I like to be able to see exactly how everything is going to cut out. Be sure to add a border around the tCream pads. That way you wont have to cut it out by hand at the finish. Arrange the .pdf so that it is in the corner of your page.
At this point, if you aren't using Illustrator or CorelDraw, you will have to venture into the unknown by yourself. It takes a few tries to figure out how the stencil will be cut out in relation to your screen layout.
If you are using Illustrator or CorelDraw, now is the time to use the plugin!
Step 6 – Cut!
At this point we can send the job to the plotter if want. There are, however, several adjustments that you can make on the machine including speed, force, and quality. Each one of these will change the quality of your stencil. You want the force to be great enough to cut through the vinyl but not hard enough to cut into the sticky backing. Cutting at a faster speed will get your stencil out sooner, but cut too fast and you will start to tear the corners of your rectangles. There is a sweet spot that gives you good speed and good quality!
On this tab, we can change several variables - most importantly being the media size. Set it to match the size of the vinyl on the sticky backer.
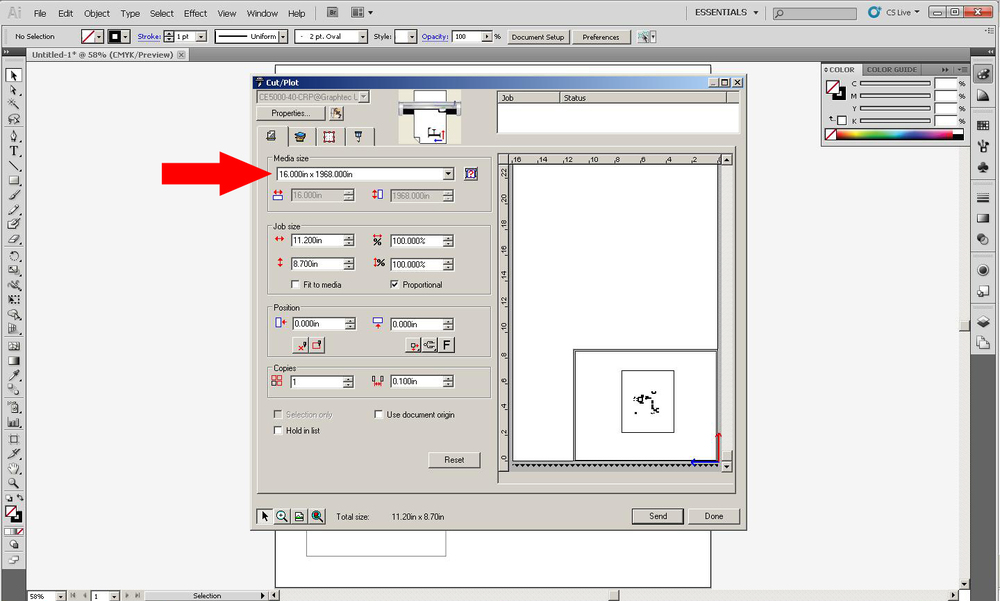
On another tab we can set the most important variables of all: Speed, Force, and Quality. You will need to experiment with your cutter to see what works best. Every material has its own setting.

Once the material has been loaded, we hit Send and the machine cuts it out!

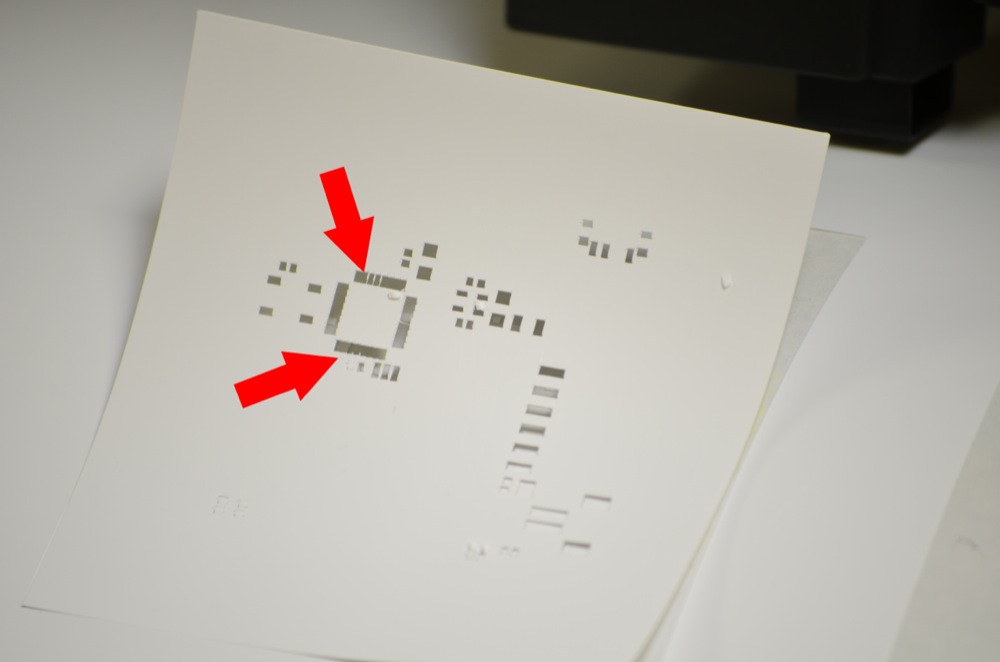
You'll notice that the vinyl is very choppy around the Atmel IC pins. The pins are so small and so close together that the machine rips the vinyl. Don't worry about it though, we'll get to that later.
If you are using Inkscape for this part, use the control panel on the cutter to set the speed, force, and quality before you send the job over.
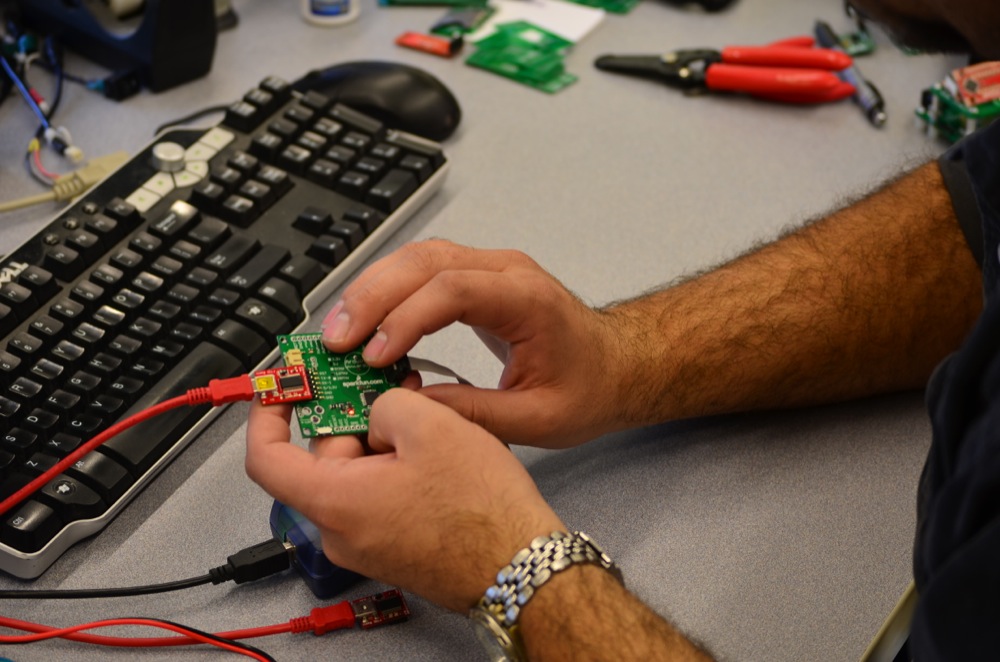
Step 7 – Apply Solder Paste
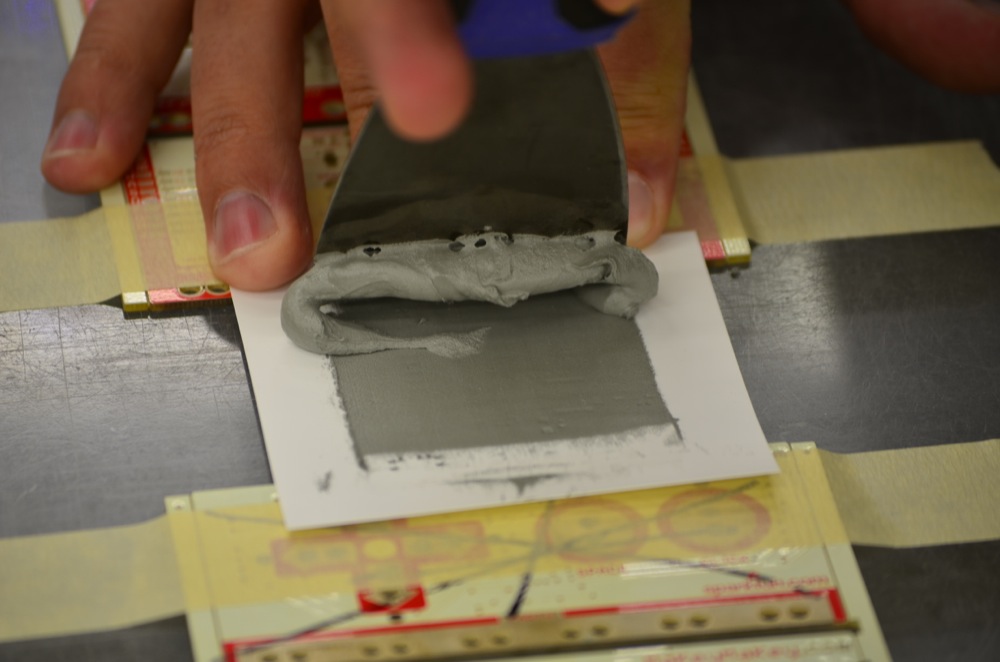
Now that the stencil has been cut out we can use it to apply solder paste to our board. It’s pretty straight forward: just line up the stencil, hold it firmly down with one hand, and drag the putty knife away from that hand with your other hand. Pressing hard will give you a nice thin layer of solder paste on your pads! If you look closely, the pins on the ATMEL have paste bridging between them. That is okay, we will take care of that later! If you need a Solder Paste Stenciling refresher, check out Nate's tutorial!

Step 8 – Drop the Components in Place
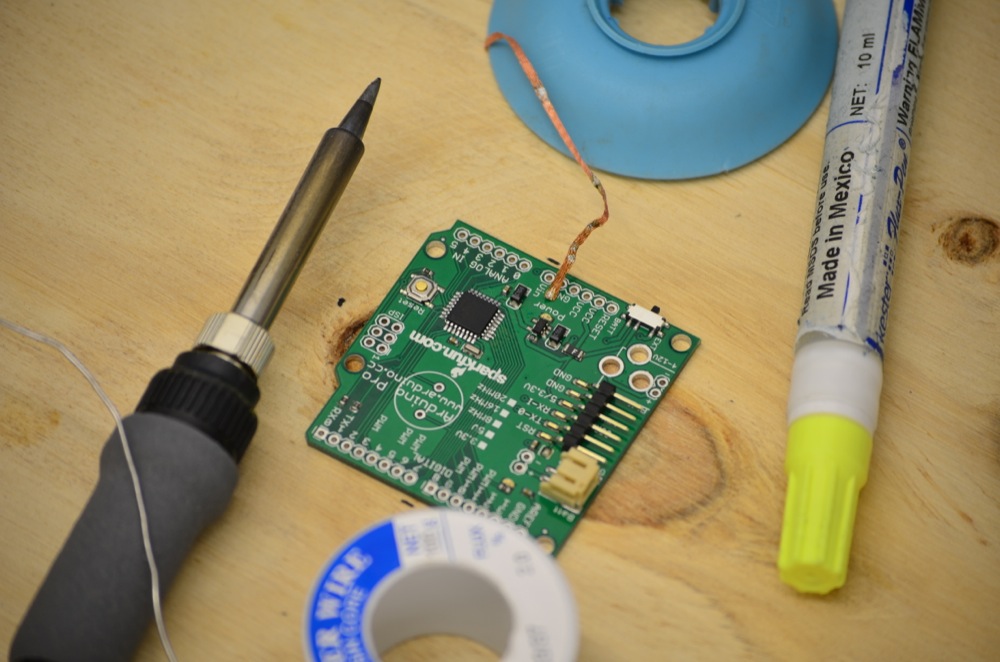
We’re almost there! Place components in their correct place using tweezers. Don’t forget to pay attention to any components that have a polarity and, of course, the Atmel IC! The solder paste will hold the components in place, just be gentle! Here I have two of all the required components to make a 5v Arduino Pro.


Step 9 – Time to Reflow
Once all the components are in place we are ready to heat up the boards and solder everything down. Check out this Reflow Tutorial if you need more info!

Step 10 – Damage Control
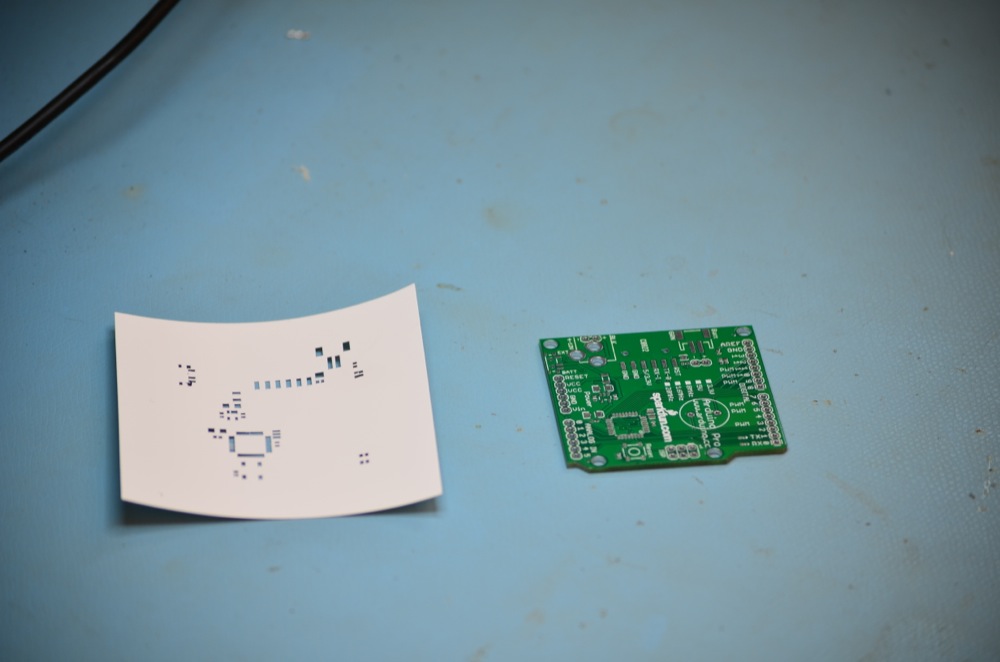
Remember earlier how we saw that the stencil area around the Atmel IC had ripped? It is quite possible that some of the pins on the chip have bridged because of that. No Problem. Use some solder wick to remove the jumpers leaving you with a finished PCB! Look over here for a SMD tutorial.

At last the jumpers have been removed. I used a magnifying glass to look very closely and check for any other problems before I powered it up.

Lastly - Program
At long last, we are ready to test it. I jogged over to Theo, our expert QC and Diagnostics guy, and had him put the Arduino bootloader on it. After a moment of suspense, the board lit up and was running the blink sketch! Success!
Conclusion
So there you have it, making your own stencils and using them too. For a single person, buying this cutter might be out of the question. For a group of people, like a hacker space, this would be a great investment! Now all you need to do is learn how to etch your own copper plated boards and you'll be all set to start your own production line!
I hope you found this tutorial helpful! Please feel free to post any questions or comments below and I will try and answer! Or if you just want to yell, you can do that here, too.
Resources
Here are links to other tool related SparkFun Tutorials.
Other useful links.
Meh. A tutorial with one of the required components being a $1100 vinyl cutter. This seems like a large jump from cost-effective toaster-oven reflow oven. Will the next "tutorial" require a used $10,000 pick-and-place machine?
And it also makes really cool stickers. You can even use it to make T Shirts if you get the right vinyl.
It can probably be done with a cheaper machine. A lot of people have craft cutters like this. CriCut is the most popular but without hacking is a closed system ie you can only use their software.
There are also cheaper cutters
...also the $1100 vinyl cutter ripped the vinyl for the atmel IC pins, so even if you have a vinyl cutter it is still not that great of a solution for making stencils. For my next project I will try SMD and was thinking that I could order a laser cut cardstock or .5mm PETG from ponoko with the stencil image on it. Place the order at the same time I place the order for the PCB at batchPCB, and I will probably get them at the same time.
i was thinking of doing the same. did this work for you?
Picky point.
This is our Graphtec 15" CE5000-40 Craft Robo Pro Vinyl Cutter. Basically, it is a knife with a brain. It essentially works like an inkjet printer: a combination of very precise X and Y movements allow it to cut very complicated shapes.
It works much more like an old pen plotter with a knife. In fact if you look at the knife holder for your plotter it looks just like old HP plotter pens. In fact I'm 100% sure the first vinyl cutter was an HP plotter or the like with a jury rigged xacto swivel knife use instead of the pen.
Also you seem to be turned around a bit. Are you cutting through the back of the vinyl sheet leaving the vinyl intact or the other way around?
If you haven't guessed yet this is what I do for part of my living. There are two parts to a sheet of solid color vinyl. The vinyl (what I think you are calling the sticky backing), what you keep, and the real backing or liner paper, ie the paper you remove (and toss) to expose the adhesive of the sticker or decal as we call it.
Also one other tip that cutter can hold different knives. It looks like you are using a 45 degree blade. A 60 degree blade is pointier and can do finer detail. Just dial down the pressure to at least half of the 45 degree blade. You don't want to cut through everything.
ETA: OK I see you are using HP Paper sheeting and some sort of sticky vinyl as sort of a carrier. Is that sticky vinyl maybe called application tape?
I think most people are going to have issues with the cutter part of this. A craft cutter like a Cricket would work but you would need to find how to hack it to allow it to be used outside their software. There are also many cheap cutters for around $300, even cheaper used . Some have a cutting mat that you stick you material like card stock to and use that as a backer.
There is a plastic backing with a sticky surface, here
I cut a piece of vinyl to fit on the plastic backing and press it down, the sticky surface holds it in place. Then the cutter makes the holes. When I peel it up, the parts I don't want are left behind.
I'm just not sure what that is? I use a masking tape like material called Application or prespacing tape. Its either beige or clear. It looks like thats maybe what you are using its just your technique seems backward to me. Its not wrong just not the normal use for these products (which I do all the time :-) )
In my world the sticky part is the part you keep and use not the other way around. Thats why I'm a little confused.
Also do look into the 60 degree blade.
PS could you post the PDF. I would like to try this with other materials.
Hmm. Maybe I'm using the wrong word. How about carrier sheet? The vinyl roll itself is not sticky. It is also very flimsy. So in order to run it through the machine, it needs to sit on the carrier sheet. The carrier sheet can be reused lots and lots of times.
Yes that would be called a carrier sheet and its probably not too sticky. Do you have any info on what brand it is? Its probably something used in the paper craft side of cutters. I use mine, Roland SP-300V*, for taxis, busses and sousaphones. Yes my sons' band has the best decorated phones in the area, probably better than most universities. They are wrapped in vinyl like a car would be.
I just tried to use the plastic "paper" I have and the application tape with not great results. I would use removable sheet vinyl, R tape and just throw it away after one use.
(shh... I'm downloading Eagle to my work PC right now to see how it works.)
It came with the machine.
Eagle 6.2.0 seems to have a Print to File (PDF) option already in the Printer drop down list. Any reason not to use that?
My bad, I didn't notice that was there. I'm sure it would work just fine.
Always a good laugh. All you need is free software. $1000 printer not included.
I have been using a technique similar to this for a few years now with a Roland GX-24. My stencle choice is a bit different though. I have tried many different things and found the best results with overhead film transparency film from staples. These are 8x10 clear sheets about 5 mils thick. This results in an almost perfect amount of paste on the pads. To hold the sheets, I have found using the Cri-Cut cutting mats work PERFECT!
http://www.amazon.com/-12-Inch-Tacky-Cutting-Measurement-Grids/dp/B0044WVV3A/ref=sr_1_1?s=arts-crafts&ie=UTF8&qid=1351617114&sr=1-1&keywords=cricut+mat
These are tacky and hold the film down. Once your done cutting like talked about above, you just tape one edge down and align the boards.
You can fit multiple designs on one sheet, but for $1 each at the Staples print center or you can buy a whole box in the store for something like $50 for 100 or something.
Hope this helps somebody else out!
That's a good idea! I'm going to try that.
How thick are those mats and does it cause a problem with your cutter. I have a Roland SP-300V printer/cutter and I would be concerned with how thick it would get with the carrier mat.
Way cool, my wife has a Silhouette Cameo craft cutter, I wonder if it would do the trick? It says it can do 1200DPI I've got to try this now...
I have a Silhouette Cameo, and it works GREAT for this, including that I can cut stencils for very fine pitch (0.5mm) parts from 3 mil Mylar. More info here. This is a nice affordable option at $250-300.
this has gotten me thinking about buying a vinyl cutter.
the catch is that i use a autocad-style program to design all my pcb's instead of a pcb program like eagle. but i can convert my drawings to pdf. is that all most cutting machines are looking for?
The Silhouette Cameo will let you use you own designs (not all do). According to Cathy's blog above it will let you open dxf files...
The machine and format shouldn't make a difference. The cutter will come with print drivers that will take care of all that. So as long as you can open the file and print the file, it should be fine. On our cutter, as long as the lines are very thin, it cuts how you would expect. If the lines are too thick, it starts to cut on both sides of the line.
Nice, looking at your blog, it looks like it did a better job at it than the laser cut version. Now I need something to build so I can try this... Thanks ;-)
This is seriously outdated but such an expensive solution for a hobby that it probably should be scrapped rather than modified.
Just tried this technique using a much less expensive "eCraft" hobby vinyl cutter. Results are absolutely worthless. Holes not rectangular, not cut through, chewed up vinyl material, etc, etc. Also tried using clear plastic sheets (e.g. old viewgraph material) - similar results. I guess it just needs a much better machine.
My existing technique has been to print the hole cutout pattern on clear plastic sheet (e.g. 3M CG3700) and drill holes of various sizes for the solder paste using a Dremel tool and tiny carbide bits (the kind used for drilling pcbs). This gives rather good results and is worth the time saving even for doing just one or two prototype boards (compared with dabbing solder paste using a syringe). The holes and paste are round, of course, not rectangular but the paste comes together when heated and fills in the SMD pads nicely.
Check this tutorial for making very good metal stencils at home: http://lowpowerlab.com/?p=483 How-to video here: http://www.youtube.com/watch?v=JWUJtmgh55M Another video in which one of these stencils is used: http://www.youtube.com/watch?v=YhavXauuWqY
The http://www.ponoko.com/make-and-sell/show-material/197-metal-aluminum#main-image link showed 40mil thick aluminum, which I think is probably too thick for fine pitch SMD. I've used http://www.4pcb.com/smtstencils/index.html multiple times and had good results. They even have a cool jig for double sided boards available. This would be more expensive than the vinyl cutter after about 10 stencils, but for a one off could be very economical.
I have access to the USCutter LaserpointII
It appears to have similar accuracy to the Graphtec. Any reason not to use it?
Go for it!
I plan to make
I want to learn resolution of sv8 unit. Is this unit cut 0.25mm X 0.25mm square's which has a 0.15mm clearance.
is vinyl cutters cut these quality ?
or can they cut mylar or kaptons ?
I have access to a epilog laser through my school. Is it possible that i would be able to use that to cut out stencils instead of the cutter you used?
Unless you have the Epilog Fibermark, it will not cut through any metal (even thin foils). The Fibermark apparently can cut some thin metals, but my guess is your school has a Legend series 120W or less just like mine does. If this is true you're out of luck.
It is possible, if you find the right material. Vinyl is not one of them.
Two things to add. Regular printing paper works fine for one time use instead of fancy plastic. For a hobbyist a Silhouette cutter is one third the price
Great discussion on possible options. You should investigate the availability of a Fab Lab http://fab.cba.mit.edu/about/labs/ in your community, they have both a vinyl cutter and a Epilog laser.
Buy some very thin copper sheets, toner transfer a mask on them and etch the windows out of it. Make your mask windows a little smaller to adjust for over-etch.
Laser cutters work great too!
Yeah they do, if you can afford one. :)
I've cut stencils by hand before, many times. And they've worked great. Even the Atmel 328P TQFP package was easy to do. On the other hand, I wouldn't try the MLF package. I may be crazy, but I'm not insane. :)
But for the cost of the cutter mentioned here, it's just not something I see a lot of home DIYers splurging on. Something like the Silhouette Cameo seems to be a better solution. Maybe I'll look into that.
Altium --> Eagle? Noooooooo!
$12,000 --> $1,640 Yeeeeesss!
SparkFun had to switch many years ago from Protel to Eagle for this reason. Don't get me wrong, Eagle has got it's problems but it works well enough for us to do what we do.
Since I was wanting to upgrade from copper-clad-meet-rotary-tool to digital board design, I downloaded and installed Eagle and tried working through the Eagle tutorial ... fascinating experience. End result: May I recommend Kicad? Way friendlier for the new user.
20 Hrs -> 6 Hrs. Geeeeee-haw!
If you don't have a cutting machine available, and say you want to send out to get a stencil made for this method, what kind of materials do you think would work well? I was just looking over here, http://www.ponoko.com/make-and-sell/show-material/386-cardstock-black, and was wondering if it would work.
I think the issue is how fine can they cut.
They do have a sample of it cut but a long cut like that is not the same as a super tiny SMD pad.
This looks much more promising.
http://www.ponoko.com/make-and-sell/show-material/197-metal-aluminum#main-image
OK I just tried this with some vinyl I have and no way is my $15k Roland fine enough for this purpose.
Those Atmel pads are what a 1/64 x 1/64 of an inch. =:-O
We getting new equipment but I'm not sure the Mimaki 51" cutter has a finer cut.
I'm out. :-)
I don't have access to this cutter, but I do have access to a CNC laser, but it isn't powerful enough to cut sheet metal. Any suggestion on media for a laser stencil?
I've done 0.5mm QFPs and 0603 level work with a 30W laser cutting 4mil PET film (McMaster #8567K42) it cuts easily is rather dimensionally stable, cleans well with isopropyl alcohol and is nice and cheap (that number is 40" x 120" for $18). Just experiment a bit when you get it to dial in the cutting speed and power. Too much power or too slow will melt it around the edges of the hole, too low a power will just etch it.
Why not use really thin sheet metal? How precise can it cut or is it more of just an engraver?
I know it may have a fine resolution but the metal itself may not hold the detail.
I think the vinyl would not take well to the heat and either burn or shrink.
I have been told by those that use it most often that it either isn't powerful enough to cut sheet metal, or the reflective surface can cause a problem. I doubt the reasoning, but I don't know the machine and they do.
We have an Epilog Helix 75W CO2 laser cutter here. Metal is too reflective and/or it doesn't have enough power to penetrate.
What does it cut then?
But anyway I would ask carefully. Now that I think about it people have asked to use these cutters in the cut vinyl side of things and someone posted that PVC based or some other material will kill your machine, something to do with the fumes that PVC gives off.
ETA: I found this. http://www.usplastic.com/knowledgebase/article.aspx?contentkey=948 some of the vinyls I have are PVC based.
I use this technique with an Epilog laser engraver. The film I use is:
http://www.dickblick.com/products/grafix-dura-lar-matte/
Works well enough for prototypes down to 0603.
I would like to explore mylar/Kapton, but I've not found a cheap source of small qty film to experiment with yet.
Thanks for the film. Once I start using more then a couple of SMD components in projects I'll ive it a try with my 40W laser cutter.
This was very helpful to me, I am creating my own PCB this month for a project, and this tutorial came just in time!
A few questions though, what kind of solder paste are you using? What kind do you recommend? Thanks!
I grabbed the stuff from our pick and place guys. It is Indium3.2- Water Wash, Pb-Free.
96.5% SN 3% AG .5% Cu