followr
Member Since: April 19, 2010
Country: New Zealand
Basic Character LCD Hookup Guide
May 28, 2019
Liquid crystal displays (LCDs) are a great way to output a string of words or sensor data to a display for visual feedback. In this tutorial, we'll learn about LCDs, how to print a string of words to a 16x2 basic character LCD and create custom characters.
Thumb Joystick Hookup Guide
February 20, 2019
Whether you're blasting aliens, driving a robot, or write your awesome classic Arcade Game for your Arduino, you'll find the analog thumb joystick a very useful addition to your projects!
LS20031 5Hz (66 Channel) GPS Receiver Hookup Guide
December 13, 2018
In this tutorial, we will solder headers to the surface mount pads of the LS20031 GPS receiver and read the output using an Arduino!
-

Thanks for your thoughts--a pleasant surprise to see on the home page. :)
Christchurch (where I live) is in a state of shock at the moment--unlike the quake six months ago this time there have been fatalities and that adds a whole new dimension to the effects.
I'm grateful that the area of the town I live in is relatively unaffected but there's others in the city without running water or electricity or with friends and relatives unaccounted for.
Wherever you are in the world take this as a reminder to have an emergency survival kit prepared for your home and family! -

The WiFly module does not currently support SPI in the module firmware.
-
For the full steps of how to use the IDE to perform this:
Download https://github.com/arduino/Arduino/raw/master/hardware/arduino/bootloaders/optiboot/optiboot_atmega328.hex
Replace the file in "/hardware/arduino/bootloaders/optiboot/optiboot_atmega328.hex" with the downloaded file. (The prefix depends on your operating system. e.g. on a Mac the prefix is "Arduino.app/Contents/Resources/Java/") (Make an optional backup first.)
Connect your programmer (or Arduino as programmer).
Select "Tools > Board > Arduino UNO".
Select "Tools > Burn Bootloader > w/ ...." and the appropriate programmer type.
Wait for bootloader to be uploaded.
You're done.
(This assumes that the new bootloader for the SMD is compatible with the non-SMD version also�if this isn't the case then you should definitely make a backup copy of the original file.)
I did this with a USBtinyISP programmer and it Worked For Me.
-

SEN-10183 was marked down because of the PCB error that required the blue wire correction.
If you take a look at the comments of SEN-10183 you'll see RobertC answer the question "Is the flawed version of the board marked down in price?" with "Yes. It will normally be $99.95.".
Hope this answers your question. -
Am I correct in thinking you want to be able to use telnet to connect to your WiFly module on port 80?
The WiFly library I linked to has an example named "WiFly_WebClient" which should work for that.
Oh, also, I have encountered an issue previously where you must specify the port to listen on before you join the network. So this:
set ip localport 80
must come before:
join ... -
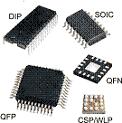
If you can read the identifying numbers there are a few sites you can use to identify them (sometimes a Google search is enough):<br />
<br />
http://octopart.com/<br />
<br />
http://www.kpsec.freeuk.com/components/cmos.htm<br />
<br />
http://chipdb.net/<br />
<br />
If they're from a digital logic class then they're probably 74-Series or similar logic gates. -
If you are having a problem getting your WiFly shield working you may want to install the WiFly library I have developed and try out the troubleshooting tool.<br />
<br />
Please read the following forum thread for more information: http://forum.sparkfun.com/viewtopic.php?f=32&t=25129 -
.jpg)
I just added a similar comment to the news post, but:<br />
<br />
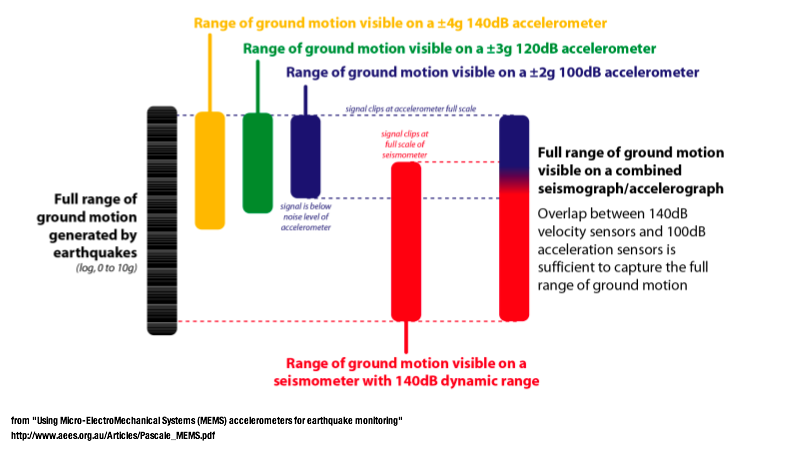
There's a really good diagram illustrating how seismographs compare to accelerometers that I didn't include in the tutorial.<br />
<br />
I've got a screenshot of it here: http://is.gd/ioiMj<br />
<br />
The diagram comes from a paper "Using Micro-ElectroMechanical Systems (MEMS) accelerometers for earthquake monitoring" available at http://www.aees.org.au/Articles/Pascale_MEMS.pdf -
I talk a bit about that in the tutorial but, in short, the current version doesn't include a RTC. In theory, it could use GPS or WiFly module for a clock signal.
-
There's a really good diagram illustrating this that I didn't include in the tutorial.<br />
<br />
I've got a screenshot of it here: http://static.sparkfun.com/images/newsimages/quake_logger/accelerometer_range_with_attrib.png<br />
<br />
It shows how seismographs compare to accelerometers.<br />
<br />
The diagram comes from a paper "Using Micro-ElectroMechanical Systems (MEMS) accelerometers for earthquake monitoring" available at http://www.aees.org.au/Articles/Pascale_MEMS.pdf<br />


