Adding More SERCOM Ports for SAMD Boards
 M-Short
Adding an I2C
1.) Figure Out Which Pins to Use.
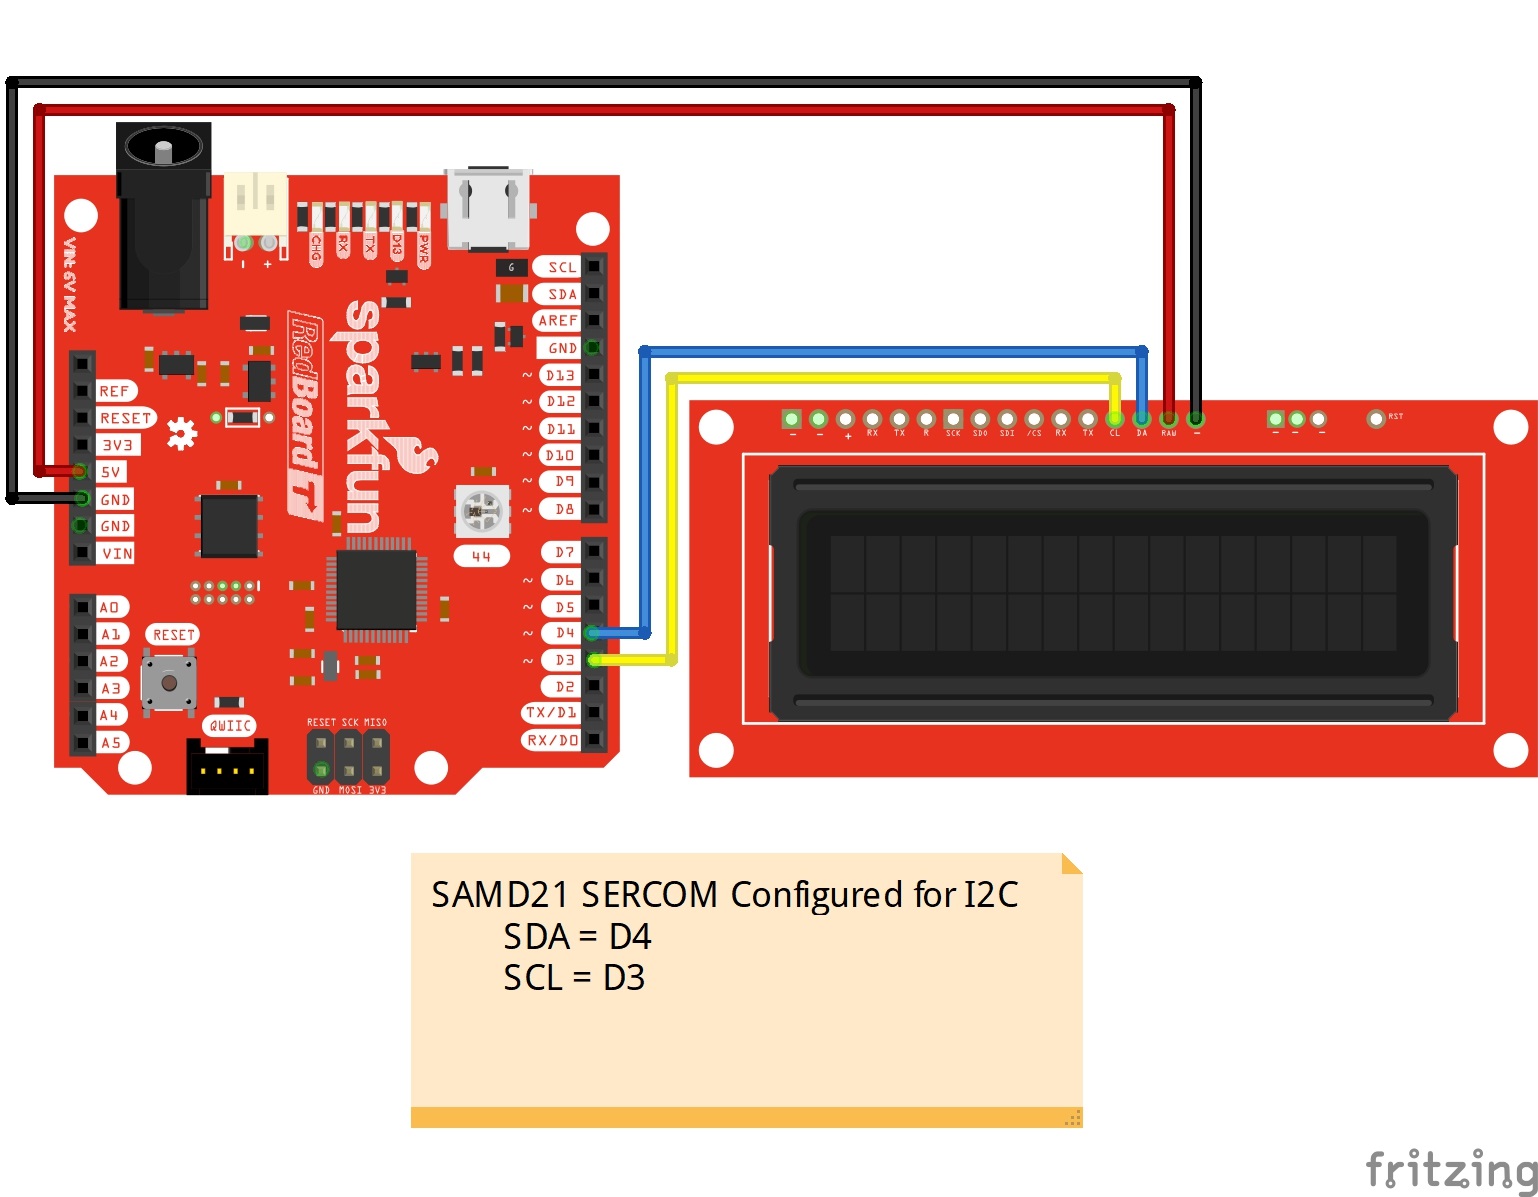
Picking pins for I2C is a bit easier. SDA is always on Pad 0. SCL is always on Pad 1. That's it. In this case, when we look at our chart, we can immediately rule out MISO and D38 as those pins are used or not broken out. That means that D4 will be SDA and D3 will be SCL.
2.) Add Your Code.
Next, let's figure out what code we need. Let's take a look at the Wire.cpp file in Arduino’s SAMD21 core files. All the way near the bottom on line 285, you'll see the following line. This is what we are trying to duplicate in our code. The variant.h file defines all those macros, but their names give us a good idea of what should go there.
language:c
TwoWire Wire(&PERIPH_WIRE, PIN_WIRE_SDA, PIN_WIRE_SCL);
Let's start with the definition. Let's pick a name. "myWire" sounds good. We also know we are going to use SERCOM 2, that we are going to use D4 for SDA and D3 for SCL. So, we'll add the following to our code.
language:c
TwoWire myWire(&sercom2, 4, 3);
3.) Update the Pin Definitions Based on the Pin Mux.
Next, we need to set up the mux. Right now the pins are defined as general I/O pins. We want them to act as SERCOM pins. The first thing we need to do is to add the pin peripheral library. Then we use the pinPeripheral command to set up the pin definition.
language:c
#include "wiring_private.h" // pinPeripheral() function

myWire.begin();
pinPeripheral (4,PIO_SERCOM_ALT);
pinPeripheral (3,PIO_SERCOM_ALT);
You'll notice that the code uses the argument PIO_SERCOM_ALT. If you look on the datasheet, you'll notice that pins can have a SERCOM port listed under SERCOM or SERCOM-ALT. In this case, both pins are under the SERCOM_ALT column, but if you are using a pin under the SERCOM column, use the argument "PIO_SEROM".
4.) Putting It All Together.
Step 4 is running the code, testing, and troubleshooting. For this example, we are going to grab a Serial LCD screen and connect it to our new I2C port. Make sure that you have soldered headers to the LCD if you have not already.
The next step is to test out the I2C port with the code listed below. The code is pretty bare bones and shows you where all your new code should go. Copy and paste the code in your Arduino IDE. Select your board, COM port, and hit upload.
language:c
/*********************************************************************
   Sample code for setting up additional Serial ports on a SamD21 board
   In this example the Redboard Turbo is used with the 16x2 SerLCD display
   For more information on the SerLCD code check out the github repo
   https://github.com/sparkfun/OpenLCD
   https://www.sparkfun.com/products/14812
   https://www.sparkfun.com/products/14072
   By: Michelle Shorter - SparkFun Electronics
   License: This code is public domain but you buy me a burger
   if you use this and we meet someday (Beefware license).
**********************************************************************/
#include <Wire.h>
#include "wiring_private.h" // pinPeripheral() function

//D4 SDA, D3 SCL
TwoWire myWire(&sercom2, 4, 3);

#define DISPLAY_ADDRESS1 0x72 //This is the default address of the OpenLCD

int i = 0;
void setup() {
  // put your setup code here, to run once:

  //Get all pins and I2C ports setup

  myWire.begin();
  pinPeripheral(3, PIO_SERCOM_ALT);
  pinPeripheral(4, PIO_SERCOM_ALT);

  //Reset the screen, set backlight, etc.
  myWire.beginTransmission(DISPLAY_ADDRESS1);
  myWire.write('|');//Setting character
  myWire.write('-');//Clear display
  myWire.write('|');//Put LCD into setting mode
  myWire.write(158 + 0); //Set green backlight amount to 0%
  myWire.write('|');//Put LCD into setting mode
  myWire.write(188 + 15); //Set blue backlight amount to 0%
  myWire.write('|');//Put LCD into setting mode
  myWire.write(128 + 0); //Set white/red backlight amount to (15=51% 100%=+29)
  //Send Welcome Text
  myWire.print("Welcome ");
  myWire.endTransmission();
  delay(3000);
}

void loop() {
  // put your main code here, to run repeatedly:

  //Clear the screen, then send the Counting string
  myWire.beginTransmission(DISPLAY_ADDRESS1);
  myWire.write('|');//Setting character
  myWire.write('-');//Clear display
  myWire.print("Counting: ");
  myWire.print(i);
  myWire.endTransmission();
  i++;
  delay(1000);

}