Arduino Shields v2
 jimblom,
  El Duderino
A Plethora of Shields
The list below describes some of the R3 form factor shields SparkFun carries separated into some loose categories based on their unique functionality. This is not an exhaustive list of all Arduino shields but it will cover most of what SparkFun has to offer. If you want to browse all the shields SparkFun carries, check out the Arduino Shields Category.
Prototyping & More
Prototyping shields usually do not augment the functionality of the Arduino like other shields but they help in other ways. Prototyping shields do things like breaking out various pins to screw terminals or create a space to build and test a circuit on the shield.
- ProtoShield Kit - The self-titled star of this category. The ProtoShield includes a large prototyping area in the center. Half of this area has solder jumper pads on the bottom you can close to make it function more like a breadboard while the other half functions as a standard prototyping/perfboard area. There is quite a lot going on in this shield so for a full rundown on everything included in the ProtoShield Kit and how to use it, check out the ProtoShield Hookup Guide!
 |
 |
- ProtoScrew Shield - Like the ProtoShield, but each pin is also broken out to a screw terminal. Handy for connecting to external motors, heavy-duty sensors or creating a strong connection to each pin that is not as permanent as a solder connection.
- Qwiic Shield - The perfect way to integrate your Arduino with SparkFun's Qwiic System! This shield has four Qwiic connectors on it along with a level-shifting circuit to easily connect to and communicate with Qwiic I2C breakouts. The shield also has a large prototyping area that includes a few neat features to help with prototyping. Take a look at the Qwiic Shield Hookup Guide to get started with this shield and the Qwiic system.
- Joystick Shield Kit - This makes your Arduino a bare-bones controller. With a joystick and four buttons added to it, this shield works great for a simple robot controller.
- microSD Shield - A lot of Arduinos have limited storage space, but this easy-to-use shield (along with the SD library) allows for plenty of extra storage for things like data logging.
- Mux Shield II - This shield from Mayhew Labs is a great way to add up to 48 analog and digital inputs or digital outputs to an Arduino using the R3 layout. Mayhew Labs also has an Arduino Library with built-in examples to help you get started. That, along with information on how to use the Mux Shield II can be found in their user guide.
IoT and Wireless Technology Shields
These shields add different types of wireless technologies to your Arduino. They range from connecting to the Internet for your next IoT Arduino project to receiving and logging the GPS coordinates of your Arduino-based robot and much more!
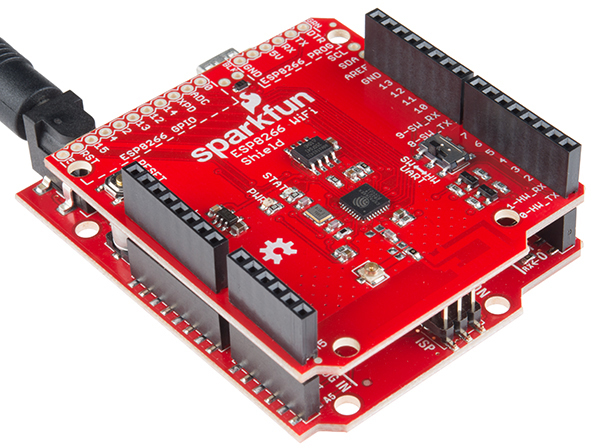
- WiFi Shield (ESP8266) - This shield uses Espressif's ESP8266 SoC to add WiFi connectivity to an Arduino using the R3 layout. The shield comes with pre-flashed AT-command firmware so it works as a serially-controlled WiFi gateway out of the box but it also breaks out the I/O pins of the ESP8266 so you can access those as well and even re-program the ESP8266 with your own custom firmware. To get started with the WiFi Shield (ESP8266) take a look through our Hookup Guide.
- Arduino Ethernet Shield 2 - Looking to access the Internet but would prefer a hard-wired option? The Ethernet Shield is for you! Getting started with the Ethernet Shield 2 is easy using the Arduino Ethernet Library. The shield also includes an on-board microSD slot to store larger files to send over your network.
- LTE CAT M1/NB-IoT Shield (SARA-R4) - This shield adds wireless, high-bandwidth cellular functionality to your IoT project. We've written an Arduino Library with some examples to get you started sending SMS messages or communicating with servers over a TCP/IP connection. All you need to get started is a compatible SIM card or you can get the version of this shield that includes a Hologram SIM card here. Check out the Hookup Guide for detailed information on how to get started with this shield.
- XBee Shield - XBee's are great RF modules that work on multiple wireless protocols (802.15.4, Digi's Zigbee specification and BLE). Simply pair an XBee radio on the shield with another XBee and you're well on your way to creating a robot controlled by gestures!
- GPS Logger Shield - With this shield you can log the position, speed and altitude of your Arduino using the on-board GP3906-TLP GPS Module. Take a look at the Hookup Guide to start logging.
Music and Sound
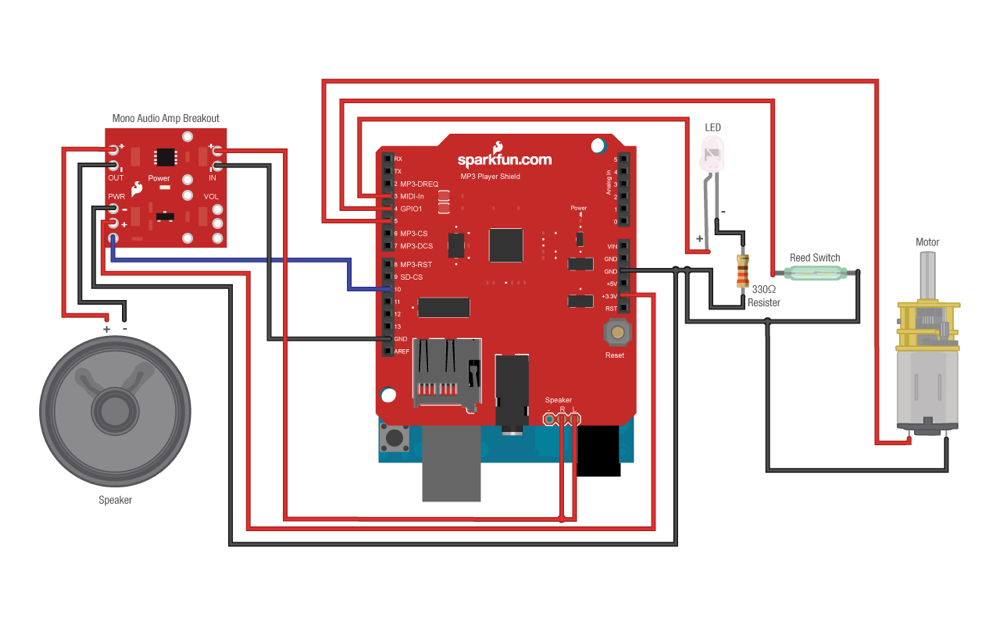
- MP3 Player Shield - Turn your Arduino into an MP3 player. Just plug in a µSD card with some MP3 files on it, add some speakers, upload the example code, and you can make your very own MP3 Playing Music Box!
- MIDI Shield - Assemble this shield to give your Arduino access to the MIDI communication protocol. Along with MIDI-In and OUT ports, the shield also includes two potentiometers to control things like pitch, volume or tone. For assembly instructions and examples using the MIDI Shield, check out the Hookup Guide!
- Spectrum Shield - This takes an stereo audio input to the shield and splits it into 7-bands per channel and reads the amplitude of each channel using the ADC on your Arduino. Use that data to control anything from LEDs, motors or even fire!
- EasyVR 3 Plus Shield - This shield adds voice recognition technology to your Arduino using the EasyVR module so you can create your own voice controlled project. You can download the Arduino Library as well as learn how to get started with the EasyVR 3 in the User Guide.
Motor Drivers
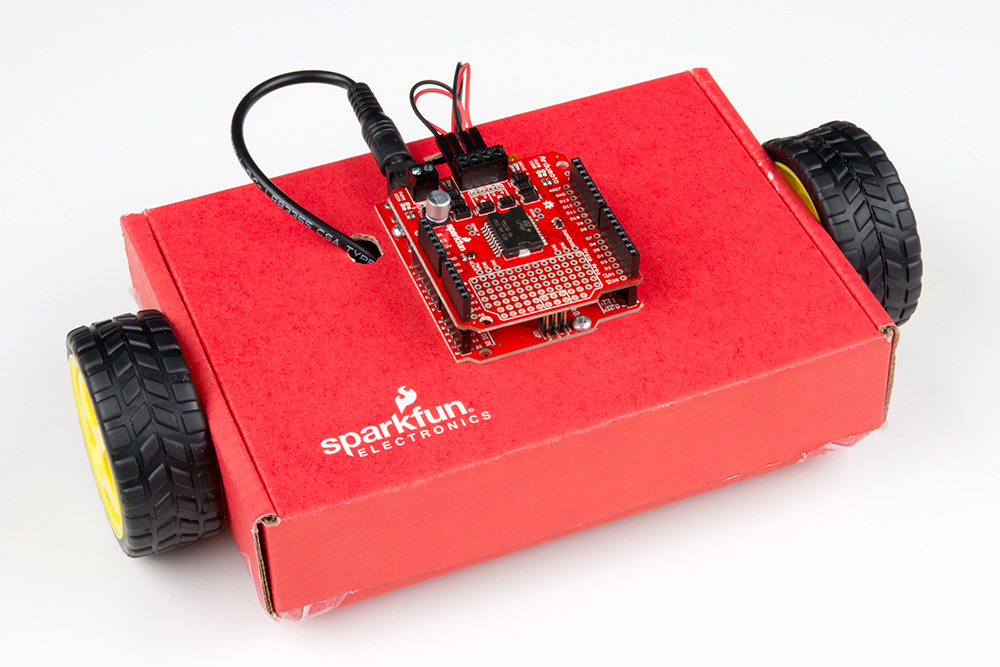
- Ardumoto Shield Kit - With this kit you can use the Ardumoto shield to create a basic robot with the included DC motors.
- Monster Moto Shield - If you need to drive beefier motors than the Ardumoto Shield can handle, this is the next step up.
- Wireless Motor Driver Shield - Looking for something more versatile than the two shields above? The Wireless Motor Driver Shield can control two DC motors and also breaks out pins to power and control several servos and even has an XBee socket to easily add wireless control to your motor project! This shield has a lot going on so take a look through the Hookup Guide to get started.
Miscellaneous Shields
These shields do not really fit into any of the above categories but we'd still like to highlight them in this list as they add some neat, unique functionality to your Arduino.
- CAN-Bus Shield - This allows your Arduino to talk to your car or other CAN application. It also has a µSD slot to log data and has connectors for a GPS connection and LCD to log and report data. Check out the Hookup Guide for more info and example code to get started.
- Vernier Interface Shield - This shield has four British Telecom connectors (2 Analog and 2 Digital) to interface with all sorts of Vernier sensors.
- Simultaneous RFID Reader - Add some item tracking to your Arduino using Radio Frequency Identification (RFID). The M6E Nano module on this board reads and writes to EPCglobal Gen 2 UHF RFID tags and can read multiple tags at the same time. Our RFID Arduino Library has a bunch of examples to get your next RFID project started.
- Weather Shield - Want to create your own weather station? The Weather Shield is a great place to start. The shield has sensors to monitor temperature, humidity, barometric pressure and luminosity as well as ports to connect a GPS module along with weather meters to monitor wind speed, direction and rainfall!
- EL Escudo Dos - Electroluminescent wire is awesome! Use this shield to add up to eight strands of EL wire to your project. Check out these EL Wire Tutorials for some inspiration for your own EL project.
- Cthulhu Shield - One of the most unique and nifty shields SparkFun carries. The Cthulhu Shield can output to and take input from an electrode array placed on your tongue! For some neat experiment ideas pairing this shield with some sensors, take a look at this blog post and get started with some sensory substitution and augmentation.