AST-CAN485 Hookup Guide
Software Installation
Note: You will need to upgrade if you are using a version older than 1.6.3. This example assumes you are using the latest version of the Arduino IDE on your desktop. If this is your first time using Arduino, please review our tutorial on installing the Arduino IDE.
The next step is to install the CAN485 board into the Arduino IDE. There are two methods of installation. The first is by using the Arduino Boards Manager, this is the preferred method. The second method is to manually copy files from the GitHub repository.
Board Installation Using the Boards Manager
Using the Arduino IDE's boards manager is the preferred installation method.
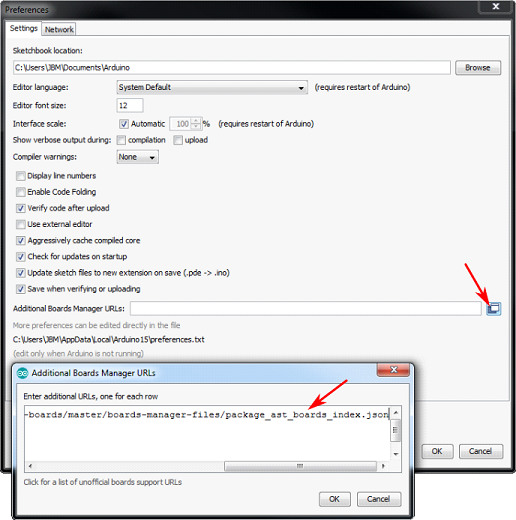
Open the preferences window (File > Preferences) in the Arduino IDE. Copy the following URL and add it to the list of boards manager URLs:
https://raw.githubusercontent.com/Atlantis-Specialist-Technologies/Arduino-Boards-Packages/master/package_ast_boards_index.json
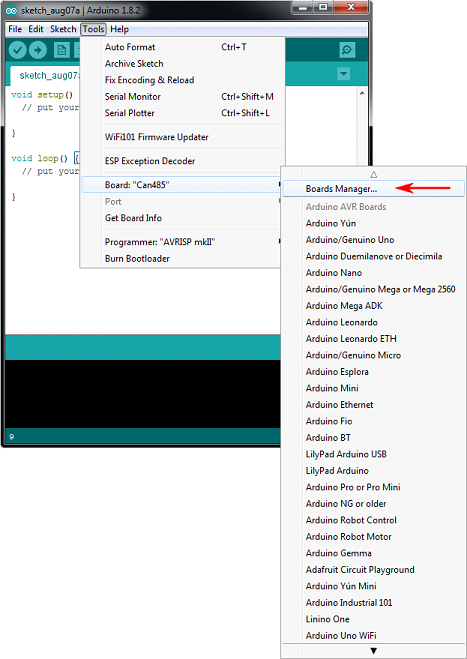
Open the boards manager (Tools > Board > Boards Manager...):
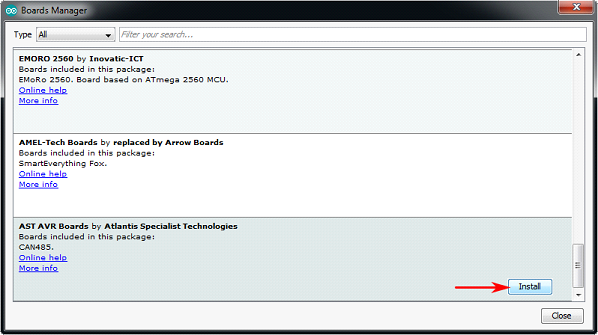
Scroll to AST AVR Boards and click on the Install button:
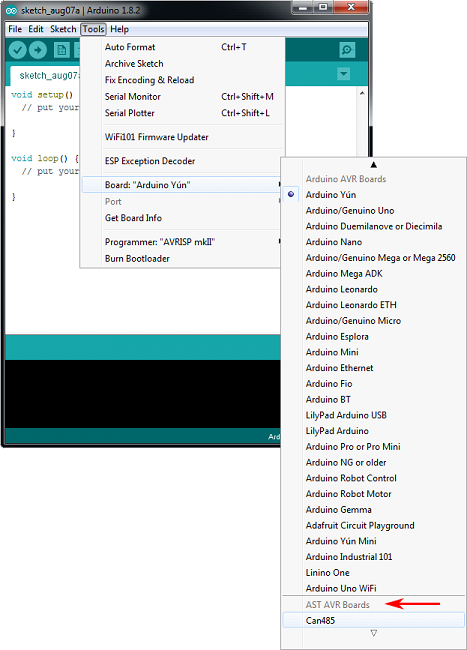
The AST AVR boards will now be available under the boards menu. Select the Can485 when uploading to the development board.
Manual Board Installation
To manually install the AST AVR Board add-on:
- Download the CAN485 repository from GitHub.
- Unzip the folder.
- Copy the ast folder to **…\MyDocuments\Arduino\hardware** .
- The directory structure should be: …\MyDocuments\Arduino\hardware\ast .
Manual Library Installation
Note: If you have not previously installed an Arduino library, please check out our installation guide.
To manually install the CAN library:
- Download the AST_CAN_Arduino_Library repository from GitHub.
- Unzip the AST_CAN_Arduino_Library-master.zip folder.
- Click on the ...\AST_CAN_Arduino_Library-master folder.
- Move the AST_CAN_Arduino_Library-master folder into the Arduino libraries folder: **...\MyDocuments\Arduino\libraries** .
- (Create the libraries folder if it does not exist)
- The final directory structure should be: ...\MyDocuments\Arduino\libraries\AST_CAN_Arduino_Library-master .
To manually install the RS485 library:
- Download the AST_RS485_Arduino_Library repository from GitHub.
- Unzip the AST_RS485_Arduino_Library-master.zip folder.
- Click on the ...\AST_RS485_Arduino_Library-master folder.
- Move the AST_RS485_Arduino_Library folder into the Arduino libraries folder: **...\MyDocuments\Arduino\libraries**
- (Create the libraries folder if it does not exist)
- The final directory structure should be: ...\MyDocuments\Arduino\libraries\AST_RS485_Arduino_Library-master .
To manually install the AST AltSoftSerial library:
- Download the RS485 library repository from GitHub.
- Unzip the AltSoftSerial-master.zip folder.
- Click on the ...\AltSoftSerial-master folder.
- Unzip into the Arduino libraries folder: **...\MyDocuments\Arduino\libraries**
- (Create the libraries folder if it does not exist)
- The final directory structure should be: ...\MyDocuments\Arduino\libraries\AltSoftSerial-master .
Multiple libraries were found for "AltSoftSerial.h"

   Used: ...\Documents\Arduino\libraries\AltSoftSerial

   Not used: ...\Documents\Arduino\libraries\AST_AltSoftSerial_Arduino_Library

exit status 1

Error compiling for board Can485.
One quick fix is to move the PaulStoffregen's "AltSoftSerial" out of the Arduino libraries folder and only use AST's "AltSoftSerial" library when compiling code for the AST-CAN485. This will avoid conflicts with multiple libraries using the same name.
Uploading Code
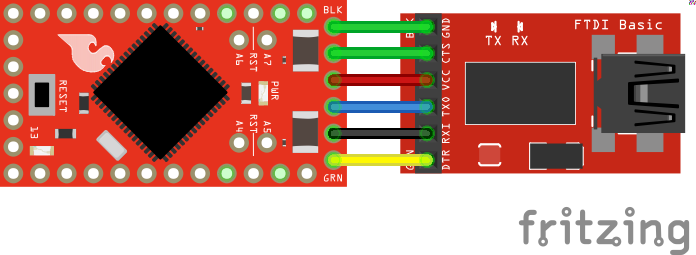
Connect the FTDI programming cable to the FTDI header as shown:
Open the Arduino IDE and select the CAN485 board in the tools menu. Ensure that the correct COM port is being used. Upload the Blink example (Examples>01.Basics>Blink). You should see the built-in LED connected to pin 13 flash.