BC118 BLE Mate 2 Hookup Guide
Contributors:
 SFUptownMaker
SFUptownMaker 
Arduino Library Example
If you haven't done so yet, download the .zip file of the BLE Mate 2 GitHub repository and install the Arduino library from the "Arduino/libraries" sub directory.
The Example
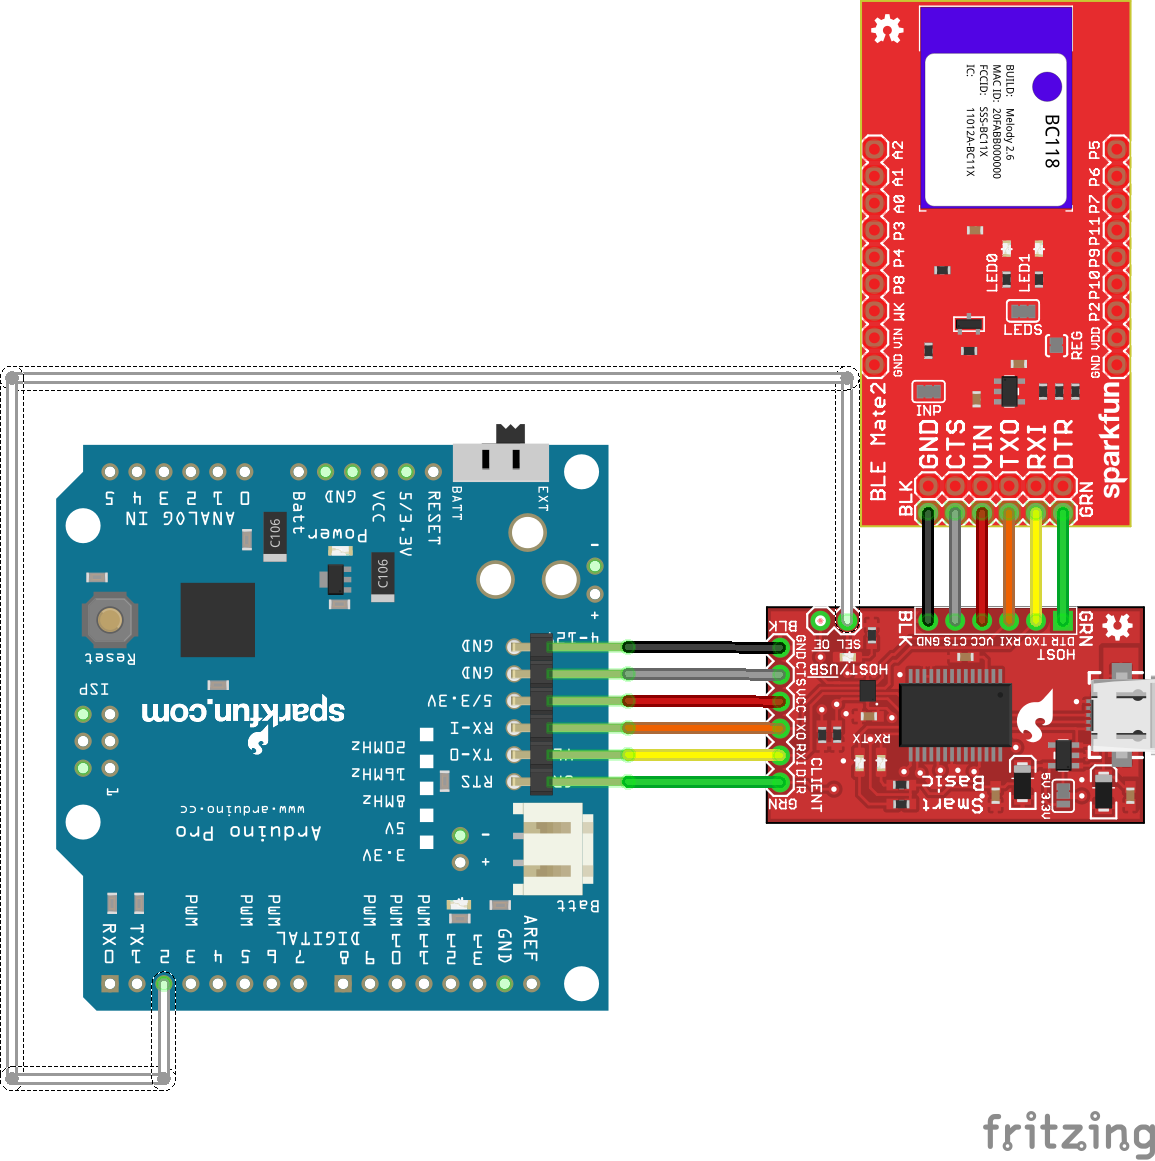
There's an example in the repository that can be accessed through the "Examples" menu in Arduino. It'll show you how to use all the various functions in the library to connect two BLE Mate 2 boards. First, connect your hardware like so...
I've reproduced the code in its entirety below.
language:c
/****************************************************************
Code to demonstrate the use of the BC118 BLE module on the
BLE Mate 2 board by SparkFun electronics.


15 Nov 2014 - Mike Hord, SparkFun Electronics

Code developed in Arduino 1.0.6, on an Arduino Pro 5V, using a
SparkFun SmartBasic board to multiplex uploading and serial
output.
****************************************************************/

#include <SparkFun_BLEMate2.h>

// You can also create a SoftwareSerial port object and pass that to the
//  BLEMate2 constructor; I don't recommend that because it's very possible
//  for the amount of traffic coming from the BC118 to overwhelm the fairly
//  shallow buffer of the SoftwareSerial object.
BLEMate2 BTModu(&Serial);

// This boolean determines whether we're going to do a central or peripheral
//  example with this code.

boolean central = true;

void setup()
{
  pinMode(2, OUTPUT);    // Control for the SmartBasic. If you look at the
                         //  bottom of the sketch, you'll see that I've added
                         //  functions called "selectBLE()" and "selectPC()"
                         //  to make it a little more obvious when I switch
                         //  between serial devices.
  Serial.begin(9600);    // This is the BC118 default baud rate.
  selectBLE();           // Route serial data to the BC118.

  // Regarding function return values: most functions that interact with the
  //  BC118 will return BLEMate2::opResult values. The possible values here
  //  are:
  //  REMOTE_ERROR - No remote devices exist.
  //  INVALID_PARAM - You've called the function with an invalid parameter.
  //  TIMEOUT_ERROR - The BC118 failed to respond to the command in a timely
  //                   manner; timely is redefined for each command.
  //  MODULE_ERROR - The BC118 didn't like the command string it received.
  //                  This will probably only occur when you attempt to send
  //                  commands and parameters outside the built-ins.
  //  SUCCESS - What it says.

  // Reset is a blocking function which gives the BC118 a few seconds to reset.
  //  After a reset, the module will return to whatever settings are in
  //  non-volatile memory. One other *super* important thing it does is issue
  //  the "SCN OFF" command after the reset is completed. Why is this important?
  //  Because if the device is in central mode, it *will* be scanning on reset.
  //  No way to change that. The text traffic generated by the scanning will
  //  interfere with the firmware on the Arduino properly identifying response
  //  strings from the BC118.
  if (BTModu.reset() != BLEMate2::SUCCESS)
  {
    selectPC();
    Serial.println("Module reset error!");
    while (1);
  }

  // restore() resets the module to factory defaults; you'll need to perform
  //  a writeConfig() and reset() to make those settings take effect. We don't
  //  do that automatically because there may be things the user wants to
  //  change before committing the settings to non-volatile memory and
  //  resetting.
  if (BTModu.restore() != BLEMate2::SUCCESS)
  {
    selectPC();
    Serial.println("Module restore error!");
    while (1);
  }
  // writeConfig() stores the current settings in non-volatile memory, so they
  //  will be in place on the next reboot of the module. Note that some, but
  //  not all, settings changes require a reboot. It's probably in general best
  //  to write/reset when changing anything.
  if (BTModu.writeConfig() != BLEMate2::SUCCESS)
  {
    selectPC();
    Serial.println("Module write config error!");
    while (1);
  }
  // One more reset, to make the changes take effect.
  if (BTModu.reset() != BLEMate2::SUCCESS)
  {
    selectPC();
    Serial.println("Second module reset error!");
    while (1);
  }
  selectBLE();

  // NB!!!!!!!!!!!!! This write/reset thing is *really* important.
  //  The status command (STS) and the LEDs *will* lie to you and tell you that
  //  you are e.g. advertising or in central mode when in fact that is not the
  //  case and the module still needs to be reset before that is actually true.

  // Okay, now we're unquestionably set to default settings. That means we're
  //  set up as a peripheral device, advertising forever. You should be seeing
  //  a blinking red LED on the BLE Mate.

  // At this point the example branches. Down one branch, we'll explore what it
  //  means to go into central mode, find and connect to a BC118, send some
  //  data, and disconnect. Down the other, we'll sit around waiting for
  //  something (either another BC118 or a phone or something) to connect and
  //  send us some data.

  if (central)
  {
    setupCentralExample();
  }
  else
  {
    setupPeripheralExample();
  }
}

void loop()
{
  // Since I'm going to be reporting strings back over serial to the PC, I want
  //  to make sure that I'm (probably) not going to be looking away from the BLE
  //  device during a data receive period. I'll *guess* that, if more than 1000
  //  milliseconds has elapsed since my last receive, that I'm in a quiet zone
  //  and I can switch over to the PC to report what I've heard.
  static String fullBuffer = "";
  static long lastRXTime = millis();
  if (lastRXTime + 1000 < millis())
  {
    if (fullBuffer != "")
    {
      selectPC();
      Serial.println(fullBuffer);
      selectBLE();
      fullBuffer = "";
    }
  }
  static String inputBuffer;
  if (central)
  {
    doCentralExample(); // We're going to go to this function and never come
                        //  back, since we want to do the central connection
                        //  demo just once.
  }
  else
  {
    // This is the peripheral example code.

    // When a remote module connects to us, we'll start to see a bunch of stuff.
    //  Most of that is just overhead; we don't really care about it. All we
    //  *really* care about is data, and data looks like this:
    // RCV=20 char max msg\n\r

    // The state machine for capturing that can be pretty easy: when we've read
    //  in \n\r, check to see if the string began with "RCV=". If yes, do
    //  something. If no, discard it.
    while (Serial.available() > 0)
    {
      inputBuffer.concat((char)Serial.read());
      lastRXTime = millis();
    }

    // We'll probably see a lot of lines that end with \n\r- that's the default
    //  line ending for all the connect info messages, for instance. We can
    //  ignore all of them that don't start with "RCV=". Remember to clear your
    //  String object after you find \n\r!!!
    if (inputBuffer.endsWith("\n\r"))
    {
      if (inputBuffer.startsWith("RCV="))
      {
        inputBuffer.trim(); // Remove \n\r from end.
        inputBuffer.remove(0,4); // Remove RCV= from front.
        fullBuffer += inputBuffer;
        inputBuffer = "";
      }
      else
      {
        inputBuffer = "";
      }
    }
  }
}

void setupCentralExample()
{
  // We need to change some settings, first, to make this central mode thing
  //  work like we want.

  // When ACON is ON, the BC118 will connect to the first BC118 it discovers,
  //  whether you want it to or not. We'll disable that.
  BTModu.stdSetParam("ACON", "OFF");
  // When CCON is ON, the BC118 will immediately start doing something after
  //  it disconnects. In central mode, it immediately starts scanning, and
  //  in peripheral mode, it immediately starts advertising. We don't want it
  //  to scan without our permission, so let's disable that.
  BTModu.stdSetParam("CCON", "OFF");
  // Turn off advertising. You actually need to do this, or the presence of
  //  the advertising flag can confuse the firmware when the module is in
  //  central mode.
  BTModu.BLENoAdvertise();
  // Put the module in central mode.
  BTModu.BLECentral();
  // Store these changes.
  BTModu.writeConfig();
  // Reset the module. Write-reset is important here!!!!!!
  BTModu.reset();

  // The module is now configured to connect to another external device.
}

void doCentralExample()
{
  // We're going to tstart with an assumption of module error. That way, we
  //  can easily check against the result while we're iterating.
  BLEMate2::opResult result = BLEMate2::MODULE_ERROR;
  // This while loop will continue to scan the world for addresses until it
  //  finds some. Why? Why not?
  while(1)
  {
    selectBLE();
    result = BTModu.BLEScan(2);
    if (result == BLEMate2::SUCCESS)
    {
      selectPC();
      Serial.println("Success!");
      break;
    }
    else if (result == BLEMate2::REMOTE_ERROR)
    {
      selectPC();
      Serial.println("Remote error!");
    }
    else if (result == BLEMate2::MODULE_ERROR)
    {
      selectPC();
      Serial.println("Module error! Everybody panic!");
    }
  }

  byte numAddressesFound = BTModu.numAddresses();

  // BC118Address is where we'll store the index of the first BC118 device we
  //  find. We'll know it because the address will start with "20FABB". By
  //  starting at 10, we know when we've found something b/c it'll be 4 or less.
  byte BC118Address = 0;
  String address;

  selectPC();
  Serial.print("We found ");
  Serial.print(numAddressesFound);
  Serial.println(" BLE devices!");
  // We're going to iterate over numAddressesFound, print each address, and
  //  check to see if each one belongs to a BC118. The first BC118 we find,
  //  we'll connect to, but only after we report our address list.
  for (byte i = 0; i < numAddressesFound; i++)
  {
    BTModu.getAddress(i, address);
    Serial.println("Found address: " + address);
    if (address.startsWith("20FABB"))
    {
      BC118Address = i;
    }
  }
  selectBLE();
  BTModu.connect(address);
  BTModu.sendData("Hello world! I can see my house from here! Whee!");
  BTModu.disconnect();
  delay(500);
  selectPC();
  Serial.println("The End!");
  while(1);
}

// The default settings are good enough for the peripheral example; just to
//  be on the safe side, we'll check the amICentral() function and do a r/w/r
//  if we're in central mode instead of peripheral mode.
void setupPeripheralExample()
{
  boolean inCentralMode = false;
  // A word here on amCentral: amCentral's parameter is passed by reference, so
  //  the answer to the question "am I in central mode" is handed back as the
  //  value in the boolean passed to it when it is called. The reason for this
  //  is the allow the user to check the return value and determine if a module
  //  error occurred: should I trust the answer or is there something larger
  //  wrong than merely being in the wrong mode?
  BTModu.amCentral(inCentralMode);
  if (inCentralMode)
  {
    BTModu.BLEPeripheral();
    BTModu.BLEAdvertise();
  }

  // There are a few more advance settings we'll probably, but not definitely,
  //  want to tweak before we reset the device.

  // The CCON parameter will enable advertising immediately after a disconnect.
  BTModu.stdSetParam("CCON", "ON");
  // The ADVP parameter controls the advertising rate. Can be FAST or SLOW.
  BTModu.stdSetParam("ADVP", "FAST");
  // The ADVT parameter controls the timeout before advertising stops. Can be
  //  0 (for never) to 4260 (71min); integer value, in seconds.
  BTModu.stdSetParam("ADVT", "0");
  // The ADDR parameter controls the devices we'll allow to connect to us.
  //  All zeroes is "anyone".
  BTModu.stdSetParam("ADDR", "000000000000");

  BTModu.writeConfig();
  BTModu.reset();

  // We're set up to allow anything to connect to us now.
}

// Below this point are support functions for the SmartBasic. If you're not
//  using the SmartBasic, you can leave this part off.
void selectPC()
{
  Serial.flush();
  digitalWrite(2, LOW);
}

void selectBLE()
{
  Serial.flush();
  digitalWrite(2,HIGH);
}
TL;DR Summary of Use
- Make liberal use of the write() and reset() functions when changing settings.
- Software serial is likely to be overwhelmed by the data from the BC118, so don't expect good results from it.
- Don't forget that Serial writes/prints are non-blocking. The library functions are all blocking with timeouts, but if you multiplex the serial port you'll need to add
Serial.flush()after non-library uses of the serial port to avoid writing non-command strings to the BC118. - The BC118 must be in scan mode to connect to a peripheral!