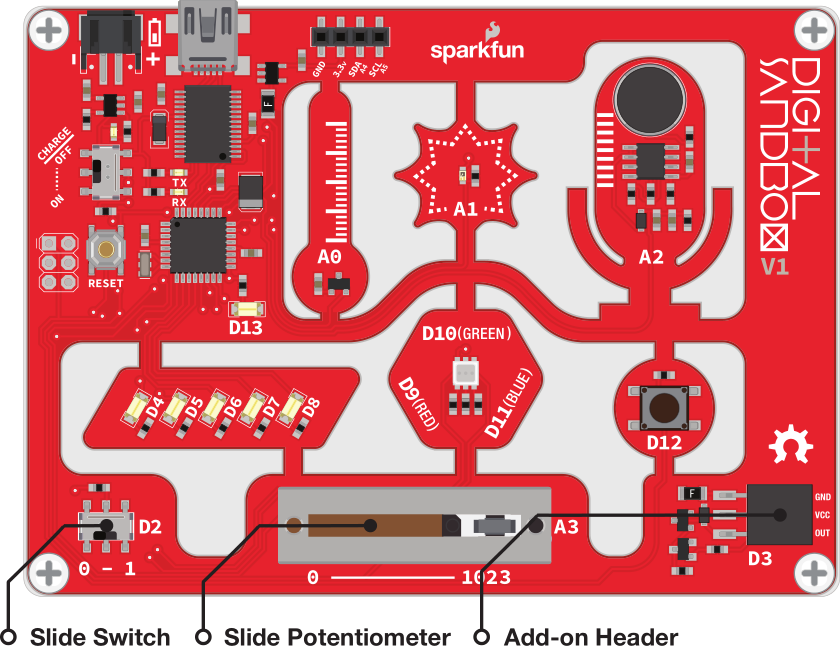
Digital Sandbox Arduino Companion
 jimblom
16. Servo Sweeper (Addon)
DC motors are great for spinning an object at high speed with no regard for where it starts or stops. For many applications, though, it's important to precisely control the position of a motor. Wing flaps in a plane, steering mechanisms in RC cars, and robotic arm platforms are applications that benefit from motorized position control. For those applications we ditch the DC motor and whip out the servo!
Note: This experiment requires the Digital Sandbox Add-On Kit, purchased separately.
Background Information
A servo motor is like a DC motor with an internal controller and built-in sensors that help keep track of its shaft position. A servo motor knows, for example, if it's pointing at 15° or 115°.
Servos all have three wires that need connecting to: supply voltage, ground, and a signal. The voltage and ground connections supply the motor with power, and the control signal - a PWM output (surprise, surprise) - sets the position of the motor. Once the motor reaches the desired position, it stops until it is commanded to move to a new position.
Servo motors vary in their range of motion - the minimum and maximum angles they can point to. Only specialized, continuous rotation servos can rotate a full 360°; most have a stated range of motion between 90° and 180°. The servo we'll be using in this experiment has a 180° range of motion.
Active Parts
Code Components
In the final experiment, we're introducing you to one of the most powerful aspects of Arduino: importing libraries. Libraries are code written by Arduino or members of the Arduino community which go beyond the basic Arduino core to add unique features.
Using the Servo Library
In this case, we'll be using the Servo library, which includes all sorts of functions and data types to make controlling servo motors super-easy. To be able to use the Servo library, you first need to include it. That can be acheived with this statement, which should go at the very top of your code:
language:c
#include <Servo.h>  // Include the servo library.
Once you've included the library, the next step is to create a Servo variable -- an object you'll refer to throughout your sketch to control the servo. Here's how we create a Servo object named myServo:
language:c
Servo myServo;  // Create a servo object, which we'll use from here on out.
You'll usually want this line to go above the setup() function as well -- making it a global object. That way we can use it in both the setup() and loop() functions.
So far, so good. As with most everything, we need to initialize the servo. In this case, we need to attach a pin to it. Here's how we attach a servo to pin 3:
language:c
myServo.attach(3); // Attach myServo to pin 3
Notice how we're using the myServo object declared earlier. This line of code will usually go in the setup() function. Run it once, then it's attached for the rest of the program.
Finally, to set your servo to a specific position, you use the write() function. For example, to set your servo to a 55° angle, here's the code you'll need:
language:c
myServo.write(55);  // Set the servo to 55 degrees.
After executing that line, your Servo should immediately start spinning till it finds its position.
Sketch and Experiment
Here we go one more time! Upload the Sandbox_16_ServoSweeper.ino sketch and away you go.
language:c
    // Sandbox 16: Servo Sweeper

/* DC motors are great for spinning an object at high speed with no regard for
   where it starts or stops. For many applications, though, it’s important to
   precisely control the position of a motor. Wing flaps in a plane, steering
   mechanisms in RC cars, and robotic arm platforms are applications that
   benefit from motorized position control. For those applications we ditch the
   DC motor and whip out the servo!

   This is the first experiment where you'll import an external library. In this
   case we'll be using the Servo library. Follow the comments as we show how the
   library is included and then used.
*/

// Servos are controlled using the Servo LIBRARY. To include a library, use the
// #include "library" statement.
#include <Servo.h>  // Include the servo library

// To use the servo library, we need to create an instance of the Servo class.
// This is like creating a variable of type "Servo". We can call our servo
// anything -- in this case we'll call it "myServo"
Servo myServo;  // Create an instance of the servo library

// Create variables for our input and ouput components:
const int switchPin = 2;    // Switch is connected to pin 2
const int slidePin = A3;    // Slide pot is connected to A3
const int servoPin = 3;     // Servo is connected to pin 3

void setup()
{
    // Set the switch and slide pot pins as INPUTS.
    pinMode(switchPin, INPUT);
    pinMode(slidePin, INPUT);

    // To use the myServo object we created above, we need to attach it to a
    // pin. Use the attach function, and use servoPin as the pin value.
    myServo.attach(servoPin); // Attach the myServo object to our servoPin:
}

void loop()
{
    if (digitalRead(switchPin)) // If the switch is in the "1" position:
    {
        // Read in the value of the slide pot, and map it to our servo's
        // position range (0-180):
        int angle = map(analogRead(slidePin), 0, 1023, 0, 180);

        // Use the write function to set the angle of the servo:
        myServo.write(angle);
    }
}
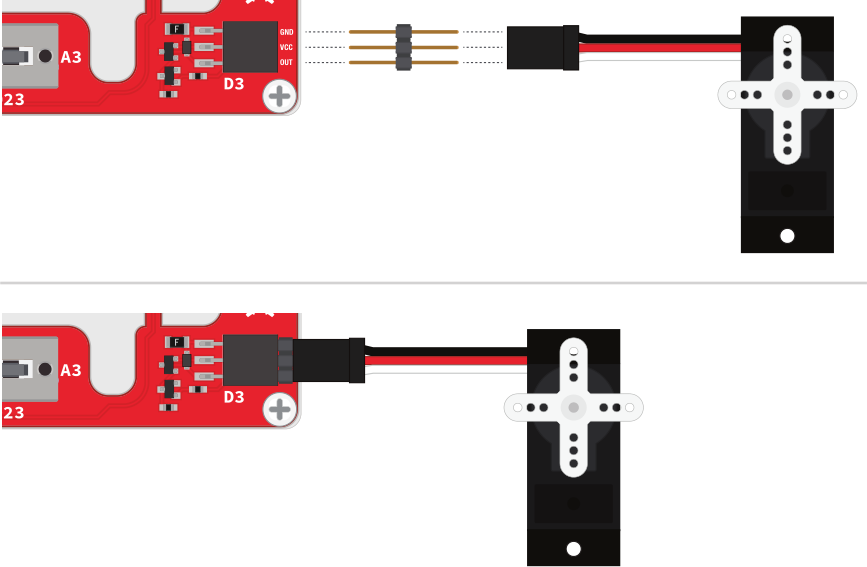
After the code has been uploaded, connect the servo with the three pin male breakaway header to the Sandbox. Make sure the servo’s black wire (GND) is lined up to the GND pin on the Sandbox, as shown here:
This program allows you to control the position of the servo motor with the sliding potentiometer. Slide all the way to the right to set the servo to 180°, and all the way to the left sets it to 0°.
The servo will only move if the switch (connected to pin 2) is set to ON. If you leave the switch in the ON position, you can see how fast the motor responds to the servo block. If you move the switch to OFF, set the position of the slide pot, and set the switch to ON, you can see the speed and control mechanisms of the motor.
Your Turn!
- What happens if you try to rotate the servo beyond 180° (change the last value in the map function)?
- Think of something to attach to the servo! You could add a clock hand to make a weird, half-circle clock. Or add a papercraft hand, and have your Sandbox give you a high-five!