Digital Sandbox Experiment Guide
 jimblom,
  bri_huang
0: Setup, Loop, and Blink
When faced with a new platform, a coder's first task is to write a "Hello, world" program. Usually a "Hello, world" program actually prints those comforting words on a screen. The Digital Sandbox doesn't give us a screen to print words on, but we do have LEDs! Wonderful, blinky, bright, shiny LEDs. Instead of printing words, let's blink an LED to say "Hello, world."
Background Information
This experiment introduces the general concept of physical programming. Changes you make in your program actually affect what’s happening on the Digital Sandbox board.
This drawing also serves to introduce a couple of the most fundamental Arduino programming concepts: setup and loop.
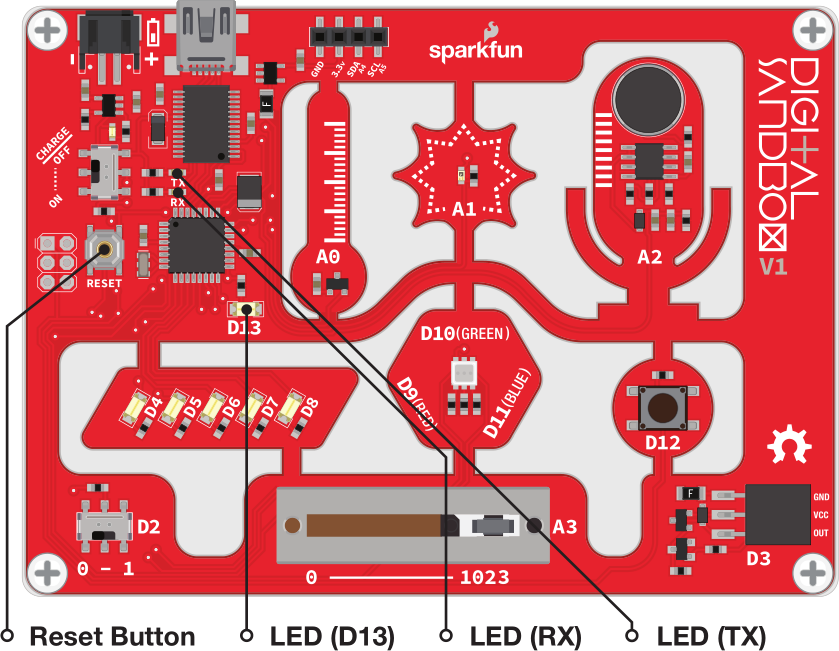
Active Parts
Code Components
This code drawing requires two blocks (well, sort of three):
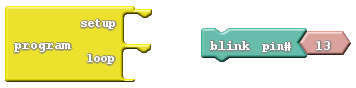
- Program: This block is required for every single ArduBlock drawing ever! You can only have one per drawing. Program always has two slots for blocks -- one named "setup" and another named "loop." Find this block under the Control bin.
- Blink: Find this block under the Pins bin. This block "blinks" a pin on the Digital Sandbox. The Blink block actually gives you two blocks for the price of one! It also includes a pink block with the number 13 inside it. Leave that block alone for now, we'll discover its use in later experiments.
Do This
With this pair of blocks, there are only two functional drawings we can create. You can either stick the Blink block under the setup section of program, or under the loop section.

Try sticking the Blink block under setup, then click Upload to Arduino.

Keep your eyes glued to the Digital Sandbox as the code uploads. You'll see the red and green RX and TX LEDs blink like crazy as code is sent from computer to Sandbox. Pay extra close attention to what happens after the red and green LEDs do their dance. Do you notice anything?
Now move the Blink block from setup to loop, and do the Upload to Arduino jig again. Notice anything different?
Every Arduino program requires two functions always be present: setup and loop. From the names of these functions, it should be pretty clear what their job is.
Setup runs once, at the very beginning of the program. Its purpose is usually to set the platform up for the rest of its lifecycle (until the Sandbox is reset, or loses power). As we continue on with these experiments, you'll have a greater understanding of what kind of things need to be set up in advance.
If setup sets the Sandbox up, Loop must...loop. Code in this block will execute sequentially and endlessly. Once we get to the bottom of loop, we jump right back up to the top and do it all over again. This looping will continue until you either reset or remove power.
Further Explorations
- What happens when you press the reset button?
- What happens if there's nothing in either setup or loop (move the Blink block out)?
- What happens if you add a second Blink block to the drawing? Regardless of where you put it, can you discern which of your Blink blocks is being executed?
- What do you think the 13 inside the Blink block is for?