Electric Imp Breakout Hookup Guide
 jimblom,
  Shawn Hymel
Example 3: Web Response
In the previous example, we used a web page to send data to the imp. But what if you wanted to send data from the imp back to a web page? This example shows how to use the imp to post a response to a web server. Maybe you want to monitor the light level in your garage with a simple photocell? Or live stream the temperature in your backyard. This is the example you'll want to start with.
The Circuit
The circuit for this example is very open-ended. If you have any digital or analog components you'd like the imp to read, hook them up to one of it's inputs. For example, if you want to monitor a button-press and a photocell, hook up a circuit like this:
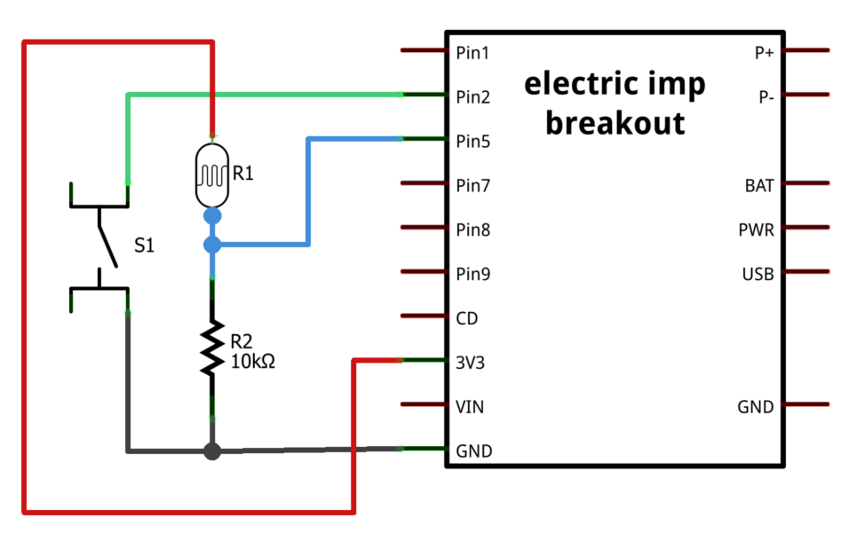

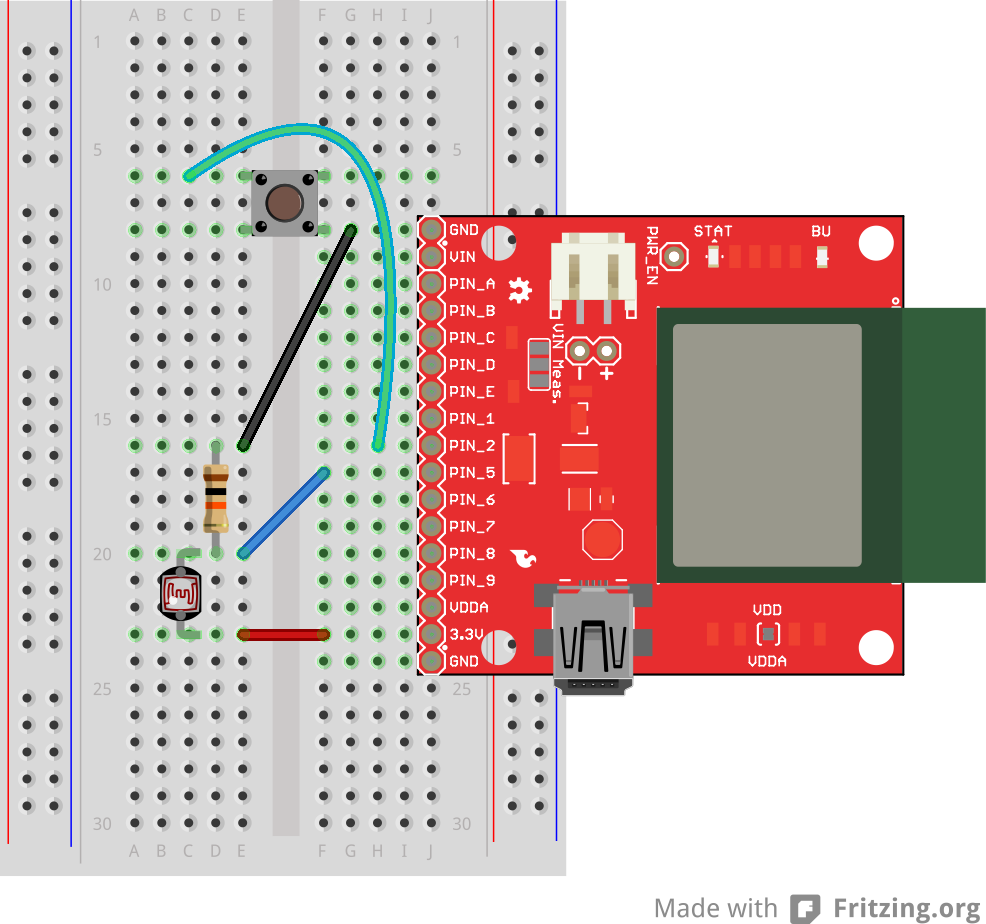
Feel free to make the circuit your own. Maybe add a tilt sensor or an analog temperature sensor to one of the unused pins. At this point you should feel somewhat comfortable modifying the imp's pin functions to make them do what you want.
The Imp Code
Once again, we'll need a few pieces of code to make everything work together. Move your impee into a new model and name it Web Response Example.
Starting with the imp again, copy and paste this code into the Device section of your IDE:
language:javascript
/*  Electric Imp Web Response Example (device)
    by: Jim Lindblom
    SparkFun Electronics
    date: November 5, 2013
    license: Beerware. Use, reuse, and modify this code however you see fit.
    If you find it useful, buy me a beer some day!
    The idea for this code was inspired by this gist by industrialinternet:
    https://gist.github.com/industrialinternet/5419730

    This example code demonstrates how an imp can publish information to a
    webpage. All of the imp's pins are configured as inputs. They can be either
    digital or analog.

    There are three parts to this code:
    1. The imp (device) code. The imp itself simply reads its pin values, and
        sends them out to the agent.
    2. The agent code. The agent waits for an http request. On such a request,
        it'll construct a JSON of the imp's pin values, and respond with that.
    3. An html page to make the http request and handle the response from the agent.
        There are a number of ways to do this. See one example at the bottom of
        The agent code.
*/

///////////
// Setup //
///////////

// Register imp. This good practice:
imp.configure("Imp Pin Web Response",[],[]);

// Configure pins:
hardware.pin1.configure(DIGITAL_IN_PULLUP);
hardware.pin2.configure(DIGITAL_IN_PULLUP);
hardware.pin5.configure(ANALOG_IN);
hardware.pin7.configure(DIGITAL_IN_PULLUP);
hardware.pin8.configure(DIGITAL_IN_PULLUP);
hardware.pin9.configure(DIGITAL_IN_PULLUP);

//////////////////////////
// Function Definitions //
//////////////////////////

// sendPins reads each of the pins, stores them in a table, and sends that
// table out to the agent.
// It calls itself every 100ms -- 10 times a second.
function sendPins()
{
    // Read each of the pins and store them in a table.
    // The key names -- "pin1", "pin2", etc. -- should be kept the same, unless
    // you also change them in the device.on() function on the agent.
    local pinValues =
    {
        pin1 = hardware.pin1.read(),
        pin2 = hardware.pin2.read(),
        pin5 = hardware.pin5.read(),
        pin7 = hardware.pin7.read(),
        pin8 = hardware.pin8.read(),
        pin9 = hardware.pin9.read(),
        voltage = hardware.voltage()    // We'll also send the operating voltage.
    }

    // Once the table is constructed, send it out to the agent with "impValues"
    // as the identifier.
    agent.send("impValues", pinValues);

    // Schedule a wakeup in 100ms, with a callback to this function.
    imp.wakeup(0.1, sendPins);
}

sendPins(); // Call sendPins once, and let it do the rest of the work.
Per usual, check out the code comments for a line-by-line overview of what's going on. The new function this time? agent.send(string, object). agent.send is used to send data from the imp, to the agent. This time we need to create a handler on the agent side to deal with the data sent by the imp.
Speaking of agent code...
The Agent Code
On the agent side we need to accomplish two tasks:
- Define an imp handler function to deal with the data sent by the imp. We'll just store the data sent by the imp into a global variable.
- Create another handler to be called when an HTTP request is received. Upon receiving the request the agent will construct a response based on the data received from the imp, and send that out to the requester.
There's the overview, here's the code. Copy and paste this into the Agent half of your model:
language:javascript
/*  Electric Imp Web Response Example (agent)
    by: Jim Lindblom
    SparkFun Electronics
    date: November 5, 2013
    license: Beerware. Use, reuse, and modify this code however you see fit.
    If you find it useful, buy me a beer some day!

    The agent half of this code accomplishes two tasks:
    1. In the device.on("impValues", function) definitions, the agent receives
    a table of pin values from the imp. It stores those values in a global
    variables.
    2. On an http request, respondImpValues(request, response) is called. This
    function constructs a JSON of the imp pin values, and responds with that.

    Also, check the comment at the bottom of this code for an example HTML file,
    which sends a request to the imp, then parses and prints the response.
*/

//////////////////////
// Global Variables //
//////////////////////
_pin1 <- "";    // Stores pin 1 value received from imp
_pin2 <- "";
_pin5 <- "";
_pin7 <- "";
_pin8 <- "";
_pin9 <- "";
_voltage <- "";

//////////////////////////
// Function Definitions //
//////////////////////////

// respondImpValues is called whenever an http request is received.
// This function will construct a JSON table containing our most recently
// received imp pin values, then send that out to the requester.
function respondImpValues(request,response){

    // First, construct a JSON table with our received pin values.
    local pinTable = {
        "pin1": ""+_pin1+"",    // e.g.: "pin1" : "1"
        "pin2": ""+_pin2+"",
        "pin5": ""+_pin5+"",    // e.g.: "pin5" : "48491"
        "pin7": ""+_pin7+"",
        "pin8": ""+_pin8+"",
        "pin9": ""+_pin9+"",
        "voltage": ""+_voltage+"" + " V",   // e.g.: "voltage" : "3.274 V"
    }

    // the http.jsonencode(object) function takes a squirrel variable and returns a
    // standardized JSON string. - https://electricimp.com/docs/api/http/jsonencode/
    local jvars = http.jsonencode(pinTable);

    // Attach a header to our response.
    // "Access-Control-Allow-Origin: *" allows cross-origin resource sharing
    // https://electricimp.com/docs/api/httpresponse/header/
    response.header("Access-Control-Allow-Origin", "*");

    // Send out our response.
    // 200 is the "OK" http status code
    // jvars is our response string. The JSON table we constructed earlier.
    // https://electricimp.com/docs/api/httpresponse/send/
    response.send(200,jvars);
}

// device.on("impValues") will be called whenever an "impValues" request is sent
// from the device side. This simple function simply fills up our global variables
// with the equivalent vars received from the imp.
device.on("impValues", function(iv) {
    _pin1 = iv.pin1;
    _pin2 = iv.pin2;
    _pin5 = iv.pin5;
    _pin7 = iv.pin7;
    _pin8 = iv.pin8;
    _pin9 = iv.pin9;
    _voltage = iv.voltage;
    });

///////////
// Setup //
///////////

// http.onrequest(function) sets up a function handler to call when an http
// request is received. Whenever we receive an http request call respondImpValues
// https://electricimp.com/docs/api/http/onrequest/
http.onrequest(respondImpValues);
There are two things to point out here. The first is the device.on function. This function sets up a handler to be called when the imp sends a defined string. In this case, we're looking for the imp sending "impValues". The data associated with this string is a table, full of all of the imp's pin readings. That function is called every time the imp sends that specific string to the agent.
The real magic happens in the respondImpValues() function. The agent sets this function as the handler for any HTTP request (using the http.onrequest function). This function constructs a JSON string of data, in the form of ""key":"value", "key":"value", ...,", which the requesting HTTP client should be able to parse and understand.
Check the comments in the code for more information on the agent code.
For now, Build and Run the code. Don't expect it to do anything of interest until we add the last bit of magic...
The Web App -- AJAX, jQuery, JSON Oh My!
The final piece to this puzzle is constructing a web page that can both send an HTTP request and deal with the response from the agent.
Create a new HTML file named pinView.html. Paste the code below into it.
<html>
<head>
    <title>Electric Imp Breakout</title>
    <script src="http://code.jquery.com/jquery-1.9.1.min.js"></script>
    <script src="http://code.jquery.com/mobile/1.3.1/jquery.mobile-1.3.1.min.js"></script>
    <script>
        $( function() {
            // Edit these values first! The externalURL variable should be the
            // unique URL of your agent. e.g. the last part of:
            // https://agent.electricimp.com/UpyYpRLmBB7m
            // pollRate defines how often the values on your page will refresh.
            var externalURL ="UpyYpRLmBB7m";
            var pollRate ="1000";

            function poll(){
                // Construct an ajax() GET request.
                // http://www.w3schools.com/jquery/ajax_ajax.asp

                $.ajax({
                    type: "get",
                    url: "https://agent.electricimp.com/"+externalURL,  // URL of our imp agent.
                    dataType: "json",   // Expect JSON-formatted response from agent.
                    success: function(agentMsg) {   // Function to run when request succeeds.

                        // jQuery find "pin1" id and overwrite its data with "pin1" key value in agentMsg
                        $("#pin1").html(agentMsg.pin1);
                        $("#pin2").html(agentMsg.pin2);
                        $("#pin5").html(agentMsg.pin5);
                        $("#pin7").html(agentMsg.pin7);
                        $("#pin8").html(agentMsg.pin8);
                        $("#pin9").html(agentMsg.pin9);
                        $("#vin").html(agentMsg.voltage);

                        updateBG(agentMsg.pin5);    // Try this if you have a photocell connected to pin 5
                    },
                    error: function(err) {
                        console.log("err"+ err.status)
                    }
                });
            }

            // setInterval is Javascript method to call a function at a specified interval.
            // http://www.w3schools.com/jsref/met_win_setinterval.asp
            setInterval(function(){ poll(); }, pollRate);

            // This function updates the
            function updateBG(lightSensor)
            {
                if (lightSensor > 30000)
                {
                    document.body.style.backgroundColor = "#FFFFFF";
                }
                else
                {
                    document.body.style.backgroundColor = "#AAAAAA";
                }
            }
        });
    </script>
</head>
    <body>
        <h3>Imp Pins:</h3>
        <div id="pins">
        <p> <b>Pin 1:</b> <span id="pin1"><!-- This is where the pin 1 reading will go --></span></p>
        <p> <b>Pin 2:</b> <span id="pin2"><!-- This is where the pin 2 reading will go --></span></p>
        <p> <b>Pin 5:</b> <span id="pin5"><!-- This is where the pin 5 reading will go --></span></p>
        <p> <b>Pin 7:</b> <span id="pin7"><!-- This is where the pin 7 reading will go --></span></p>
        <p> <b>Pin 8:</b> <span id="pin8"><!-- This is where the pin 8 reading will go --></span></p>
        <p> <b>Pin 9:</b> <span id="pin9"><!-- This is where the pin 9 reading will go --></span></p>
        <p> <b>Voltage:</b> <span id="vin"><!-- This is where the voltage reading will go --></span></p>
    </body>
</html>
Before saving and closing the file, edit this line of code to point to your agent's unique URL:
var externalURL ="UpyYpRLmBB7m"; // Put your agent's unique URL here Sweet! Save and open the file with your favorite web browser. Assuming your imp is running with the new device/agent code, you should see something like this:
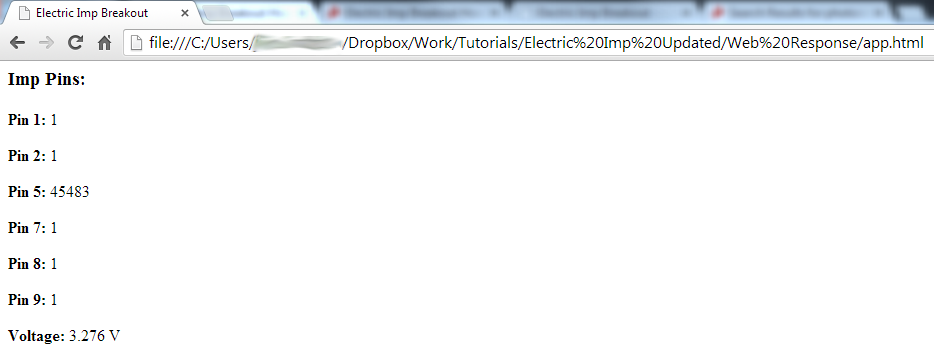
Those 1's, 0's, and other numbers might be a little different on your screen. Try pressing a button. Or cover the photocell. Or mess with the imp's pins in some other way. Are the values changing? How cool is that!
The code for this webpage is a little ugly. It uses some web "stuff" that my fragile, electrical engineer mind can barely grasp. There may be a better way to do this, but this works for us. If you find another cool way to request and use data from the imp, let us know in the discussion section!
Towards the bottom of the HTML code is a series of <span> tags, with ids like "pin1", "pin2" etc. But they're blank. Remember those, they'll come in handy.
The real magic here is happening in the poll() function in the <script> area up top. This function sets up an AJAX request to the Electric Imp agent. If the request succeeds, function(agentMsg) is executed. This function parses the JSON message received from the agent, and dynamically updates the data in our blank <span> tags defined below. poll() is set to be called every pollRate (defaulted to 1000) milliseconds.
Whew! Hopefully all of this stuff is easy enough to pattern-match and modify as you please. To make some other information stream to the webpage, you have to:
- Edit the imp Device code to send the desired data to the agent. Use the
agent.send()function to do this. - Edit the Agent code in two places:
- Read the data in from the imp in the
device.on()function. - In an HTTP request handler, send the data out as a JSON string.
- Read the data in from the imp in the
- Add something in the AJAX success function to look for the correct JSON "key" and "value" combination. Then do something with that data.
- Add a location in the HTML body to show the data. E.g.
<span id="myData"><!--Data goes here--></span>
Give it a try! It sounds like a lot of work, but most of the constructs are already there for you to quickly add new displayable data. You could print the imp's measured RSSI, or do some math on the analog input reading to turn it into a voltage.