ESP32 OTA Updates over BLE from a React Web Application
 Englandsaurus
 Introduction
The ESP32 is a ridiculously capable microcontroller. With WiFi, Bluetooth, and two cores, there's a ton you can do with it including update the firmware without ever plugging it into your computer. This is something I've been wanting to implement for a while to allow somebody like my grandmother to push software updates to a hypothetical electronic gift. The examples I kept seeing on the internet were all based on the ArduinoOTA examples included in the Arduino IDE, and followed the same basic method.
- Hardcode your SSID and Password into the ESP32 using the Arduino IDE
- Connect the ESP32 to WiFi and have it set up a local web server capable of receiving a binary file.
- Obtain the IP address over serial if ESP32's mDNS doesn't want to work on your network.
- Have the compiled binary stored locally on your computer or phone.
- Navigate to the page or IP address of the ESP32
- Browse to the file using the dropdown provided by the ESP32 and hit send.
This process functions well and updates the ESP32 in a few seconds depending on file size, but for some applications, it isn't the best. For example, I wanted a nice clunky application in the HTML as well that could interact with my ESP32 over BLE, and putting that into the Arduino sketch (In addition to being difficult to deal with) would probably exceed the memory budget for OTA updates anyway. So, since I'm already using BLE and a webapp, let's toss OTA updates in as the icing on the cake. BLE isn't the best way to do this, but like I said, it's already in use elsewhere. This BLE OTA update employs the following method.
- ESP32 begins BLE server.
- WebApp allows the user to pair with our ESP32 BLE Server using Web Bluetooth. (Sorry iPhone users)
- Upon pairing, the WebApp reads the hardware and software version numbers hard-coded into the sketch on the ESP32.
- This version number is crosschecked with a JSON file of containing software versions along with their compatible hardware versions.
- If a compatible update is available, the user is asked if they want to update.
- If the user clicks yes, the WebApp fetches the firmware and writes it to the ESP32 in buffered chunks.
Web App
This is my very first foray into Javascript and HTML, so I started with a React WebApp (follow this link to set up a vanilla one). You can download the final code to peruse as you read by clicking the button below. If you've set up all of your tools for React correctly, you should be able to navigate to /ESP32_OTA_BLE and run npm start to run the WebApp locally. It's also a pretty good idea to read up on this Google Developer Web Bluetooth tutorial and most importantly, make sure you know what Javascript Promises are and how they work.
You can poke around in the app, but let's go over the code in App.js to see what the App is actually doing.
App()
This is the function that is actually rendered by the DOM, so the basic structure of our page can go here. In this simple app, we put our connect button and user-prompt popup here. Our button, when clicked, launches our BTConnect function which begins searching for devices.
BTConnect()
The BTConnect function is called to search for and connect to our ESP32's BLE Server. Notice how we filter for services that match the myESP32 variable, which is declared in line 13 with a custom UUID. This UUID matches the one that the ESP32 uses for it's BLE Service, so when we look for devices, we'll only see the ESP32 that we've already programmed with our OTA sketch. Once we're connected, we save the BLE Service that we just connected to globally and run our CheckVersion() function.
onDisconnect()
onDisconnect is an event handler that will prompt the user if they want to reconnect to the device if it becomes disconnected. If the ESP32 is disconnected during an update, reset the ESP32 before trying again. This function is a little buggy and sometimes freezes so it needs some work.
CheckVersion()
CheckVersion() grabs the hardware and software version numbers from the ESP32 first and stores them globally. The App then grabs the JSON file from GitHub that has a list of our existing software versions and their compatible hardware versions. If the software versions don't match, we check to see if the newest version is compatible with our current hardware. If it is, we call PrompUserForUpdate() to ask if the user wants to update to a compatible version. If not, we check the next newest software version until we inevitably find some compatible software.
PromptUserForUpdate()
This function opens a simple pop-up with yes or no options. The pop-up informs the user of their current version and that it is out of date, and asks if they would like to update to the newest version compatible with their hardware. If they click yes, the App grabs the appropriate binary from GitHub, stores it, and calls SendFileOverBluetooth() passing the binary we just downloaded into the function.
SendFileOverBluetooth()
The first thing this function does is prepare the data to be sent by grabbing its initial size. This function sets up an event listener on the same GATT characteristic that we write our binary data to, so that when the ESP32 finishes handling the data, the ESP32 can write to the characteristic and trigger the event listener to send the next packet. Once we've set up the event listener to call SendBufferedData(), we call SendBufferedData() ourselves to kick off the Write/Flag/Write cycle.
SendBufferedData & RecursiveSend(characteristic, data)
SendBufferedData() takes our file and splits it up into the appropriate 512 byte size chunks (the size of a GATT characteristic) and calls RecursiveSend(characteristic, data) with the appropriate chunk. This function returns a promise to itself as it sends to ensure that we don't try and write to the characteristic while a GATT operation is still in progress.
Arduino Sketch
On the Arduino side things are relatively simple. We have a begin function that initializes our BLE Server, services and characteristics. pOtaCharacteristic is initialized with NOTIFY and WRITE, which allows it to write to the flag and also receive data from our Client. For NOTIFY, we need to also add a BLE2902 descriptor to the characteristic. For WRITE, a callback must be attached so the ESP32 does something with the data every time the characteristic is written. Check out how pOtaCharacteristic is initialized in the begin() function below.
language:c
pOtaCharacteristic = pService->createCharacteristic(
                     CHARACTERISTIC_UUID_FW,
                     BLECharacteristic::PROPERTY_NOTIFY | BLECharacteristic::PROPERTY_WRITE
                     );
pOtaCharacteristic->addDescriptor(new BLE2902());
pOtaCharacteristic->setCallbacks(new otaCallback(this));
The callback itself is where all of the magic happens. Upon boot-up, the ESP32 has an updateFlag that is false. The first time the callback is called (i.e. the application wants to start writing a new version) the ESP32 configures its OTA Handler and begins the partition. On every subsequent callback, the size of the received data is checked. If it is a full 512 bytes, the ESP32 writes it to the OTA partition then writes a few bytes to the characteristic it just read to notify the WebApp that it's ready for another packet. If we have an incomplete packet, we know we're at the end of the road so we write those bytes to the partition, check to see if the partition is okay, and if it is, we reboot with our new firmware. The code for this callback is below.
language:c
void otaCallback::onWrite(BLECharacteristic *pCharacteristic)
{
  std::string rxData = pCharacteristic->getValue();
  if (!updateFlag) { //If it's the first packet of OTA since bootup, begin OTA
    Serial.println("BeginOTA");
    esp_ota_begin(esp_ota_get_next_update_partition(NULL), OTA_SIZE_UNKNOWN, &otaHandler);
    updateFlag = true;
  }
  if (_p_ble != NULL)
  {
    if (rxData.length() > 0)
    {
      esp_ota_write(otaHandler, rxData.c_str(), rxData.length());
      if (rxData.length() != FULL_PACKET)
      {
        esp_ota_end(otaHandler);
        Serial.println("EndOTA");
        if (ESP_OK == esp_ota_set_boot_partition(esp_ota_get_next_update_partition(NULL))) {
          esp_restart();
        }
        else {
          Serial.println("Upload Error");
        }
      }
    }
  }

  uint8_t txData[5] = {1, 2, 3, 4, 5};
  //delay(1000);
  pCharacteristic->setValue((uint8_t*)txData, 5);
  pCharacteristic->notify();
}
Compiling for OTA
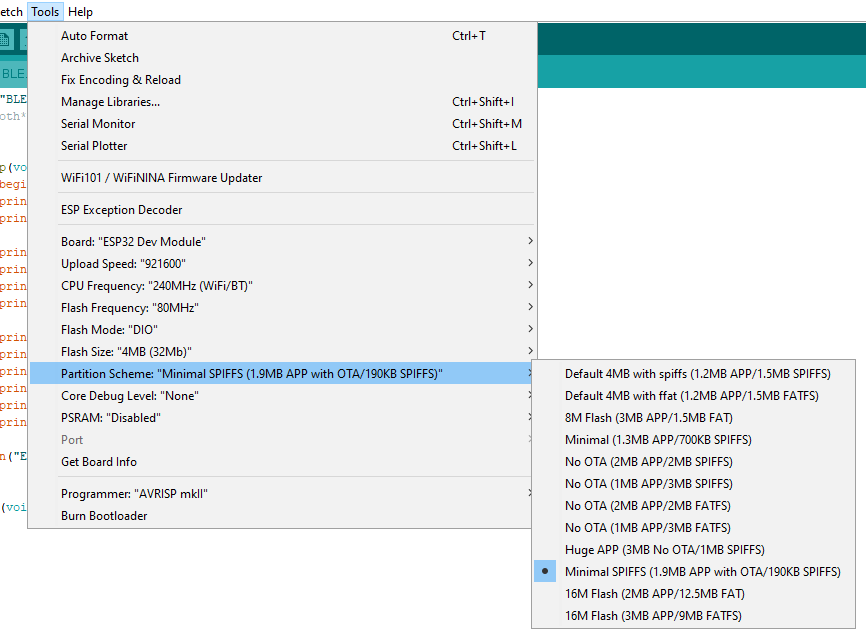
If you're going to do OTA updates, you'll have to make sure that your flash size and partition scheme are set properly in Arduino. I usually like to choose Minimal SPIFFS (1.9 MB APP with OTA/190KB SPIFFS) in the ESP32 Dev Modules options for partition scheme because I rarely use SPIFFS.
You can also configure your partition table manually if you'd like, but we won't cover that in this tutorial. You'll also need to change the hardware and software version numbers to reflect reality, these can be found at the beginning of BLE.cpp
Once you have the proper options selected, go ahead and go to Sketch -> Export Compiled Binary to compile and save the binary to your sketch folder. From here, we need rename and move this BIN to configure our GitHub repo so everything plays nicely together.
Github
Our WebApp is going to interact with GitHub so it's relatively easy for us as developers to push new code through GitHub's Release feature. However, we're really only grabbing a JSON and a BIN so you could also just host those within the App itself. The only step that GitHub removes from this is that by titling your release properly, you can avoid having to manually change some file structure so the WebApp can find the proper BIN. Anyway, there are two components that we need on GitHub. One is a JSON of our existing software versions and their compatible hardware versions and the other is all of the BIN files compatible with the software release. Check out the releases page on GitHub and check the contents of each release if you still have questions on how things should be structured.
version.JSON
Our version.JSON file is structured with the newest software release at position 0 in the array. The newest software version would be accessed by calling data.firmware[0]['software']. You can then iterate through the 'hardware' section of that same entry to see all of the hardware that is compatible with this software. Newest hardware versions should also be kept at the top of the JSON entry. An example JSON file is below.
language:json
{
    "firmware": [
        {
            "software": "v2.0.0",
            "hardware": [
                "v2.0"
            ]
        },
        {
            "software": "v0.1.1",
            "hardware": [
                "v1.3",
                "v1.2"
            ]
        },
        {
            "software": "v0.1.0",
            "hardware": [
                "v1.3",
                "v1.2",
                "v1.1"
            ]
        }
    ]
}
BIN Files
The repository that this tutorial uses has three folders. The one titled GithubRepo should have all that is necessary for the actual public facing repository that is accessed by the App which is really just a few BIN files (multiple hardware versions compatible with the same software) and a JSON. Your BIN files should be titled with their compatible hardware versions and your JSON file should include the structure for the current release as well as all previous releases. For instance, the above JSON file would be in a folder with only a single BIN titled v2.0.bin. After pushing these files to GitHub, make a release for the repository in this state and title it as the software version. For the above JSON (and associated BIN) this title for both tag and release would be v2.0.0. It is important that each software version have it's own corresponding release with the compiled binaries and JSON.
Using the OTA Updater
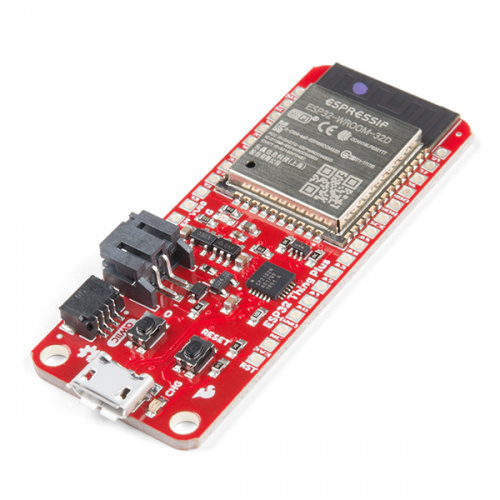
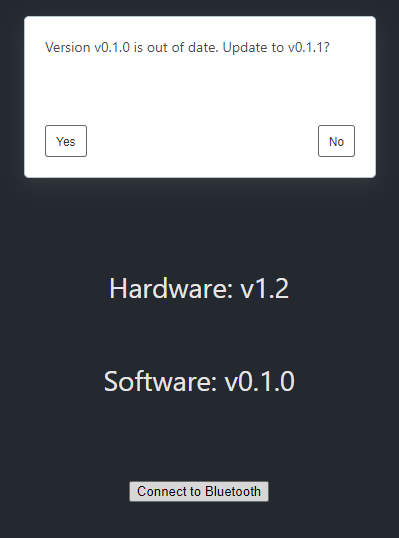
Alright, now that we've gone through how everything works, usage should be fairly simple. The first thing to do is upload the sketch in the ArduinoSketch folder to your ESP32 (don't forget to select the proper partition settings, as discussed in the Arduino Sketch Section). This sketch should be configured as hardware version v1.2 (the actual version number here is arbitrary, just to show functionality) and software version v0.1.0. Now go ahead and open a Serial Terminal at 115200 BPS to confirm this and also to eventually watch the ESP reboot with its new firmware.
Now that the ESP32 has its firmware, we can go ahead and boot up the WebApp on a local server by navigating to the folder it's been downloaded to (inside the repository under WebApp) and running npm start.
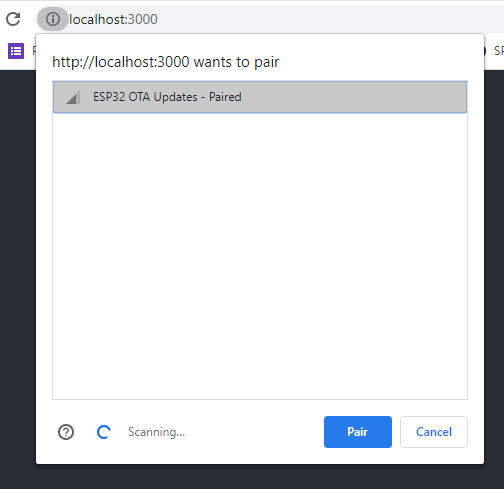
From here, go ahead and click on the Connect to Bluetooth button, which will bring up available devices with the proper UUID and allow you to connect. Obviously, go ahead and connect to the device.
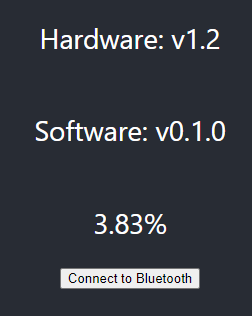
Wait a few seconds while the App connects and checks the version number on the device. If the software isn't current, a pop-up should show up like the one below, asking if the user wants to update to the newest compatible software.
Clicking yes will begin the update process. A percentage will appear showing how far along the update is. This process can take quite some time. Upon completion, the ESP32 will reboot.
When the ESP32 reboots, it'll become disconnected from Bluetooth. The WebApp currently doesn't handle this gracefully and freezes, so restart it however you see fit and connect again to your ESP32 to see the new version pop up! You can also check this in a Serial Monitor
Now, you can feel free to add all sorts of things to your ESP32 sketch or your WebApp! Be sure to always verify that you can not only flash a compiled binary, but also flash to an ESP32 running that compiled binary. Also, make sure to keep good track of binaries and be doubly sure that a compiled binary has the proper hardware and software version number coded in or you may end up with issues down the road.
With some careful housekeeping, a relatively easy end user experience is possible!