ESP8266 Thing Hookup Guide
 jimblom
Example Sketch: AP Web Server
Not only can the ESP8266 connect to a WiFi network and interact with the Internet, but it can also set up a network of its own, allowing other devices to connect directly to it. This example demonstrates how to turn the ESP8266 into an access point (AP), and serve up web pages to any connected client.
Copy and paste the code from below in the Arduino IDE. Then hit the upload button.
language:c
#include <ESP8266WiFi.h>

//////////////////////
// WiFi Definitions //
//////////////////////
const char WiFiAPPSK[] = "sparkfun";

/////////////////////
// Pin Definitions //
/////////////////////
const int LED_PIN = 5; // Thing's onboard, green LED
const int ANALOG_PIN = A0; // The only analog pin on the Thing
const int DIGITAL_PIN = 12; // Digital pin to be read

WiFiServer server(80);

void setup()
{
  initHardware();
  setupWiFi();
  server.begin();
}

void loop()
{
  // Check if a client has connected
  WiFiClient client = server.available();
  if (!client) {
    return;
  }

  // Read the first line of the request
  String req = client.readStringUntil('\r');
  Serial.println(req);
  client.flush();

  // Match the request
  int val = -1; // We'll use 'val' to keep track of both the
                // request type (read/set) and value if set.
  if (req.indexOf("/led/0") != -1)
    val = 0; // Will write LED low
  else if (req.indexOf("/led/1") != -1)
    val = 1; // Will write LED high
  else if (req.indexOf("/read") != -1)
    val = -2; // Will print pin reads
  // Otherwise request will be invalid. We'll say as much in HTML

  // Set GPIO5 according to the request
  if (val >= 0)
    digitalWrite(LED_PIN, val);

  client.flush();

  // Prepare the response. Start with the common header:
  String s = "HTTP/1.1 200 OK\r\n";
  s += "Content-Type: text/html\r\n\r\n";
  s += "<!DOCTYPE HTML>\r\n<html>\r\n";

  /*Note: Uncomment the line below to refresh automatically
   *      for every 1 second. This is not ideal for large pages
   *      but for a simple read out, it is useful for monitoring
   *      your sensors and I/O pins. To adjust the fresh rate,
   *      adjust the value for content. For 30 seconds, simply
   *      change the value to 30.*/
  //s += "<meta http-equiv='refresh' content='1'/>\r\n";//auto refresh page

  // If we're setting the LED, print out a message saying we did
  if (val >= 0)
  {
    s += "LED is now ";
    s += (val)?"on":"off";
  }
  else if (val == -2)
  { // If we're reading pins, print out those values:
    s += "Analog Pin = ";
    s += String(analogRead(ANALOG_PIN));
    s += "<br>"; // Go to the next line.
    s += "Digital Pin 12 = ";
    s += String(digitalRead(DIGITAL_PIN));
  }
  else
  {
    s += "Invalid Request.<br> Try /led/1, /led/0, or /read.";
  }
  s += "</html>\n";

  // Send the response to the client
  client.print(s);
  delay(1);
  Serial.println("Client disonnected");

  // The client will actually be disconnected
  // when the function returns and 'client' object is detroyed
}

void setupWiFi()
{
  WiFi.mode(WIFI_AP);

  // Do a little work to get a unique-ish name. Append the
  // last two bytes of the MAC (HEX'd) to "Thing-":
  uint8_t mac[WL_MAC_ADDR_LENGTH];
  WiFi.softAPmacAddress(mac);
  String macID = String(mac[WL_MAC_ADDR_LENGTH - 2], HEX) +
                 String(mac[WL_MAC_ADDR_LENGTH - 1], HEX);
  macID.toUpperCase();
  String AP_NameString = "ESP8266 Thing " + macID;

  char AP_NameChar[AP_NameString.length() + 1];
  memset(AP_NameChar, 0, AP_NameString.length() + 1);

  for (int i=0; i<AP_NameString.length(); i++)
    AP_NameChar[i] = AP_NameString.charAt(i);

  WiFi.softAP(AP_NameChar, WiFiAPPSK);
}

void initHardware()
{
  Serial.begin(115200);
  pinMode(DIGITAL_PIN, INPUT_PULLUP);
  pinMode(LED_PIN, OUTPUT);
  digitalWrite(LED_PIN, LOW);
  // Don't need to set ANALOG_PIN as input,
  // that's all it can be.
}
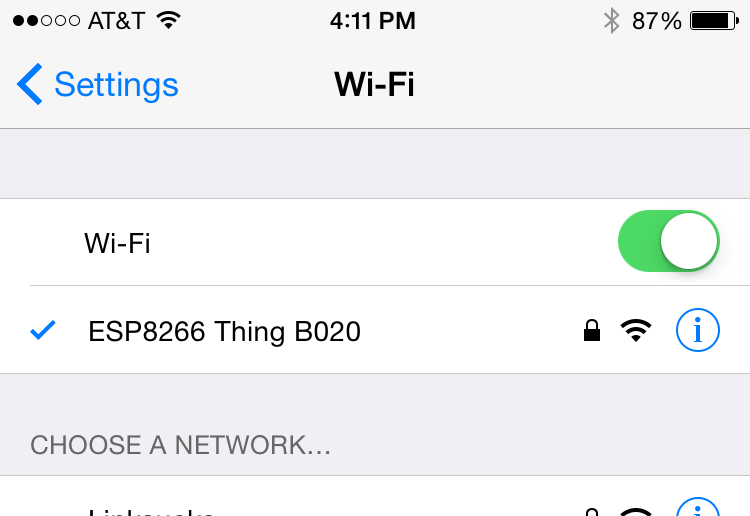
After uploading this sketch, find another device that you can connect to a WiFi network -- phone, laptop, etc. Look for a network called "Thing-XXXX", where XXXX is the last 2 bytes of the Thing's MAC address.
The sketch sets the network's password to "sparkfun".
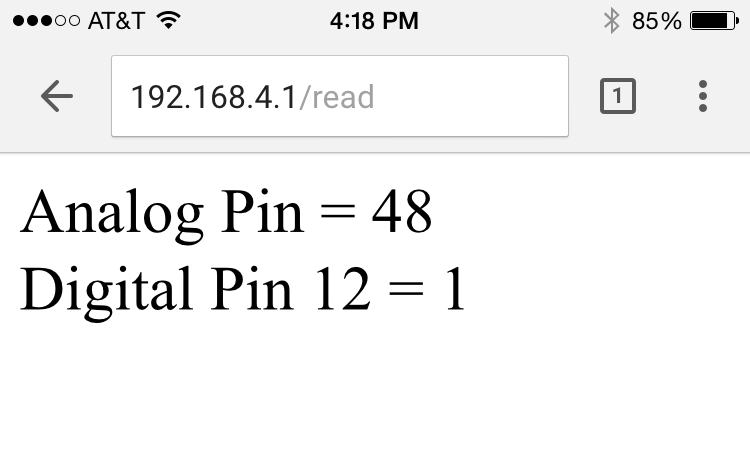
After connecting to your Thing's AP network, load up a browser and point it to 192.168.4.1/read. The Thing should serve up a web page showing you its ADC and digital pin 12 readings:
After that, give 192.168.4.1/led/0 and 192.168.4.1/led/1 a try, and keep an eye on the Thing's green LED while you do.
Auto Refresh
Tired of hitting the refresh button to update the I/O pin readings? Try uncommenting the line of code where it says: s += "<meta http-equiv='refresh' content='1'/>\r\n";. Then reupload the code to your ESP8266. This line of code will auto refresh the page every second.
  /*Note: Uncomment the line below to refresh automatically
   *      for every 1 second. This is not ideal for large pages
   *      but for a simple read out, it is useful for monitoring
   *      your sensors and I/O pins. To adjust the fresh rate,
   *      adjust the value for content. For 30 seconds, simply
   *      change the value to 30.*/
  //s += "<meta http-equiv='refresh' content='1'/>\r\n";//auto refresh page
As always, check through the code comments to get a line-by-line breakdown of what's going on.