Experiment Guide for the Johnny-Five Inventor's Kit
 rwaldron
 reconbot
 D___Run___
 lyzadanger
 Shawn Hymel
Experiment 10: Using the BME280
Introduction
The sensor used in this experiment is pretty sophisticated. The BME280 reads barometric pressure, temperature and humidity. It can even extrapolate altitude based on pressure changes! It communicates all that data to the Tessel 2 using a serial protocol called I2C (Inter-Integrated Circuit) protocol. This sensor has built-in support in Johnny-Five using the Multi class.
I2C is a popular serial protocol; it shows up all over the place in digital electronics. The design of I2C, with a shared bus, takes far fewer wires than other serial options (e.g., SPI, which we'll meet in a future experiment)—especially when hooking up multiple devices. You can (theoretically) connect up to 1008 different devices to the same two pins and use 'em all at once.
Got a C or Arduino background? To work with I2C sensors, you'd normally have to work with device-specific libraries written by others (or maybe yourself!). But in Johnny-Five there are a number of I2C sensors built right in to the framework—the heavy lifting is done for you and the low-level details abstracted out of your way.
Preflight Check
Whoa there, Turbo! If this is your first experiment with the Johnny-Five Inventor's Kit (J5IK) and the Tessel 2, there are a few things you gotta do first:Suggested Reading
The following tutorial provides in-depth background on some of the hardware concepts in this experiment:
Parts Needed
You will need the following parts for this experiment:
- 1x Tessel 2
- 1x Breadboard
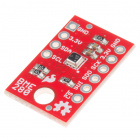
- 1x The BME280 Atmospheric Sensor
- 6x Jumper Wires


Introduction to the BME280

The SparkFun BME280 Atmospheric Sensor Breakout is an easy way to measure stuff about the atmosphere around you: pressure, humidity and air temperature. All of this is combined into a petite package, called a breakout board.
The 3.3V breakout is power-efficient, using as little as 5µA (that's 1/1000000 of an amp!) when idling and less than 1mA when it's taking measurements. There are 10 pins on the breakout board, but six is the maximum ever used at one time.
In this experiment you will work with the BME280 to read the temperature, pressure and humidity of the room as well as your altitude based off of the atmospheric pressure. Finally, in the Building Further section you will use your BME280 as the heart of a web-based weather dashboard application.
Hardware Hookup
Is it hot in here, or is it just me? Let's find out using this sensor, but first you need to hook it up!
| Polarized Components | Pay special attention to the component’s markings indicating how to place it on the breadboard. Polarized components can only be connected to a circuit in one direction. |
Build the BME280 Circuit
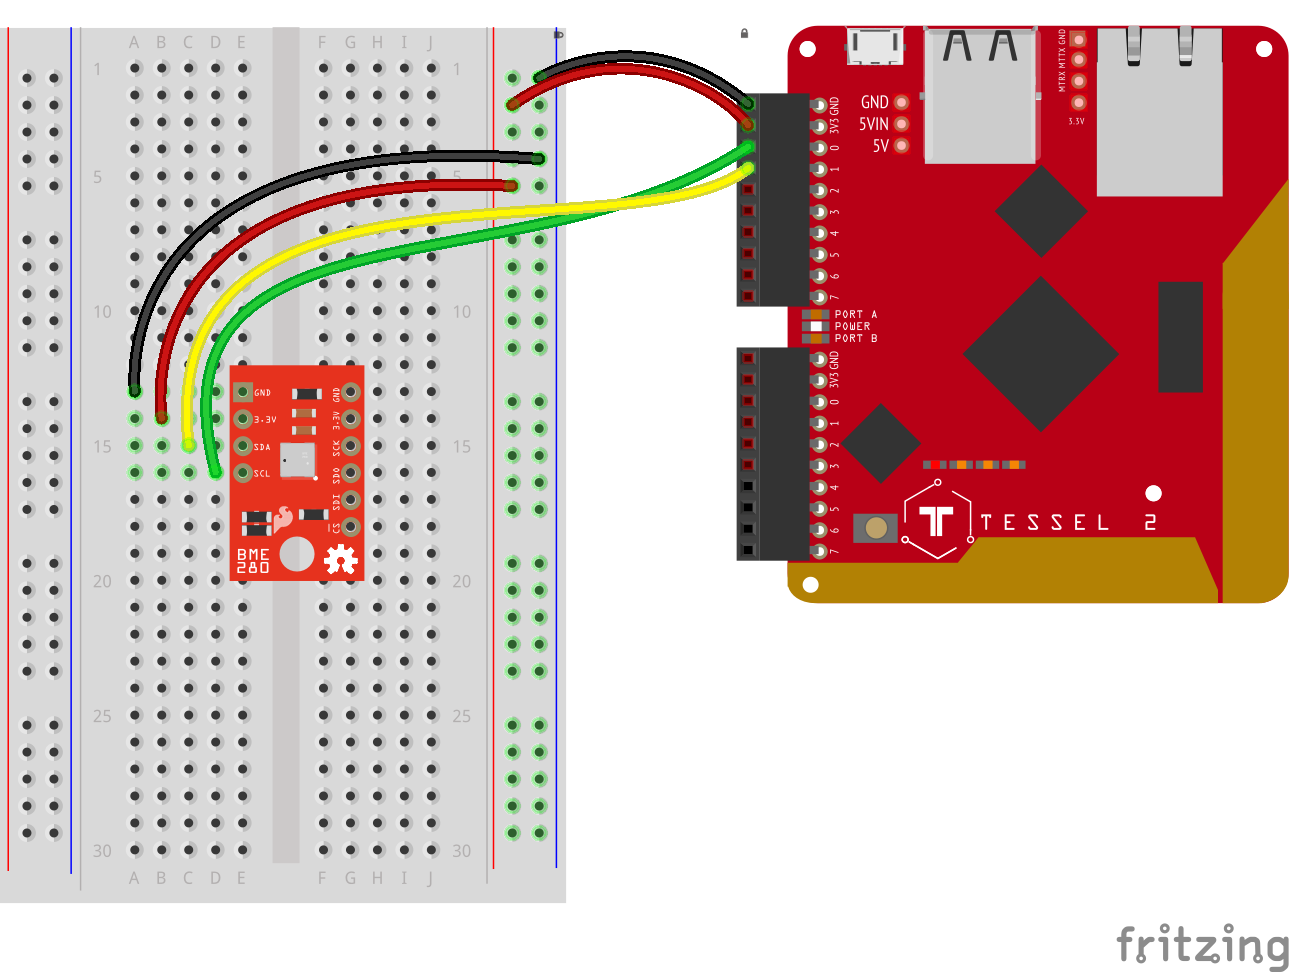
Compared to the H-Bridge motor circuit in Experiment 9, this one is pretty simple. Attach the BME280 breakout board to the breadboard so that it spans the center notch. Connect the BME280's SCL (clock) pin to Tessel 2's Port A, Pin 0. Connect the SDA (data) pin to the Tessel's Port A, Pin 1. Connect 3.3V to the Tessel's 3.3V pin and GND to GND.
Observing the Environment With Johnny-Five and the BME280
For this experiment, you will be "graphing" sensor output in your browser, using:
However, before we dive into our browser "monitor" system, let's take a look at the most basic example. Open your favorite code editor, create a file called bme.js and save it in the j5ik/ directory. Type—or copy and paste—the following JavaScript code into your bme.js file:
language:javascript
var Tessel = require("tessel-io");
var five = require("johnny-five");
var board = new five.Board({
  io: new Tessel()
});

board.on("ready", () => {
  var monitor = new five.Multi({
    controller: "BME280"
  });

  monitor.on("change", function() {
    console.log("thermometer");
    console.log("  celsius      : ", this.thermometer.celsius);
    console.log("  fahrenheit   : ", this.thermometer.fahrenheit);
    console.log("  kelvin       : ", this.thermometer.kelvin);
    console.log("--------------------------------------");

    console.log("barometer");
    console.log("  pressure     : ", this.barometer.pressure);
    console.log("--------------------------------------");

    console.log("altimeter");
    console.log("  feet         : ", this.altimeter.feet);
    console.log("  meters       : ", this.altimeter.meters);
    console.log("--------------------------------------");
  });
});
To Deploy Code Over WiFi:
- Connect your Tessel to the same Wifi network as your computer t2 wifi -n[SSID] -p[PASSWORD]`
- Make sure that your Tessel is provisioned and shows up in your list of Tessels using t2 list. See the Hardware Installation and Setup for how to provision your Tessel if it doesn't show up in your list.
- Deploy your code using the
--lantag. Example: t2 run mycode.js --lan
Type—or copy and paste—the following into your terminal:
t2 run bme.js
What You Should See
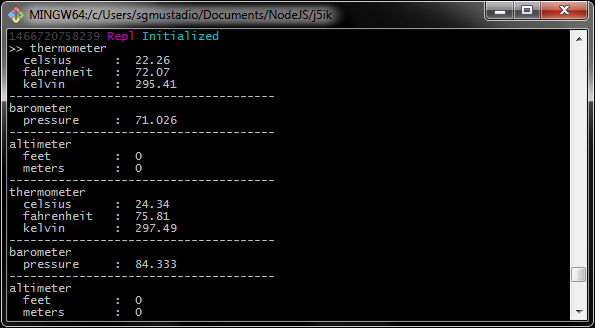
This is going to print a lot of data to your console, very quickly—so quickly that you likely won't be able to make sense of it! Go ahead and exit the program by typing Command-C or Control-C.
Exploring the Code
Once the board has emitted the ready event, hardware inputs are ready for interaction, so the first thing that occurs is an instantiation of a Multi object. Multi objects represent two or more components, usually sensors, that are packaged together and exposed via a single register. Multi and IMU (Inertial Measurement Unit) boards that combine multiple movement sensors like accelerometers, gyroscopes, etc.) are very similar; the latter is used for non-motion-related packages.
language:javascript
var monitor = new five.Multi({
  controller: "BME280"
});
Now that we have a monitor Multi instance, the next thing to do is register an event handler to be invoked whenever changes are detected in the sensor readings:
language:javascript
monitor.on("change", function() {
  // ...
});
Within that handler, we're logging all of the relevant data properties for this multi-component package:
language:javascript
console.log("thermometer");
console.log("  celsius      : ", this.thermometer.celsius);
console.log("  fahrenheit   : ", this.thermometer.fahrenheit);
console.log("  kelvin       : ", this.thermometer.kelvin);
console.log("--------------------------------------");

console.log("barometer");
console.log("  pressure     : ", this.barometer.pressure);
console.log("--------------------------------------");

console.log("altimeter");
console.log("  feet         : ", this.altimeter.feet);
console.log("  meters       : ", this.altimeter.meters);
console.log("--------------------------------------");
... which is a lot of data and will likely overwhelm the terminal, so be ready to type Command-C or Control-C to end the program.
Making a Slick Gauge Dashboard for the BME280
Now that we've demonstrated the basics of using a sensor package like the BME280, let's make something interesting! The next sections will guide you through creating a web application that displays all of the data from the BME280 as nice-looking gauges in a browser. The data updates automatically because we will use these snazzy things called Web Sockets — basically there will be no need for you to refresh the page!
The steps for building this little application are:
- Install some needed
npmpackages. - Create a directory and files for the client-side web application: HTML and JavaScript.
- Create files for the Tessel 2: a JavaScript program and a
.tesselincludefile. - Deploy and run the program on the Tessel 2!
Install Needed Packages
First, we need to install a few modules that we'll use in this application:
npm install socket.io@1.4.8 express justgage
Create Client-Side Application Files
Once npm packages are installed, create a new subdirectory called app/ inside of your j51k directory.
Inside the app directory, create a file called index.html. Type—or copy and paste—the following HTML code into your index.html file:
<!doctype html>
<html lang="en">
  <head>
    <meta charset="utf-8">
    <title>Tessel 2 Enviro-Monitor</title>
    <style>
    .gauge {
      display: block;
      float: left;
    }
    #thermometer,
    #barometer,
    #altimeter,
    #hygrometer {
      width: 25%;
    }
    </style>
  </head>
  <body>
    <div id="thermometer" class="gauge"></div>
    <div id="barometer" class="gauge"></div>
    <div id="altimeter" class="gauge"></div>
    <div id="hygrometer" class="gauge"></div>
    <script src="/socket.io/socket.io.js"></script>
    <script src="/vendor/justgage/justgage.js"></script>
    <script src="/vendor/justgage/raphael-2.1.4.min.js"></script>
    <script src="main.js"></script>
  </body>
</html>
Next, create another file in the app subdirectory called main.js. Type—or copy and paste—the following JavaScript code into your main.js file:
language:javascript
window.onload = function() {
  var socket = io();
  var monitor = {};

  monitor.thermometer = new JustGage({
    id: "thermometer",
    value: 10,
    min: 0,
    max: 100,
    title: "Thermometer",
    label: "° Celsius",
    relativeGaugeSize: true,
  });

  monitor.barometer = new JustGage({
    id: "barometer",
    value: 100,
    min: 50,
    max: 150,
    title: "Barometer",
    label: "Pressure/kPa",
    relativeGaugeSize: true,
  });

  monitor.altimeter = new JustGage({
    id: "altimeter",
    value: 10,
    min: 0,
    max: 100,
    title: "Altimeter",
    label: "Meters",
    relativeGaugeSize: true,
  });

  monitor.hygrometer = new JustGage({
    id: "hygrometer",
    value: 10,
    min: 0,
    max: 100,
    title: "Hygrometer",
    label: "Humidity %",
    relativeGaugeSize: true,
  });

  var displays = Object.keys(monitor);

  socket.on("report", function (data) {
    displays.forEach(function (display) {
      monitor[display].refresh(data[display]);
    });
  });
};
Create Server-Side Files and Code
Back in your j5ik directory (not in the app subdirectory), create a new file called .tesselinclude.
This file is used to tell t2-cli that you have additional files and assets that you want to deploy to the board. This is where you identify files like HTML, browser JavaScript and CSS, images, sounds, videos, etc.
.tesselinclude may include any valid glob expressions. For this exercise, you don't need an in-depth understanding of glob expressions, just type—or copy and paste—the following pattern expressions into your .tesselinclude file:
app/
node_modules/justgage/*.js
With all the "setup" aside, let's get to the actual program. Create a file called monitor.js and save it in the j5ik/ directory. Type—or copy and paste—the following JavaScript code into your monitor.js file:
language:javascript
var http = require("http");
var os = require("os");
var path = require("path");

var five = require("johnny-five");
var Tessel = require("tessel-io");
var board = new five.Board({
  io: new Tessel()
});

var Express = require("express");
var SocketIO = require("socket.io");

var application = new Express();
var server = new http.Server(application);
var io = new SocketIO(server);

application.use(Express.static(path.join(__dirname, "/app")));
application.use("/vendor", Express.static(__dirname + "/node_modules/"));

board.on("ready", () => {
  var clients = new Set();
  var monitor = new five.Multi({
    controller: "BME280",
    elevation: 2,
  });
  var updated = Date.now() - 5000;

  monitor.on("change", () => {
    var now = Date.now();
    if (now - updated >= 5000) {
      updated = now;

      clients.forEach(recipient => {
        recipient.emit("report", {
          thermometer: monitor.thermometer.fahrenheit,
          barometer: monitor.barometer.pressure,
          hygrometer: monitor.hygrometer.relativeHumidity,
          altimeter: monitor.altimeter.meters,
        });
      });
    }
  });

  io.on("connection", socket => {
    // Allow up to 5 monitor sockets to
    // connect to this enviro-monitor server
    if (clients.size < 5) {
      clients.add(socket);
      // When the socket disconnects, remove
      // it from the recipient set.
      socket.on("disconnect", () => clients.delete(socket));
    }
  });

  var port = 3000;
  server.listen(port, () => {
    console.log(`http://${os.networkInterfaces().wlan0[0].address}:${port}`);
  });

  process.on("SIGINT", () => {
    server.close();
  });
});
Try It Out!
Double-check that your j5ik/ directory contains the following:
├── app
│   ├── index.html
│   └── main.js
├── monitor.js
├── node_modules
├── package.json
└── .tesselinclude
There will likely be additional files in your j5ik/ directory from other experiments in this guide, but make sure monitor.js and .tesselinclude are in the j5ik/ directory and that index.html and main.js are inside of j5ik/app.
Type—or copy and paste—the following into your terminal:
t2 run monitor.js
Once the program is bundled and deployed, a URL will be displayed in the terminal. Copy and paste the URL into a browser address bar and press [ENTER].
What You Should See
When the page loads, it should appear similar to this:

Exploring the Code
There is certainly a lot more code in this experiment than in anything we've previously looked at!
It may help to first consider what's going on in the application as a whole:
monitor.jscontains JavaScript code that is executed on the Tessel 2.app/main.jscontains JavaScript that gets executed in your web browser.main.jsis included in theindex.htmlpage that is delivered to the browser.- A web server configured in
monitor.jsserves HTML (index.html) and JS (app/main.jsand a few others included inindex.html) to the browser. - A web socket connection between
monitor.js(the Tessel, or "server-side" JavaScript) andmain.js(the "client-side" JavaScript) allows updates to theMultisensors to be communicated and displayed in-browser in (near) real time.
Monitor.js: The Code That Runs on the Tessel 2
Requiring Some Modules
monitor.js starts out with several require calls, as we bring in our dependencies. The first new dependencies are the built-in—meaning that they come with Node.js and you don't have to npm install them—http, os and path modules. We'll see these again as we go.
language:javascript
var http = require("http");
var os = require("os");
var path = require("path");
Following these are our familiar Tessel-io and Johnny-Five dependencies, and a Board instantiation:
language:javascript
var five = require("johnny-five");
var Tessel = require("tessel-io");
var board = new five.Board({
  io: new Tessel()
});
Then, more new third-party modules: the Express framework API and Socket.IO:
language:javascript
var Express = require("express");
var SocketIO = require("socket.io");
Configuring a Web Application, Server and Socket.io
Once the dependencies are available, a new Express application server instance is created for our web application:
language:javascript
var application = new Express();
The resulting application object is then passed as an argument to the instantiation of a new http.Server object:
language:javascript
var server = new http.Server(application);
Huzzah! Now we have the beginnings of a web server.
Now let's pass that server on to a new SocketIO object (it's turtles all the way down!):
language:javascript
var io = new SocketIO(server);
All of that boilerplate completes the setup of a fully functional HTTP server with simple routing and an Active WebSocket. Yay, Node.js!
Just before we proceed with registering the ready event handler for the board object, we need to set up some basic routing for our application's HTTP requests (that is, when we visit our monitor app, this will tell the server where to find the content to deliver).
language:javascript
application.use(Express.static(path.join(__dirname, "/app")));
application.use("/vendor", Express.static(__dirname + "/node_modules/"));
The first line tells the server to serve up static content. It will treat the app directory as the web root and respond to a browser request for /index.html by delivering the file at app/index.html. The second line makes the content in the local node_modules directory available as the URL path /vendor (e.g., a browser request for /vendor/justgage/justgage.js will result in the delivery of the file at node_modules/justgage/justgage.js).
Using a Set to Contain Clients
The last top-level portion of monitor.js is the by-now-very-familiar registration of a ready event handler for the board object:
language:javascript
board.on("ready", () => {
  // ...
});
Once the ready event is emitted, a new variable called clients is created, whose value is a new Set instance object.
language:javascript
var clients = new Set();
While Set may seem much like Array, it's got its own thing going on. You can't put the same thing in a Set twice. You can't access entries in a Set using a numeric index like you do with Arrays. You can only access stuff in a Set by iterating over the Set in order. You can't change the order of things in a Set once they're there.
Lest that sound like a lot of rules and "can'ts", Sets are great when you do want to iterate over things in order, and they have intuitive methods for getting stuff done.
This clients Set will contain a list of unique connections to our server and allow the program to limit the number of connections to 5. Turns out 5 is a totally arbitrary number to limit connection demands (the more active clients, the more resources the program will use). Nothing goes in the Set just yet.
Handling Changes to the Multi Object
Next, we create a new instance of the Multi class. This time we're setting a baseline elevation, in meters, which can be obtained by visiting whatismyelevation.com/. This will give us a relative altitude from our current elevation (in meters). If you don't set this value, the sensor will display relative altitude from the point of the first pressure reading—you'll be starting from 0!
language:javascript
var monitor = new five.Multi({
  controller: "BME280",
  elevation: 2,
});
We'll need to respond to changes from the monitor (changes to the values of any of its sensors) and tell all of the connected clients about that so that the freshest values can be displayed. We can do that by triggering (emit-ting) a report event. There's a small wrinkle to this: emitting a report event causes the gauges displayed on the web page to refresh and re-animate. Doing this too often causes browser performance woes. So we'll throttle the report events to happen, at most, every five seconds (change events fire pretty frequently). That's the purpose of the updated variable—to keep track of the last time a report event was emitted.
Once we know we do want to emit a report event, it's easy to iterate over the clients because, yay, Sets make that handy. So: iterate over the clients, emit the report event on each client entry:
language:javascript
var updated = Date.now() - 5000;

monitor.on("change", () => {
  var now = Date.now();
  if (now - updated >= 5000) {
    updated = now;

    clients.forEach(recipient => {
      recipient.emit("report", {
        thermometer: monitor.thermometer.fahrenheit,
        barometer: monitor.barometer.pressure,
        hygrometer: monitor.hygrometer.relativeHumidity,
        altimeter: monitor.altimeter.meters,
      });
    });
  }
});
Yeah, so where'd these clients (0--5 of 'em) all come from? That bit comes next:
language:javascript
io.on("connection", socket => {
  // Allow up to 5 monitor sockets to
  // connect to this enviro-monitor server
  if (clients.size < 5) {
    clients.add(socket);
    // When the socket disconnects, remove
    // it from the recipient set.
    socket.on("disconnect", () => clients.delete(socket));
  }
});
Whenever there is a connection event on the io object (io is a SocketIO instance):
- Are there fewer than five clients already connected? Good. If so:
a.
addthat client (socket) to theclientsSet. b. When that new client (socket) later emits adisconnectevent, remove (delete) that client from theclientsSet. That frees up room for more connections.
Getting the Web Server Going
All right! Time to kick our web server into gear.
language:javascript
var port = 3000;
server.listen(port, () => {
  console.log(`http://${os.networkInterfaces().wlan0[0].address}:${port}`);
});
That'll make the server listen on port 3000. It'll also helpfully log the URL for you so you can view it from a browser (on the same network, anyway).
Respecting the great circle of life, the server also needs to know when it's time to die. It listens for a SIGINT (SIGnal INTerrupt) on the process object (which represents the actual software process). That is: when the program's process stops running, close the server.
JavaScript for the Browser: main.js
The main.js script is included in index.html and is the JavaScript that drives the display of the pretty gauges. Most of the stuff going on here uses third-party code (justgages and socket.io).
The server-side code that's running on the Tessel has a socket server, and now we'll create the other end of that connection by creating a socket client:
language:javascript
var socket = io();
Then we're creating new JustGage objects, stored in a monitor object. The options passed to JustGage define details about the gauge: its appearance, range, etc.
language:javascript
var monitor = {};

monitor.thermometer = new JustGage({
  id: "thermometer",
  value: 10,
  min: 0,
  max: 100,
  title: "Thermometer",
  label: "° Celsius",
  relativeGaugeSize: true,
});

monitor.barometer = new JustGage({
  id: "barometer",
  value: 100,
  min: 50,
  max: 150,
  title: "Barometer",
  label: "Pressure/kPa",
  relativeGaugeSize: true,
});

monitor.altimeter = new JustGage({
  id: "altimeter",
  value: 10,
  min: 0,
  max: 100,
  title: "Altimeter",
  label: "Meters",
  relativeGaugeSize: true,
});

monitor.hygrometer = new JustGage({
  id: "hygrometer",
  value: 10,
  min: 0,
  max: 100,
  title: "Hygrometer",
  label: "Humidity %",
  relativeGaugeSize: true,
});
Next, make a list of the monitor gauges, stored in a variable called displays:
language:javascript
var displays = Object.keys(monitor);
Finally, and very importantly, the socket client object registers an event handler called report—this will handle that report event that comes from our server! Inside the handler, iterate all of the entries in displays and refresh each monitor gauge:
language:javascript
var displays = Object.keys(monitor);

socket.on("report", function (data) {
  displays.forEach(function (display) {
    monitor[display].refresh(data[display]);
  });
});
Building Further
- Build a home-monitoring app with Blynk -- Have your phone interact with your Tessel 2 to monitor the temperature and humidity in your home.
- Report your data to a data-streaming service (i.e. Blynk, ThingSpeak, and Cayenne). For more information, check out the blog post about the Three IoT Platforms for Makers.
- Log your data to a CSV file using the file system -- If you don't have access to the internet, log your data to a text file using the file system on your Tessel 2.
Reading Further
- JavaScript — JavaScript is the programming language that you'll be using.
- Node.js — Node.js is the JavaScript runtime where your programs will be executed.
- Johnny-Five — Johnny-Five is a framework written in JavaScript for programming hardware interaction on devices that run Node.js.