Experiment Guide for the Johnny-Five Inventor's Kit
 rwaldron
 reconbot
 D___Run___
 lyzadanger
 Shawn Hymel
Experiment 11: Soil Moisture Sensor
Introduction
In this experiment, you'll use the SparkFun soil moisture sensor to alert you when your plants are getting sad and need a bit of water to cheer up.
Remember Experiment 6? In that experiment, you built a voltage divider circuit to read light intensity data as voltage from a photoresistor. Good news: the SparkFun moisture sensor has an on-board voltage divider—it does that part for you. All you need to do is power it and read the analog values coming from its signal (third) pin. When the soil is getting dry, we'll turn on a yellow LED to warn you. Moist and good? Then we'll turn on a blue LED.
Preflight Check
Whoa there, Turbo! If this is your first experiment with the Johnny-Five Inventor's Kit (J5IK) and the Tessel 2, there are a few things you gotta do first:Suggested Reading
The following tutorials provide in-depth background on some of the hardware concepts in this experiment:
Parts Needed
You will need the following parts for this experiment:
- 1x Tessel 2
- 1x Breadboard
- 1x Soil Moisture Sensor
- 1x Standard Yellow LED
- 1x Standard Blue LED
- 2x 100Ω Resistor
- 9x Jumper Wires


Introduction to the Soil Moisture Sensor

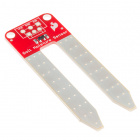
The SparkFun Soil Moisture Sensor is a simple breakout board for measuring the moisture in soil and similar materials. The soil moisture sensor is straightforward to use. The two large exposed pads function as probes for the sensor, together acting as a variable resistor. The more water that is in the soil, the better the conductivity between the pads will be, which will result in a lower resistance and a higher SIG (output voltage).
To get the SparkFun Soil Moisture Sensor functioning, all you need to do is connect the VCC and GND pins to your Tessel 2. You will receive a SIG out, which will depend on the amount of water in the soil. Oh, and you'll also need a bit of dirt in a pot to test it all out!
One commonly known issue with soil moisture sensors is their short lifespan when exposed to a moist environment. To combat this, we've had the PCB coated in Gold Finishing (ENIG, or Electroless Nickel Immersion Gold).
Hardware Hookup
Let's get this circuit wired up! Your plants are waiting to tell you if they are thirsty or not.
| Polarized Components | Pay special attention to the component’s markings indicating how to place it on the breadboard. Polarized components can only be connected to a circuit in one direction. |
Build the Soil Sensor Circuit
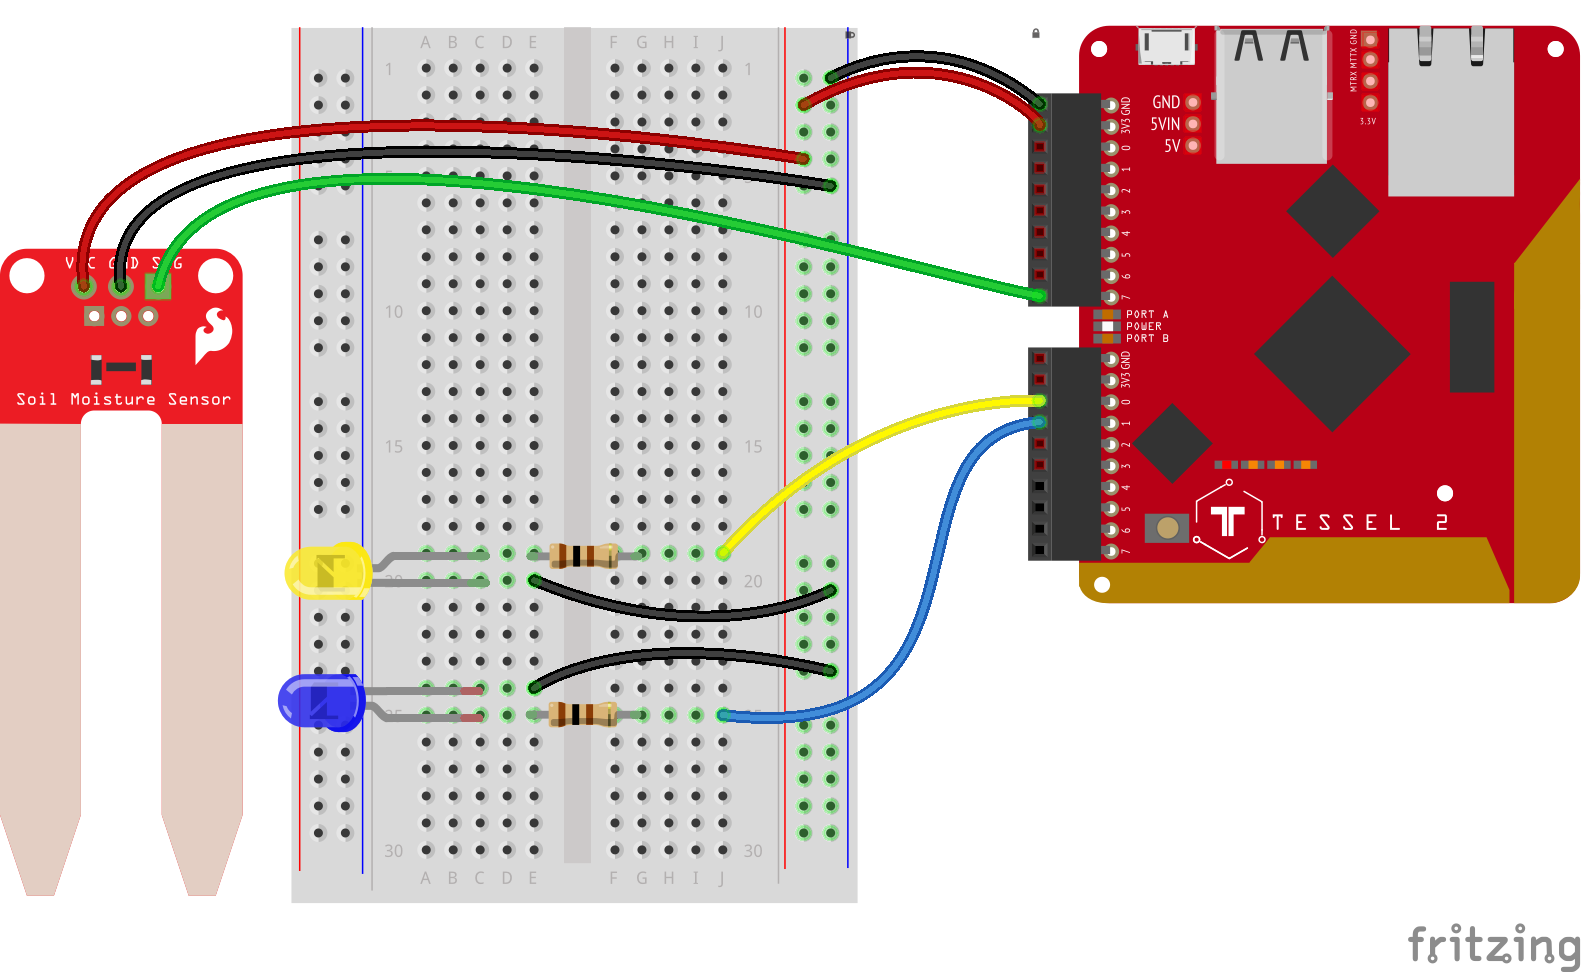
- Connect three jumper wires to the soil sensor: one each for VCC, GND and SIG (supply voltage, ground, signal out) pins. Connect the power and ground jumper wires to the power rail of the breadboard. Connect the SIG pin to Tessel's Port A, Pin 7.
- Connect the blue and yellow LEDs to the breadboard. Connect a 100Ω to each LED's anode (longer leg) such that it spans the center notch on the breadboard. Then connect a jumper wire between each of the resistors and Port B, Pin 0 (yellow LED) and Port B, Pin 1 (blue LED). Connect the LED's cathodes to the ground power rail.
- Connect the Tessel's 3.3V and GND pins to the breadboard power rail using jumper wires.
Monitoring Soil Moisture With Johnny-Five
Open your favorite code editor, create a file called moisture.js and save it in the j5ik/ directory. Type—or copy and paste—the following JavaScript code into your moisture.js file:
language:javascript
var Tessel = require("tessel-io");
var five = require("johnny-five");

var board = new five.Board({
  io: new Tessel()
});

board.on("ready", () => {
  var dry = new five.Led("b0");
  var wet = new five.Led("b1");
  var both = new five.Leds([dry, wet]);
  var soil = new five.Sensor("a7");

  dry.on();

  soil.on("change", () => {
    /*
      Condition   Low   High
      ----------------------
      Dry           0    300
      Damp        300    700
     */
    if (wet.isOn && soil.value < 300) {
      both.toggle();
    } else {
      if (dry.isOn && soil.value > 300) {
        both.toggle();
      }
    }
  });
});
Put some dry soil into two small containers (paper cups would work great). Pour some water into the soil in one of the containers so that it is nicely damp but not saturated.
Type—or copy and paste—the following into your terminal:
t2 run moisture.js
Move the soil sensor between the dry and wet soil samples to see the LEDs light up.
What You Should See
When the moisture sensor is in a "dry" condition, the yellow LED will be lit. When the moisture sensor is in a "damp" or "wet" condition, the blue LED will light up.
Exploring the Code
Once the board object has emitted the ready event, the program initializes the instance objects that will be used to observe the sensor and output a state based on its condition. For that, you'll create two Led objects, an Leds collection object that contains those Led objects, and a Sensor object for the soil sensor.
language:javascript
var dry = new five.Led("b0");
var wet = new five.Led("b1");
var both = new five.Leds([dry, wet]);
var soil = new five.Sensor("a7");
Set the "dry" condition indicator LED to be on by default—don't worry; this program will right itself even if the sensor is initially in a "damp" or "wet" condition.
language:javascript
dry.on();
The last major piece of program initialization is the Sensor's change event handler. This code indicates that the program wants to be informed whenever the soil Sensor reading changes:
language:javascript
soil.on("change", () => {
  // ...
});
Within the "change" handler, the program will determine which indicator LED should be on, based on the value of the sensor:
language:javascript
/*
  Condition   Low   High
  ----------------------
  Dry           0    300
  Damp        300    700
 */
if (wet.isOn && soil.value < 300) {
  both.toggle();
} else {
  if (dry.isOn && soil.value > 300) {
    both.toggle();
  }
}
Led's toggle method will cause the LED to swap its current state (if it's off, it will turn on; if it's on, it will turn off).
The logic above can be written and reasoned about in a narrative form:
If the wet indicator is on and the soil sensor's value is less than 300, toggle the state of both indicators; otherwise, if the dry indicator is on and the soil sensor's value is greater than 300, toggle the state of both indicators.
These predicate conditions ensure that the indicators do not toggle on and off wildly as each change event is received. This could happen because analog input sensors are generally very noisy.
Building Further
- Use a single RGB LED instead of two colored LEDs
- Have your plant Tweet you when it needs to be watered
- Build an IFTTT Project to email you when your Tessel 2 detects water/ moisture
Reading Further
- JavaScript — JavaScript is the programming language that you'll be using.
- Node.js — Node.js is the JavaScript runtime where your programs will be executed.
- Johnny-Five — Johnny-Five is a framework written in JavaScript for programming hardware interaction on devices that run Node.js.