Fingerprint Scanner (GT-521Fxx) Hookup Guide
 bboyho
Example Code for Arduino
Using SDK_Demo.exe w/ FPS_Serial_Passthrough.ino
Testing this with a Arduino Uno based microcontroller (i.e RedBoard Programmed w/ Arduino or Arduino Uno ) and the serial passthrough code, I was able to connect to the SDK demo software provided on the fingerprint scanner's product page. This might be another alternative if you do not have a 3.3V FTDI to connect to your fingerprint scanner.
To use the SDK demo with an Arduino microcontroller connected to the fingerprint scanner, you need to:
- Build a circuit between the Arduino and scanner using logic level translation. This is assuming that you are using a 5V Arduino.
- In the Arduion IDE, upload the FPS_Serial_Passthrough.ino sketch to your Arduino.
- In the SDK_demo.exe labeled Serial Port Number , select a COM port that is lower than COM10 (COM3 should be the lowest that you can use).
- Select a baud rate of 9600 .
- After uploading the serial passthrough code or powering the Arduino for the first time during the session, you will need to reset the Arduino. Press the RESET button.
- After the Arduino initializes, press on the "Open" button in the SDK
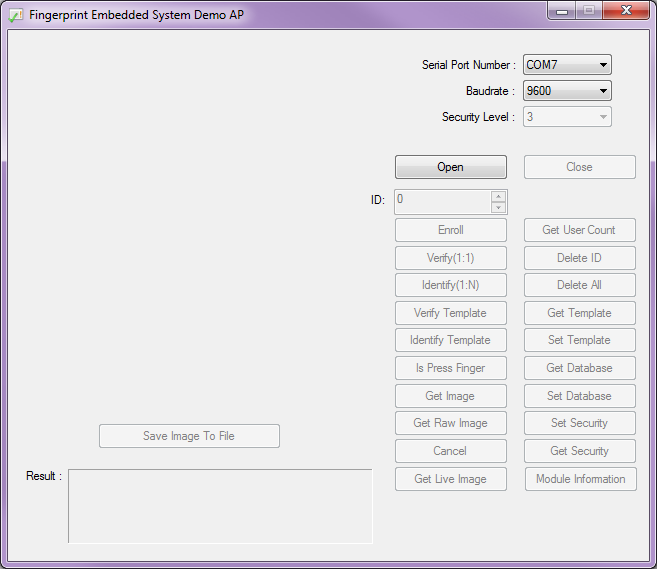
The image below shows the SDK_Demo before it is opened with an Arduino on COM7 and a baud of 9600 :
Hawley's FPS_GT511C3 Library for Arduino
Note: This example assumes you are using the latest version of the Arduino IDE on your desktop. If this is your first time using Arduino, please review our tutorial on installing the Arduino IDE. If you have not previously installed an Arduino library, please check out our installation guide.
To create a standalone system that can read fingerprints without the aid of a computer, you will need to replicate what the demo software does in Arduino code. Luckily there is a fingerprint scanner Arduino library written by jhawley. The code does most of the leg work for you and handles a lot of the complicated protocol commands. You can download it directly using the link below or find the source files on the GitHub repo.
This library is limited in functionality compared to the SDK_Demo.exe, but it gets the job done. If you look at the comments in the FPS_GT511C3's library, certain functions were not implemented due to the Atmega328P's memory restrictions. Certain functions were also not needed when it was originally written. The FPS_GT511C3 library and example code works with the GT511C3 and GT511C1R models.
The library has three examples. Each one performs a different task with the FPS:
- Blink the white LED.
- Enroll a fingerprint.
- Attempt to identify the fingerprint against the local database.
Example 1: Basic Serial Test w/ FPS_Blink.ino
The FPS_Blink.ino sketch is a basic test to see if the Arduino is able to talk with the fingerprint scanner through the serial UART. As a basic sanity check, it is recommended to test this code to make sure that your connections are correct and the scanner is able to send/receive commands. The code sets up a the Arduino's hardware serial UART for debugging and tells the scanner to send serial debug messages. The code also initializes the connection with the fingerprint scanner.
Once the setup is complete, the Arduino will tell the fingerprint scanner to toggle the white LED. By opening the serial monitor at 9600 baud, you should see this output:
FPS - Open
FPS - SEND: "55 AA 01 00 00 00 00 00 01 00 01 01"
FPS - RECV: "55 AA 01 00 00 00 00 00 30 00 30 01"

FPS - LED on
FPS - SEND: "55 AA 01 00 01 00 00 00 12 00 13 01"
FPS - RECV: "55 AA 01 00 00 00 00 00 30 00 30 01"

FPS - LED off
FPS - SEND: "55 AA 01 00 00 00 00 00 12 00 12 01"
FPS - RECV: "55 AA 01 00 00 00 00 00 30 00 30 01"
The code will repeat and toggle the LED while printing to the serial monitor.
Example 2: Enrolling w/ FPS_Enroll.ino
The FPS_Enroll.ino is used for enrolling a fingerprint each time the Arduino is reset. The fingerprint will save in a template within the scanner's local database. The code will initialize like the FPS_Blink.ino sketch. Instead of toggling the LED, the LED will remain on to scan a fingerprint. Before the end of the setup() function, it will jump to the Enroll() function. The Enroll() function will look for an empty template ID and begin enrolling your fingerprint.
Below is what to expect in the serial monitor when enrolling a finger successfully:
    Press finger to Enroll #3
    Remove finger
    Press same finger again
    Remove finger
    Press same finger yet again
    Remove finger
    Enrolling Successful
The scanner will reject a fingerprint if the scanner is not able to recognize your finger at anytime during the enrollment process. If your finger is not placed in the same position like the other scans, the template will not be saved. When this happens, you will need to restart the enrollment process.
Below is what to expect when the scanner fails if the first scan does not match the second scan.
    Press finger to Enroll #4
    Remove finger
    Press same finger again
    Failed to capture second finger
Try enrolling a fingerprint by uploading the code and following the serial monitor's output. To enroll more than one fingerprint, just reset the Arduino.
Example 3: Identifying w/ FPS_IDFinger.ino
The FPS_IDFinger.ino sketch checks to see if a finger is on the scanner. Once a finger has been placed on the scanner, it checks the fingerprint against any of the fingerprints saved in the local database. You will be notified through the serial monitor if the fingerprint matches an ID, if the fingerprint is not found, or when it fails to read the fingerprint. After checking and lifting your finger, it will request for another fingerprint to check.
Below is what you would expect when using this example:
Verified ID:0
Finger not found
Finger not found
Verified ID:0
Verified ID:0
Please press finger
Please press finger
Please press finger
Verified ID:2
Please press finger
Verified ID:2
Please press finger
Looking at the output, "Finger not found" usually means that: the fingerprint does not match any of the template IDs or when the the scanner is not able to clearly read the fingerprint. If the finger has been enrolled, you would need to make sure that you place the fingerprint on the scanner just like when you scanned the finger.
Adjust Code for GT-521F52's 3000 ID's
Depending on what model you are using, make sure to change number of fingerprint IDs. For example,the GT521F52 can hold 3000 fingerprint IDs instead of 200. When enrolling a fingerprint to the GT-521F52, you will need to make sure to change retval < 200 to retval < 3000 for the FPS_GT511C3::Enroll1(), FPS_GT511C3::Enroll2(), and FPS_GT511C3::Enroll3() functions in the FPS_GT511C3.cpp file.
When identifying a fingerprint with the GT-521F52, make sure to update if (retval > 200) retval = 200; to if (retval > 3000) retval = 3000; for the FPS_GT511C3::Identify1_N() function in the FPS_GT511C3.cpp file. You will also need change id <200 to id <3000 in the FPS_IDFinger.ino file.
Try testing the scanner with the code to see if the scanner is able to read the fingerprints that were enrolled.
Software Serial w/ Other Microcontrollers
The demo code was originally designed for the ATmega328P on the Arduino Uno. If you were using it with ATmega2560 (i.e. Arduino Mega 2560) or ATmega32U4 (i.e. Arduino Leonardo, Pro Micro 5V/16MHz, Pro Micro 3.3V/8Mhz, FioV3, etc.), you would need to re-configure the software serial pin definitions and adjust the connections. Not all the pins can support change interrupts for a serial Rx pin depending on what Arduino microcontroller is used. For more information, try looking at the reference language for the Software Serial library.
To use the FPS on an Arduino Mega 2560 or Arduino Leonardo, you would just need to comment out the line where it says:
language:c
SoftwareSerial fps(4, 5); // (Arduino SS_RX = pin 4, Arduino SS_TX = pin 5)
and uncomment out the line here:
language:c
SoftwareSerial fps(10, 11); // (Arduino SS_RX = pin 10, Arduino SS_TX = pin 11)
Once you change the code, make sure to rewire your connections to follow the pin definitions.
Caution: The FPS_GT511C3 library may not work for all microcontrollers using the Arduino IDE. As you move away from the ATmega328P family, you may need to modify the code or port the library over to get it working. It would be easier and faster to just have an Atmega328P bootloaded with Arduino to handle the FPS code. To use the fingerprint scanner, you could just write additional code to have the ATmega328P send serial data to the other microcontroller.