Getting Started with the Teensy
 Toni_K
 MTaylor
Programming
To start working with the Teensy, all you need to do is plug in your USB cable to your computer and your Teensy board. There are two options for programming the Teensy boards - the Arduino IDE or your favorite C compiler.
Arduino IDE
Teensyduino Add-On Installation
You will need to download the Teensyduino add-on for Arduino. You can find the Teensyduino download from PJRC here.
Please follow their installation instructions for the most up-to-date version of the Teensyduino. You will also need to select which Teensy-compatible libraries you'd like to install at that time. If you aren't sure which libraries you will want, you can always download them and install them later from the curated list.
Programming the Teensy
When you first plug the Teensy in, the appropriate drivers will be installed (if using a Windows machine). Your Teensy should default to the standard Blink sketch. You should see the LED blinking, as a quick check to make sure your board is functioning.
Open up the Arduino IDE, and select the appropriate Teensy board from the Board menu. This will provide you with additional options in the Tools menu.
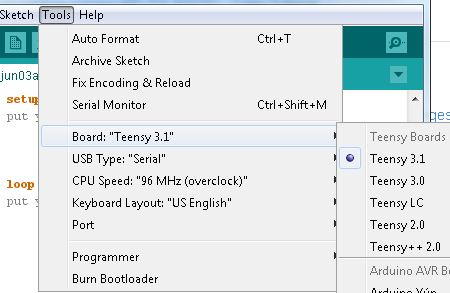
If you would like to use the Teensy as an HID, MIDI, or user interface device (such as a keyboard or mouse), you can select that option from the USB Type menu.
The CPU speed can be changed for low-power applications.
The Keyboard Layout option can be updated to your preferred style.
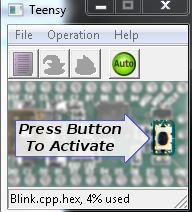
Press the button on the Teensy to open the Teensy loader program. You should see this window:
Verify your example code, and upload to the board as usual in the Arduino IDE. You will need to hit the on-board button once the IDE has compiled the code to finish uploading it to your Teensy. You should only need to do this the first time you upload code for the duration that your Teensy is powered.
C Compiler
This is typically a more advanced option. For step-by-step instructions on using a C-compiler for the Teensy, please check out PJRC's directions here. You will still need to download and install the Teensyduino and modify the Arduino files to use the Makefile for the Teensy boards.
Additional support for other languages is slowly being added. Please check here for more information.
MicroPython
For those that are comfortable with Python language, you can also load MicroPython on the Teensy! Check out the following tutorial for more information on getting started.