Internet of Things Experiment Guide
 Shawn Hymel
 Introduction
The Internet of Things (IoT) is the network of connected physical objects, such as vehicles, buildings and people. These objects, or "things," are often embedded with electronics to include sensors, actuators and microcontrollers that enable the devices to sense the environment around them, log data in real time, communicate with services or other devices, and be remotely controlled.
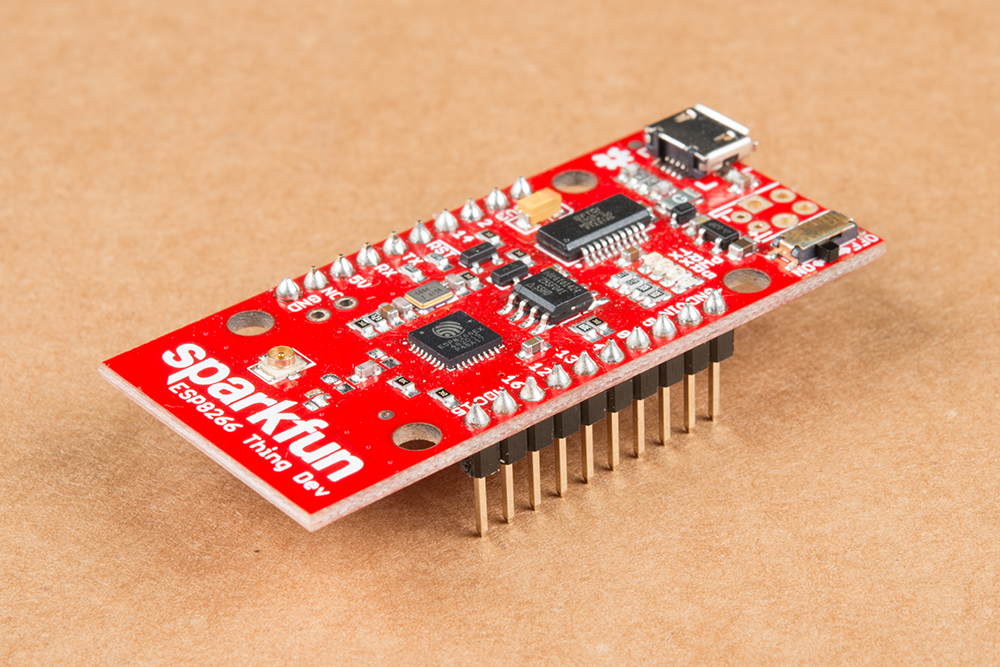
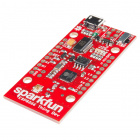
The SparkFun ESP8266 Thing Dev Board is a microcontroller board with a built-in WiFi radio, which makes it a fantastic development platform for IoT and home automation projects.

Lucky for us, we can use the Arduino IDE to program the Thing Dev Board, which makes life easy for programming and configuring our IoT projects. This guide will show you how to set up your Thing Dev Board and construct a few simple (but useful!) connected projects involving logging sensor data and controlling home appliances.
Required Materials
To follow along with this tutorial, you'll need the following parts:
Suggested Reading
We recommend checking out the following guides before diving in with the IoT experiments:
How to Solder: Through-Hole Soldering
How to Use a Breadboard
What is an Arduino?
ESP8266 Thing Development Board Hookup Guide
Soldering and Arduino Setup
Soldering
If your ESP8266 Thing Dev Board did not come with pre-soldered headers, you'll need to attach them yourself. Solder male break-away headers or stackable headers to the Thing Dev Board.
Arduino
The ESP8266 community has created a library and bootloader that allows us to program ESP8266 chips and boards using Arduino (see this GitHub repository for more information).
Once you have the Arduino IDE installed, follow the directions on this page to install the ESP8266 library.
At the end of the installation guide, you should have the Thing Dev Board running the Blink sketch:

Configure ThingSpeak
For these examples, we'll be using ThingSpeak.
ThingSpeak is an open source IoT data channel created by MathWorks (the same people who make MATLAB).
ThingSpeak allows us to read and write data to channels, which are logs of numbers, strings, etc. Each channel can have up to eight fields, which are groupings of similar data.
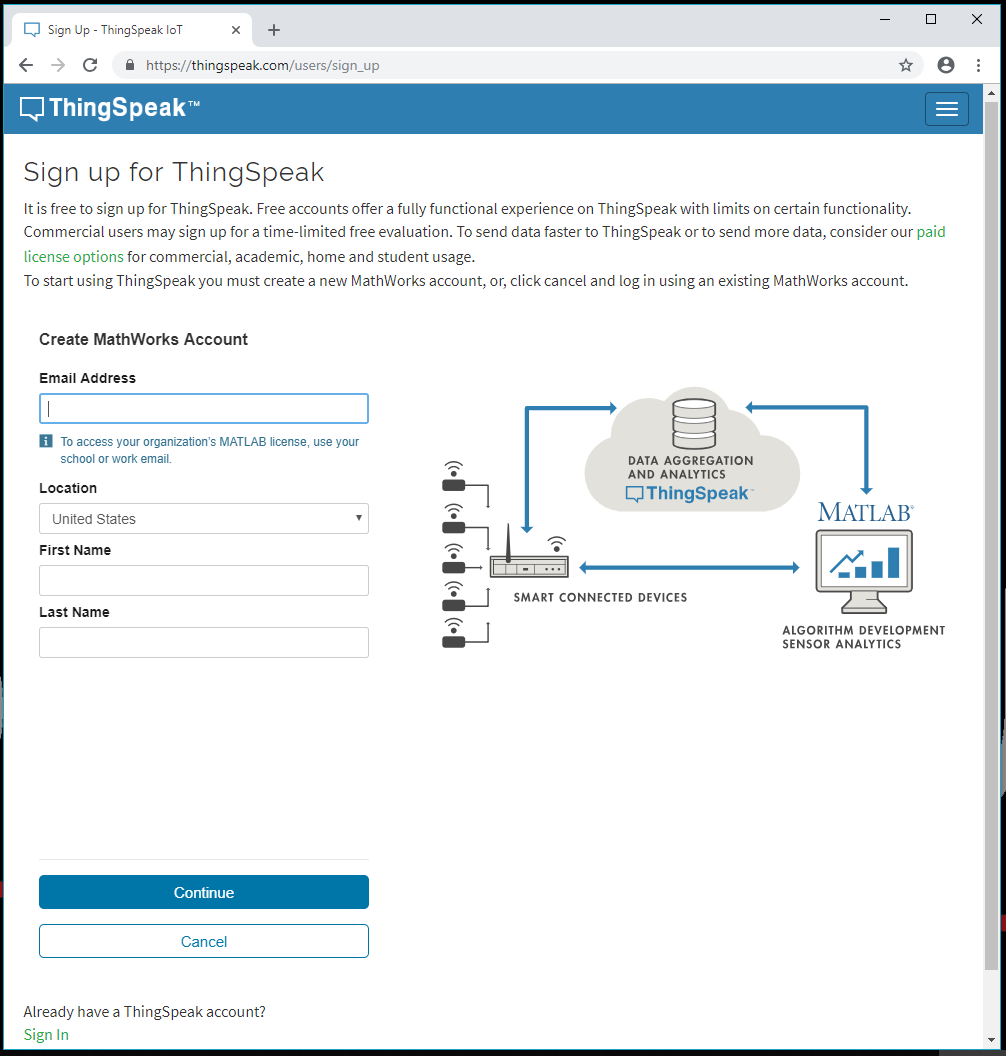
Create an Account
To use ThingSpeak, you'll need to create an account. Don't worry; it's free. Head to ThingSpeak.com. At the top right of the page, click Sign Up.
-> 
 <-
<-
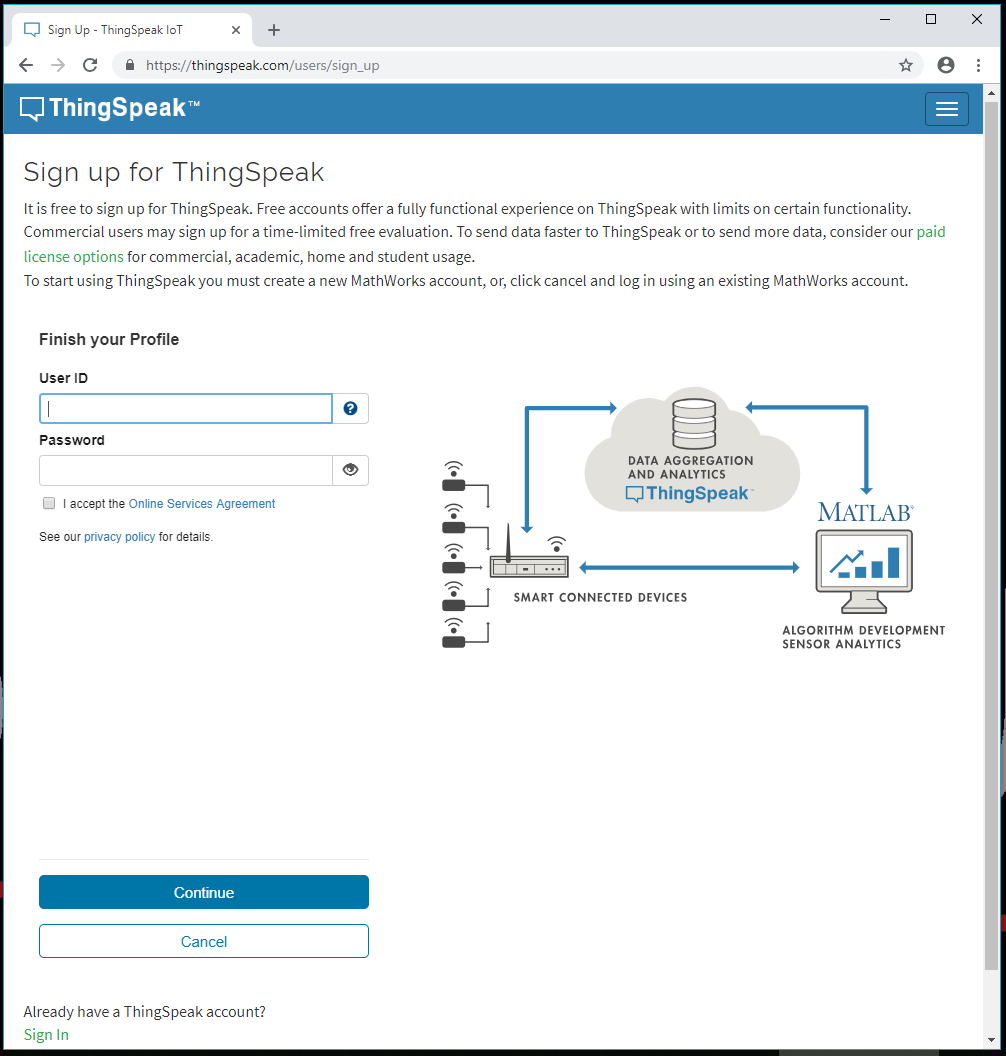
Fill out the form and click Create Account. And that's it! You'll be presented with a welcome screen where you can make your first channel. We'll do that in the next section.
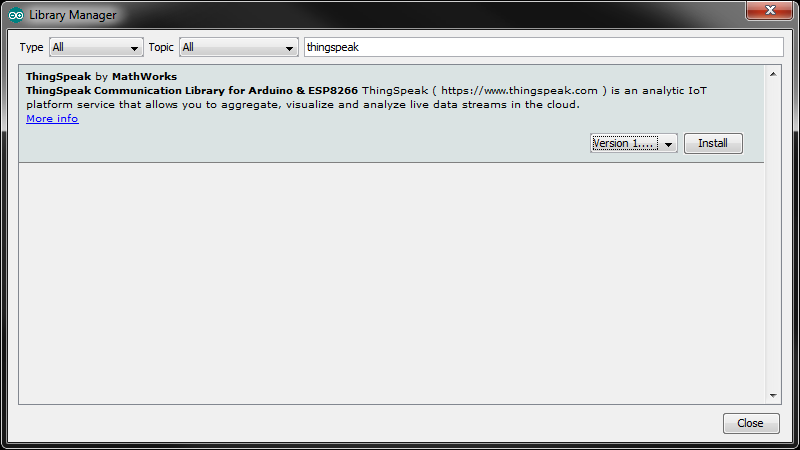
Install ThingSpeak Arduino Library
In the Arduino IDE, go to Sketch > Include Library > Manage Libraries... Search for thingspeak and click Install. Note that ThingSpeak library v1.2.1 was used for this guide.
Experiment 1: Temperature and Humidity Logging
One of the most basic IoT projects is to log data from a sensor to an online channel, and we're going to do just that. For the first experiment, we'll capture temperature and humidity data from a sensor and post it to our ThingSpeak channel.
Parts Needed
- SparkFun ESP8266 Thing Dev Board
- Humidity and Temperature Sensor - RHT03
- Breadboard
- M/M Jumper Wires
Hardware Hookup
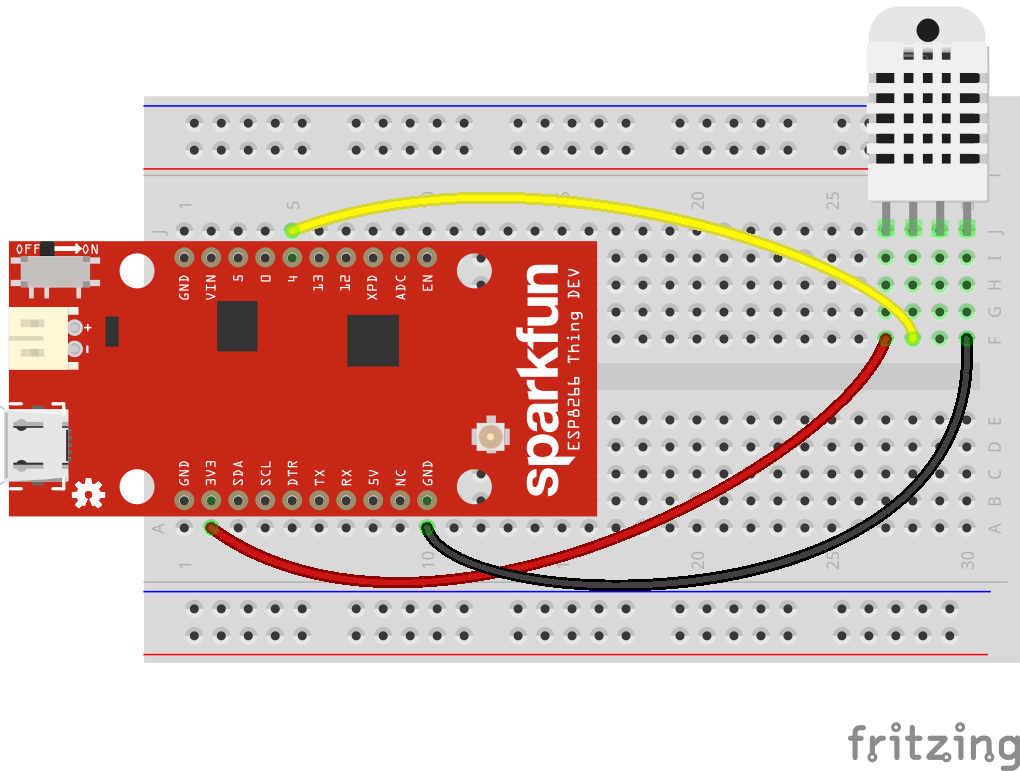
Connect the RHT03 to the Thing Dev board as shown:
Create ThingSpeak Channel
Head to thingspeak.com, sign in, and navigate to Channels > My Channels.
Click New Channel, and fill out the required information, adding fields 2 and 3 to your channel.

Scroll down to the bottom of the page, and click Save Channel.
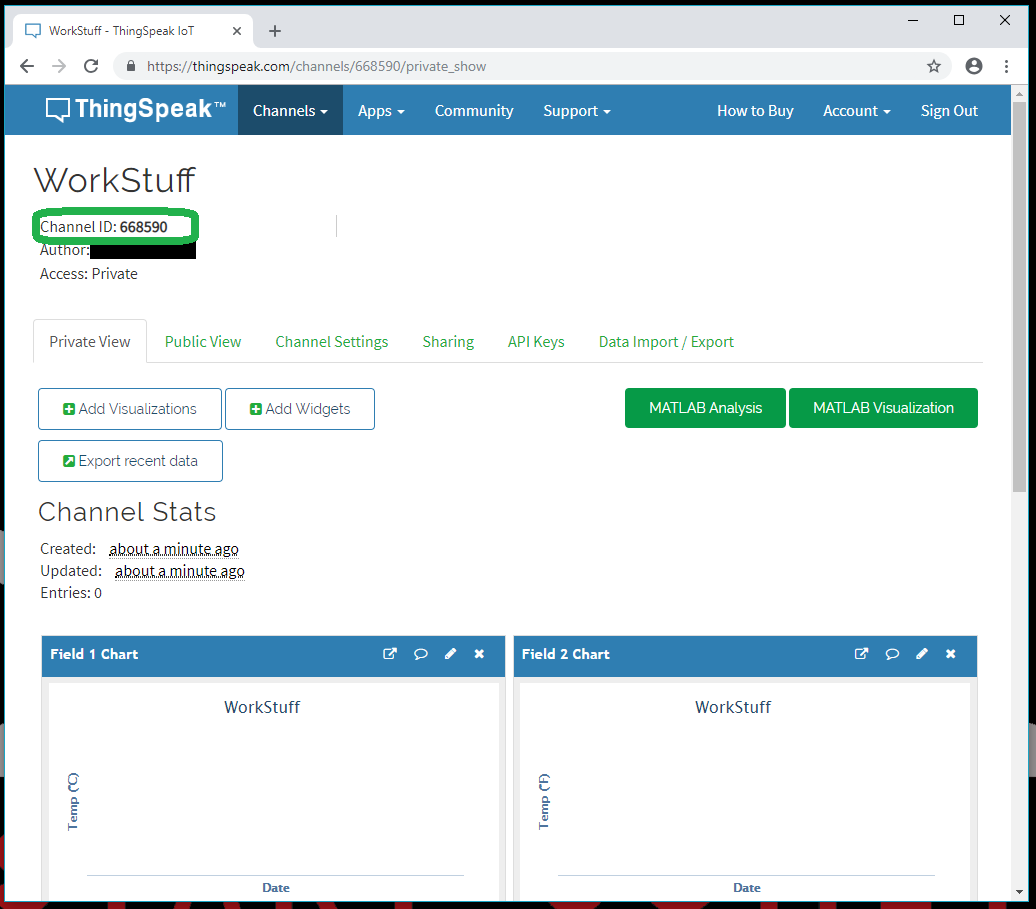
On the page that follows, copy down your Channel ID number (highlighted in the screenshot below).
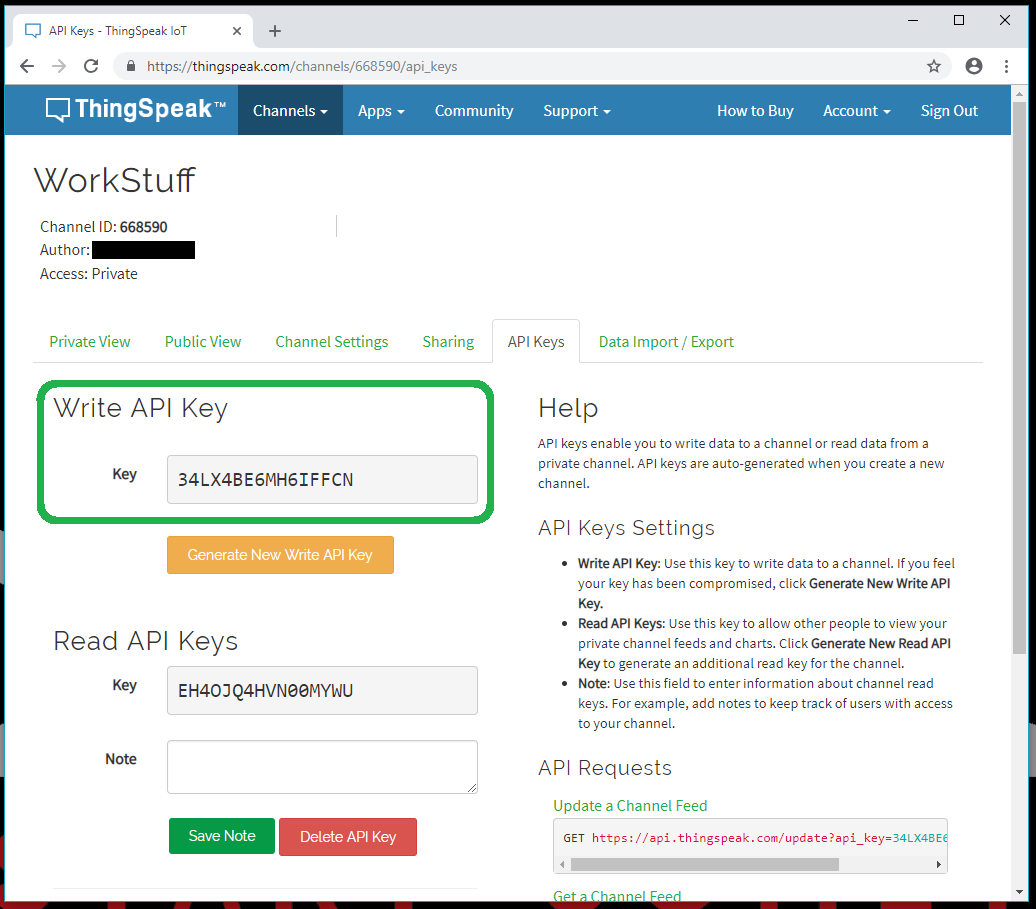
Click on API Keys and copy your Write API Key.
The Code
Note: This example assumes you are using the latest version of the Arduino IDE on your desktop. If this is your first time using Arduino, please review our tutorial on installing the Arduino IDE.
If you have not previously installed an Arduino library, please check out our installation guide.In a new Arduino sketch, copy in the code below (make sure you have the ThingSpeak library and the RHT03 library installed!). In the code, find the section under // WiFi and Channel parameters, and change <YOUR WIFI SSID>, <YOUR WIFI PASSWORD>, <THINGSPEAK CHANNEL ID>, and <THINGSPEAK WRITE API KEY> to your WiFi network's name, password, ThingSpeak Channel ID, and Write API Key, respectively.
language:c
/**
 * IoT Kit - Temperature and Humidity Logger
 * Author: Shawn Hymel (SparkFun Electronics)
 * Date: October 30, 2016
 *
 * Log temperature and humidity data to a channel on
 * thingspeak.com once every 20 seconds.
 *
 * Connections:
 *   Thing Dev |  RHT03
 *  -----------|---------
 *      3V3    | 1 (VDD)
 *        4    | 2 (DATA)
 *      GND    | 4 (GND)
 *
 * Development environment specifics:
 *  Arduino IDE v1.6.5
 *  Distributed as-is; no warranty is given.
 */

#include <ESP8266WiFi.h>
#include <SparkFun_RHT03.h>
#include "ThingSpeak.h"

// WiFi and Channel parameters
const char WIFI_SSID[] = "<YOUR WIFI SSID>";
const char WIFI_PSK[] = "<YOUR WIFI PASSWORD>";
unsigned long CHANNEL_ID = <THINGSPEAK CHANNEL ID>;
const char * WRITE_API_KEY = "<THINGSPEAK WRITE API KEY>";

// Pin definitions
const int RHT03_DATA_PIN = 4;
const int LED_PIN = 5;

// Global variables
WiFiClient client;
RHT03 rht;

void setup() {

  // Set up LED for debugging
  pinMode(LED_PIN, OUTPUT);

  // Connect to WiFi
  connectWiFi();

  // Initialize connection to ThingSpeak
  ThingSpeak.begin(client);

  // Call rht.begin() to initialize the sensor and our data pin
  rht.begin(RHT03_DATA_PIN);
}

void loop() {

  // Flash LED to show that we're sampling
  digitalWrite(LED_PIN, LOW);

  // Call rht.update() to get new humidity and temperature values from the sensor.
  int updateRet = rht.update();

  // If successful, the update() function will return 1.
  if (updateRet == 1)
  {

    // The tempC(), tempF(), and humidity() functions can be
    // called after a successful update()
    float temp_c = rht.tempC();
    float temp_f = rht.tempF();
    float humidity = rht.humidity();

    // Write the values to our ThingSpeak channel
    ThingSpeak.setField(1, temp_c);
    ThingSpeak.setField(2, temp_f);
    ThingSpeak.setField(3, humidity);
    ThingSpeak.writeFields(CHANNEL_ID, WRITE_API_KEY);
  }
  else
  {

    // If the update failed, try delaying for some time
    delay(RHT_READ_INTERVAL_MS);
  }

  // Turn LED off when we've posted the data
  digitalWrite(LED_PIN, HIGH);

  // ThingSpeak will only accept updates every 15 seconds
  delay(20000);
}

// Attempt to connect to WiFi
void connectWiFi() {

  byte led_status = 0;

  // Set WiFi mode to station (client)
  WiFi.mode(WIFI_STA);

  // Initiate connection with SSID and PSK
  WiFi.begin(WIFI_SSID, WIFI_PSK);

  // Blink LED while we wait for WiFi connection
  while ( WiFi.status() != WL_CONNECTED ) {
    digitalWrite(LED_PIN, led_status);
    led_status ^= 0x01;
    delay(100);
  }

  // Turn LED off when we are connected
  digitalWrite(LED_PIN, HIGH);
}
Run It!
When you upload and run the Arduino code on the Thing Dev Board, it should connect to your WiFi and begin sending data to ThingSpeak about once every 20 seconds. You'll see data points appearing in the charts in your channel under the Private View tab.

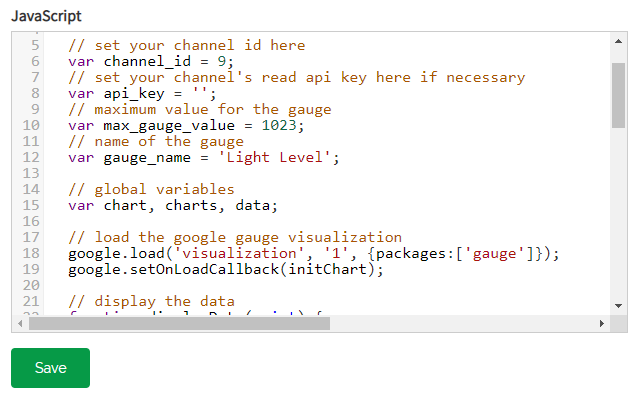
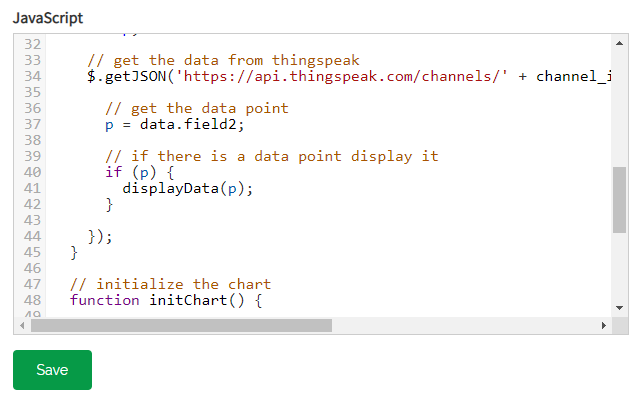
Challenge
If you go to the Apps tab and select Plugins, you'll be able to create an embeddable widget for your data channel. If you're familiar with HTML, JavaScript and CSS, you can customize these widgets to do things like display a chart with multiple series.
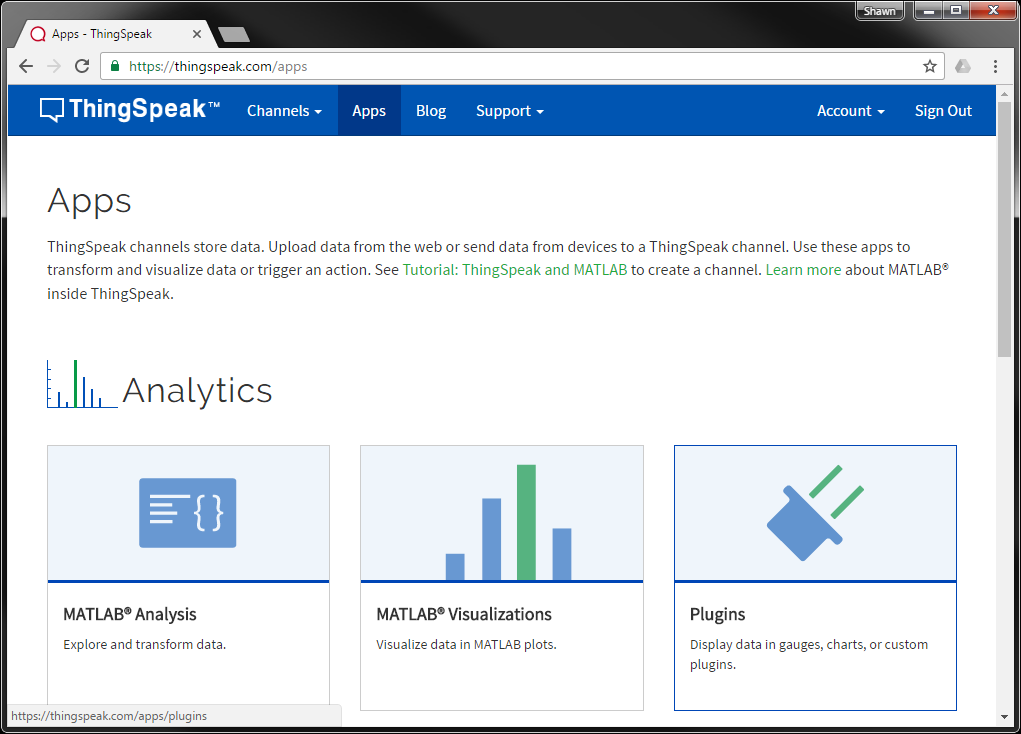
See if you can create a gauge plugin, modify it so it shows the temperature in Fahrenheit, and display it on your channel.

Click on the images for a closer look.
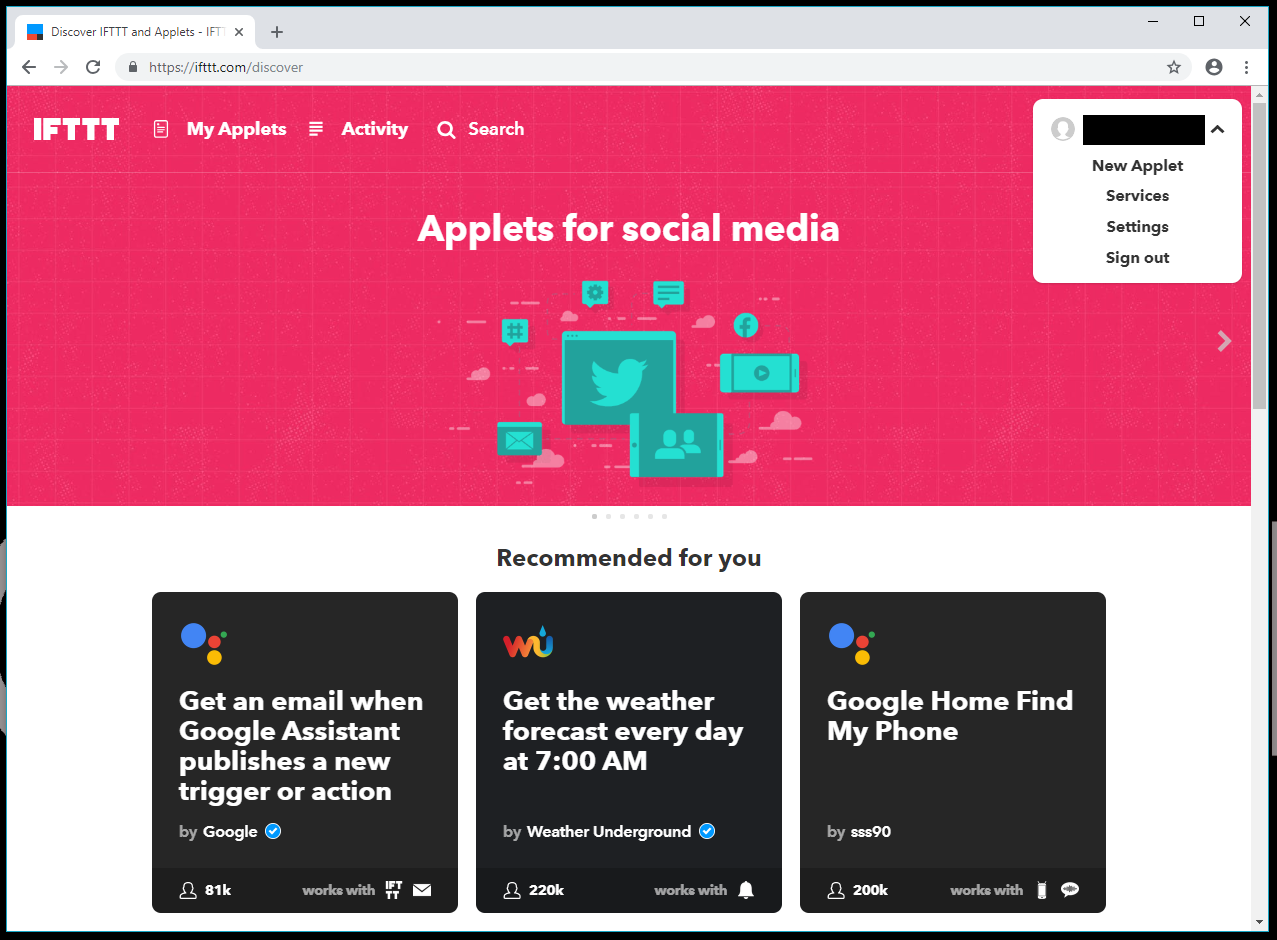
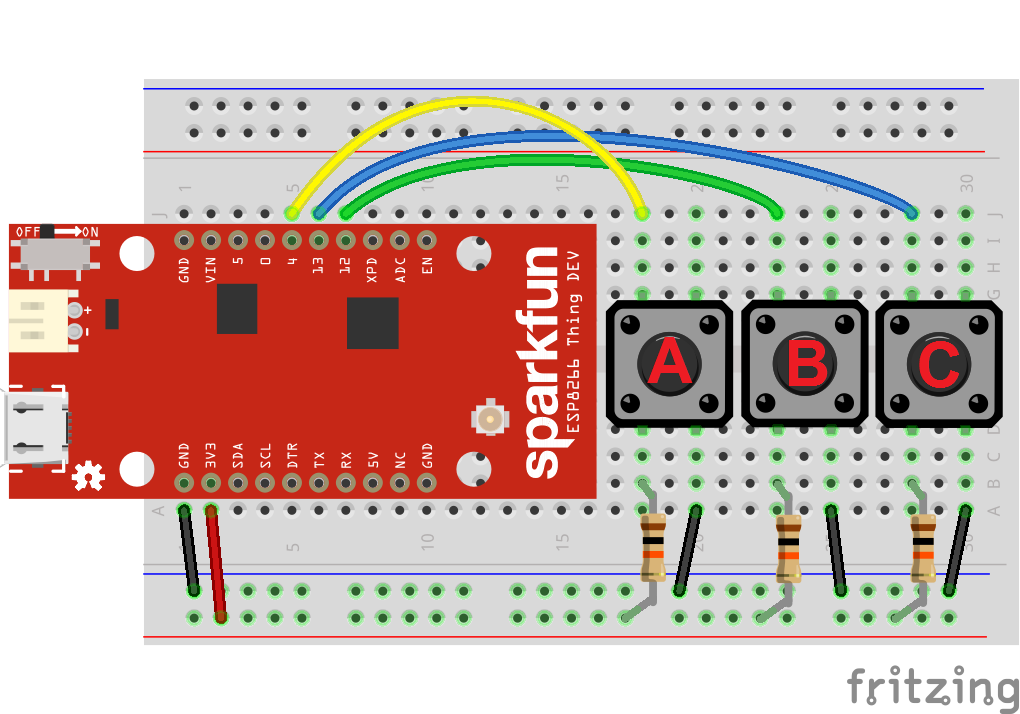
Experiment 2: IoT Buttons
If you've seen Amazon's IoT Button and wondered what you can use it for, we've got some possible solutions for you! First, though, we need to build our own IoT button, but why build one when you can build three?
Parts Needed
- SparkFun ESP8266 Thing Dev Board
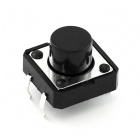
- 3x 12mm Momentary Pushbutton
- 3x 10k Ohm Resistor
- Breadboard
- M/M Jumper Wires
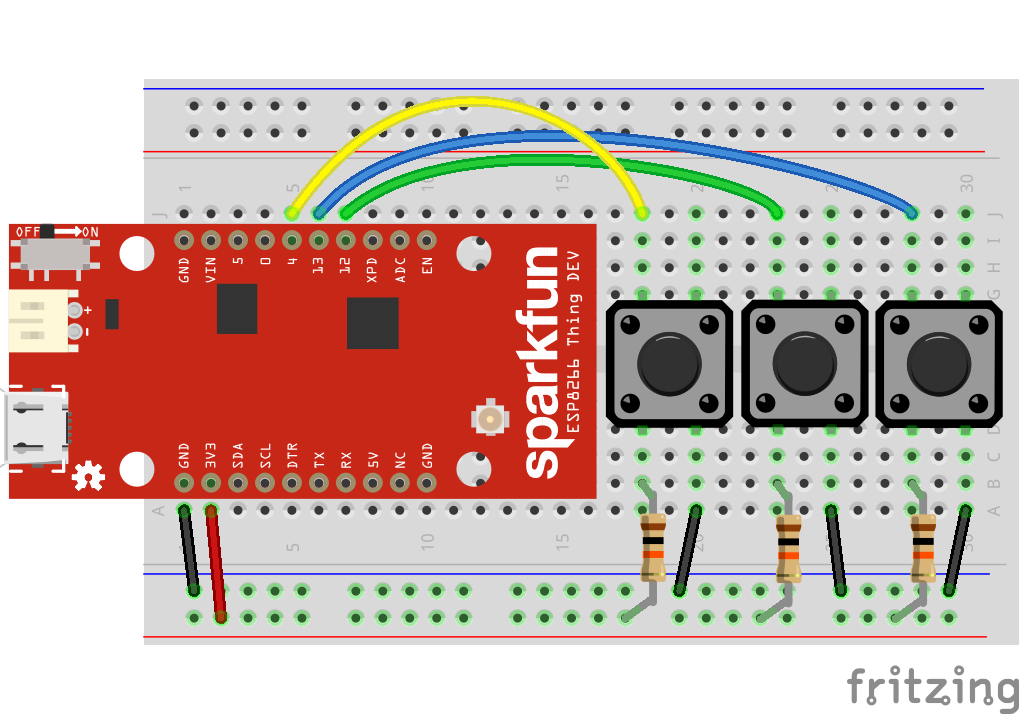
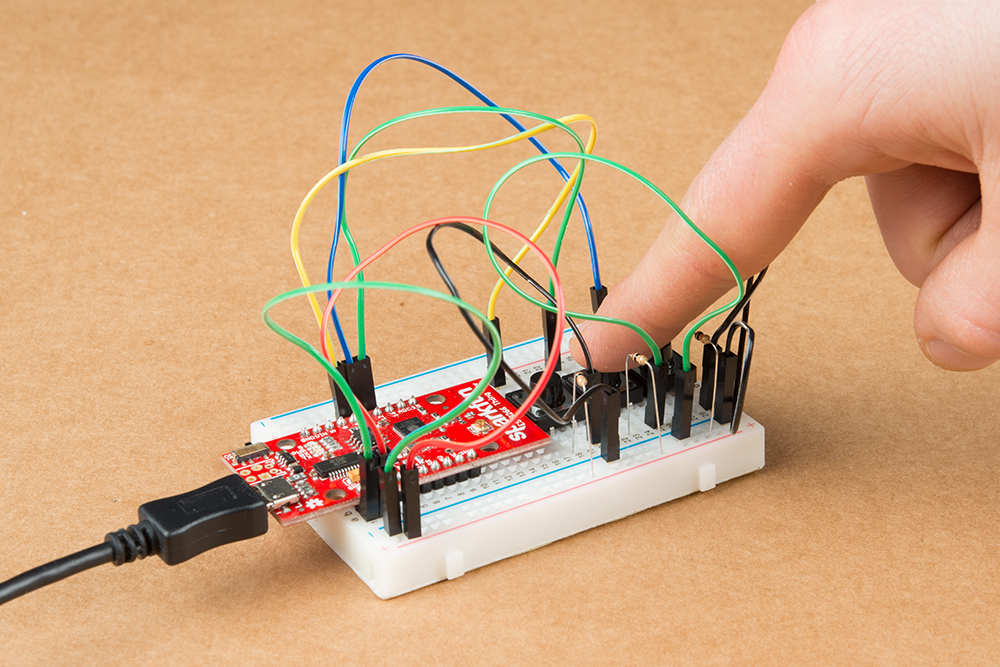
Hardware Hookup
Connect the buttons to the Thing Dev board as shown:
Create IFTTT Applet for Button A (send an email reminder)
If This, Then That (IFTTT) is a free web service that allows you to connect other web services together. For example, you can send yourself an email whenever a certain hashtag on Twitter is used. For this applet, we'll send ourselves an email reminder whenever we push Button A connected to our Thing Dev Board.
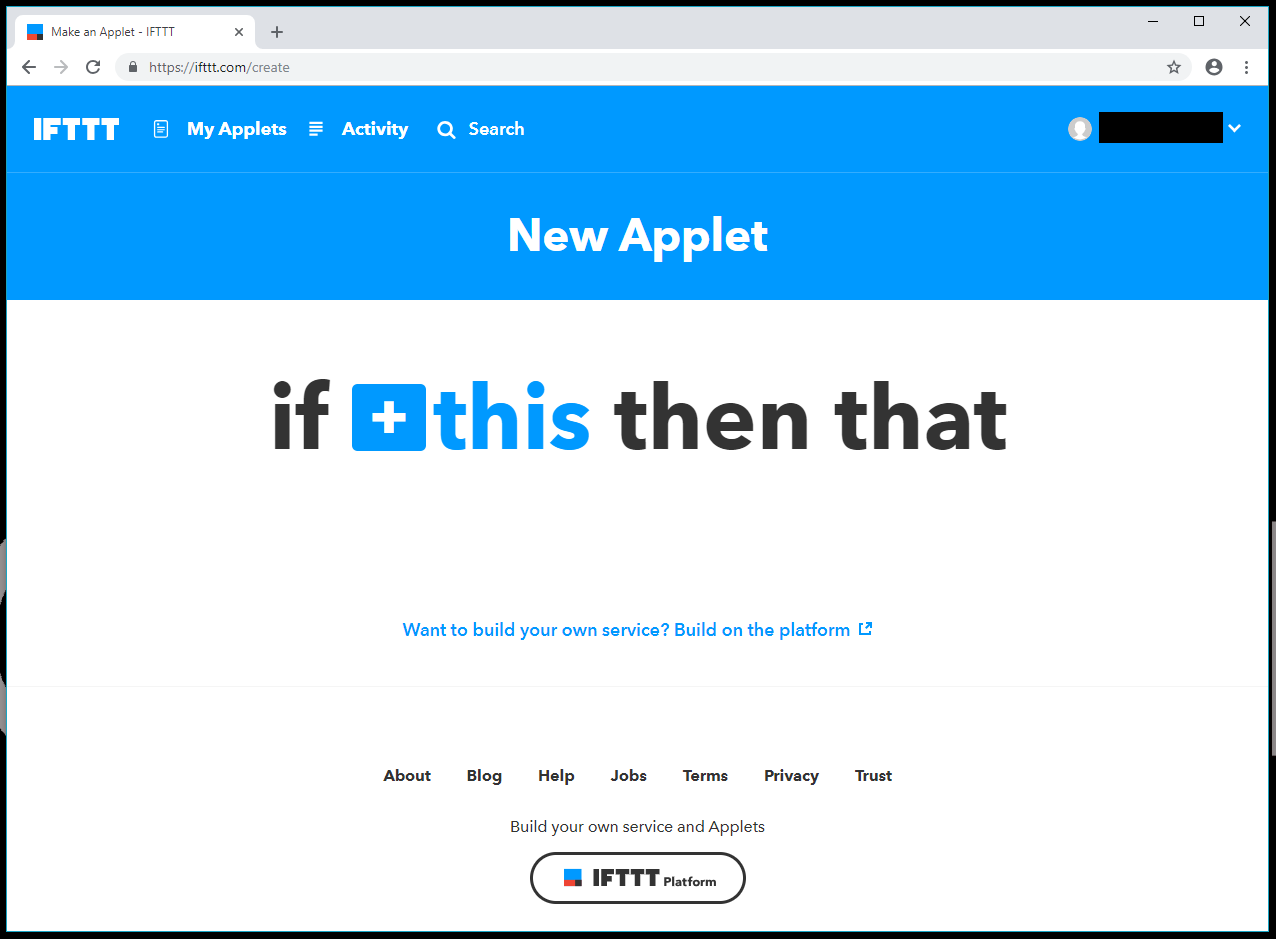
To get started, head to ifttt.com, and create a new account. Once signed in, click on your username, and select New Applet.
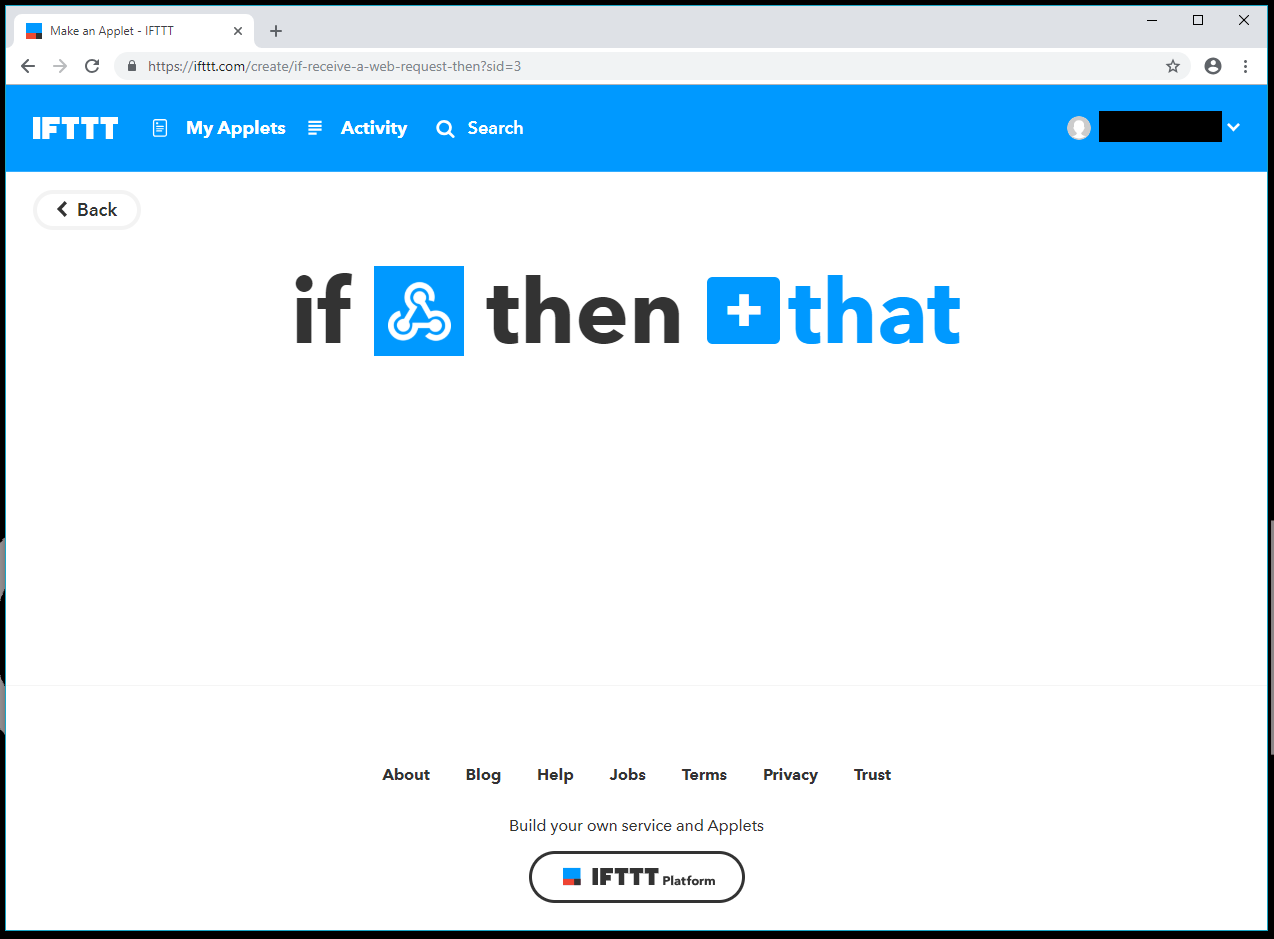
You'll be presented with the New Applet page. Click on the highlighted + this (the trigger for the event).
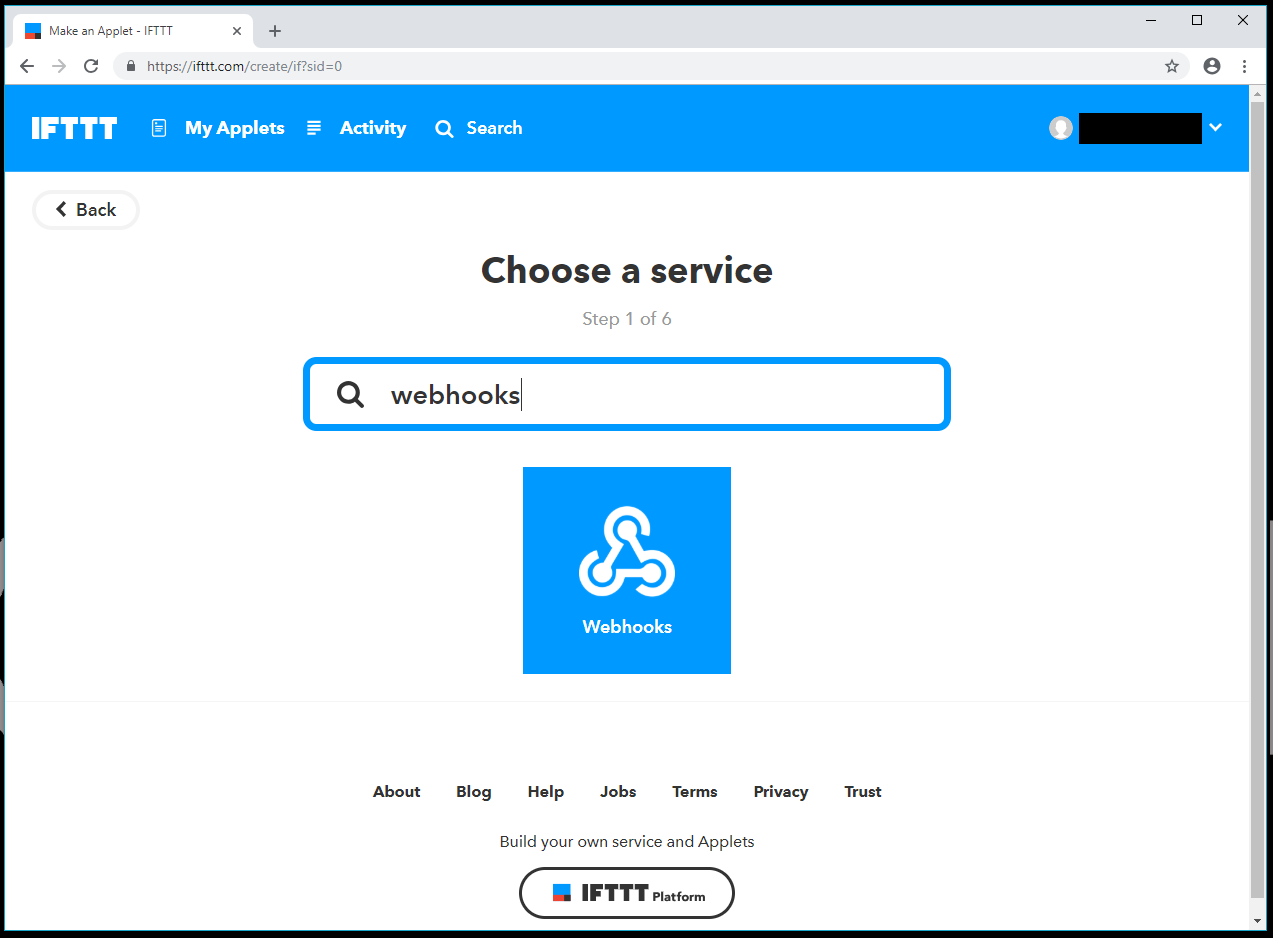
Search for "webhooks" and click on the Webhooks icon. This will allow us to receive HTTP requests from other websites (we'll be sending requests from ThingSpeak).
The first time you click on the Webhooks channel, you'll be asked to connect the Webhooks service to IFTTT. Follow the instructions on the site to do that.
When you finish connecting to the Webhooks channel, you'll be presented with an option to choose the trigger.
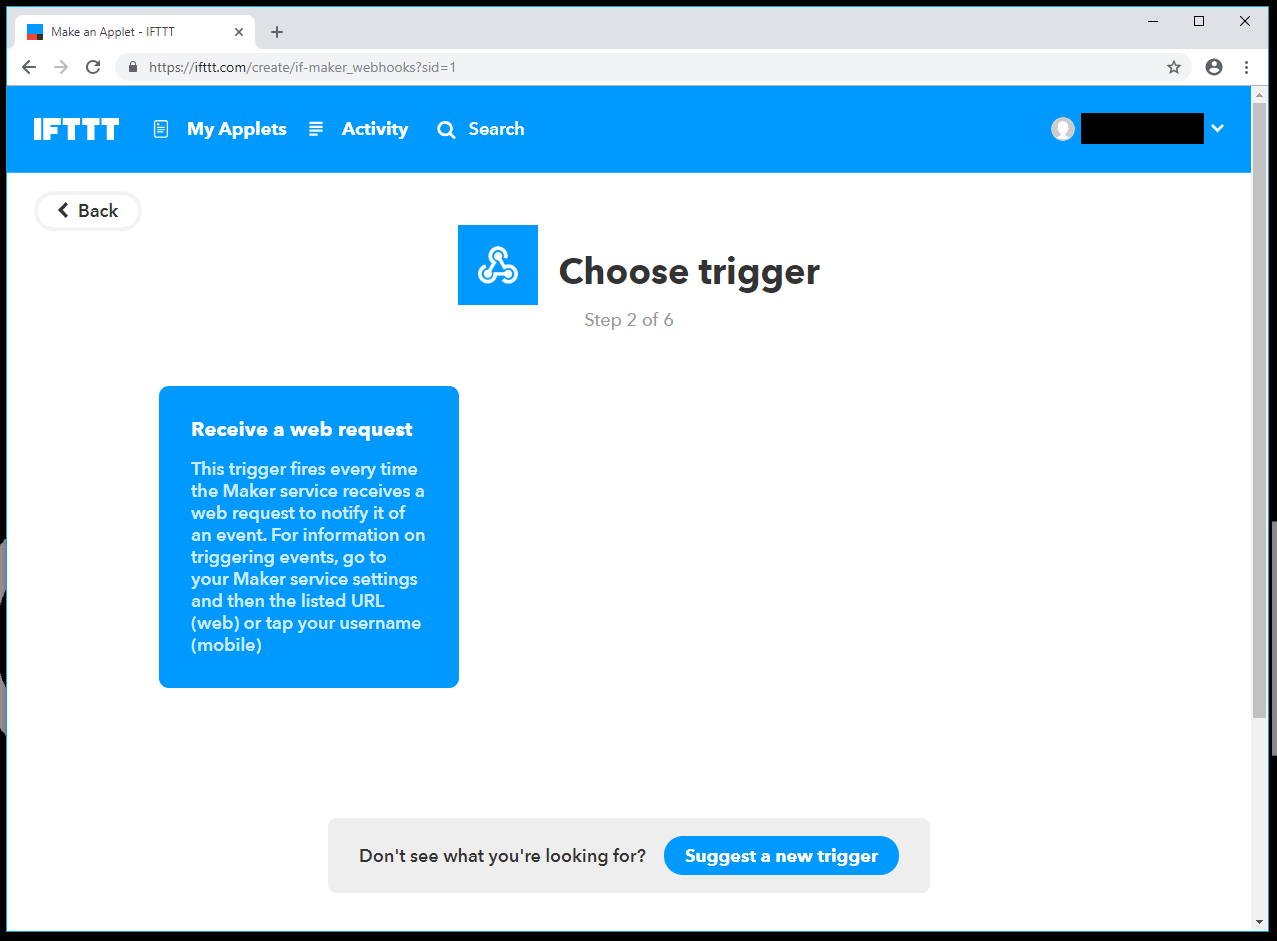
Click on Receive a web request, and name the event "button_a".

Click Create trigger, and you'll be presented with another screen showing your applet creation progress.
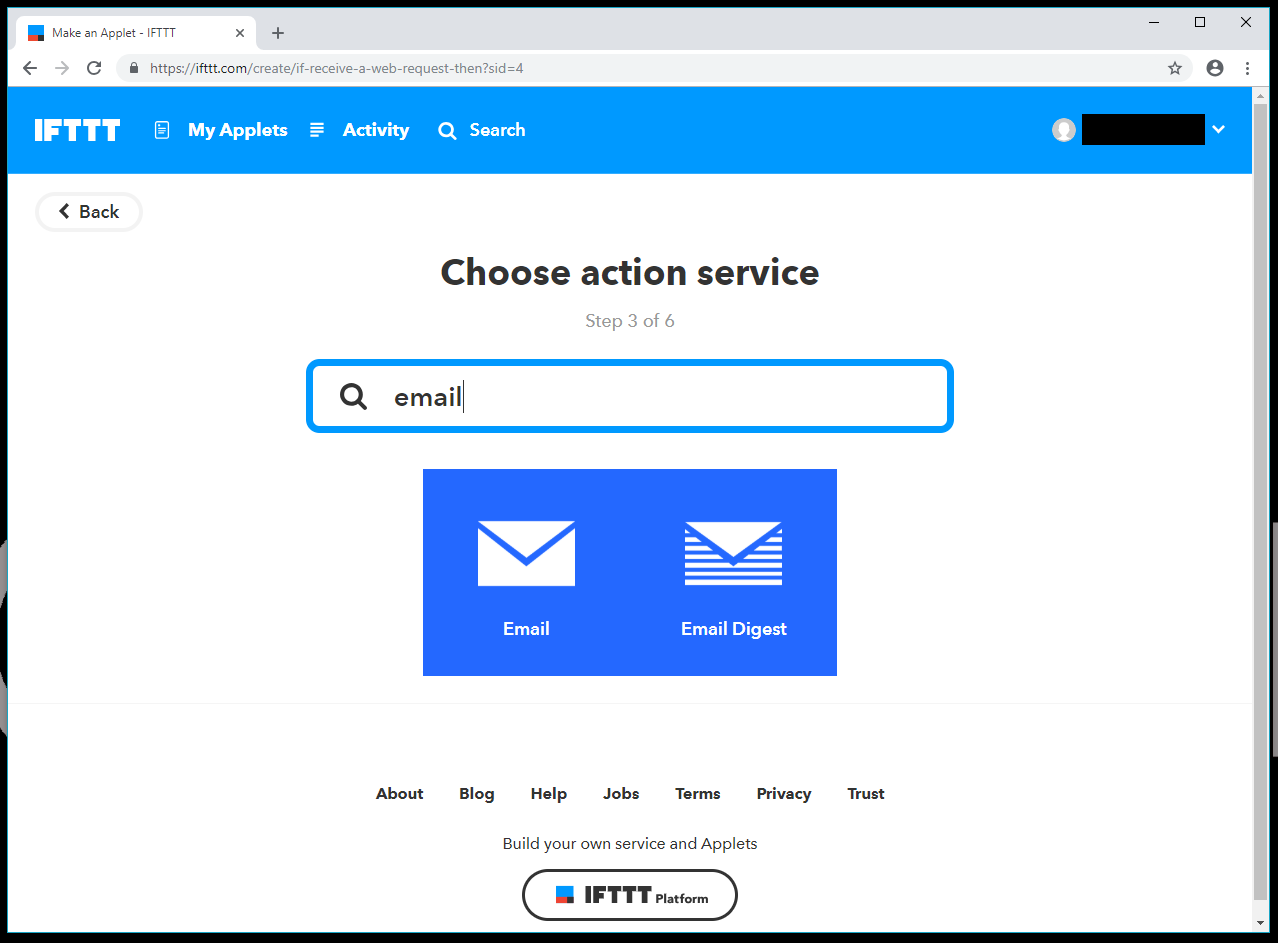
Click on + that to define the action that occurs whenever your "button_a" web request trigger occurs. Search for "email".
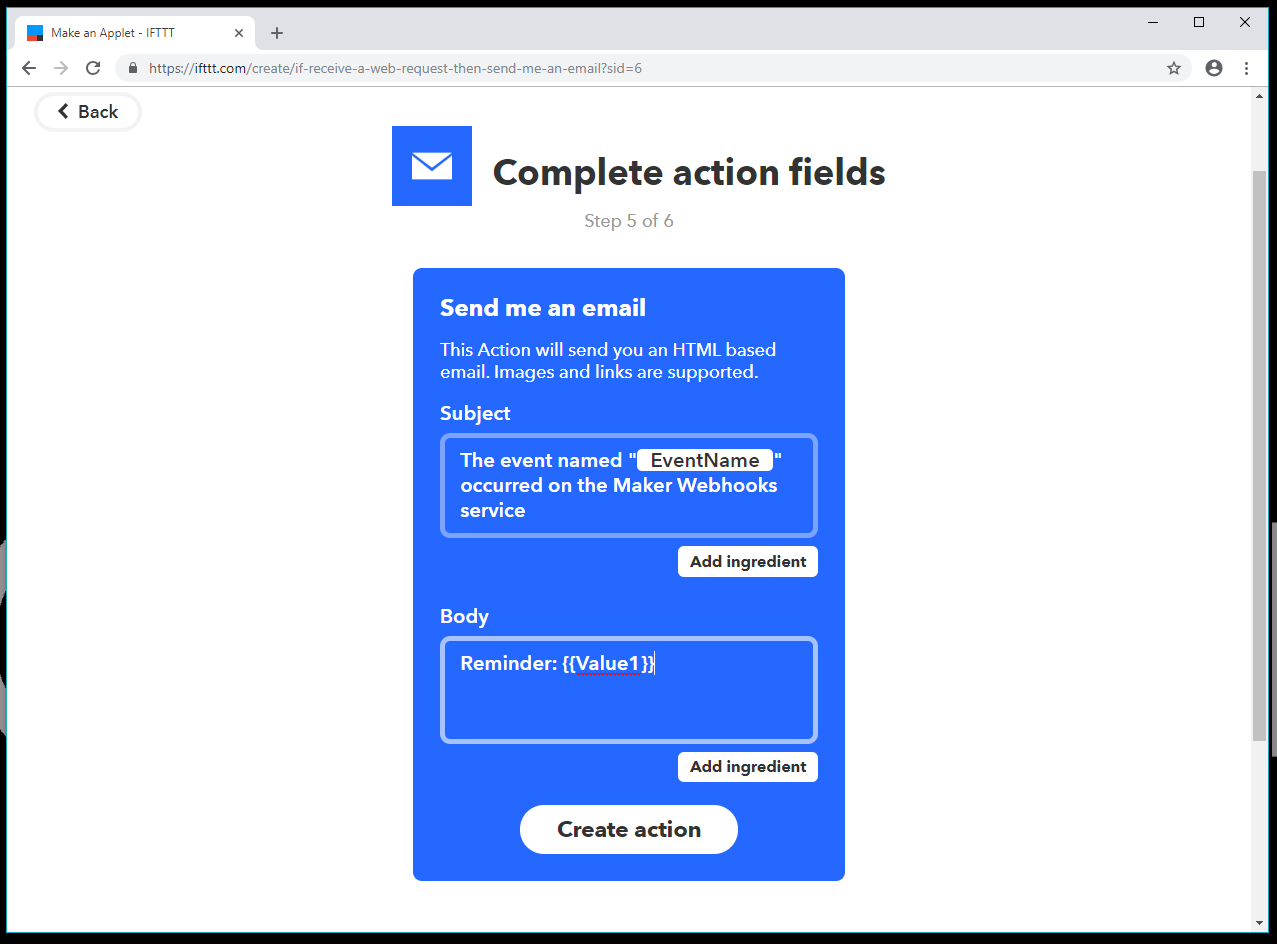
Click on the Email icon. On the next screen, click Send me an email. Leave the Subject line alone and change the body to:
Reminder: {{Value1}}
{{value1}} is a parameter that we will pass to IFTTT in our web request from ThingSpeak.
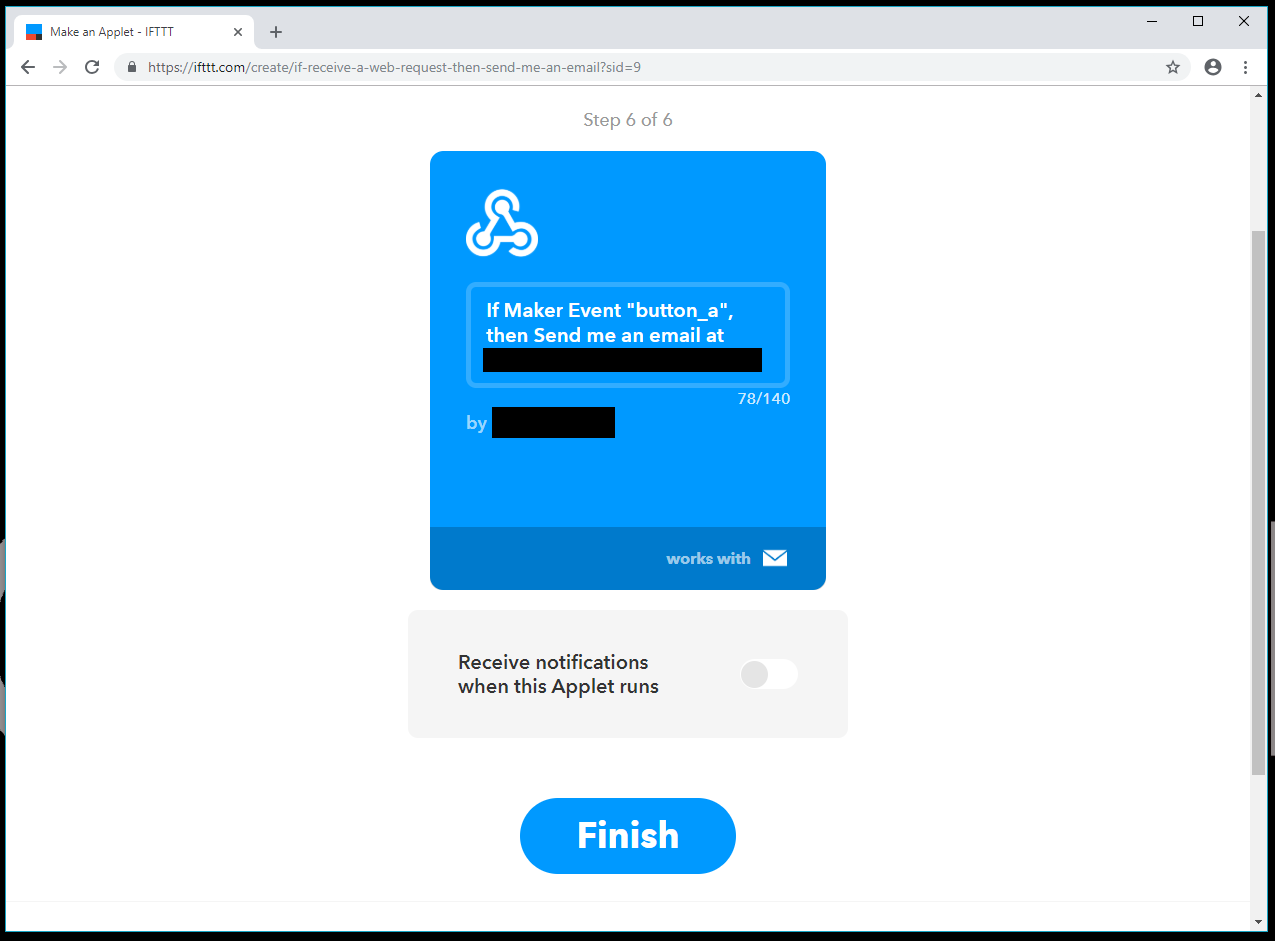
Click Create action. Review your applet, and click Finish.
We will set up a ThingSpeak channel and ThingHTTP app to send HTTP requests to our IFTTT applet, but for now, let's create the IFTTT applets for the other two buttons.
Create IFTTT Applet for Button B (text yourself)
Follow the same steps above to set up a new Applet. Label the Event Name as button_b.
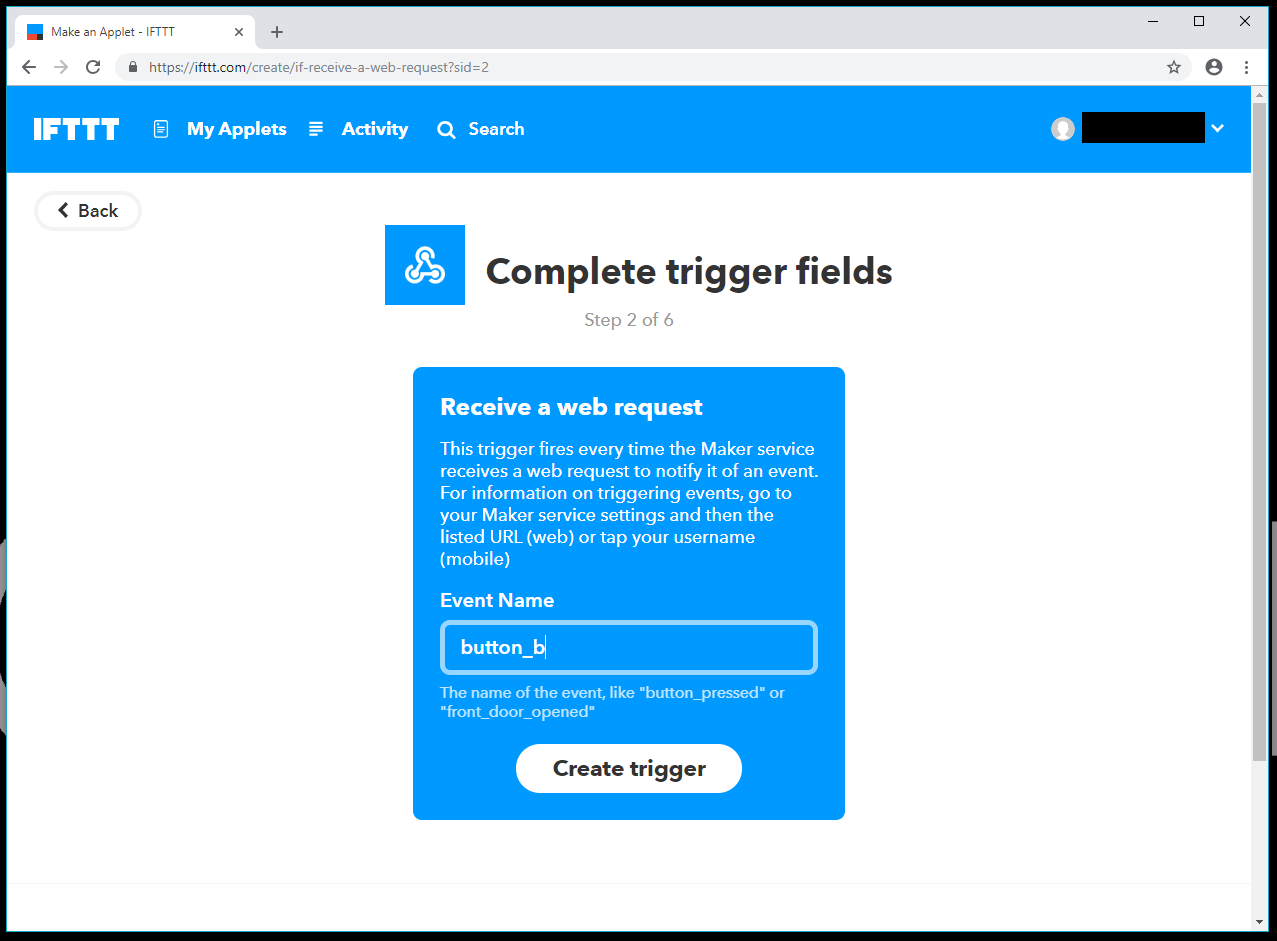
When asked for the That action, search for and choose SMS.
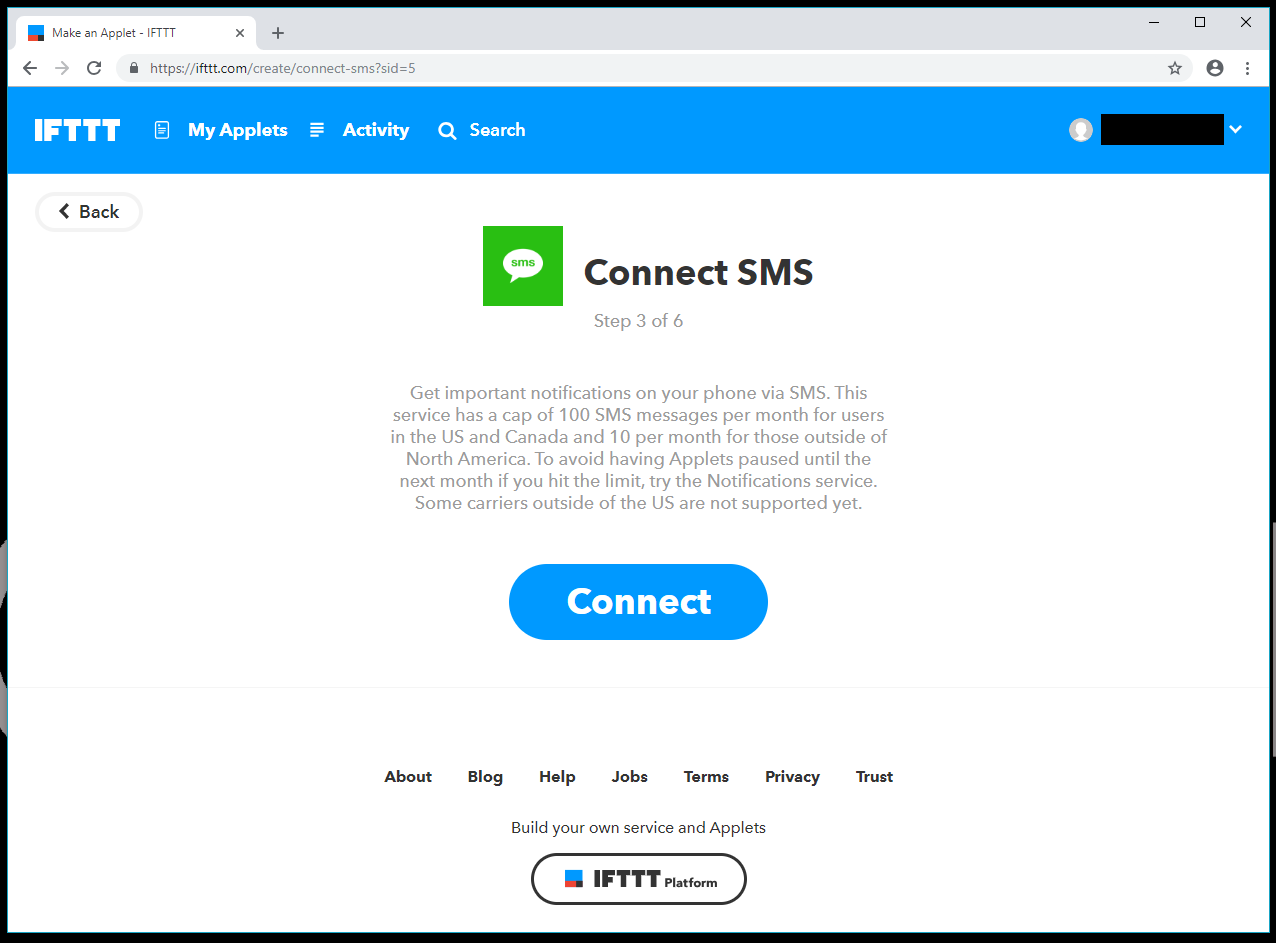
Click Connect and follow the instructions to connect your cell phone with IFTTT. Choose Send me an SMS and fill out some message to send yourself, like "I found you!"

Click Create Action and Finish.
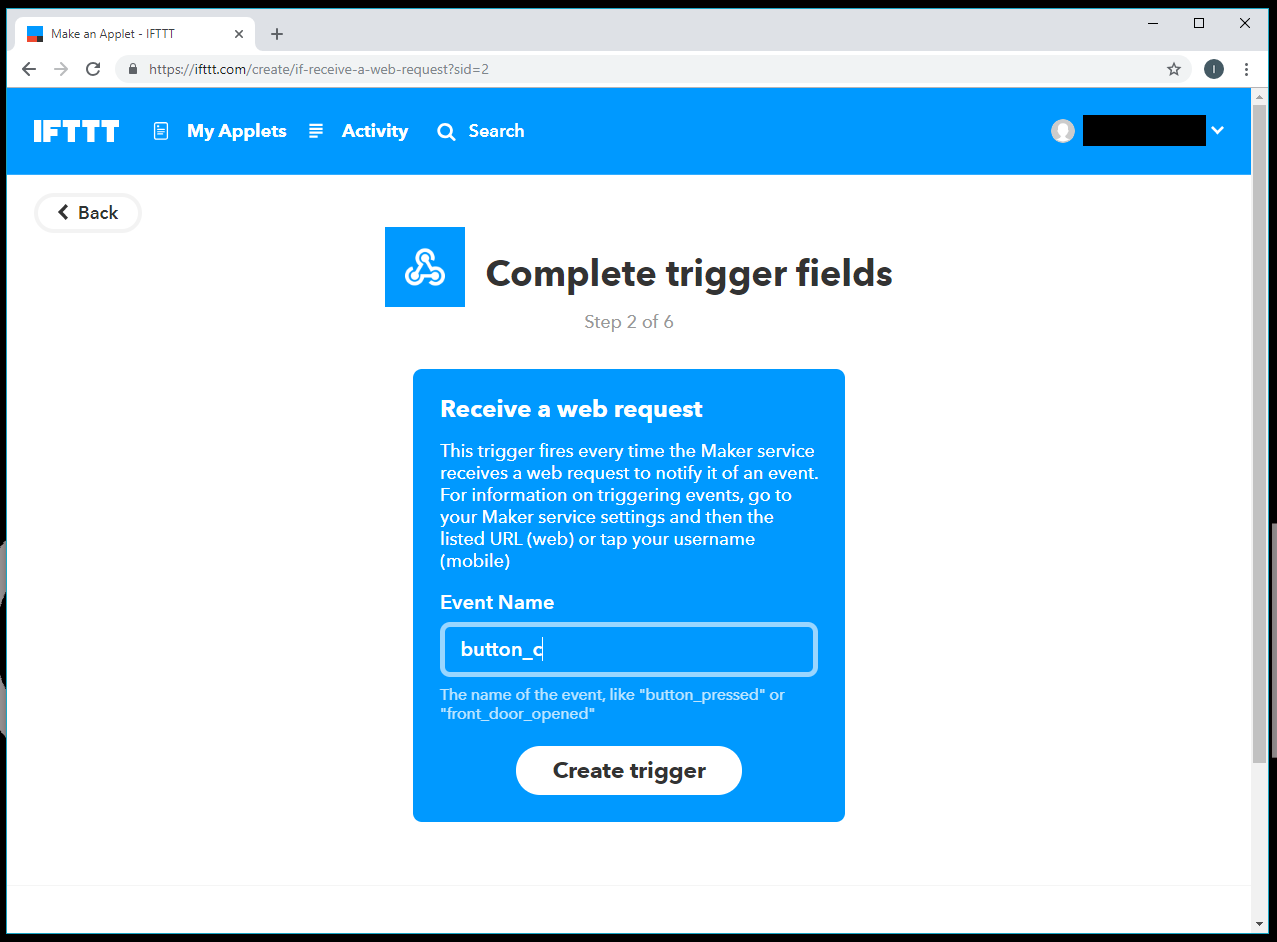
Create IFTTT Applet for Button C (post a tweet)
For the final button, we'll tweet a random number that was generated by the Thing Dev Board. Once again, follow the same steps to create a new applet, and call the Event Name button_c.
For That, search for and select Twitter.

When you select Twitter on IFTTT, you'll be asked to connect your Twitter account. If you don't have a Twitter account, you can create one at twitter.com.
Fill out the Tweet text with the following:
[{{OccurredAt}}] IoT Button generated a random number: {{Value1}}
Note that we can use variables like {{OccurredAt}} to show when the event happened. These can be found by clicking the + Ingredient button just under the Tweet text.
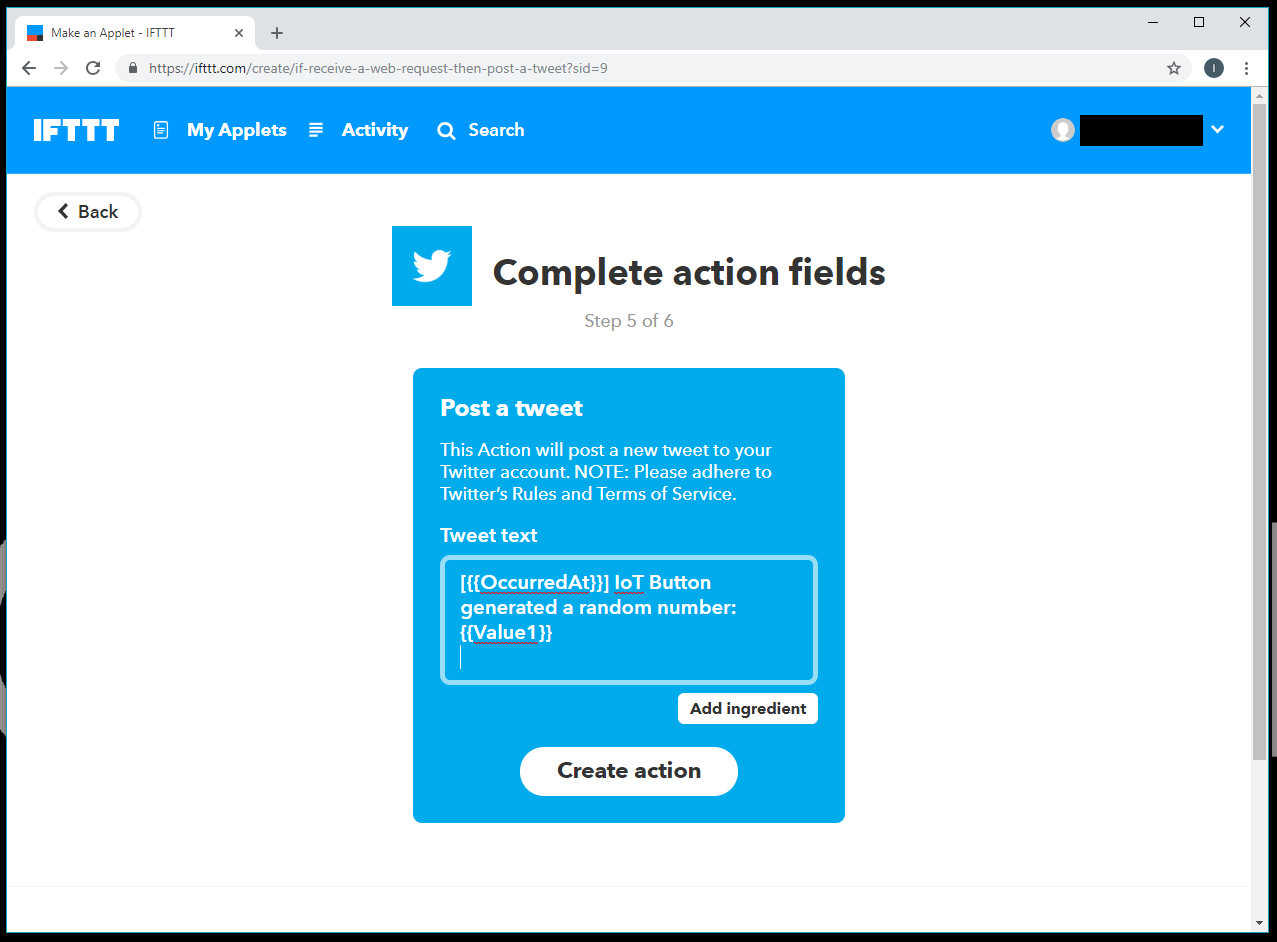
Create action, and select Finish.
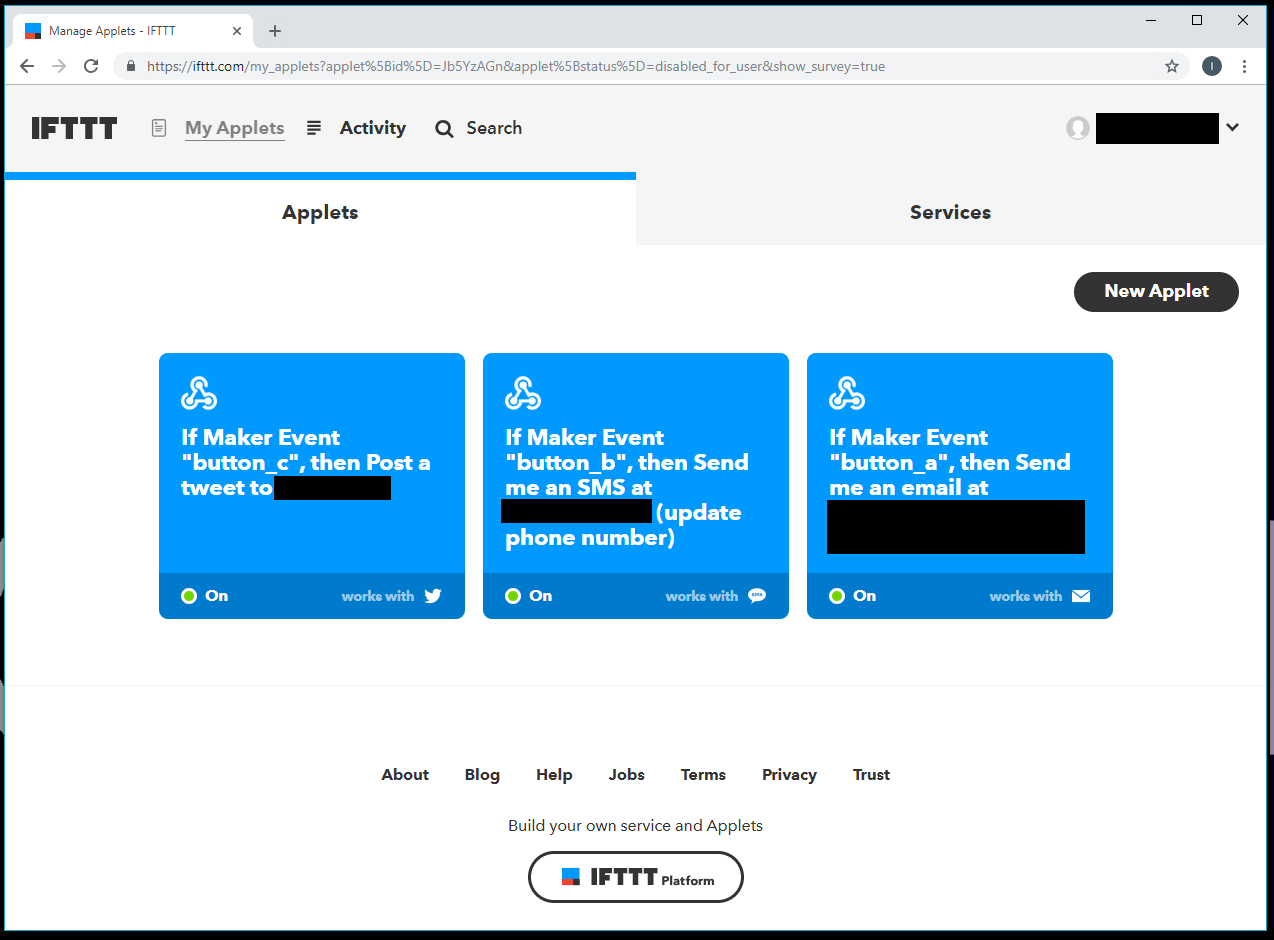
If you navigate to My Applets, you can see all your applets. The three we just created should be turned on.
Find Your IFTTT Webhooks Channel Secret Key
In order to use the Webhooks Channel on IFTTT, we need to send HTTP GET requests to a special address with your unique secret key, which we'll refer to as IFTTT_SECRET_KEY when we make our ThingSpeak app. To find it, navigate to My Applets in IFTTT, and click on the Services tab.
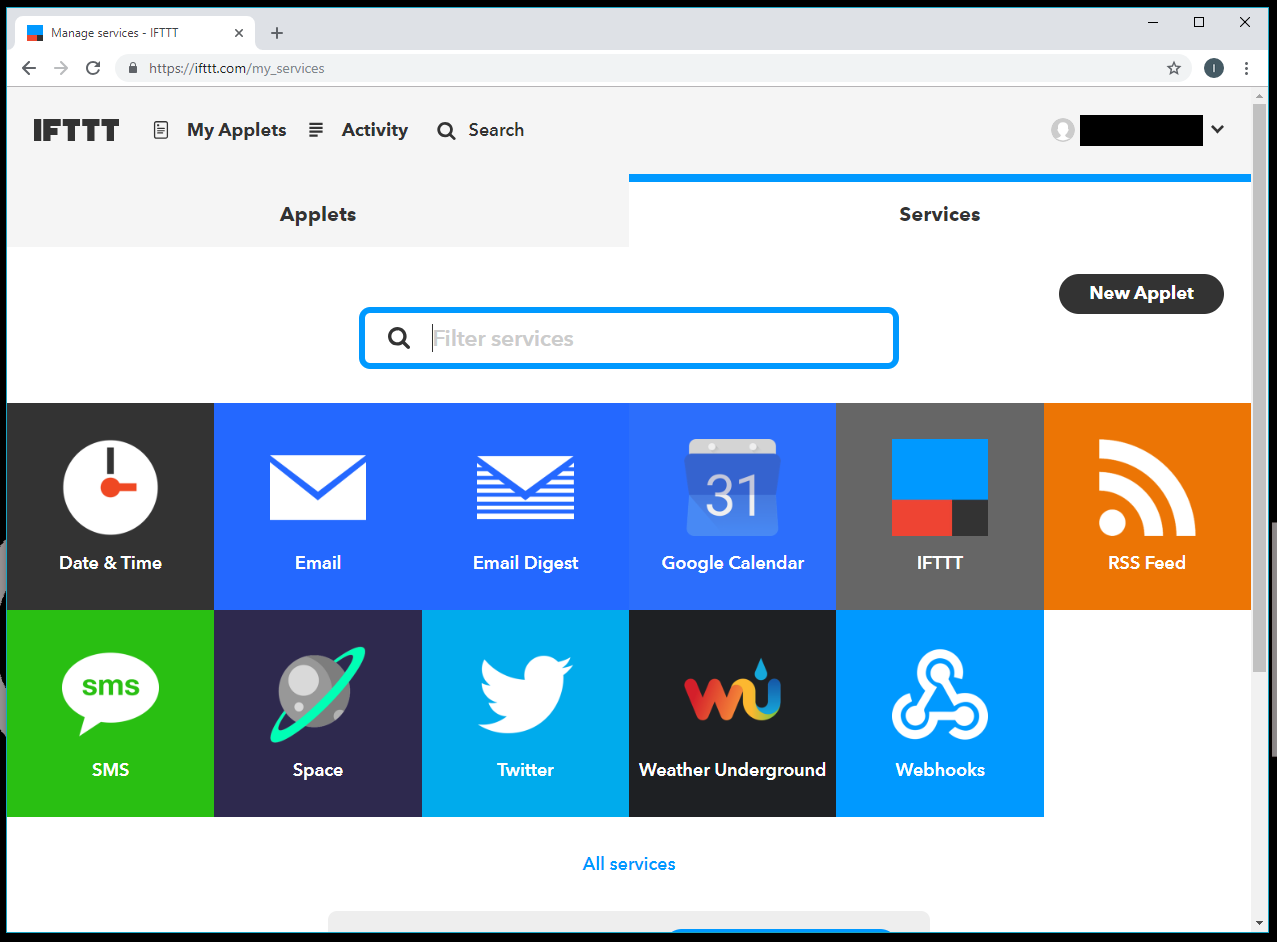
These are the services that you have connected to IFTTT. Click on Webhooks.
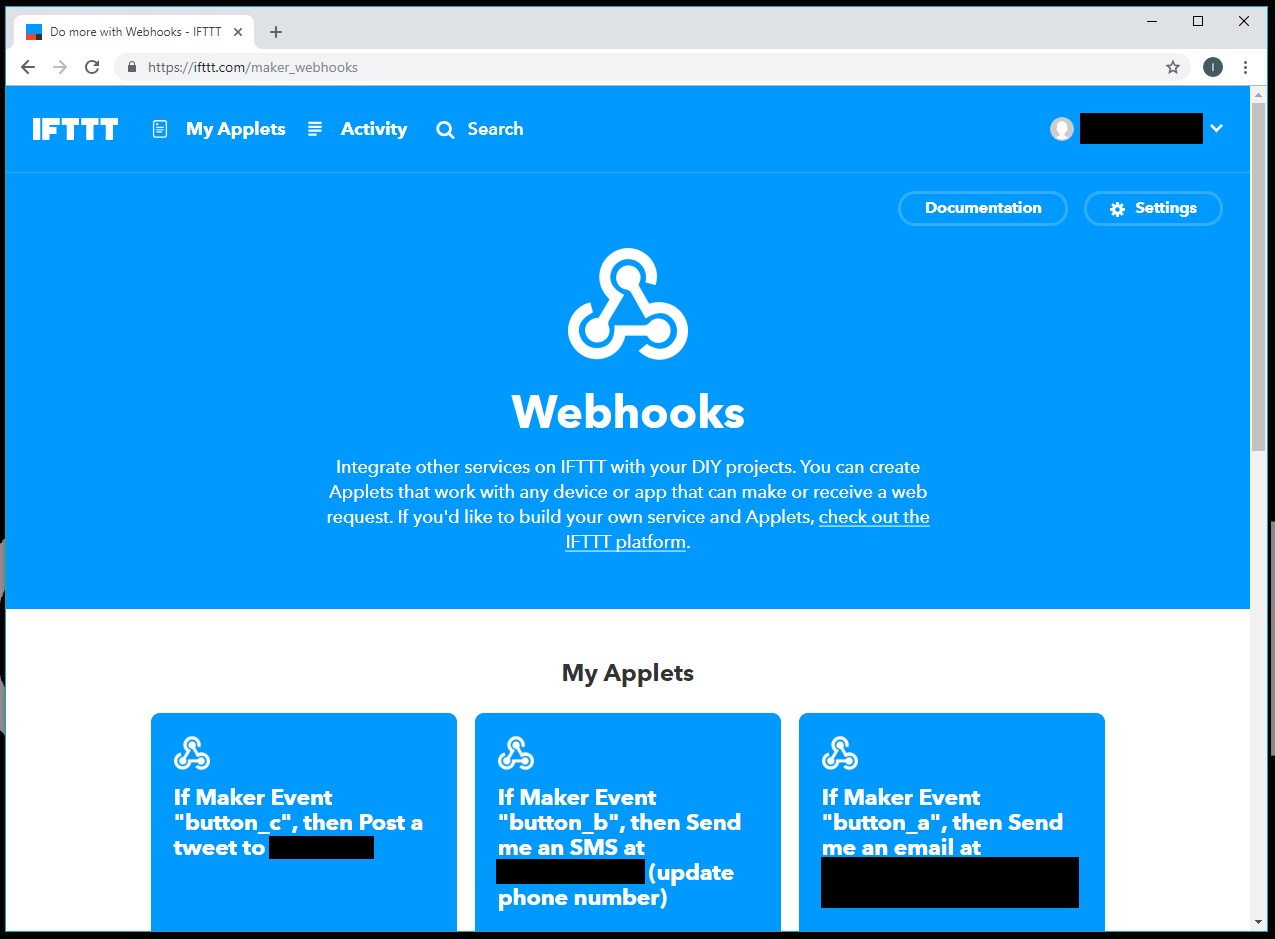
Click on Settings in the upper-right corner.
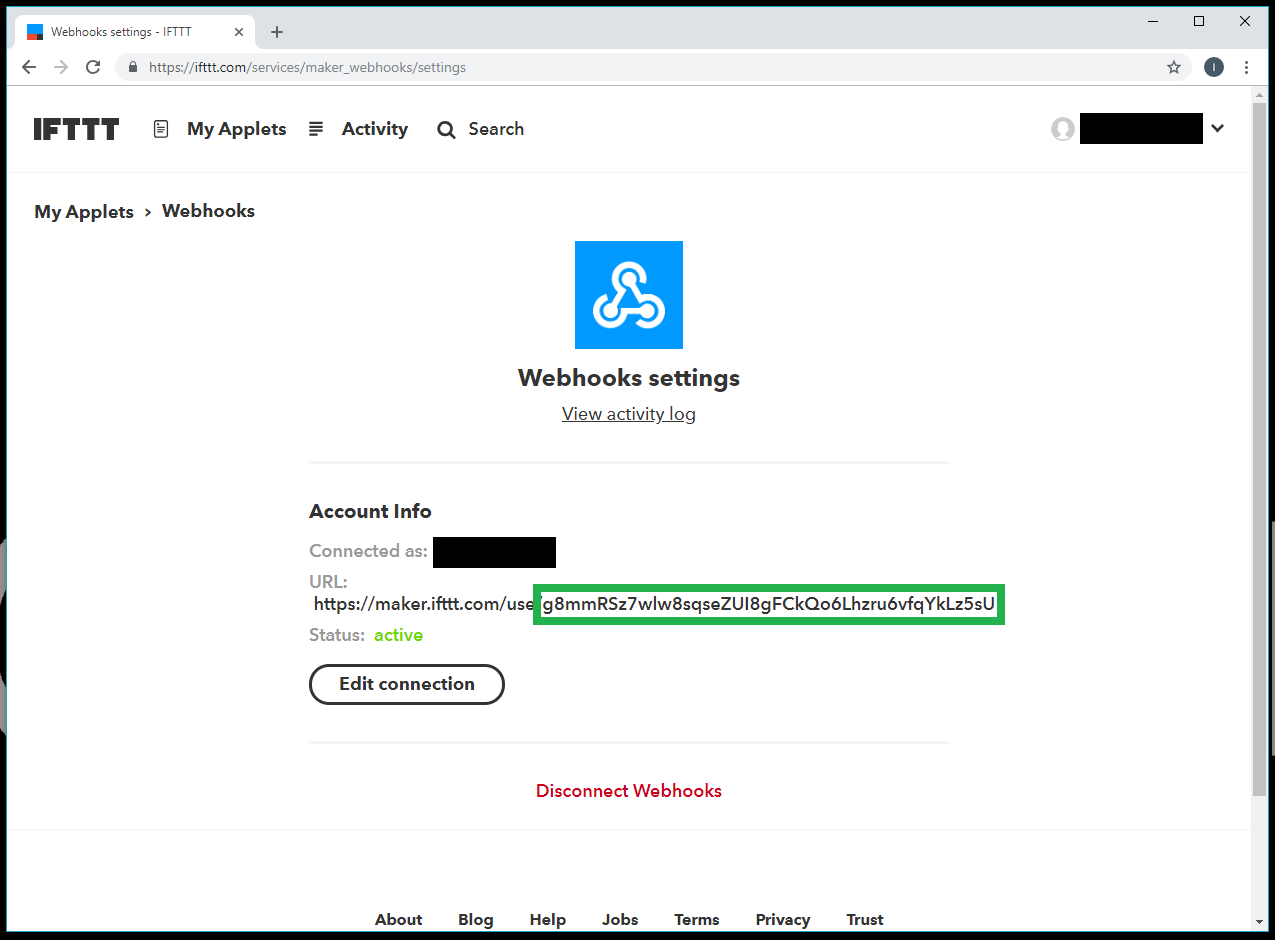
Copy down the string of characters that make up the last section of the URL (shown highlighted in the screenshot). This string is your IFTTT_SECRET_KEY and is unique to your account.
Create ThingSpeak Channel
Head to thingspeak.com, select My Channels, and create a new channel with the following parameters:
- Name: IoT Buttons
- Description: Anything you want
- Field 1: Button A
- Field 2: Button B
- Field 3: Button C
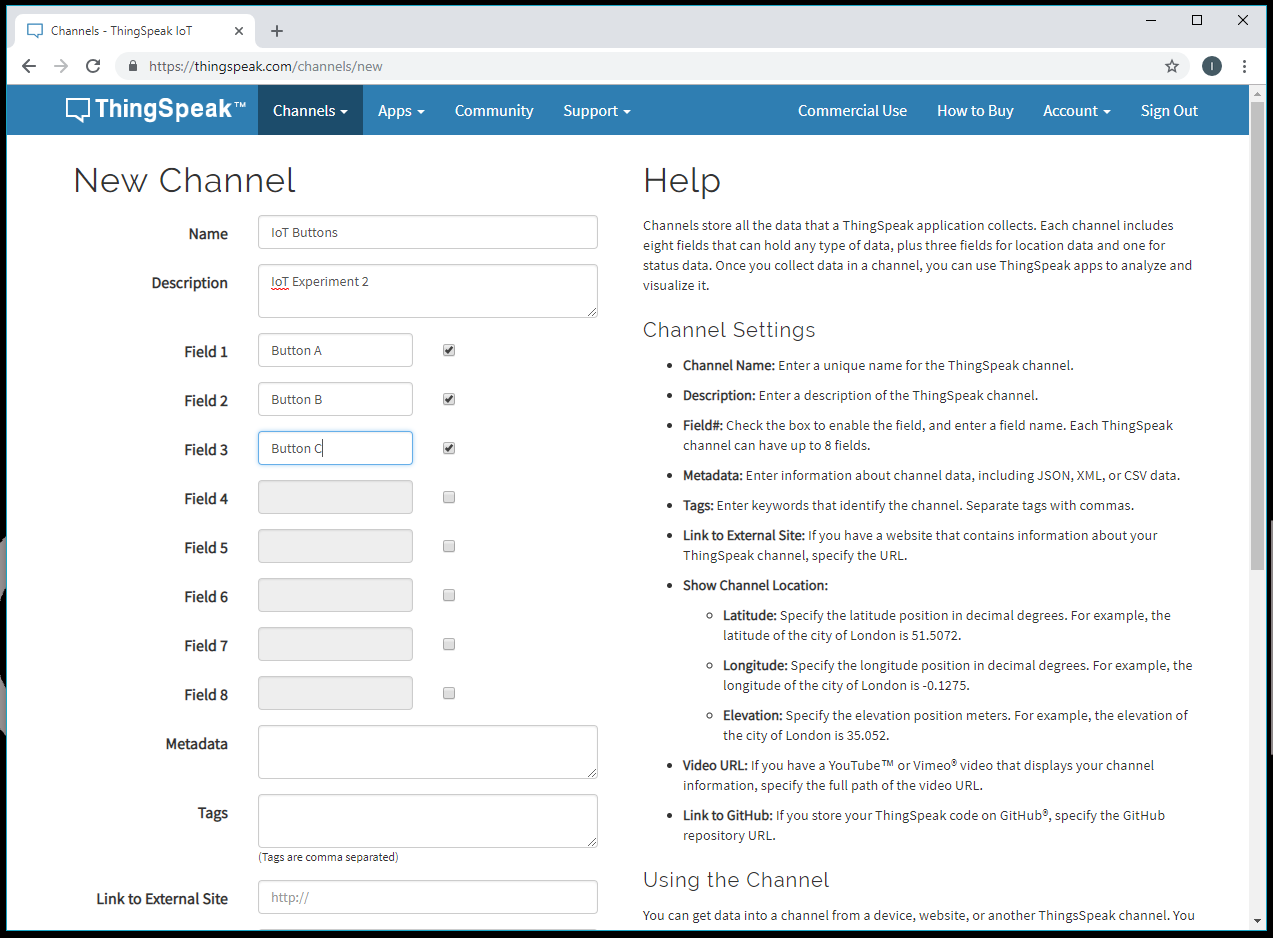
Save the channel, and you should be presented with the dashboard for your channel. Copy down your Channel ID (shown highlighted below). This will be referred to as your CHANNEL_ID later in this tutorial.

Create ThingSpeak ThingHTTP Actions
Head to thingspeak.com/apps, and select ThingHTTP.

This will allow us to create a custom HTTP request in order to trigger one of our IFTTT applets. Click New ThingHTTP, and fill out the fields with the following (making sure to replace \<IFTTT_SECRET_KEY> with your unique IFTTT Webhooks Channel Key):
- Name: IoT Button A
- URL: https://maker.ifttt.com/trigger/button_a/with/key/\<IFTTT_SECRET_KEY>
- Method: POST
- Content Type: application/json
- Body: {"value1": "Take the dog out at noon!"}
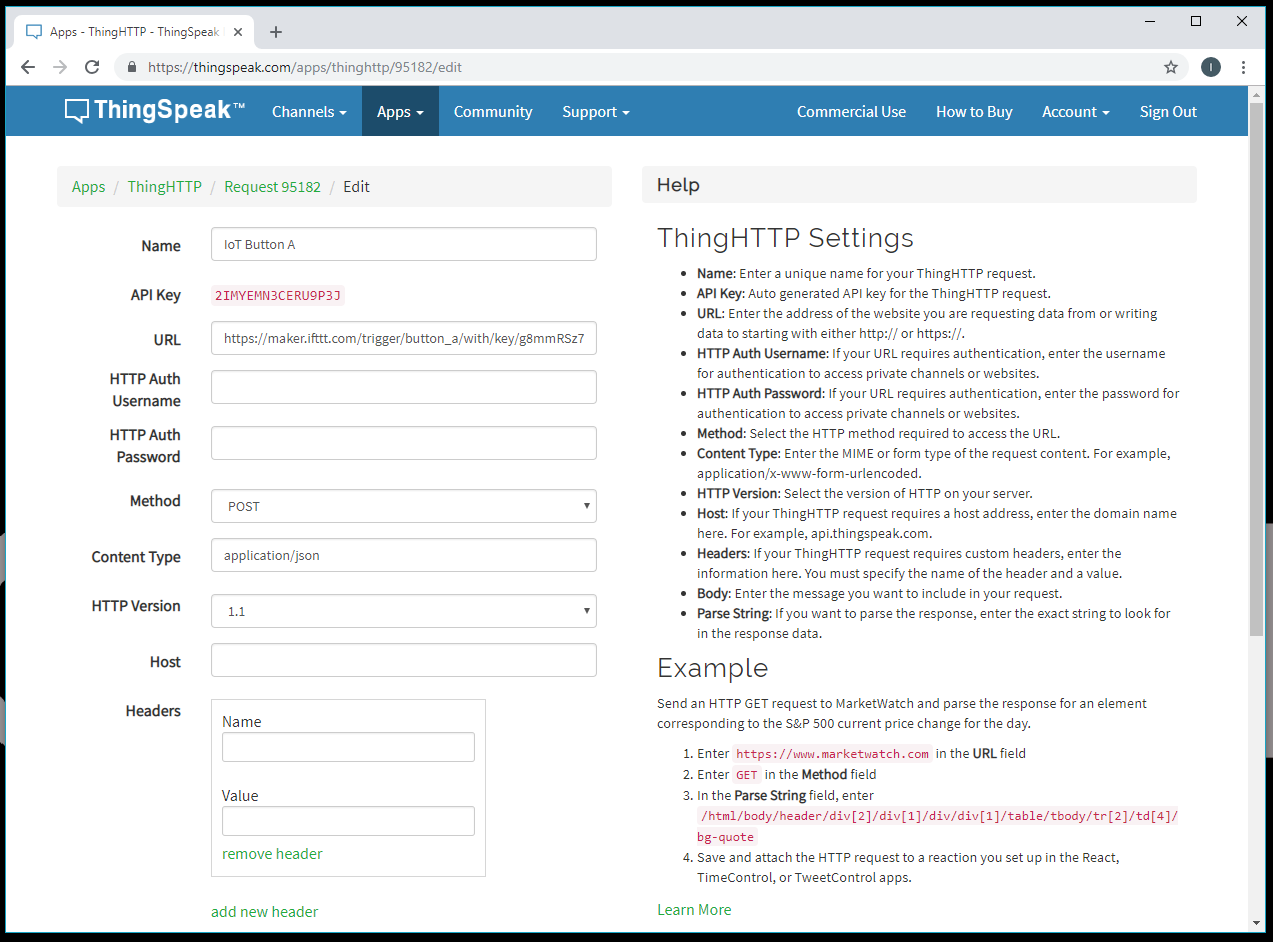
When called, this action will make an HTTP POST request to ifttt.com with the given body. That body, a JSON object, is then passed along to the action ("THAT") portion of the IFTTT applet. "value1" matches up with "value1" in the email, so "Take the dog out at noon!" will be added to the body of the email sent to us.
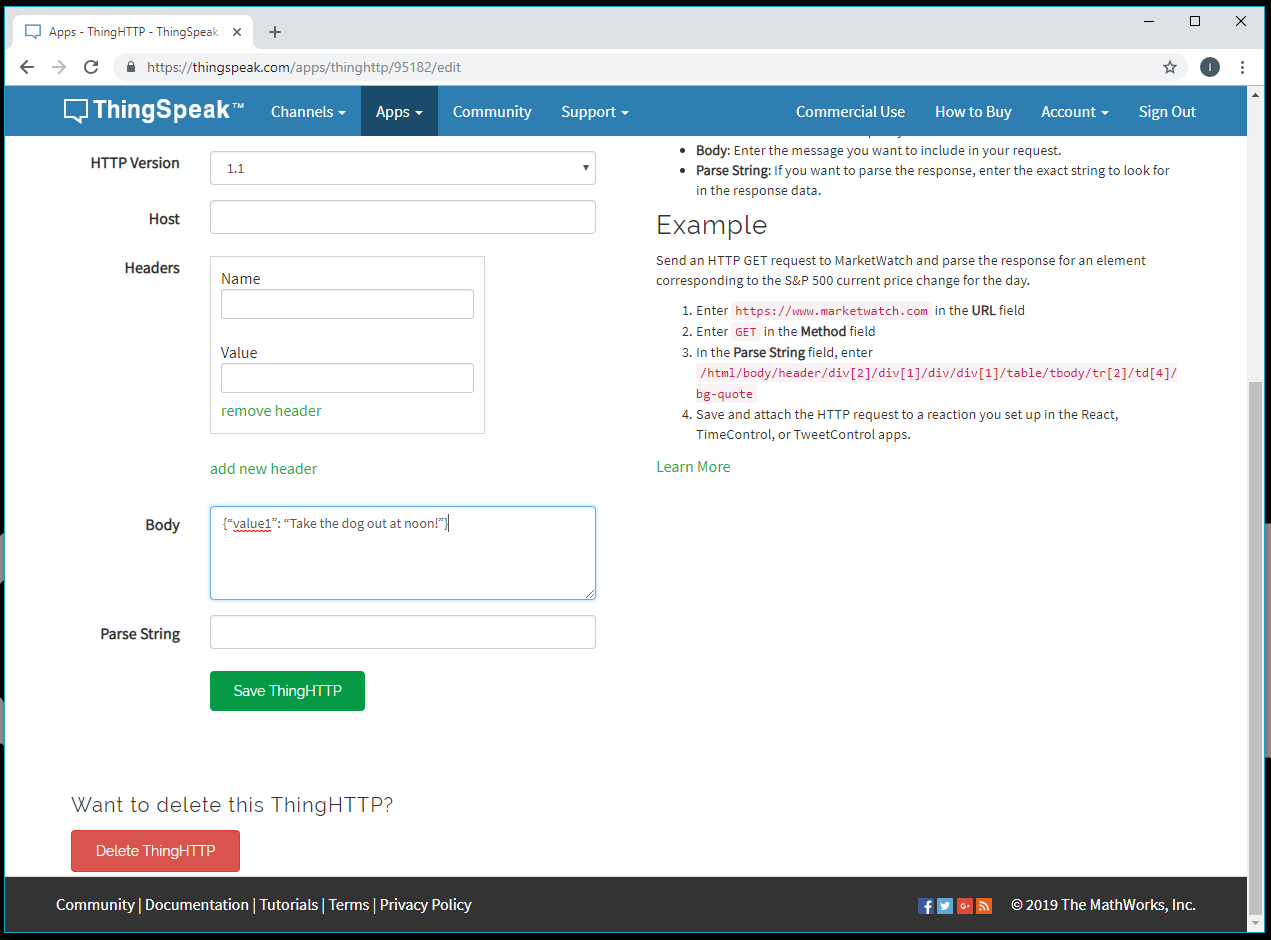
From there, you can click Save ThingHTTP.
Create another ThingHTTP with the following parameters. Don't forget to change \<IFTTT_SECRET_KEY> with your IFTTT Maker Channel Key.
- Name: IoT Button B
- URL: https://maker.ifttt.com/trigger/button_b/with/key/\<IFTTT_SECRET_KEY>
- Method: GET
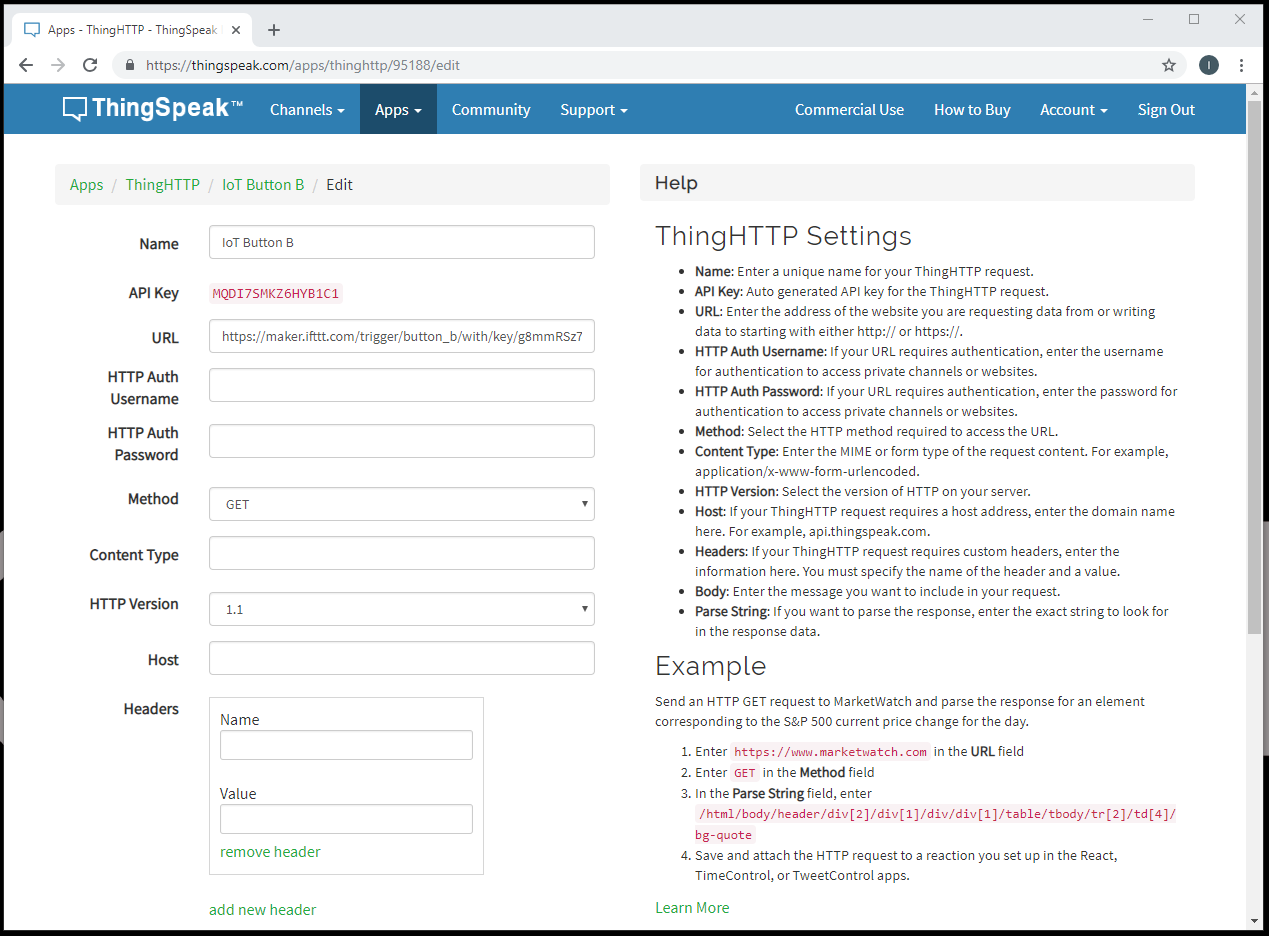
Save it, and make a third ThingHTTP with the following, changing \<IFTTT_SECRET_KEY> to your IFTTT key and \<CHANNEL_ID> to your ThingSpeak Channel ID.
- Name: IoT Button C
- URL: https://maker.ifttt.com/trigger/button_c/with/key/\<IFTTT_SECRET_KEY>
- Method: POST
- Content Type: application/json
- Body: {"value1": "%%channel_\<CHANNEL_ID>_field_3%%"}

Click Save ThingHTTP.
Create ThingSpeak React App
Head back to thingspeak.com/apps, and select React. Click New React. We will use React apps to trigger our ThingHTTP app whenever data is posted to each of our channel fields. ThingHTTP will then trigger our custom IFTTT applet.
Fill out the following parameters for the React app:
- React Name: Button A React
- Condition Type: Numeric
- Test Frequency: On Data Insertion
- Condition (If channel): IoT Buttons (\<CHANNEL_ID>)
- Condition (field): 1 (Button A), is equal to, 1
- Action: ThingHTTP
- Action (then perform): IoT Button A
- Options: Run action each time condition is met
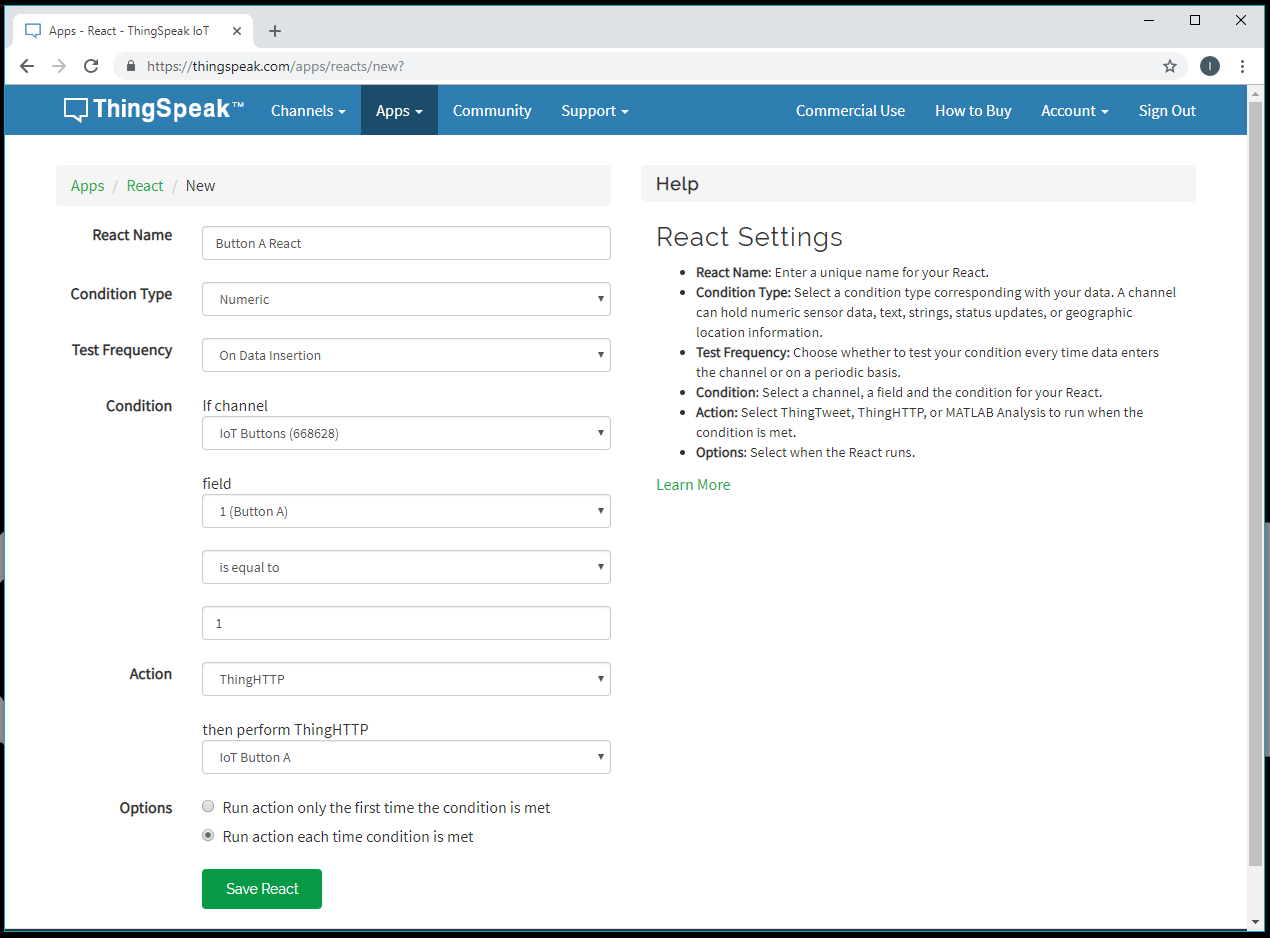
Save your React app. Then, create a new React app with the following parameters:
- React Name: Button B React
- Condition Type: Numeric
- Test Frequency: On Data Insertion
- Condition (If channel): IoT Buttons (\<CHANNEL_ID>)
- Condition (field): 2 (Button B), is equal to, 1
- Action: ThingHTTP
- Action (then perform): IoT Button B
- Options: Run action each time condition is met
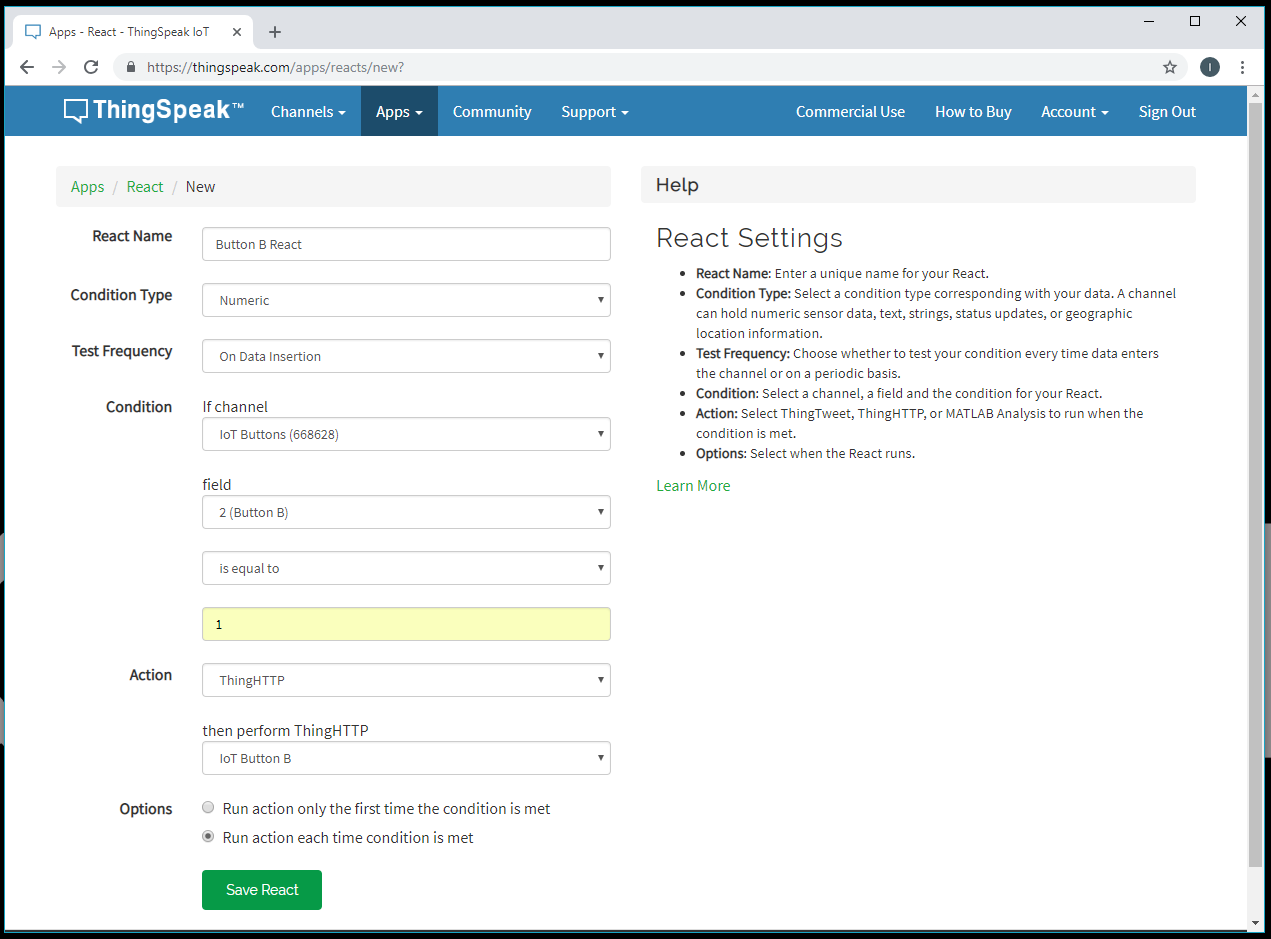
Save it, and create a third React app with the following:
- React Name: Button C React
- Condition Type: Numeric
- Test Frequency: On Data Insertion
- Condition (If channel): IoT Buttons (\<CHANNEL_ID>)
- Condition (field): 3 (Button C), is greater than, 0
- Action: ThingHTTP
- Action (then perform): IoT Button C
- Options: Run action each time condition is met
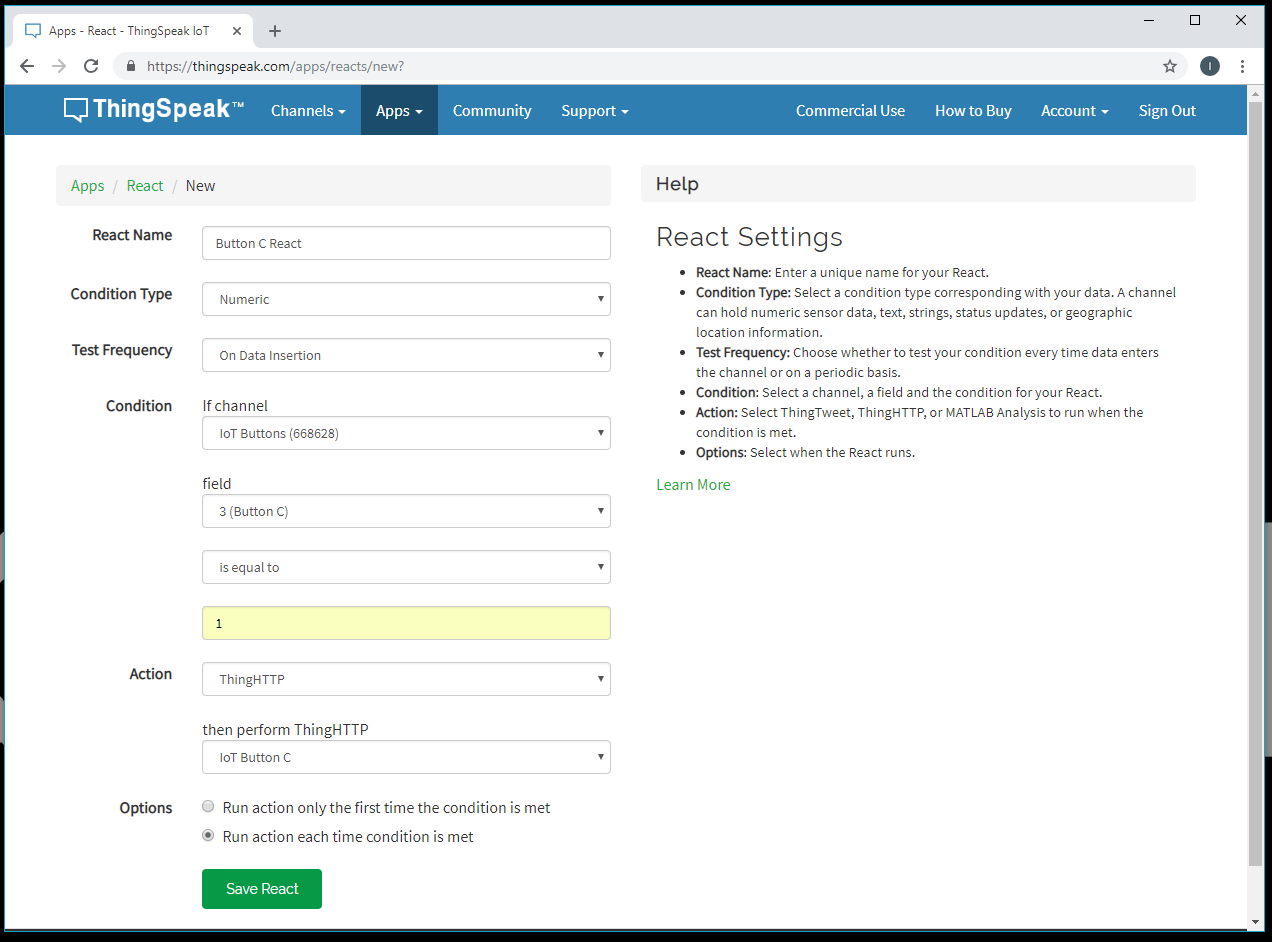
Save your React app.
Arduino Code
Now that we have our data channels and IFTTT applet set up, it's time to program the ESP8266 Thing Dev Board. Open up a new sketch in Arduino and paste in the code below. Change \
language:c
/**
 * IoT Kit - IoT Buttons
 * Author: Shawn Hymel (SparkFun Electronics)
 * Date: October 30, 2016
 *
 * Push one of three buttons to make something happen on the
 * Internet using IFTTT. Button C will generate a random number
 * between 1-100 to post to ThingSpeak.
 *
 * Connections:
 *   Thing Dev |  Button
 *  -----------|---------
 *       4     |    A
 *      12     |    B
 *      13     |    C
 *
 * Development environment specifics:
 *  Arduino IDE v1.6.5
 *  Distributed as-is; no warranty is given.
 */

#include <ESP8266WiFi.h>
#include "ThingSpeak.h"

// WiFi and Channel parameters
const char WIFI_SSID[] = "<YOUR WIFI SSID>";
const char WIFI_PSK[] = "<YOUR WIFI PASSWORD>";
unsigned long CHANNEL_ID = <YOUR THINGSPEAK CHANNEL ID>;
const char * WRITE_API_KEY = "<YOUR CHANNEL WRITE API KEY>";

// Pin definitions
const int BTN_A_PIN = 4;
const int BTN_B_PIN = 12;
const int BTN_C_PIN = 13;
const int LED_PIN = 5;

// Global variables
WiFiClient client;
int last_btn_a = HIGH;
int last_btn_b = HIGH;
int last_btn_c = HIGH;

void setup() {

  // Set up LED for debugging
  pinMode(LED_PIN, OUTPUT);

  // Connect to WiFi
  connectWiFi();

  // Initialize connection to ThingSpeak
  ThingSpeak.begin(client);

  // Seed the random number generator
  randomSeed(analogRead(A0));
}

void loop() {

  int btn_a;
  int btn_b;
  int btn_c;
  int rnd;

  // Look for a falling edge on button A with debounce
  btn_a = digitalRead(BTN_A_PIN);
  if ( (btn_a == LOW) && (last_btn_a == HIGH) ) {
    delay(30);
    if ( digitalRead(BTN_A_PIN) == LOW ) {
      digitalWrite(LED_PIN, LOW);
      ThingSpeak.writeField(CHANNEL_ID, 1, 1, WRITE_API_KEY);
    }
  }
  last_btn_a = btn_a;

  // Look for a falling edge on button B with debounce
  btn_b = digitalRead(BTN_B_PIN);
  if ( (btn_b == LOW) && (last_btn_b == HIGH) ) {
    delay(30);
    if ( digitalRead(BTN_B_PIN) == LOW ) {
      digitalWrite(LED_PIN, LOW);
      ThingSpeak.writeField(CHANNEL_ID, 2, 1, WRITE_API_KEY);
    }
  }
  last_btn_b = btn_b;

  // Look for a falling edge on button C with debounce
  // Randomly choose a number between 1-100 and post it
  btn_c = digitalRead(BTN_C_PIN);
  if ( (btn_c == LOW) && (last_btn_c == HIGH) ) {
    delay(30);
    if ( digitalRead(BTN_C_PIN) == LOW ) {
      digitalWrite(LED_PIN, LOW);
      rnd = random(1, 101);
      ThingSpeak.writeField(CHANNEL_ID, 3, rnd, WRITE_API_KEY);
    }
  }
  last_btn_c = btn_c;

  // Turn off LED
  digitalWrite(LED_PIN, HIGH);
}

// Attempt to connect to WiFi
void connectWiFi() {

  byte led_status = 0;

  // Set WiFi mode to station (client)
  WiFi.mode(WIFI_STA);

  // Initiate connection with SSID and PSK
  WiFi.begin(WIFI_SSID, WIFI_PSK);

  // Blink LED while we wait for WiFi connection
  while ( WiFi.status() != WL_CONNECTED ) {
    digitalWrite(LED_PIN, led_status);
    led_status ^= 0x01;
    delay(100);
  }

  // Turn LED off when we are connected
  digitalWrite(LED_PIN, HIGH);
}
Run It!
When you run the sketch on your Thing Dev board, you should be able to press one of the buttons. The buttons are as follows:
For example, by pressing button B, you should receive a text on your phone.
When you press button C, the Thing Dev Board will generate a number between 1 and 100 and post it to your Twitter account.
Challenge
See if you can change the Button B functionality so that it will send you the temperature and humidity near the ESP8266 Thing Dev Board to your phone via SMS.
Experiment 3: Appliance Controller
Now that we've logged data and pushed some physical buttons to make virtual things happen, it's time to make physical things happen when something virtual happens. OK, that's a mouthful, but in essence, we're going to turn on and off home appliances (120 VAC) from anywhere in the world (assuming we have an internet connection).
To make this work, we'll have an IFTTT applet send an HTTP request to ThingSpeak to log a value in a data channel. Our ESP8266 Thing Dev Board will poll the ThingSpeak data channel for new values. If it finds one, it will trigger the normally OFF outlets of the IoT Power Relay on and then send a request to ThingSpeak to clear the data channel.
Parts Needed


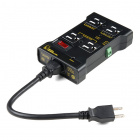


(*Everything else for the PowerSwitch Tail II version of project is still the same.)
Hardware Hookup
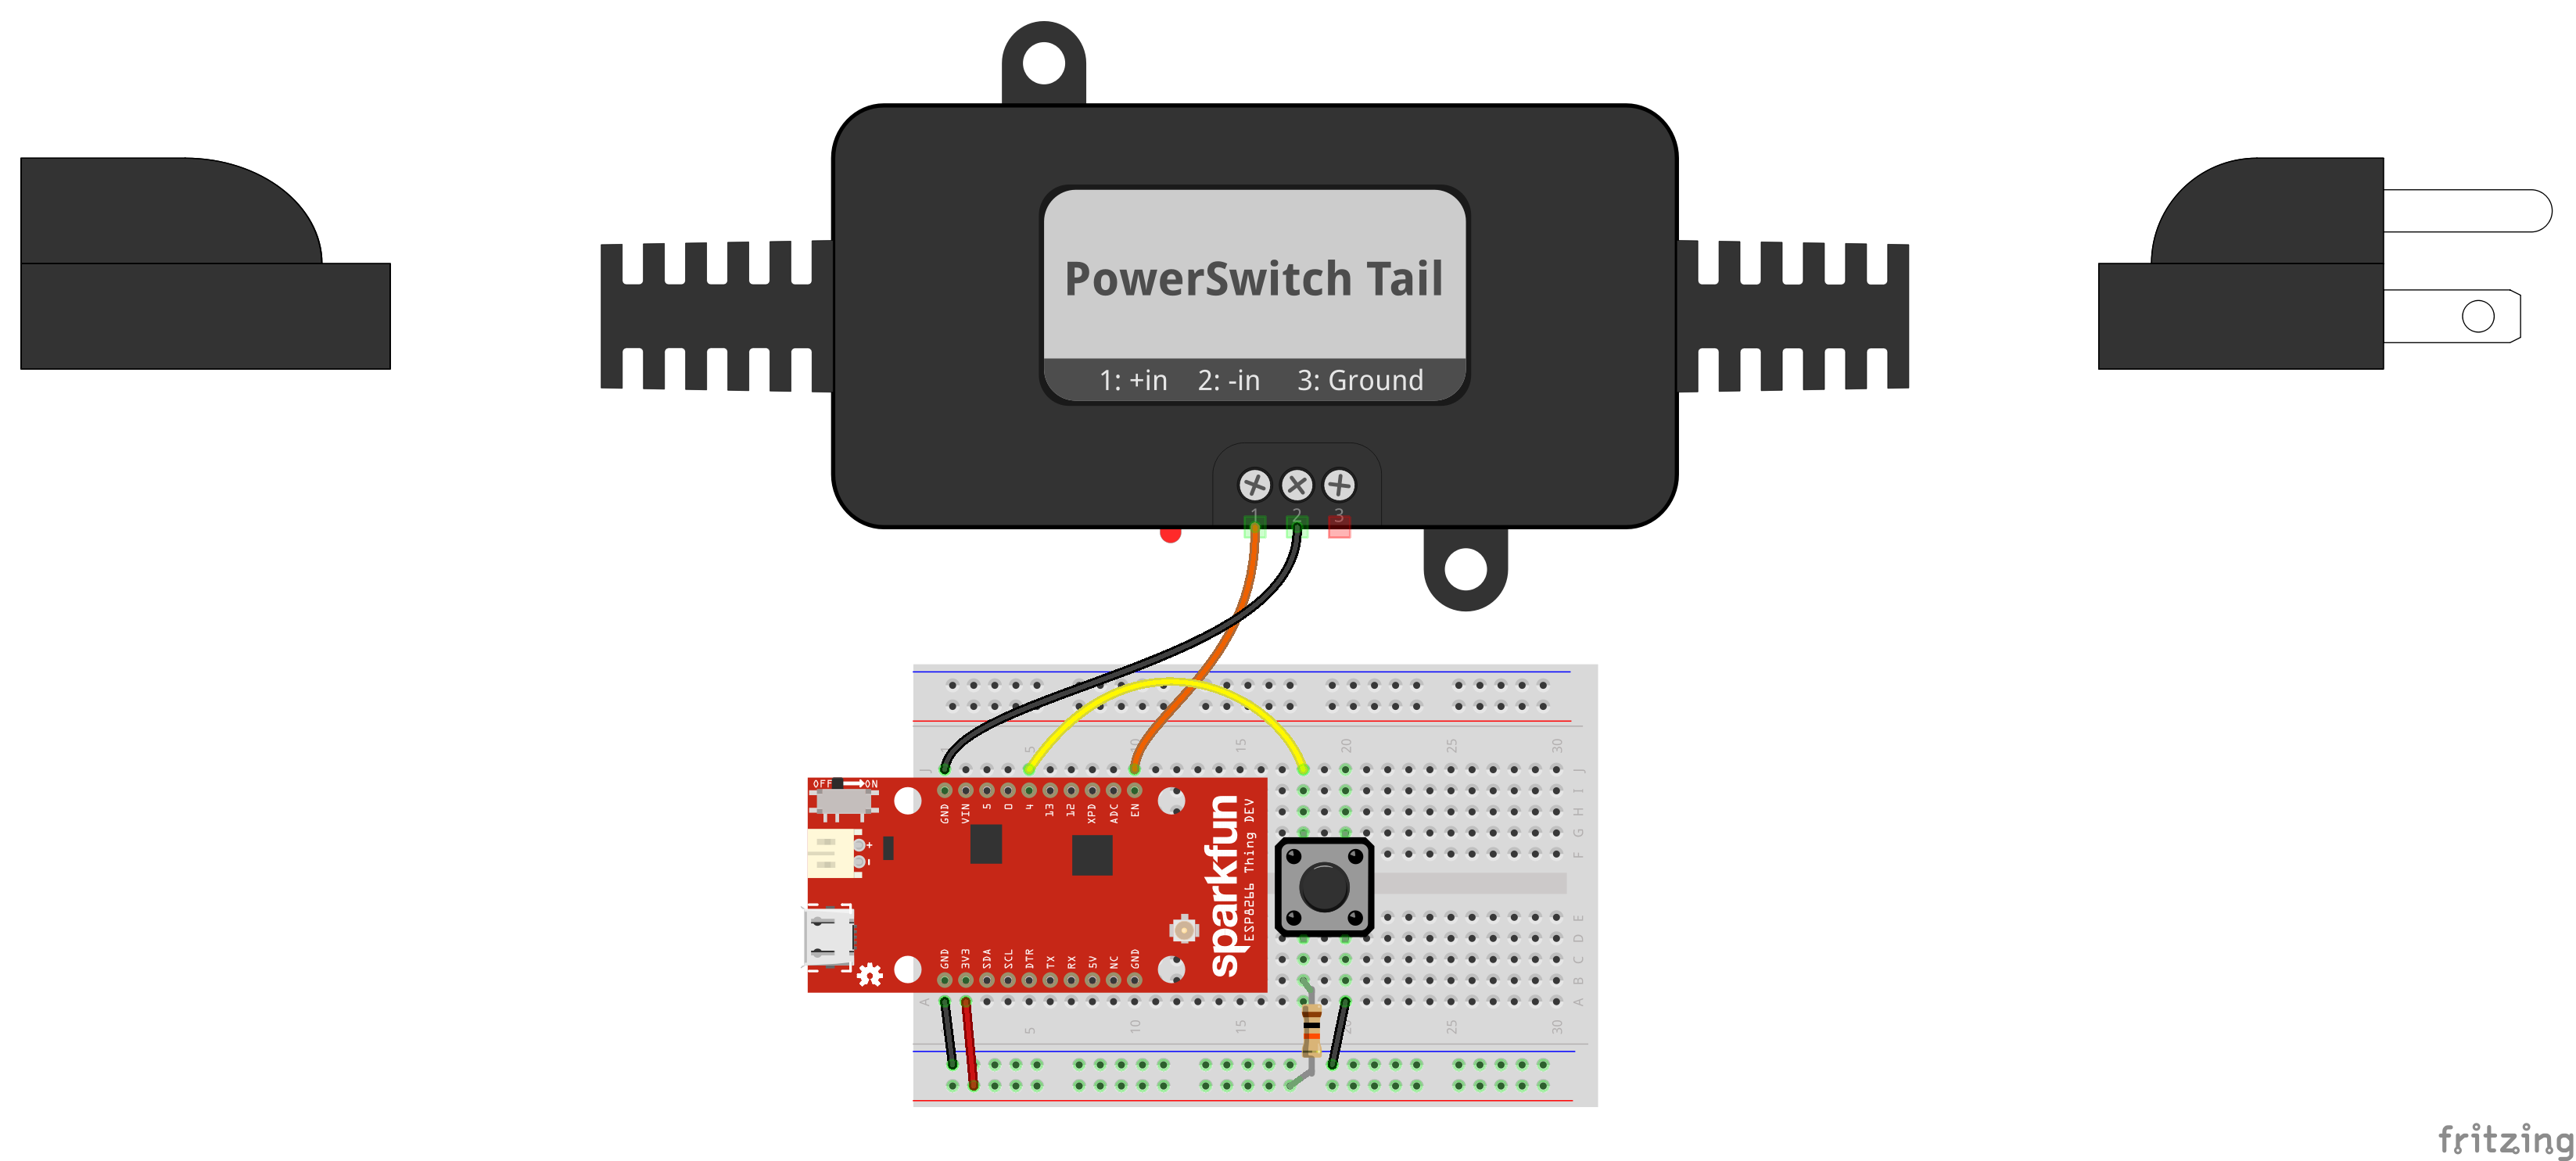
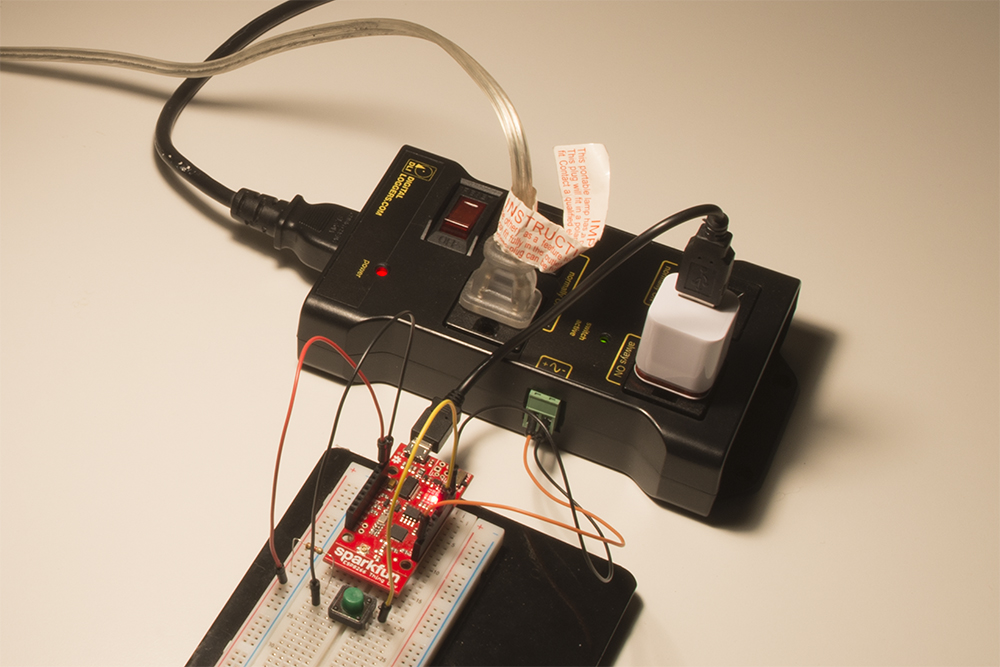
Connect one button and the IoT Power Relay to the Thing Dev as shown:
Create a ThingSpeak Data Channel
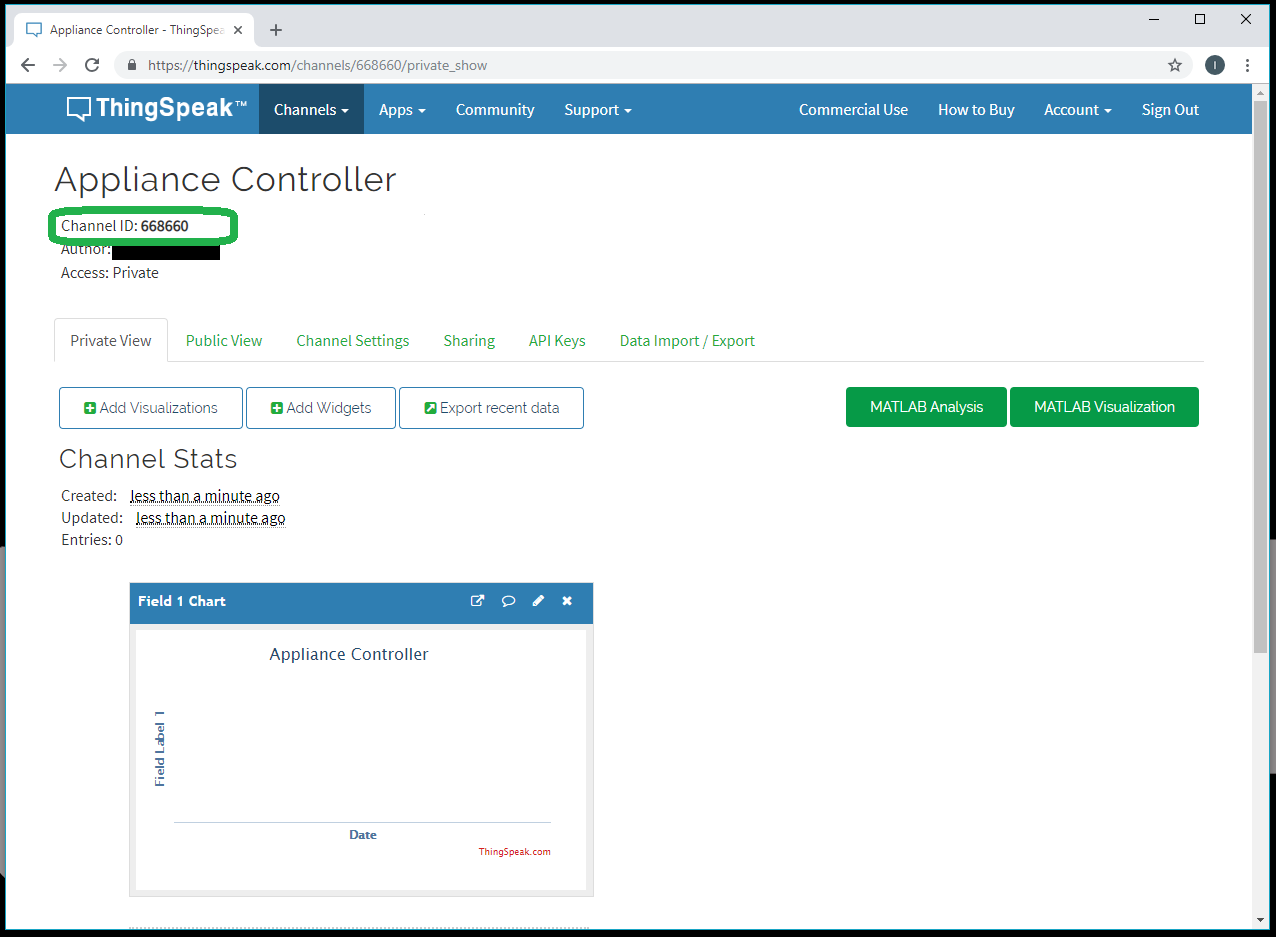
Head to ThingSpeak, and create a new channel. Name it Appliance Controller, and name Field 1 something appropriate (e.g., "Control"). On the channel dashboard, copy down the CHANNEL_ID, as we'll need it later.
Get Your API Keys
From your channel's dashboard, click on the API Keys tab. Copy down the WRITE_API_KEY and READ_API_KEY. We'll need those later, too.
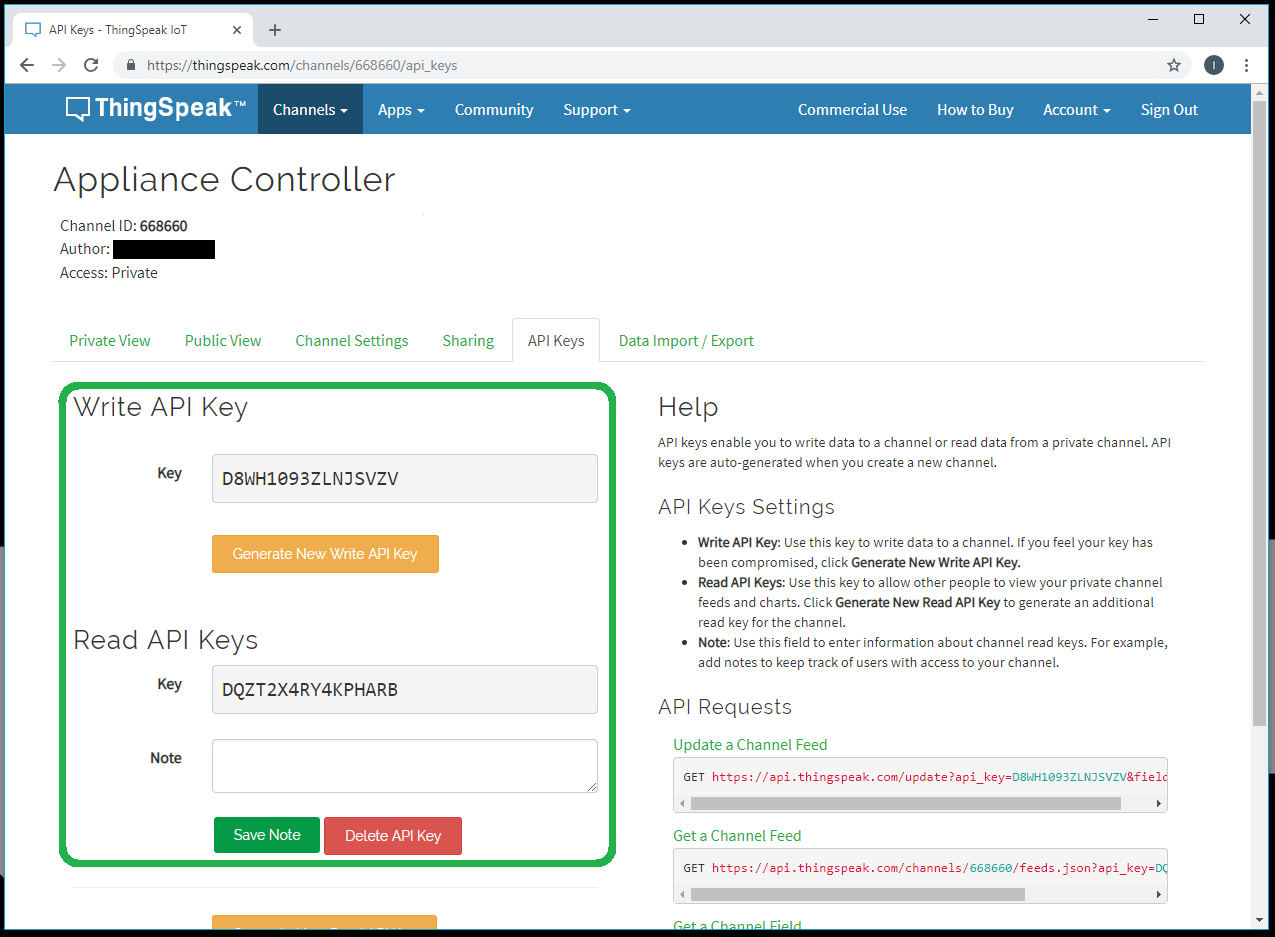
We'll also need our ThingSpeak Account API Key, as that's used to make delete requests to the data channel. In the top-right corner of ThingSpeak, click Account > My Account. Copy down the API Key found there. We'll refer to this key as the \<THINGSPEAK_ACCOUNT_API_KEY>.

Create IFTTT Applet
Navigate to IFTTT and create a new applet. For this section, search for weather.
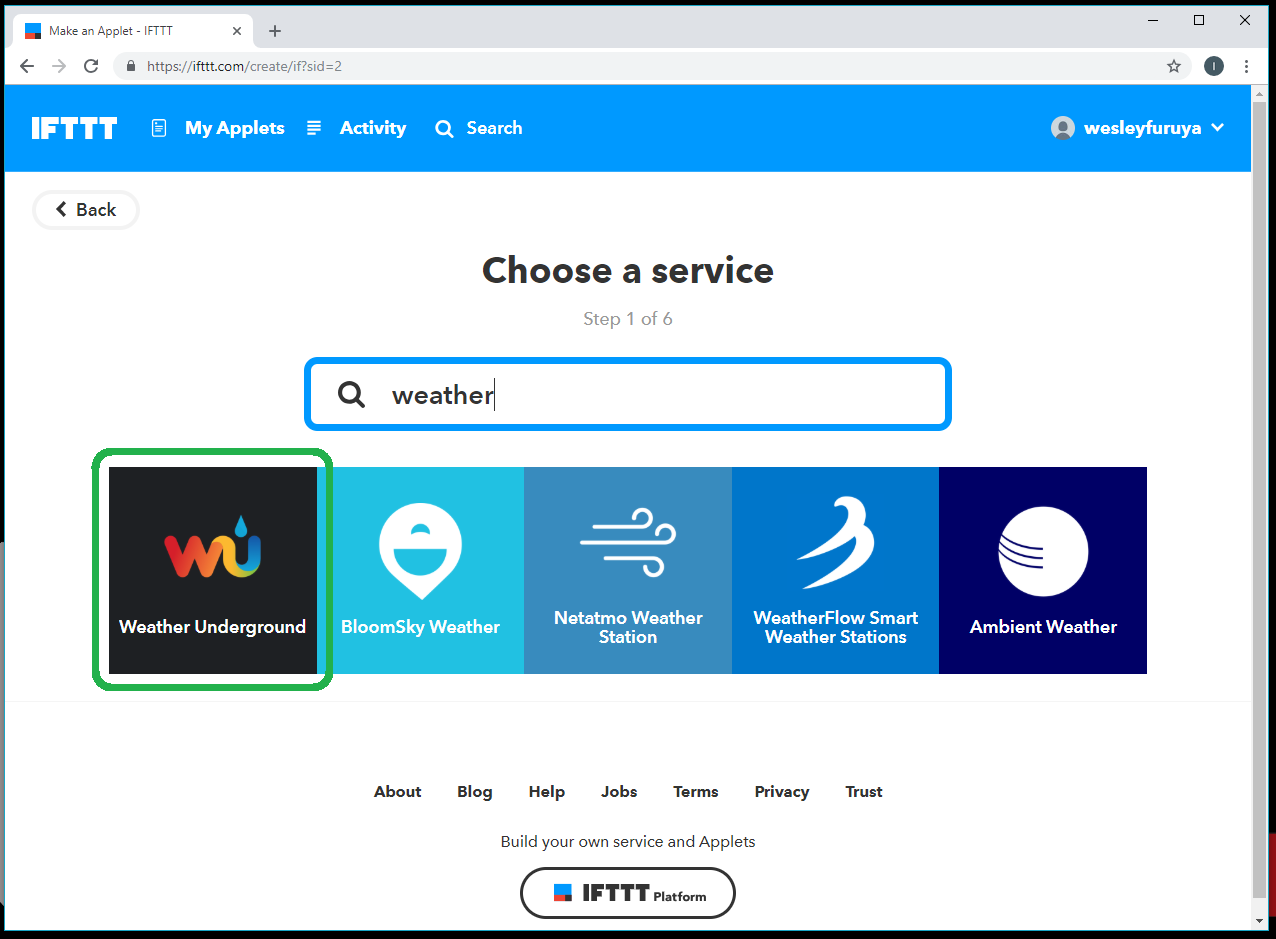
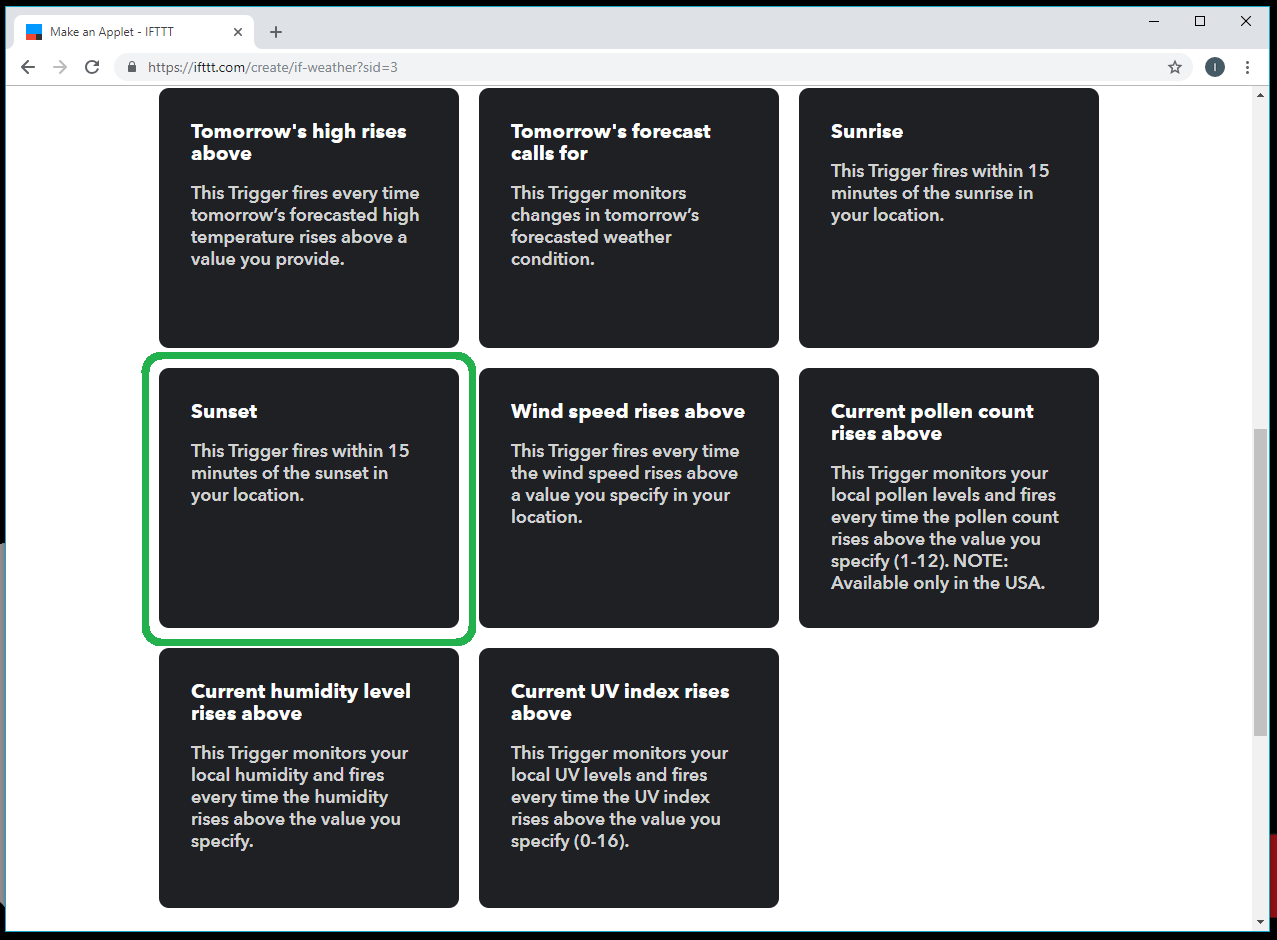
You'll be asked to connect the Weather Underground channel. Follow the prompts to set your location to the nearest city. After that, select Sunset as the trigger.
For that, search for and select the Webhooks channel. Select Make a web request. Fill out the form with the parameters listed below, making sure to replace \<WRITE_API_KEY> with your ThingSpeak Write API Key.
- URL: https://api.thingspeak.com/update
- Method: POST
- Content Type: application/x-www-form-urlencoded
- Body: api_key=\<WRITE_API_KEY>&field1=1
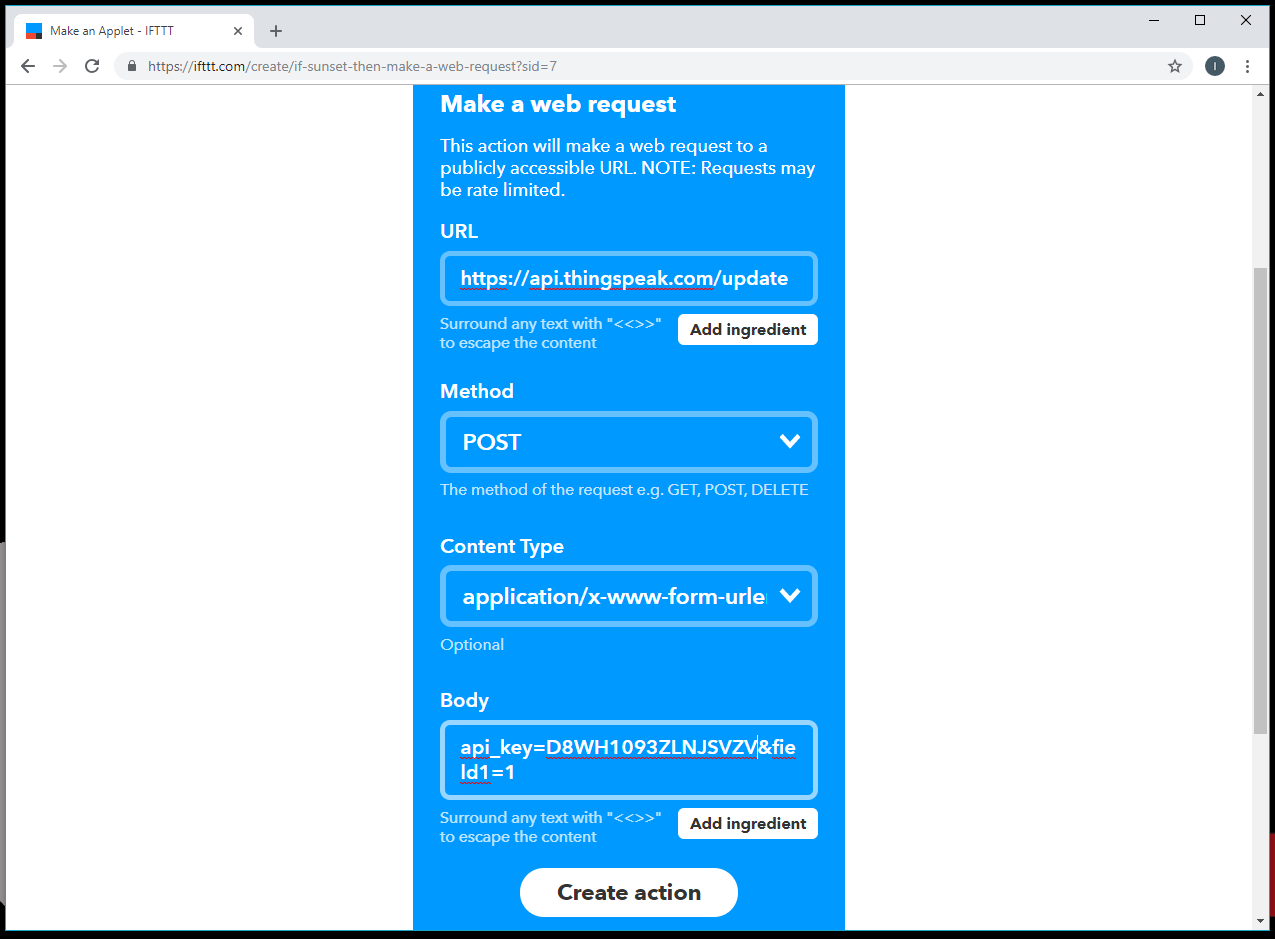
Click Create action and Finish.
Arduino Code
With our channel and applet configured, let's make some firmware to run on our ESP8266 Thing Dev. Copy in the code below, changing the parameters in the WiFi and Channel parameters section as noted.
language:c
/**
 * IoT Kit - Appliance Controller
 * Author: Shawn Hymel (SparkFun Electronics)
 * Date: November 11, 2016
 *
 * Set up an IFTTT applet to send an HTTP request to ThingSpeak
 * on a specific event, such as the sun setting. This sketch
 * monitors the channel and turns the attached appliance on or
 * off as requested before clearing the channel. A manual
 * override button can also toggle the appliance.
 *
 * Connections:
 *   Thing Dev | Button | PowerSwitch Tail II
 *  -----------|--------|---------------------
 *        4    |    A   |
 *       15    |        |       1 (+in)
 *      GND    |        |       2 (-in)
 *
 * Development environment specifics:
 *  Arduino IDE v1.6.5
 *  Distributed as-is; no warranty is given.
 */

#include <ESP8266WiFi.h>
#include "ThingSpeak.h"

// WiFi and Channel parameters
const char WIFI_SSID[] = "<YOUR WIFI SSID>";
const char WIFI_PSK[] = "<YOUR WIFI PASSWORD>";
unsigned long CHANNEL_ID = <YOUR THINGSPEAK CHANNEL ID>;
const char * READ_API_KEY = "<YOUR THINGSPEAK READ API KEY>";
const char * ACCOUNT_API_KEY = "<YOUR THINGSPEAK ACCOUNT API KEY>";

// Channel data definitions
const int CHANNEL_ERROR = 0;
const int APPLIANCE_ON = 1;
const int APPLIANCE_OFF = 2;

// Remote site information
const char HTTP_SITE[] = "api.thingspeak.com";
const int HTTP_PORT = 80;

// Pin definitions
const int LED_PIN = 5;
const int BTN_PIN = 4;
const int PST_PIN = 15;

// Global variables
WiFiClient client;
int appliance_state = 0;

void setup() {

  // Set up pins
  pinMode(LED_PIN, OUTPUT);
  pinMode(PST_PIN, OUTPUT);
  digitalWrite(PST_PIN, LOW);

  // Connect to WiFi
  connectWiFi();

  // Initialize connection to ThingSpeak
  ThingSpeak.begin(client);

  // For debugging
  Serial.begin(9600);

  // Send clear request to channel (start fresh)
  if (!clearChannel()) {
    Serial.println("Error connecting to ThingSpeak API");
  } else {
    Serial.println("Connected and listening!");
  }
}

void loop() {

  int val = -1;
  int btn;
  int last_btn = HIGH;
  unsigned long timestamp;
  unsigned long delay_time;

  // See if there was something posted to our channel
  val = ThingSpeak.readIntField(CHANNEL_ID, 1,READ_API_KEY);

  // If there is data on our channel, act on it and clear it
  if ( val > 0 ) {

    // If the value is a 1, turn on appliance
    if ( val == APPLIANCE_ON ) {
      Serial.println("Turning appliance on");
      appliance_state = 1;
      digitalWrite(PST_PIN, appliance_state);

    // If the value is a 2, turn off appliance
    } else if ( val == APPLIANCE_OFF ) {
      Serial.println("Turning appliance off");
      appliance_state = 0;
      digitalWrite(PST_PIN, appliance_state);
    }

    // Clear the data channel
    if ( !clearChannel() ) {
      Serial.println("Error: Could not clear channel!");
    } else {
      Serial.println("Channel cleared");
    }

    // Wait at least 15 seconds before polling the channel again
    delay_time = 15000;

  // No data. Try again later.
  } else {
    delay_time = 5000;
  }

  // Wait the required time before polling again
  timestamp = millis();
  while ( millis() < (timestamp + delay_time) ) {

    // Look for a falling edge on the button to toggle appliance
    btn = digitalRead(BTN_PIN);
    if ( (btn == LOW) && (last_btn == HIGH) ) {
      delay(30);
      if ( digitalRead(BTN_PIN) == LOW ) {
        appliance_state ^= 1;
        digitalWrite(PST_PIN, appliance_state);
      }
    }
    last_btn = btn;
    delay(1);
  }
}

// Attempt to connect to WiFi
void connectWiFi() {

  byte led_status = 0;

  // Set WiFi mode to station (client)
  WiFi.mode(WIFI_STA);

  // Initiate connection with SSID and PSK
  WiFi.begin(WIFI_SSID, WIFI_PSK);

  // Blink LED while we wait for WiFi connection
  while ( WiFi.status() != WL_CONNECTED ) {
    digitalWrite(LED_PIN, led_status);
    led_status ^= 0x01;
    delay(100);
  }

  // Turn LED off when we are connected
  digitalWrite(LED_PIN, HIGH);
}

// Send HTTP DELETE request to clear the channel
bool clearChannel() {

  // Attempt to make a connection to the remote server
  if ( !client.connect(HTTP_SITE, HTTP_PORT) ) {
    return false;
  }

  // Make an HTTP DELETE request
  client.print("DELETE /channels/");
  client.print(String(CHANNEL_ID));
  client.println("/feeds HTTP/1.1");
  client.print("Host: ");
  client.println(HTTP_SITE);
  client.println("Accept: */*");
  client.println("Accept-Encoding: gzip, deflate");
  client.println("Connection: close");
  client.println("Content-Type: application/x-www-form-urlencoded");
  client.println("Content-Length: 24");
  client.println();
  client.print("api_key=");
  client.println(ACCOUNT_API_KEY);

  return true;
}
Run It!
Save and upload the code to the Thing Dev Board. Plug in the IoT Power Relay to an outlet, and plug an appliance (e.g., a lamp) into one of the normally OFF outlets of the IoT Power Relay. Now, just wait for sunset (if you don't want to wait for sunset, you can modify the IFTTT applet to trigger earlier; try the Challenge below).
Challenge
Download the IFTTT App for your smartphone. See if you can create an IFTTT applet that allows you to remotely turn a device on and off from your smartphone using the DO button.
Resources and Going Further
Monitoring temperature, interacting with web services and remotely controlling physical devices are just the beginning for IoT. These experiments have hopefully given you a taste for some of the things you can do with internet-connected devices. What other projects can you come up with?
Resources
Going Further
Here are some other IoT projects you can use as inspiration: