Keyboard Shortcut, Qwiic Keypad
Introduction
You may not realize it, but you probably often use keyboard shortcuts for common tasks that, otherwise, were previously extremely monotonous. A perfect example of these shortcuts are the Cut, Copy, and Paste commands, which are almost universally used in every computer application today. Originally, people used to cut (with special scissors) and paste these changes manually.
In this guide, we will cover how to utilize the RedBoard Turbo to emulate an HID keyboard that responds to inputs from the Qwiic Keypad to create your own custom shortcut keypad. This is perfect for gaming hotkeys, keyboard shortcuts that require more than two button combinations, or for command line/data/text entries.
This will be similar to the Enginursday Blog Post: Pressing Our Buttons, but without the complex soldering. Although not necessary, it would be good to review the blog post.
Required Materials
For this project, you will need the following products. You may already have a few of these items, so feel free to modify your cart based on your needs.

Suggested Reading
If you haven't already gone through the hookup guides for each of these parts, we highly suggest starting off there to understand the basic functionality of each board:
Qwiic Keypad Hookup Guide
RedBoard Turbo Hookup Guide
This project utilizes the Qwiic connect system. We recommend familiarizing yourself with the Logic Levels and I2C tutorials (above) before using it. Click on the banner above to learn more about our Qwiic products.
For a better understanding of how example codes work, please review the following references for the platform you are interested in:
Project Overview
In this example project, we will be focusing on three different types of shortcuts that will probably be the most useful for readers.
Button Combinations
These are shortcuts that require a combination of buttons. This is not just limited to easy ones like Ctrl + x that you may use often. Often in program applications, there will be a number of shortcut button combinations available for users. These shortcuts may even use combinations of +3 buttons or may not always seem intuitive.
Win10/Linux:
- Ctrl + Alt + F1: Used to switch between virtual desktops.
Force Quit Application
- Win 10: Ctrl + Alt + Esc
- Mac OSX: ⌘ + Option + Esc
Microsoft Excel:
- Ctrl + Shift + U: Expand or collapse the formula bar
- Alt + F8: Create, run, edit, or delete a macro
- Alt + F11: Open the Microsoft Visual Basic For Applications Editor
- Alt + H + D + C: Delete column
- Alt + H + H: Select a fill color
- Alt + H + B: Add a border
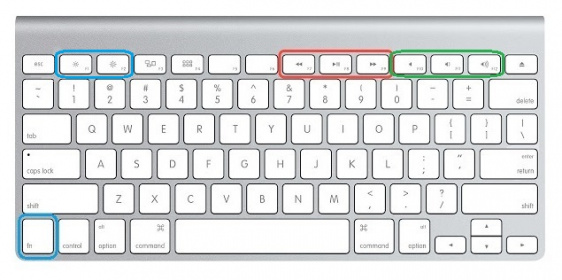
Functional Buttons
These are consumer functions or multimedia buttons available on modern keyboards. Usually these buttons have special icons and may lie outside the normal keyboard layout. (If inside the keyboard layout, they may require special buttons like Fn.)
Example Functions: Web Search , Volume Up/Down , Mute , Calculator, or Increase/Decrease Screen Brightness.
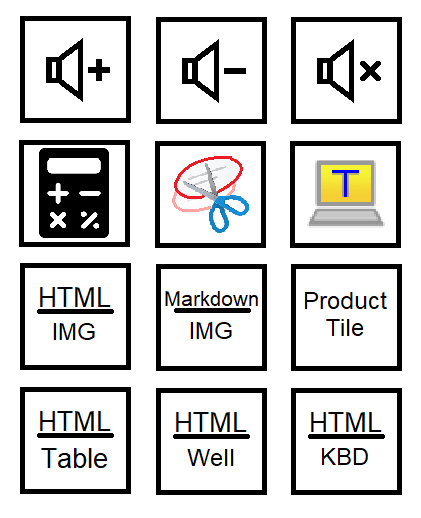
Text Strings
Text strings, these may be things that you must commonly write everyday. Think of it as a quick type or saved clipboard. Essentially, these buttons will automatically generate keyboard entries for saved text strings.
For example, I am in charge of writing tutorials and hookup guides and often I need to create HTML features like the ones listed below. I have most of them memorized, but it still takes a few seconds to type everything out. We'll use the HTML table as an example for the one of the buttons code below.
HTML Ordered List:
Example: |
Code: |
|
|
HTML Table:
Example: |
Code: |
|||||||||
|
|
HTML Alerts or Wells:
Example:
Code:
<div class="alert alert-warning"><b>Heads up!</b> This is some kind of warning.</div>
Hardware Assembly
With the Qwiic connector system, assembling the hardware is simple. All you need to do is connect your Qwiic Keypad to a RedBoard Turbo with a Qwiic cable.

If you wish to create a custom enclosure, this can easily be done with a laser cutter and or 3D printer. For custom button faces, you can use printable stickers or some paper and glue.
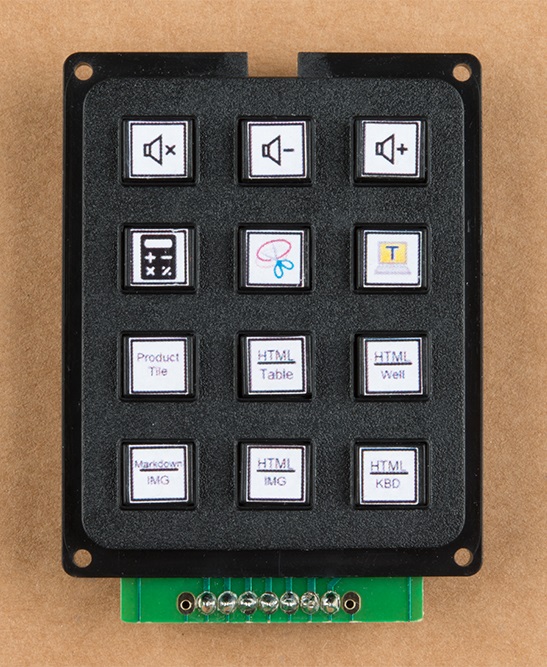
Stickers
Stickers on keypad. (Click to enlarge)
Arduino Example
Arduino Library
The easiest way to install the Arduino libraries are by searching SparkFun Qwiic Keypad and HID-Project inside the Arduino library manager. To manually install, head on over to their respective GitHub repositories:
or feel free to download the libraries below:
Using the Qwiic Keypad Library
The functionality of the Qwiic Keypad library is pretty straight forward. The example code, primarily draws from the Example1_ReadButton.ino sketch. Below is a quick summary of the library functions that are used in the example code.
keypad1.begin()- Used to connect to Qwiic Keypad.keypad1.updateFIFO()- Used to increment the FIFO.char button = keypad1.getButton()- Used to read button press from FIFO with value stored as a character in the variable button.
Using the HID-Project Library
The HID-Project library, built by NicoHood work similarly to the Arduino Keyboard library. It is also compatible with the original key definitions, just make sure you use the name, not the number. (i.e Keyboard.write(0xB0) will not work, use Keyboard.write(KEY_RETURN) instead.)
Button Combinations
To create shortcut using button combinations, find out the button combination for your shortcut. These should be listed in the user manual for your program or operating system; otherwise, the internet is a great resource. Make sure to test that the shortcut works before programming it.
To code your shortcut in Arduino, use the Keyboard.press(Define_Key) function, designating the individual key. To press multiple keys together, call this function again while designating each of the individual keys. Then use Keyboard.releaseAll() to release all the keys pressed at once. Please refer to the ImprovedKeylayouts.h header file from the HID-Project library for the naming convention (or keycode) of each keyboard key.
Example: Ctrl + Alt + F1
Code:
language:c
Keyboard.press(KEY_CTRL);
Keyboard.press(KEY_F1);
Keyboard.press(KEY_ALT);
Keyboard.releaseAll();
Functional Buttons
To create a functional shortcut in Arduino, use the Consumer.write(Define_Key) function, designating the functional key to implement. Please refer to the ConsumerAPI.h header file from the HID-Project library for the naming convention (or keycode) of the available keys.
Example:
Code:
language:c
Consumer.write(MEDIA_VOLUME_DOWN);
delay(50);
Keyboard.releaseAll();
Text String
To type out a string of text in Arduino, use the Keyboard.print("Text") or Keyboard.println("Text") function.
<table>
    <tr>
        <td></td>
        <td></td>
        <td></td>
    </tr>
    <tr>
        <td></td>
        <td></td>
        <td></td>
    </tr>
    <tr>
        <td></td>
        <td></td>
        <td></td>
    </tr>
</table>
Keyboard.println("<table border=\"1\">");
Keyboard.println("    <tr style=\"padding:10px\">");
Keyboard.println("        <td style=\"padding:10px\" valign=\"center\"></td>");
Keyboard.println("        <td style=\"padding:10px\" valign=\"center\"></td>");
Keyboard.println("        <td style=\"padding:10px\" valign=\"center\"></td>");
Keyboard.println("    </tr>");
Keyboard.println("    <tr style=\"padding:10px\">");
Keyboard.println("        <td style=\"padding:10px\" valign=\"top\"></td>");
Keyboard.println("        <td style=\"padding:10px\"></td>");
Keyboard.println("        <td style=\"padding:10px\"></td>");
Keyboard.println("    </tr>");
Keyboard.println("    <tr style=\"padding:10px\">");
Keyboard.println("        <td></td>");
Keyboard.println("        <td></td>");
Keyboard.println("        <td></td>");
Keyboard.println("    </tr>");
Keyboard.println("</table>");
Example Code
In the example code below I have implemented specific keyboard shortcuts for my personal needs. You will also notice, that in certain instances, I have combined a series of different shortcuts for greater functionality.
language:c
/*
Hot-Shortcut KeyPad
By: Wes Furuya
SparkFun Electronics
Date: March 27th, 2019
License: This code is public domain but you buy me a beer if you use this and we meet someday (Beerware license).
Feel like supporting our work? Buy a board from SparkFun!
https://www.sparkfun.com/products/14641
https://www.sparkfun.com/products/14812
This sketch allows the RedBoard Turbo to emulate a HID keyboard. The buttons on the Qwiic Keypad are set for
specific keyboard entries. For more details, please refer to the project guide:
https://learn.sparkfun.com/tutorials/keyboard-shortcut-qwiic-keypad
*/
//#include "Keyboard.h"
#include "HID-Project.h"
#include <Wire.h>
#include "SparkFun_Qwiic_Keypad_Arduino_Library.h" //Click here to get the library: http://librarymanager/All#SparkFun_keypad
KEYPAD keypad1; //Create instance of this object
void setup(void)
{
// Initializes serial output
// SerialUSB is used for debug messages to the serial monitor
SerialUSB.begin(9600);
delay(3000);
SerialUSB.println("Qwiic KeyPad Example");
// Connects Turbo to the Qwiic Keypad
if (keypad1.begin() == false) // Note, using begin() like this will use default I2C address, 0x4B.
// You can pass begin() a different address like so: keypad1.begin(Wire, 0x4A).
{
SerialUSB.println("Keypad does not appear to be connected. Please check wiring. Freezing...");
while (1);
}
SerialUSB.print("Initialized. Firmware Version: ");
SerialUSB.println(keypad1.getVersion());
SerialUSB.println("Press a button: * to do a space. # to go to next line.");
// Initializes keyboard functions
Keyboard.begin();
Consumer.begin();
}
void loop(void)
{
// Checks for next keypad press
keypad1.updateFIFO(); // necessary for keypad to pull button from stack to readable register
delay(50);
char button = keypad1.getButton();
if (button == -1)
{
SerialUSB.println("No keypad detected");
delay(1000);
}
else if (button != 0)
{
SerialUSB.print(button);
if (button == '1')
{
//Mute Button
Consumer.write(MEDIA_VOLUME_MUTE);
Keyboard.releaseAll();
}
else if (button == '2')
{
//Volume Down
Consumer.write(MEDIA_VOLUME_DOWN);
Keyboard.releaseAll();
}
else if (button == '3')
{
//Volume Up
Consumer.write(MEDIA_VOLUME_UP);
Keyboard.releaseAll();
}
else if (button == '4')
{
//Calculator
Consumer.write(CONSUMER_CALCULATOR);
Keyboard.releaseAll();
}
else if (button == '5')
{
//Used custom shortcut to launch Snipping tool
//In shorcut properties, set to: Ctrl+Alt+Insert
Keyboard.press(KEY_LEFT_CTRL);
Keyboard.press(KEY_LEFT_ALT);
Keyboard.press(KEY_INSERT);
Keyboard.releaseAll();
}
else if (button == '6')
{
//Windows Button
Keyboard.press(KEY_LEFT_WINDOWS);
Keyboard.releaseAll();
delay(50);
//Enters "ter" into search
Keyboard.println("ter");
delay(50);
//Presses enter button to select entry
//On my computer, this is TeraTerm
Keyboard.press(KEY_ENTER);
Keyboard.releaseAll();
}
else if (button == '7')
{
//Cuts selected entry
Keyboard.press(KEY_LEFT_CTRL);
Keyboard.press(KEY_X);
Keyboard.releaseAll();
delay(50);
//Types text
Keyboard.print("<!-- product_big(");
delay(50);
//Pastes entry
Keyboard.press(KEY_LEFT_CTRL);
Keyboard.press(KEY_V);
Keyboard.releaseAll();
delay(50);
//Types text
Keyboard.println(") -->");
Keyboard.print("<!-- products_by_id(");
delay(50);
//Pastes entry
Keyboard.press(KEY_LEFT_CTRL);
Keyboard.press(KEY_V);
Keyboard.releaseAll();
delay(50);
//Types text
Keyboard.println("ID1, ID2) -->");
Keyboard.println("<div class=\"clearfix\"></div>");
}
else if (button == '8')
{
//Types text
Keyboard.println("<table border=\"1\">");
Keyboard.println(" <tr style=\"padding:10px\">");
Keyboard.println(" <td style=\"padding:10px\" valign=\"center\"></td>");
Keyboard.println(" <td style=\"padding:10px\" valign=\"center\"></td>");
Keyboard.println(" <td style=\"padding:10px\" valign=\"center\"></td>");
Keyboard.println(" </tr>");
Keyboard.println(" <tr style=\"padding:10px\">");
Keyboard.println(" <td style=\"padding:10px\" valign=\"top\"></td>");
Keyboard.println(" <td style=\"padding:10px\"></td>");
Keyboard.println(" <td style=\"padding:10px\"></td>");
Keyboard.println(" </tr>");
Keyboard.println(" <tr style=\"padding:10px\">");
Keyboard.println(" <td></td>");
Keyboard.println(" <td></td>");
Keyboard.println(" <td></td>");
Keyboard.println(" </tr>");
Keyboard.println("</table>");
}
else if (button == '9')
{
//Cuts selected entry
Keyboard.press(KEY_LEFT_CTRL);
Keyboard.press(KEY_X);
Keyboard.releaseAll();
delay(50);
//Types text
Keyboard.print("<div class=\"alert alert-info\"><b>Note:</b>");
delay(50);
//Pastes entry
Keyboard.press(KEY_LEFT_CTRL);
Keyboard.press(KEY_V);
Keyboard.releaseAll();
delay(50);
//Types text
Keyboard.println("</div>");
}
else if (button == '*')
{
//Cuts selected entry
Keyboard.press(KEY_LEFT_CTRL);
Keyboard.press(KEY_X);
Keyboard.releaseAll();
delay(50);
//Types text
Keyboard.print("-> [;
delay(50);
//Pastes entry
Keyboard.press(KEY_LEFT_CTRL);
Keyboard.press(KEY_V);
Keyboard.releaseAll();
delay(50);
//Types text
Keyboard.print(")](");
delay(50);
//Pastes entry
Keyboard.press(KEY_LEFT_CTRL);
Keyboard.press(KEY_V);
Keyboard.releaseAll();
delay(50);
//Types text
Keyboard.println(") <-");
Keyboard.println(" *Caption* ");
}
else if (button == '0')
{
//Cuts selected entry
Keyboard.press(KEY_LEFT_CTRL);
Keyboard.press(KEY_X);
Keyboard.releaseAll();
delay(50);
//Types text
Keyboard.print("<center><a href=\"");
delay(50);
//Pastes entry
Keyboard.press(KEY_LEFT_CTRL);
Keyboard.press(KEY_V);
Keyboard.releaseAll();
delay(50);
//Types text
Keyboard.print("\"><img src=\"");
delay(50);
//Pastes entry
Keyboard.press(KEY_LEFT_CTRL);
Keyboard.press(KEY_V);
Keyboard.releaseAll();
delay(50);
//Types text
Keyboard.println("\" alt=\"\"></a></center>");
Keyboard.println("<center><i>Caption</i></center>");
}
else if (button == '#')
{
//Cuts selected entry
Keyboard.press(KEY_LEFT_CTRL);
Keyboard.press(KEY_X);
Keyboard.releaseAll();
delay(50);
//Types text
Keyboard.print("<kbd>");
delay(50);
//Pastes entry
Keyboard.press(KEY_LEFT_CTRL);
Keyboard.press(KEY_V);
Keyboard.releaseAll();
delay(50);
//Types text
Keyboard.print("</kbd>");
}
else
{
Keyboard.println(button);
}
}
//Do something else. Don't call your Keypad a ton otherwise you'll tie up the I2C bus
delay(25); //25 is good, more is better
}
CircuitPython Example
In an effort to utilize the CircuitPython capability of the RedBoard Turbo, I also have included CircuitPython example code. When you plug the RedBoard Turbo into the computer, it should show up as an USB drive. If not, check out the Troubleshooting section below on how to re-install CircuitPython. To upload your code to your board, you must save the python file on the drive that appears when the board is plugged in.
Import CircuitPython Libraries
Installing the Libraries
There may be better instructions than these, but this is what I did to get the CircuitPython libraries onto the RedBoard Turbo. You can also download the library directly using the button below.
- Go to the Releases tab for the GitHub Repository.
- Download the .zip file containing "bundule-3.x-mpy" in the name or click the button below.
- Unzip the file.
- Copy the lib folder from file onto the board.
Utilizing the Libraries
To utilize the libraries in your code, you need to import them. Below, are the lines used for importing the libraries in the example python code.
language:python
import time
import board
import busio

from adafruit_hid.keyboard import Keyboard
from adafruit_hid.keyboard_layout_us import KeyboardLayoutUS
from adafruit_hid.keycode import Keycode
from adafruit_hid.consumer_control import ConsumerControl
from adafruit_hid.consumer_control_code import ConsumerControlCode
Implementing CircuitPython
Querying the Keypad
Using the description of the FIFO operation from the Qwiic Keypad hookup guide, the Qwiic Keypad utilizes two registers for querying button presses. The first is register 0x03, that is read for the oldest entry in the FIFO (first-in, first-out) stack. The second is the FIFO increment command register, 0x06, used to update register 0x03 with the next button value.
Setup for I2C
To setup your I2C connection, you need to import the following libraries. You also need to define the pins used for the I2C bus, which was built into the board library for the SAMD21 used on the Turbo. Finally, the I2C address for the Qwiic Keypad was store as a variable.
language:python
import time
import board
import busio

i2c = busio.I2C(board.SCL, board.SDA)
i2caddress = 75 #equals 0x4B in HEX
Read Register
The following code is used to read the value of the oldest button press out of the FIFO stack from register 0x03.
language:python
i2c.writeto(i2caddress, bytes([0x03]), start=0, end=8, stop=True)
time.sleep(.2)
i2c.readfrom_into(i2caddress, result2, start=0, end=1)
Write/Set Register
The following code is used to write 0x01 to register 0x06 to increment the FIFO stack, updating the value stores in register 0x03.
language:python
i2c.writeto(i2caddress, bytes([0x06,0x01]), start=0, end=16, stop=True)
Creating Shortcuts
Utilizing HID Library
The CircuitPython HID library works similarly to the Arduino library used in the previous section. To reference keycodes and naming conventions I used a combination of the following documentation:
- CircuitPython HID library
- USB HID Keycode Usage Table
- Keyboard Keycodes from Arduino HID-Project Library
- Consumer Keycodes from Arduino HID-Project Library
Button Combinations
To create shortcut using button combinations, find out the button combination for your shortcut. These should be listed in the user manual for your program or operating system; otherwise, the internet is a great resource. Make sure to test that the shortcut works before programming it.
To code your shortcut in CircuitPython, use the kbd.press(Define_Key) function, designating the individual key. To press multiple keys together, call this function again while designating each of the individual keys. Then use kbd.release_all() to release all the keys pressed at once. Please refer to the documentation listed above for the naming convention (or keycode) of each keyboard key.
Example: Ctrl + Alt + F1
Code:
language:python
kbd.press(Keycode.CONTROL)
kbd.press(Keycode.ALT)
kbd.press(Keycode.INSERT)
kbd.release_all()
Functional Buttons
To create a functional shortcut in CircuitPython, use the cc.send(Define_Key) function, designating the functional key to implement. Please refer to the documentation listed above for the naming convention (or keycode) of the available keys.
Example:
Code:
language:python
cc.send(ConsumerControlCode.VOLUME_DECREMENT)
Text String
To type out a string of text in CircuitPython, use the layout.write('Text') function.
<table>
    <tr>
        <td></td>
        <td></td>
        <td></td>
    </tr>
    <tr>
        <td></td>
        <td></td>
        <td></td>
    </tr>
    <tr>
        <td></td>
        <td></td>
        <td></td>
    </tr>
</table>
layout.write('<table border="1">\n')
layout.write('    <tr style="padding:10px">\n')
layout.write('        <td style="padding:10px" valign="center"></td>\n')
layout.write('        <td style="padding:10px" valign="center"></td>\n')
layout.write('        <td style="padding:10px" valign="center"></td>\n')
layout.write('    </tr>\n')
layout.write('    <tr style="padding:10px">\n')
layout.write('        <td style="padding:10px" valign="top"></td>\n')
layout.write('        <td style="padding:10px"></td>\n')
layout.write('        <td style="padding:10px"></td>\n')
layout.write('    </tr>\n')
layout.write('    <tr style="padding:10px">\n')
layout.write('        <td></td>\n')
layout.write('        <td></td>\n')
layout.write('        <td></td>\n')
layout.write('    </tr>\n')
layout.write('</table>\n')
Example Code
In the example code below I have implemented specific keyboard shortcuts for my personal needs. You will also notice, that in certain instances, I have combined a series of different shortcuts for greater functionality.
code.py on the drive that appears when the RedBoard Turbo is plugged into your computer.language:python
""" Hot-Shortcut KeyPad
By: Wes Furuya
SparkFun Electronics
Date: March 27th, 2019
License: This code is public domain but you buy me a beer if you use this and we meet someday (Beerware license).
Feel like supporting our work? Buy a board from SparkFun!
https://www.sparkfun.com/products/14641
https://www.sparkfun.com/products/14812
This sketch allows the RedBoard Turbo to emulate a HID keyboard. The buttons on the Qwiic Keypad are set for specific keyboard entries. For more details, please refer to the project guide:
https://learn.sparkfun.com/tutorials/keyboard-shortcut-qwiic-keypad """
import time
import board
import busio
# https:#github.com/adafruit/Adafruit_CircuitPython_Bundle/releases/tag/20190326
# 1. Download "bundule-3.x":
# https:#github.com/adafruit/Adafruit_CircuitPython_Bundle/releases/download/20190326/adafruit-circuitpython-bundle-3.x-mpy-20190326.zip
# 2. Unzip
# 3. Copy lib folder on to board
from adafruit_hid.keyboard import Keyboard
from adafruit_hid.keyboard_layout_us import KeyboardLayoutUS
from adafruit_hid.keycode import Keycode
from adafruit_hid.consumer_control import ConsumerControl
from adafruit_hid.consumer_control_code import ConsumerControlCode
cc = ConsumerControl()
kbd = Keyboard()
layout = KeyboardLayoutUS(kbd)
i2c = busio.I2C(board.SCL, board.SDA)
i2caddress = 75 #equals 0x4B in HEX
CALCULATOR = 402 #equals 0x192 in HEX
while not i2c.try_lock():
pass
while True:
result2 = bytearray(1)
i2c.writeto(i2caddress, bytes([0x03]), start=0, end=8, stop=True)
i2c.readfrom_into(i2caddress, result2, start=0, end=1)
if result2 != bytes([0x00]):
if result2 == b'1':
cc.send(ConsumerControlCode.MUTE)
print(result2)
elif result2 == b'2':
cc.send(ConsumerControlCode.VOLUME_DECREMENT)
print(result2)
elif result2 == b'3':
cc.send(ConsumerControlCode.VOLUME_INCREMENT)
print(result2)
elif result2 == b'4':
cc.send(CALCULATOR) #cc.send(402)
print(result2)
elif result2 == b'5':
kbd.press(Keycode.CONTROL)
kbd.press(Keycode.ALT)
kbd.press(Keycode.INSERT)
kbd.release_all()
print(result2)
elif result2 == b'6':
kbd.send(227) #Windows Button
time.sleep(.05)
layout.write('ter')
time.sleep(.1)
kbd.send(Keycode.ENTER)
print(result2)
elif result2 == b'7':
# Cuts selected entry
kbd.press(Keycode.CONTROL)
kbd.press(Keycode.X)
kbd.release_all()
time.sleep(.05)
layout.write('<!-- product_big(')
time.sleep(.05)
#Pastes entry
kbd.press(Keycode.CONTROL)
kbd.press(Keycode.V)
kbd.release_all()
time.sleep(.05)
#Types text
layout.write(') -->\n')
layout.write('<!-- products_by_id(')
time.sleep(.05)
#Pastes entry
kbd.press(Keycode.CONTROL)
kbd.press(Keycode.V)
kbd.release_all()
time.sleep(.05)
#Types text
layout.write('ID1, ID2) -->\n')
layout.write('<div class="clearfix"></div>')
elif result2 == b'8':
#Types text
layout.write('<table border="1">\n')
layout.write(' <tr style="padding:10px">\n')
layout.write(' <td style="padding:10px" valign="center"></td>\n')
layout.write(' <td style="padding:10px" valign="center"></td>\n')
layout.write(' <td style="padding:10px" valign="center"></td>\n')
layout.write(' </tr>\n')
layout.write(' <tr style="padding:10px">\n')
layout.write(' <td style="padding:10px" valign="top"></td>\n')
layout.write(' <td style="padding:10px"></td>\n')
layout.write(' <td style="padding:10px"></td>\n')
layout.write(' </tr>\n')
layout.write(' <tr style="padding:10px">\n')
layout.write(' <td></td>\n')
layout.write(' <td></td>\n')
layout.write(' <td></td>\n')
layout.write(' </tr>\n')
layout.write('</table>\n')
elif result2 == b'9':
#Cuts selected entry
kbd.press(Keycode.CONTROL)
kbd.press(Keycode.X)
kbd.release_all()
time.sleep(.05)
#Types text
layout.write('<div class="alert alert-info"><b>Note:</b>')
time.sleep(.05)
#Pastes entry
kbd.press(Keycode.CONTROL)
kbd.press(Keycode.V)
kbd.release_all()
time.sleep(.05)
#Types text
layout.write('</div>')
elif result2 == b'*':
#Cuts selected entry
kbd.press(Keycode.CONTROL)
kbd.press(Keycode.X)
kbd.release_all()
time.sleep(.05)
#Types text
layout.write('-> [
time.sleep(.05)
#Pastes entry
kbd.press(Keycode.CONTROL)
kbd.press(Keycode.V)
kbd.release_all()
time.sleep(.05)
#Types text
layout.write(')](')
time.sleep(.05)
#Pastes entry
kbd.press(Keycode.CONTROL)
kbd.press(Keycode.V)
kbd.release_all()
time.sleep(.05)
#Types text
layout.write(') <-')
layout.write('<div class="center-block text-center"> *Caption* </div>')
elif result2 == b'0':
#Cuts selected entry
kbd.press(Keycode.CONTROL)
kbd.press(Keycode.X)
kbd.release_all()
time.sleep(.05)
#Types text
layout.write('<center><a href="')
time.sleep(.05)
#Pastes entry
kbd.press(Keycode.CONTROL)
kbd.press(Keycode.V)
kbd.release_all()
time.sleep(.05)
#Types text
layout.write('"><img src="')
time.sleep(.05)
#Pastes entry
kbd.press(Keycode.CONTROL)
kbd.press(Keycode.V)
kbd.release_all()
time.sleep(.05)
#Types text
layout.write('" alt=""></a></center>')
layout.write('<center><i>Caption</i></center>')
elif result2 == b'#':
#Cuts selected entry
kbd.press(Keycode.CONTROL)
kbd.press(Keycode.X)
kbd.release_all()
time.sleep(.05)
#Types text
layout.write('<kbd>')
time.sleep(.05)
#Pastes entry
kbd.press(Keycode.CONTROL)
kbd.press(Keycode.V)
kbd.release_all()
time.sleep(.05)
#Types text
layout.write('</kbd>')
else:
print(result2)
time.sleep(.05)
i2c.writeto(i2caddress, bytes([0x06,0x01]), start=0, end=16, stop=True)
Troubleshooting
Drivers
After plugging in your board into the computer, make sure that the drivers for the SAMD21 are installed on your computer. For MAC OSX and Win 10, this should be done automatically once the board is plugged in. I believe this also applies for the more popular flavors of Linux as well.
If needed, you can download the Windows driver using the button below. You can find instructions for this process in the SAMD21 MiniDev Hookup Guide.
Double-Tapping Into the Bootloader
The bootloader is what allows us to load code over a simple USB interface. If you have bricked your board, try to upload code from bootloader mode. To manually enter bootloader mode, rapidly double-tapping the reset button (after hitting the reset button once, you have about half a second to hit it again). The board will remain in bootloader mode until power cycles (happens automatically after uploading code) or the reset button is hit again (once).
On the Turbo, the there are a clues to if it is in bootloader mode:
- RGB LED (on Pin 44) will be solid green.
- The D13 LED indicator will be a solid blue (might fade in and out a little).
- Charge indicator LED will be flashing constantly.
- Board will show up under a different COM port.
Dual Serial Ports
One global issue to be aware of is that each SAMD21 Board appears to your computer as two USB devices, and your computer will assign two different port numbers to your SAMD21 Board - one for the bootloader, the other for the sketch.
- Verify that you are selecting the available serial port for the board.
- If your computer isn't registering the board try double-tapping it into bootloader mode.
Serial Port Not Appearing in Port Menu
If your SAMD21 board is plugged in -- power LED illuminated -- but it isn't appearing in your Arduino port list, first of all, make sure you have the drivers installed (Windows computers only). Then follow these steps to see if you can get the port back:
- Close all Arduino windows. (Don’t forget to save!)
- Unplug SAMD21 Board from your computer.
- Wait a few seconds for the device to be detached.
- Plug SAMD21 Board back in.
- Open Arduino back up, check the Ports menu again.
Upload Fails or Freezes
If a sketch upload is taking longer than usual, or fails entirely, try resetting into the bootloader and uploading directly there. If the SAMD21 is in bootloader mode, you may need to re-select your port -- this time selecting the bootloader port.
- Closing the serial monitor before uploading may also make for more reliable uploading.
Reinstalling CircuitPython
If you do your developing in Arduino, you'll find that after uploading your first sketch, the RedBoard Turbo no longer pops up like a removable USB device as it did previously. That's to be expected. In this section we'll walk through a few simple steps to getting CircuitPython re-uploaded onto your RedBoard Turbo.
Reset board to Bootloader
We want the board to reset to the UF2 bootloader, which enables the board to act like a flash drive. To do that we'll double tap the reset button. Shortly after you do that, the board will pop up as a USB drive named TURBOBOOT.
Download and Drag CircuitPython Firmware
Download the CircuitPython firmware below (also found in the GitHub product repository). Drag the contents named
turbo-boot_cp.uf2onto your TURBOBOOT USB drive and the USB drive should disappear momentarily only to reappear as a CIRCUITPY USB drive instead.Re-install the CircuitPython Libraries (to get example code working)
Download the CircuitPython library bundle below and then drag the lib folder over to the USB drive for the RedBoard Turbo. For more details see the instructions above.
Project Notes
This is the end of the project documentation, excluding the resources linked below. Here are a few notes I had following the completion of the project tutorial.
CircuitPython
Unfortunately, this was my first time using CircuitPython and there was a little confusion getting everything working. Specifically, I am not sure if I implemented the I2C functionality properly (as intended) for CircuitPython, but it worked for the purpose of this project. Feel free to comment below on any changes that should be made.
In my initial attempt to get the Qwiic Keypad running, I was able to read from all the registers. However, I wasn't able to implement a write to set individual register values in a similar fashion using the writeto function. It wasn't until I looked at how the code was operating with a logic analyzer, that I realized that these functions operated at a lower level. Despite being able to read a whole register block, the functions actually were meant for read and write bit operations as demonstrated above.
language:python
try:
    #initial attempt
    result1 = bytearray(8)
    i2c.readfrom_into(i2caddress, result1, start=0, end=7)
    print(result1)
    time.sleep(3)

finally:
    i2c.unlock()
Going Further with Macros
Do you have a repetitive task that you perform daily on your computer that you wish to automate? If you are more computer savy, you may already use or have created your own simple macro for more complex tasks that can't be handled with a mere keyboard shortcut or hotkey. Although we won't cover macros in this guide, they are simple, yet powerful tools.
How simple...
Even a grade schooler, could easily use Microsoft Excel to record a custom macro in VBA.
How powerful...
Macros can perform essentially, almost any function you can with a mouse and keyboard. If you are particularly diabolical, this is an easy way to prank your friends... you could easily create and hide a macro to cause mouse movements or play a particular audio file randomly. However, please be aware of the security risks involved in using macros (see note below).
Resources and Going Further
For more information, check out the resources below:
- SFE Product Showcase
- Enginursday Blog Post: Pressing Our Buttons
- Table of Keyboard Shortcuts
- USB HID Keycode Usage Table
- Circuit Python Documentation Page
- Arduino HID-Project Library GitHub Repository
If you haven't already gone through the hookup guides for components used in this project, we highly suggest starting off there to understand the basic functionality of each board:
Qwiic Keypad Hookup Guide
RedBoard Turbo Hookup Guide
Check out other Qwiic products and tutorials here: