LilyPad Development Board Activity Guide
 Gella
Gella 
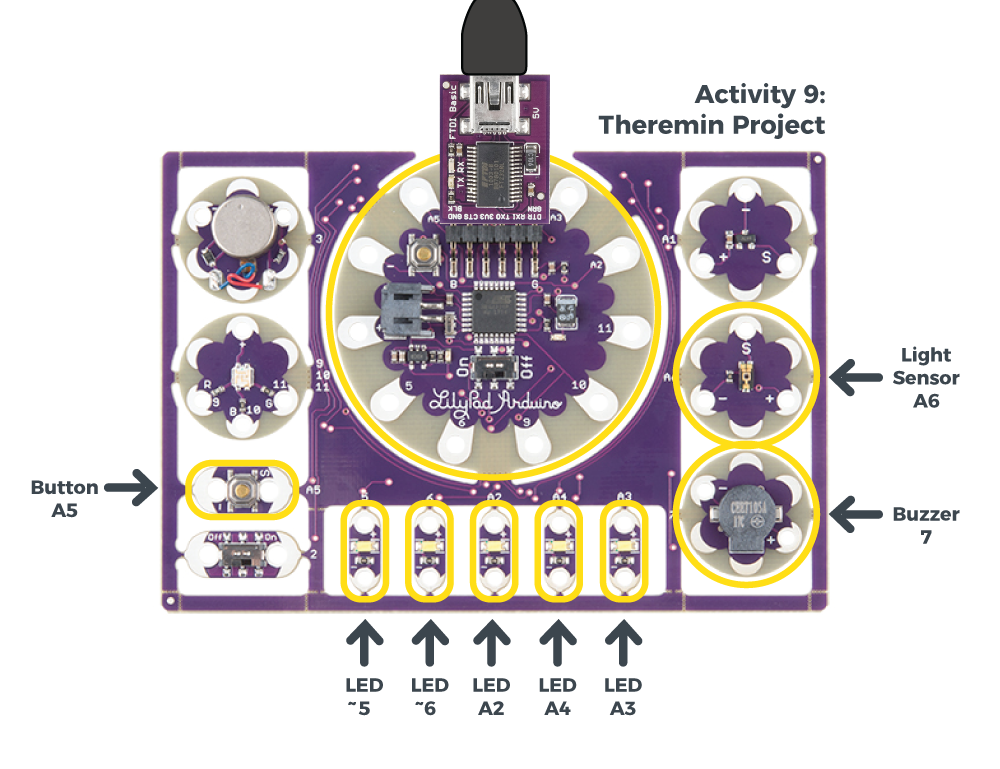
9: Theremin Project
Now that you've explored the basic programming skills needed to use the Development Board, it's time to start combining some of those skills into more interactive projects. The first project we'll explore is creating a musical 'instrument' inspired by a theremin. A theremin is an instrument played without needing physical contact, typically utilizing antennas. In this 'theremin', you'll use readings from the light sensor as a controller for frequency of tones produced by the buzzer. We can further categorize this project an opto-theremin because it is using light as a controller. In addition to the sensor and buzzer, we'll display the light readings on the bar graph and add the button as an on/off trigger.
LilyPad Boards Used in This Activity
- LilyPad Arduino Simple
- LilyPad Light Sensor
- LilyPad Buzzer
- LilyPad Button
- LilyPad LEDs
New Concepts Introduced in This Activity
Using the Map() Function
The map() function is a handy function that translates one range of numbers into another range.
For example, let's say you wanted to use the light sensor (read by analogRead()) to control the brightness of a LED (written by analogWrite()), as we did back in activity 7. But the range of analogRead() (0 to 1023) doesn't match the range of analogWrite() (0 to 255).
This particular example is easy to solve in that you can simply divide the light sensor value by 4, as we did in activity 7. But it would take a bit more work to solve for arbitrary ranges that may not start at 0, as we'll be doing in this activity.
The map() function does this for you. The parameters it needs are:
result = map(value,fromLow,fromHigh,toLow,toHigh);
Where fromLow to fromHigh is the range of the original value, and toLow to toHigh is the range we want to translate that value into.
For example, here's how we'd set up map() for our earlier example:
LEDbrightness = map(lightSensorValue,0,1023,0,255);
It's worth mentioning that if value isn't within the original range, map() will still work; but it will return a result outside the target range. If your result must be within the target range, an additional function called constrain() can be used to ensure that:
result = constrain(value,low,high);
If value is already within the range of low to high, the result will be the same as value. But if value is outside that range, it will be set to low or high, whichever is closest. Our complete example would then look like:
LEDbrightness = map(lightSensorValue,0,1023,0,255);
LEDbrightness = constrain(LEDbrightness,0,255);
Example Code
To open the code, go to:
File > Examples > LilyPadDevelopmentBoard_ActivityGuide > LPD_09_Theremin
You can also copy and paste the following code into the Arduino IDE. Hit upload, and see what happens!
language:c
/*
LilyPad Development Board Activity 9: Theremin
SparkFun Electronics
https://www.sparkfun.com/products/11262

A Theremin is an electronic musical instrument that is played by
moving your hands over it. In this activity we'll create a Theremin
using the light sensor and the buzzer.

Follow the tutorial at:
https://learn.sparkfun.com/tutorials/lilypad-development-board-activity-guide/9-theremin-project

This code is released under the MIT License (http://opensource.org/licenses/MIT)

******************************************************************************/

// Create variables for the pins we'll be using

int sensorPin = A6;
int buttonPin = A5;
int buzzer = 7;
int bargraphLED[5] = {5,6,A2,A4,A3};

// Set the highest and lowest frequencies
// (Change these and see what happens)

int highestFrequency = 1047; // C6
int lowestFrequency = 523; // C5

void setup()
{
  int x;

  // Initialize the pins we'll be using

  pinMode(sensorPin, INPUT);
  pinMode(buzzer, OUTPUT);
  pinMode(buttonPin, INPUT_PULLUP);

  for (x = 0; x <= 4; x++)
  {
    pinMode(bargraphLED[x],OUTPUT);
  }

  // Initialize the serial monitor

  Serial.begin(9600);
}

void loop()
{
  int sensorValue;
  int frequency;

  // Read the sensor value (will be 0 to 255):

  sensorValue = analogRead(sensorPin);

  // Print out the sensor reading:

  Serial.print("sensor value: ");
  Serial.println(sensorValue);

  // Display the sensor reading on the bar graph LEDs:

  barGraph(sensorValue);

  // Play a tone based on the light level:

  // The light sensor will return a value from 0 to 1023,
  // but we want to map this to a specific range of frequencies.
  // We'll use a built-in fuction called "map" that transforms one range
  // of values (0 to 1023) to another (lowestFrequency to highestFrequency):

  frequency = map(sensorValue,0,1023,lowestFrequency,highestFrequency);

  if (digitalRead(buttonPin) == LOW) // If the button is pressed:
  {
    tone(buzzer,frequency);
  }
  else
  {
    noTone(buzzer);
  }
}

void barGraph(int value)
{
  // Create a LED bargraph using value as an input.
  // Value should be in the range 0 to 1023.

  int x;

  // Step through the bargraph LEDs,
  // Turn them on or off depending on value.

  // Value will be in the range 0 to 1023.
  // There are 6 LEDs in the bargraph.
  // 1023 divided by 5 is 204, so 204 will be our threshold
  // between each LED (0,42,84, etc.)

  for (x=0; x <= 4; x++)
  {
    if (value > (x*170) )
    {
      digitalWrite(bargraphLED[x], HIGH);
    }
    else
    {
      digitalWrite(bargraphLED[x], LOW);
    }
  }
}
What You Should See
To play the theremin, press and hold the button with one hand and cover the light sensor with the other. As the light sensor reads different light levels, the frequency on the buzzer will change and the row of LEDs will illuminate to show the different tones. Release the button to stop the sounds. You can also use a flashlight to shine more light on the sensor and get a large range of tones.
Understanding Your Program
Program Overview
- Create variables to store.
- Read the value from the light sensor and store in
sensorValue. - Print the light sensor reading to the serial monitor.
- Display the sensor reading on the bar graph using a custom
barGraph()function. - Map the values from the light sensor to the set range of frequencies (set in
lowestFrequencyandhighestFrequency) - Check to see if the button is pressed.
a. If it is, send a
tone()command to the buzzer using thefrequencyvalue. b. If it is not, turn the buzzer off usingnoTone()command. - Repeat.
Code to Note
| Code | Description |
|---|---|
map(value,inMin, inMax, outMin, outMax) |
Mapping a Range of Values:Themap() function is a tool in Arduino used to take a value from one range and constrain it to another. This is especially helpful when you want to take readings from an analog input (which can range from 0-1023) and use them to display directly on an output (which ranges from 0-255). In previous examples, the code used division to make these two variables compatible. The map function is a little more sophisticated. The map value has five parameters, listed below:Value: sensorValue The values/variable to map. In this code we are using the data we read from the light sensor stored in sensorValue.inMin: 0 inMax: 1023 The minimum and maximum bounds of the value to be mapped. In this case, since sensorValue is from an analog sensor, these will be 0-1023.
outMin: lowestFrequencyoutMax: highestFrequencyThe minimum and maximum bounds you want to map the current value to. In this case, we've chosen a range of frequencies stored in the lowestFrequency and highestFrequency variables set at the beginning of the program.
Read more about the map() function on the Arduino Reference site. |
Coding Challenges
Adjust
lowestFrequencyandhighestFrequencyto use different ranges for the tones the theremin creates.Try adding additional sound controls by adding another
if/elsestatement using the switch. Suggestions: Turning a light pattern on/off that coordinates with the sound or switching between different frequency ranges.