LilyPad Safety Scarf
 Feldi
Feldi Understanding Your Circuit
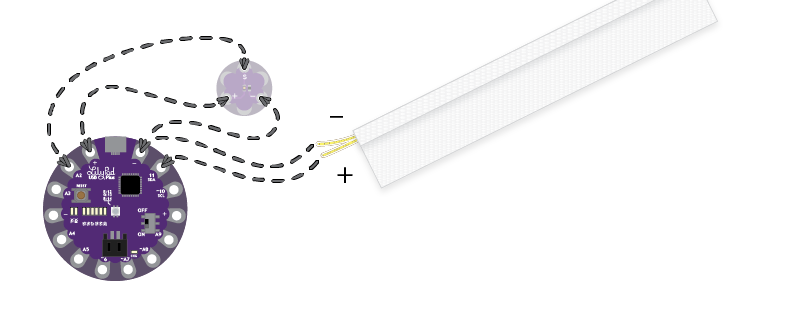
The LilyPad Safety Scarf is an example of a sewable embedded circuit. For this project, we will use a LilyPad USB Plus from the LilyPad ProtoSnap Plus and LilyPad Light Sensor (there is also one included on the ProtoSnap plus that can be used) as well as two LED Ribbons. This project will be powered with an 850 mAh LiPo battery.
As expressed in the circuit diagram below, the sewable microcontroller is connected to a sewable light sensor via conductive thread. The light sensor has three connections, VCC, GND, and 'S'. VCC and GND connect to '+' and '-', respectively. The 'S' tab should be connected to pin A2 on the microcontroller.
The LED ribbon will be handled differently. While the ribbon itself can be sewn onto a garment, the electrical leads are not sewable - just traditional wires. Luckily, the LilyPad Sew tabs are also solder friendly. So in this instance, we will solder the LED lead's soft, flexible wire to the microcontroller. The datasheet for the LED ribbon indicates that the anode is copper colored (i.e. reddish brown) and the cathode is a silver color (i.e. metallic grey). Connect the anode to pin 11 on the LilyPad USB Plus and the cathode to the GND pin labeled '-'.