mbed Starter Kit Experiment Guide
This Tutorial is Retired!
This tutorial covers concepts or technologies that are no longer current. It's still here for you to read and enjoy, but may not be as useful as our newest tutorials.
 Shawn Hymel
Experiment 3: Graphic LCD
Let's make some graphics! In this tutorial, we walk you through connecting your Serial Miniature Graphic LCD to the mbed LPC1768 and making some shapes and text. This tutorial is important as we will use the LCD in the next few tutorials, so pay close attention!
Suggested Reading
The Circuit
This circuit can be made with parts in the SparkFun mbed Starter Kit. Also, keep in mind that the LPC1768 box contains a USB mini-B cable for programming and power.
Parts List
To follow this experiment, you would will need the following materials if you did not order the SparkFun mbed starter kit. You may not need everything though depending on what you have. Add it to your cart, read through the guide, and adjust the cart as necessary.
Schematic
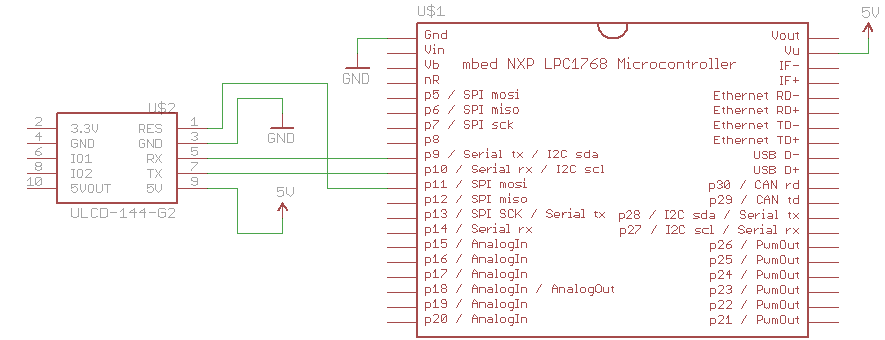
Connections
Before connecting the LCD to your breadboard, we recommend you carefully bend the 3.3V pin on the LCD back so that it does not short to the RESET pin. This can be accomplished with a set of needle nose pliers. You will likely never need 3.3V from the LCD, as you can get 3.3V from the VOUT pin on the LPC1768. The other pins in the second row can be shorted to pins in the first row and not affect the LCD's operation.
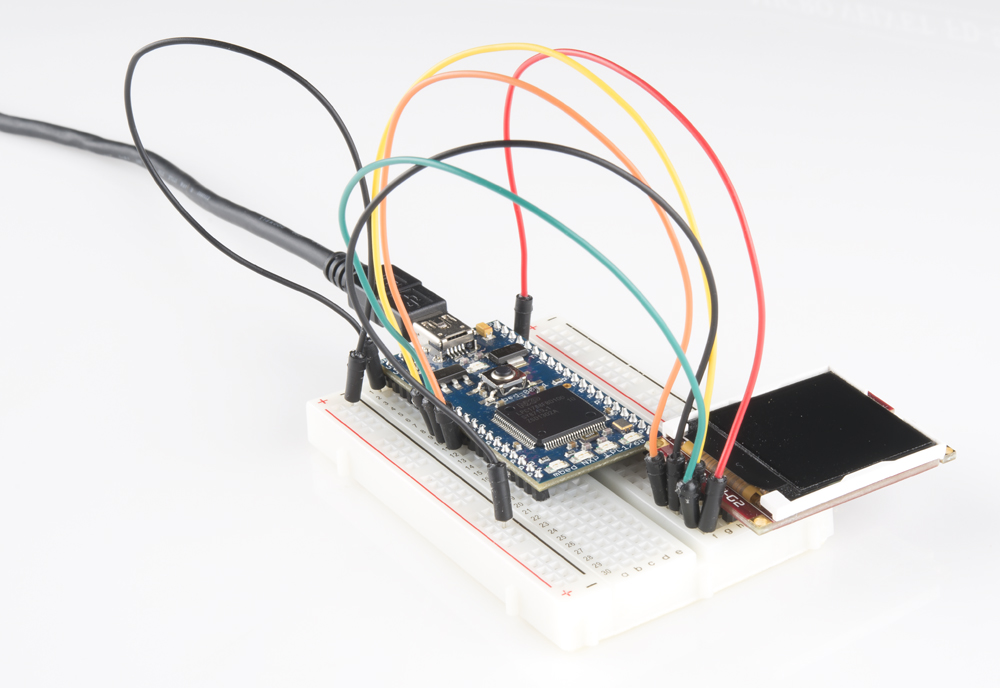
Plug the LCD into your breadboard and connect it to the LPC1768 as shown.
Fritzing Diagram

Hookup Table
Place the LPC1768 in a breadboard with pin VOUT in position i1 and pin 20 in position b20.
Connect the rest of the components as follows:
| Component | Breadboard | ||||
|---|---|---|---|---|---|
| uLCD-144-G2* | h26 (RES) | h27 (GND) | h28 (RX) | h29 (TX) | h30 (+5V) |
| Jumper Wire | j2 | f30 | |||
| Jumper Wire | a1 | ( - ) | |||
| Jumper Wire | a9 | f28 | |||
| Jumper Wire | a10 | f29 | |||
| Jumper Wire | a11 | f26 | |||
| Jumper Wire | ( - ) | f27 | |||
* Pins not listed are not used.
The Code
For this tutorial, we will be using an mbed library. Libraries can be found under the Handbook for official, mbed-supported libraries or the Cookbook for user-created mbed libraries.
Libraries
mbed.org user Jim Hamblen modified a 4D LCD library to work with our uLCD-144-G2. We copied (also known as "forked") his library for use in this tutorial.
Go to mbed.org and sign in to your account.
Navigate to the mbed 4DGL-uLCD-SE library page.
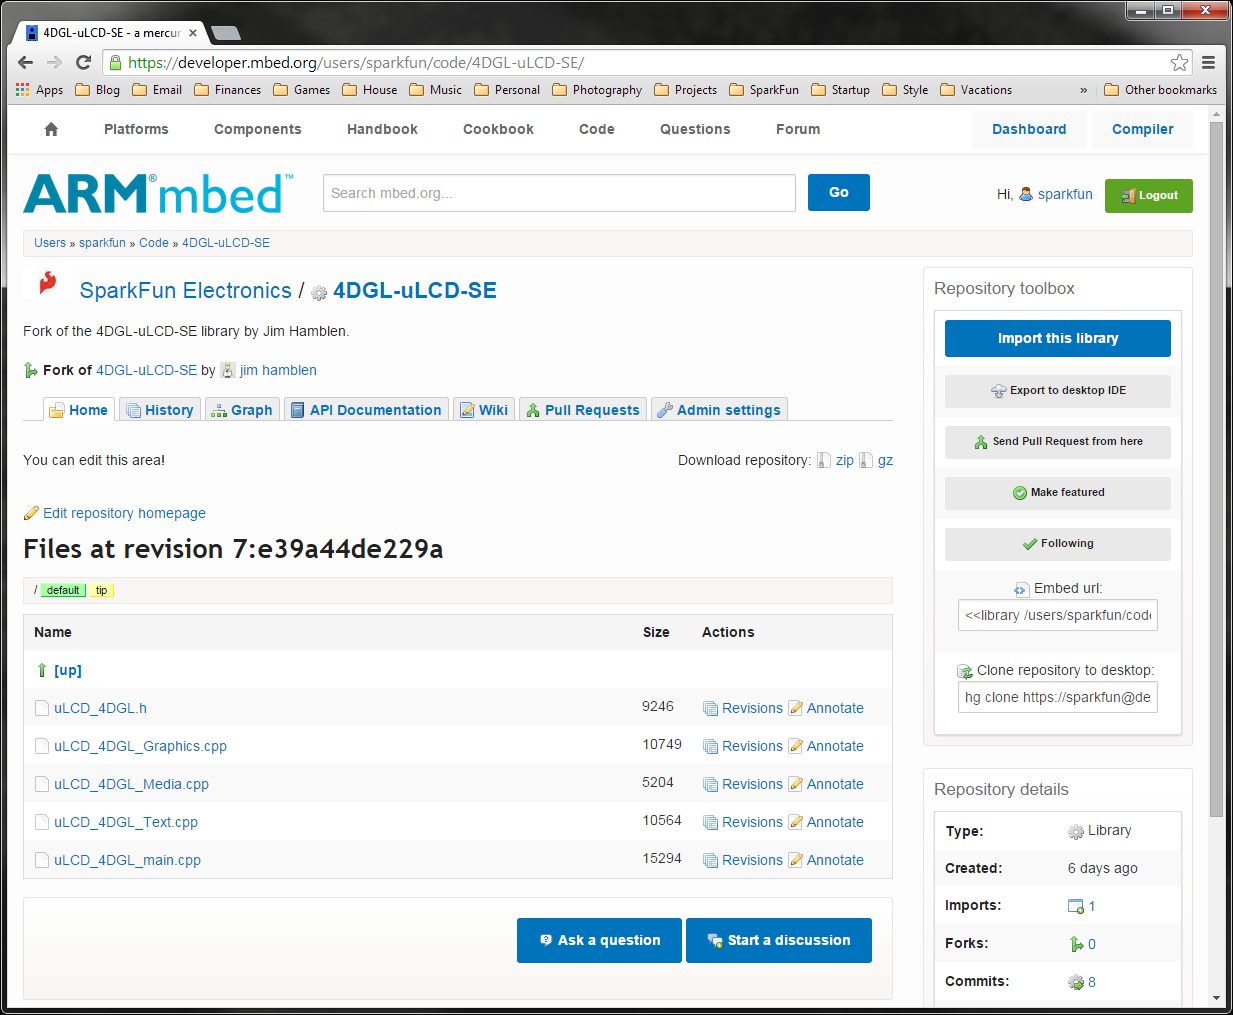
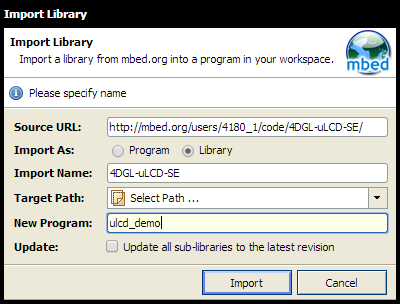
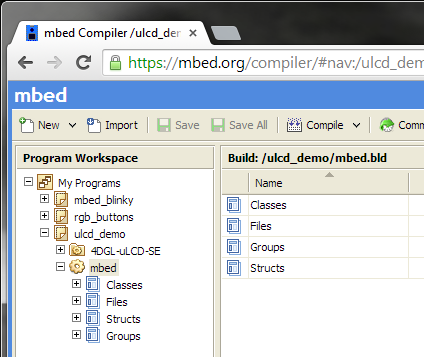
Click "Import this library" on the right side of the page. You will be brought to the mbed Compiler and asked to import the library. Fill in a program name (e.g. "ulcd_demo") for "New Program" and click "Import."
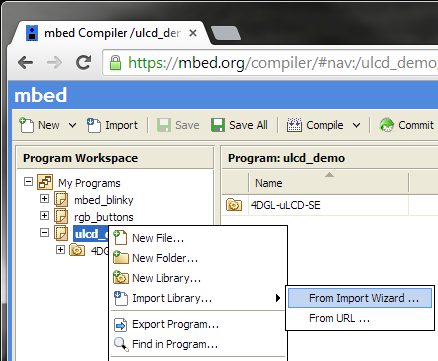
Since the import process imported only the 4DGL-uLCD-SE library, we need to add the mbed library.
In the Compiler, right-click on the "ulcd_demo" project, highlight "Import Library..." and select "From Import Wizard..."
That will bring you to the Import Wizard page. In the "Search criteria..." on the right type in "mbed" and click the "Search" button (Note: the mbed library is likely already listed, but it is good practice to know how to search for libraries).
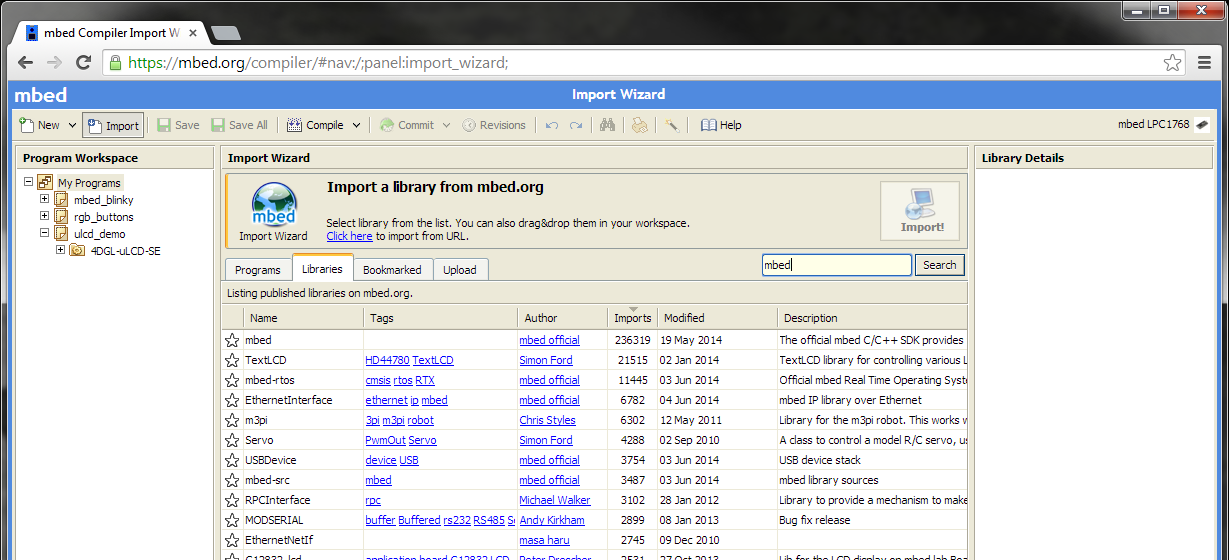
The mbed library should be the first listing.
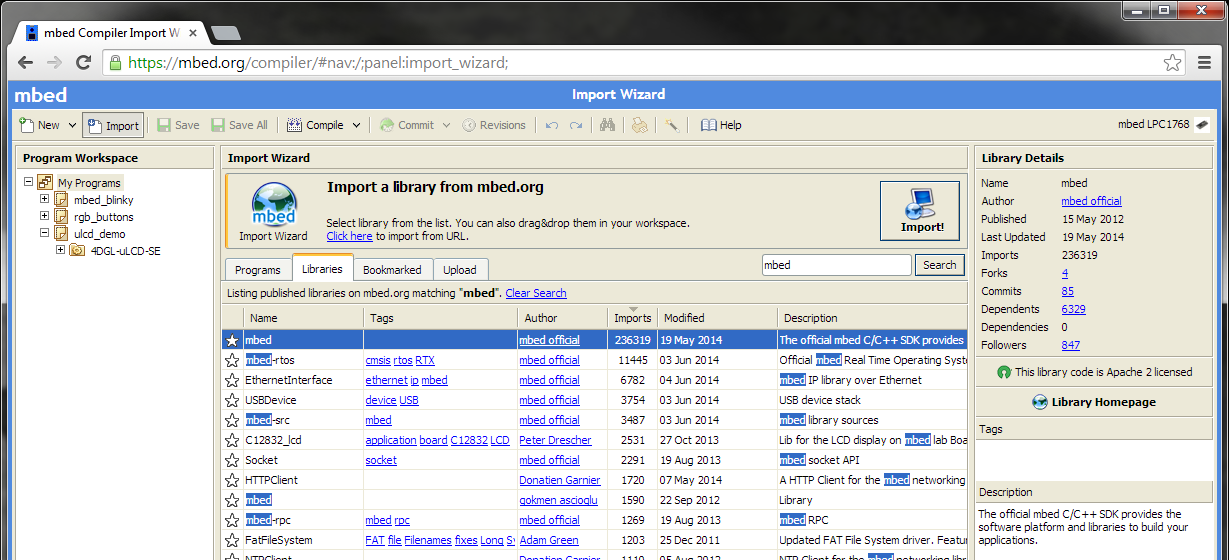
Double-click the entry (highlighted in the picture) to import the library. This will automatically load the library into your "ulcd_demo" project.
Program
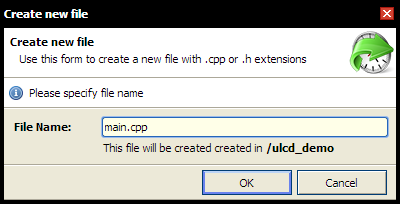
With our libraries loaded, we can create our LCD program. Create a new file in our project by right-clicking on the "ulcd_demo" project in the left pane and selecting "New File..."

You will be prompted to name your new file. Call it "main.cpp" and click the "OK" button.
The Compiler will automatically open the new main.cpp in the workspace.

Enter the following code so that we can test out our 4D serial LCD.
language:c
// Demo for the uLCD-144-G2 based on the work by Jim Hamblen

#include "mbed.h"
#include "uLCD_4DGL.h"

// TX, RX, and RES pins
uLCD_4DGL uLCD(p9,p10,p11);

int main() {

    int x;
    int y;
    int radius;
    int vx;

    // Set our UART baudrate to something reasonable
    uLCD.baudrate(115200);

    // Change background color (must be called before cls)
    uLCD.background_color(WHITE);

    // Clear screen with background color
    uLCD.cls();

    // Change background color of text
    uLCD.textbackground_color(WHITE);

    // Make some colorful text
    uLCD.locate(4, 1);      // Move cursor
    uLCD.color(BLUE);
    uLCD.printf("This is a\n");
    uLCD.locate(5, 3);      // Move cursor
    uLCD.text_width(2);     // 2x normal size
    uLCD.text_height(2);    // 2x normal size
    uLCD.color(RED);        // Change text color
    uLCD.printf("TEST");
    uLCD.text_width(1);     // Normal size
    uLCD.text_height(1);    // Normal size
    uLCD.locate(3, 6);      // Move cursor
    uLCD.color(BLACK);      // Change text color
    uLCD.printf("of my new LCD");

    // Initial parameters for the circle
    x = 50;
    y = 100;
    radius = 4;
    vx = 1;

    // Make a ball bounce back and forth
    while (1) {

        // Draw a dark green
        uLCD.filled_circle(x, y, radius, 0x008000);

        // Bounce off the edges
        if ((x <= radius + 1) || (x >= 126 - radius)) {
            vx = -1 * vx;
        }

        // Wait before erasing old circle
        wait(0.02);         // In seconds

        // Erase old circle
        uLCD.filled_circle(x, y, radius, WHITE);

        // Move circle
        x = x + vx;
    }
}
Run
Compile the program and copy the downloaded file to the mbed. Press the mbed's restart button to see the LCD come to life with your program!

Concepts
We touched on a few important concepts in this tutorial that you may want to understand.
Serial Communications
To communicate between the mbed and the LCD, we are relying on a protocol known as UART. While you can create a program that emulates UART, it is far easier to rely on the mbed's built-in UART hardware peripherals. We are using pin 9 and pin 10, which are the TX and RX lines, respectively, of one of the LPC1768's UART peripherals. To read more about UART and serial communications, see this tutorial.
Libraries
Many software programs rely on "libraries." A library is a separate program or programs that may be called upon to perform one or several functions. We interface with libraries by linking to them in our project (the "Import" step in the mbed Compiler) and using the "#include" command in our main program. This tells the compiler to include the header file (".h"), which makes functions in the library available to us (e.g. the uLCD_4DGL class and methods, such as background_color()). Many mbed libraries can be found in the Handbook and the Cookbook.
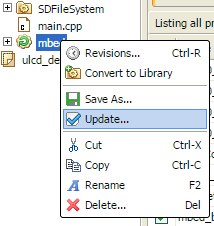
For this guide, we are using forked tutorials so that the versions stay the same. When you start making projects on your own, we highly recommend using libraries from the original author (or write your own!). As you start developing projects using other people's libraries, you'll notice that they might update their library from time to time. If you see a little green circular arrow around the library icon in your project, that means the library has been updated. To update the library to the latest revision, right-click on the library in your project viewer and select "Update..."
The Super Loop
Many simple embedded systems use the concept of "setup" and "loop" (more powerful embedded systems often use a Real-Time Operating System). For these tutorials, we rely on setting up some parameters and then looping forever within a while loop. This type of structure is known as a super loop architecture.
For mbed, the super loop architecture looks like:
language:c
int main() {

    // Setup code goes here

    while (1) {

        // Loop forever code goes here

    }
}
We can declare functions outside of main, which can be called within either our setup or loop code. Additionally, we can declare variables outside of main (and other functions), which are known as "global variables".
This super loop template is a great starting place for many simple embedded programs.
Graphics
The realm of computer graphics is vast. We only touched on the beginning with simple text and shapes. Even if we do not go in-depth into graphics, we recommend you familiarize yourself with some graphics terms such as framebuffer, frame rate, and refresh rate.
Going Further
Now that you have learned about libraries and graphical displays, you are well on your way to becoming an mbed expert. We will be using the LCD in the coming tutorials, so don't disconnect it yet!
Beyond the Tutorial
- Can you make the circle bounce up and down as well as side to side?
- Can you make the circle grow and shrink in size?
- Can you make the circle speed up and slow down?
- Can you make the text move around the screen?
- Can you make a scrolling text marquee? (Hint: Look at how we create text and how we move objects around the screen)
- Can you draw a rectangle instead of a circle? (Hint: see Jim Hamblen's Demo Code)
Digging Deeper
- Read more about UART and Serial Communications as well as mbed's Serial library
- Learn about the history of computer graphics
- Try out Jim Hamblen's other uLCD-144-G2 demo program. Can you get video to play on your LCD?