mbed Starter Kit Experiment Guide
This Tutorial is Retired!
This tutorial covers concepts or technologies that are no longer current. It's still here for you to read and enjoy, but may not be as useful as our newest tutorials.
 Shawn Hymel
Experiment 9: PWM Sounds
Let's make some music! By using the pulse-width modulation (PWM) pins on the mbed LPC1768 and a speaker (or headphones), we can make rudimentary sounds. By controlling the PWM frequency, we can create specific notes in the music scale. While it won't sound like a full-size orchestra, the notes (and perhaps the song) will be recognizable.
This tutorial will cover how to connect a headphone jack to the mbed and control the PWM pins to create basic sounds.
Note: You will need a set of headphones or speakers to hear the sounds.
Suggested Reading
The Circuit
This circuit can be made with parts in the SparkFun mbed Starter Kit. Also, keep in mind that the LPC1768 box contains a USB mini-B cable for programming and power.
Parts List
To follow this experiment, you would will need the following materials if you did not order the SparkFun mbed starter kit. You may not need everything though depending on what you have. Add it to your cart, read through the guide, and adjust the cart as necessary.
In addition to the listed parts, you will also need a set of headphones or speakers (with a 3.5mm plug) to complete the tutorial.
Schematic

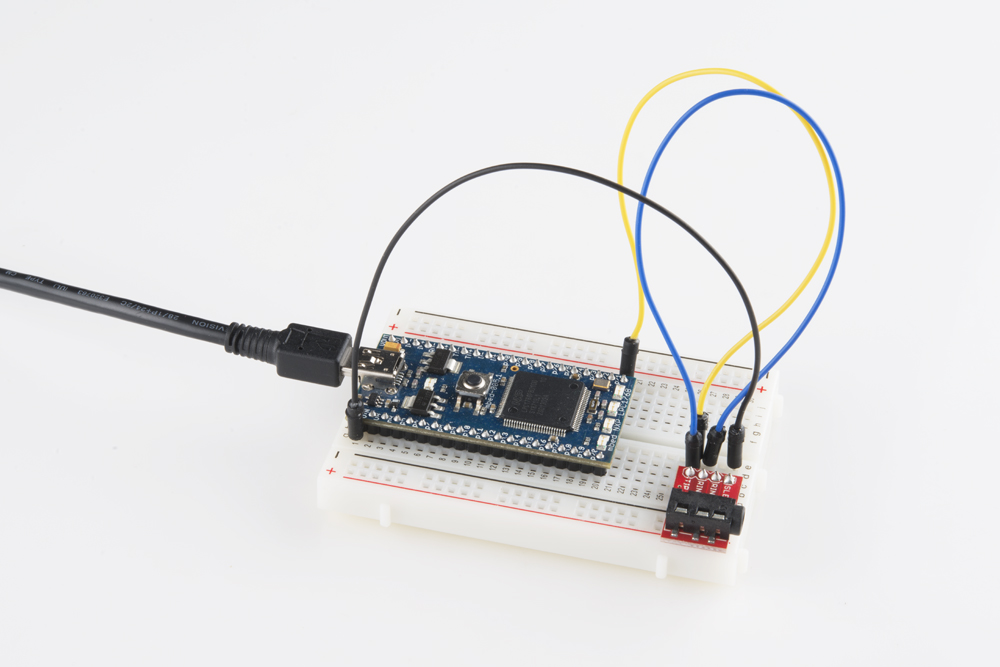
Connections
Connect a PWM output pin of the LPC1768 to the TIP of the audio jack breakout. Also, connect the tip to RING1 of the audio jack in order to get sound out of both the left and right speakers. Do not connect anything to RING2!
Fritzing Diagram

Hookup Table
Place the LPC1768 in a breadboard with pin VOUT in position i1 and pin 20 in position b20.
Connect the rest of the components as follows:
| Component | Breadboard | ||
|---|---|---|---|
| TRRS 3.5mm Jack Breakout* | b27 (TIP) | b28 (RING1) | b30 (SLEEVE) |
| Jumper Wire | a1 | d30 | |
| Jumper Wire | j20 | e27 | |
| Jumper Wire | c27 | c28 | |
* Pins not listed are not used.
The Code
To make sounds, we need to modulate our PWM pin with a particular frequency. Luckily, we can control the precise frequency of the PWM within the mbed. If you looked into how PWM works, you'll notice that it is a square wave. Square waves do not make the most pleasant sound, but it will be good enough for our purposes.
Program
This demo is simple! We don't need any libraries.
Navigate to the mbed.org, login, and navigate to your Compiler.
Create a new program with the "Blinky LED Hello World" template. Name it something like "pwm_song."
Click on "main.cpp" in your project, remove the template code, and copy in the following code.
language:c
// Plays a familiar melody using PWM to the headphones. To find the frequencies
// of notes, see http://en.wikipedia.org/wiki/Piano_key_frequencies
// Based on the "speaker_demo_PWM" program by Jim Hamblen

#include "mbed.h"

#define VOLUME 0.01
#define BPM 100.0

PwmOut pwm_pin(p21);

// Plays a sound with the defined frequency, duration, and volume
void playNote(float frequency, float duration, float volume) {
    pwm_pin.period(1.0/frequency);
    pwm_pin = volume/2.0;
    wait(duration);
    pwm_pin = 0.0;
}

int main()
{
    float beat_duration;

    // Calculate duration of a quarter note from bpm
    beat_duration = 60.0 / BPM;

    // Loop forever
    while(1) {

        // First measure
        playNote(391.995, (beat_duration - 0.1), VOLUME);
        wait(0.1);
        playNote(391.995, (beat_duration - 0.1), VOLUME);
        wait(0.1);
        playNote(391.995, (beat_duration - 0.1), VOLUME);
        wait(0.1);
        playNote(311.127, (0.75 * beat_duration), VOLUME);
        playNote(466.164, (0.25 * beat_duration), VOLUME);

        // Second measure
        playNote(391.995, (beat_duration - 0.1), VOLUME);
        wait(0.1);
        playNote(311.127, (0.75 * beat_duration), VOLUME);
        playNote(466.164, (0.25 * beat_duration), VOLUME);
        playNote(391.995, ((2 * beat_duration) - 0.1), VOLUME);
        wait(0.1);

        // Third measure
        playNote(587.330, (beat_duration - 0.1), VOLUME);
        wait(0.1);
        playNote(587.330, (beat_duration - 0.1), VOLUME);
        wait(0.1);
        playNote(587.330, (beat_duration - 0.1), VOLUME);
        wait(0.1);
        playNote(622.254, (0.75 * beat_duration), VOLUME);
        playNote(466.164, (0.25 * beat_duration), VOLUME);

        // Fourth measure
        playNote(369.994, (beat_duration - 0.1), VOLUME);
        wait(0.1);
        playNote(311.127, (0.75 * beat_duration), VOLUME);
        playNote(466.164, (0.25 * beat_duration), VOLUME);
        playNote(391.995, ((2 * beat_duration) - 0.1), VOLUME);
        wait(0.1);
    }
}
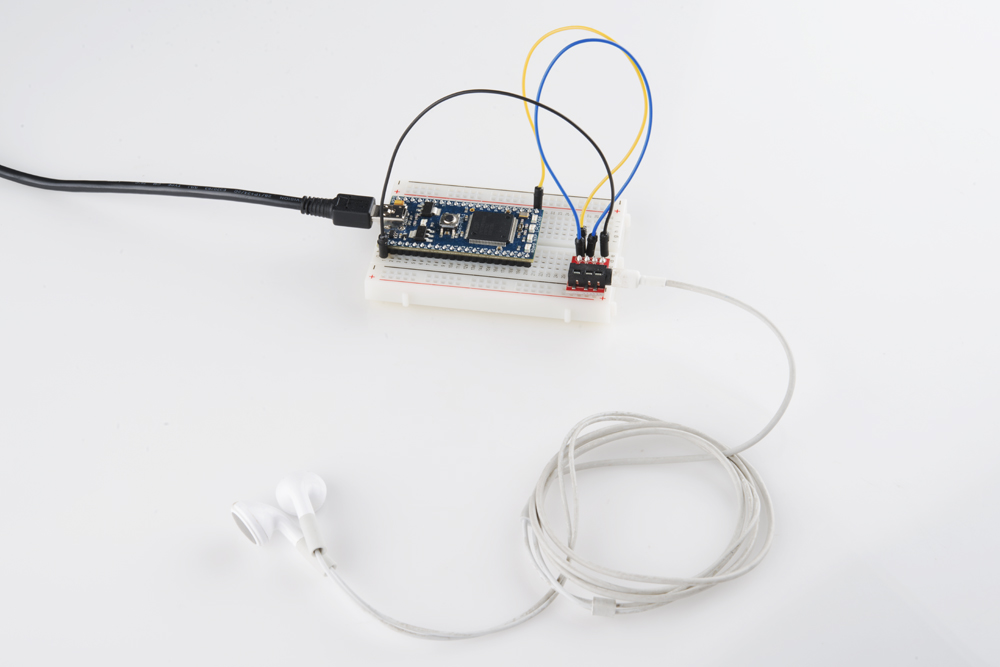
Run
Compile the program and copy the downloaded file to the mbed. Connect a set of headphones or speakers to the audio jack. Press the mbed's reset button, and you should hear a tune come out of your headphones or speakers!
If the volume is too low, adjust the VOLUME constant in the program (try 0.1 or 1).
Concepts
Much like in our other PWM tutorial, we relied on pulse-width modulation to emulate an analog signal (sound, this time). We also connected a peripheral that allowed us to convert electrical signals into sound: a speaker (or headphones, but these are nothing more than tiny speakers that wrap around your head).
PWM for Sound
Much like in Part 2, we used a PWM to control the a signal. In this example, we adjusted the period of the PWM (the inverse of the frequency) to control the pitch of the musical note. We also adjusted the duty cycle of the PWM to control the volume of the note.
If you looked at the code, you'll notice that there is also a "duration" parameter in the playNote function. This told the function how long to play the note. So, by setting various volumes, frequencies (pitch), and durations, we can play an entire song!
To read more about PWM, see this Wikipedia article.
Speakers
Speakers are fascinating pieces of technology, despite their seemingly simple function. An electromagnet moves an attached membrane, or cone, through a permanent magnet. An electrical current causes the electromagnet to move at varying rates, which moves the cone in a similar fashion. The cone forces air back and forth, which creates sound! At certain frequencies, these moving airwaves can be heard by our ears.
To learn more about how speakers work, see this article.
Going Further
Making sounds with PWM can be useful for adding feedback into your project. You could make chirps and buzzes to notify the user of important information. That, or you could just make an R2-D2 clone.
Beyond the Tutorial
- Search for sheet music from your favorite song, and using a note/frequency chart, make the mbed play your song
- Try using the digital-to-analog converter (DAC) pins to play songs instead of PWM (Hint: see Jim Hamblen's example)
- Can you make the DAC play a chord instead of a single note?
Digging Deeper
- As it turns out, you can use a combination of DAC and PWM to make some interesting sounds. Read about their uses in synthesizers.
- In order to get louder sounds, we need to amplify our signal. Read about how amplifiers work.
- Headphones have a long and interesting history. Check it out here.