micro:climate Kit Experiment Guide
 bboyho,
  D___Run___
 Introduction to the Micro:Climate Kit
We have seen a huge amount of excitement from hobbyists, students and scientists around building a DIY weather station to track what is going on around us on Planet Earth on a daily basis.
We have seen just as much excitement around the BBC's newly released micro:bit, which made its debut in the United Kingdom and is now available in the United States through SparkFun.
And then it dawned on us...why not combine the two? So, here it is: a weather station kit that is built on top of the inexpensive, easy-to-use micro:bit and Microsoft MakeCode. We have also written seven experiments that walk you through how to use each and every component of the kit and how to use them with the micro:bit and Microsoft MakeCode. For more information about the kit, check out the videos below.
What's Included in the Kit?
| micro:climate Kit SKU | Revision History |
|---|---|
| KIT-16274 | - Minor revision on the weather:bit with Qwiic connector and surface mount edge connector. - Rain gauge in the weather meter has a bubble level and deeper reservoir for rain. |
| KIT-14217 | Switch to 2xAAA battery holder with a built-in switch. |
| KIT-15301 | Initial release. |
Below is all the parts included in the SparkFun micro:climate kit.
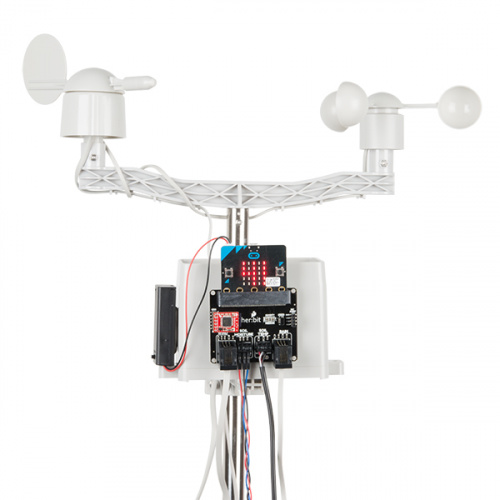
The kit comes with everything you need to build a fully featured weather station for the micro:bit. All you need to supply is, well, the micro:bit!
The kit includes the following parts:
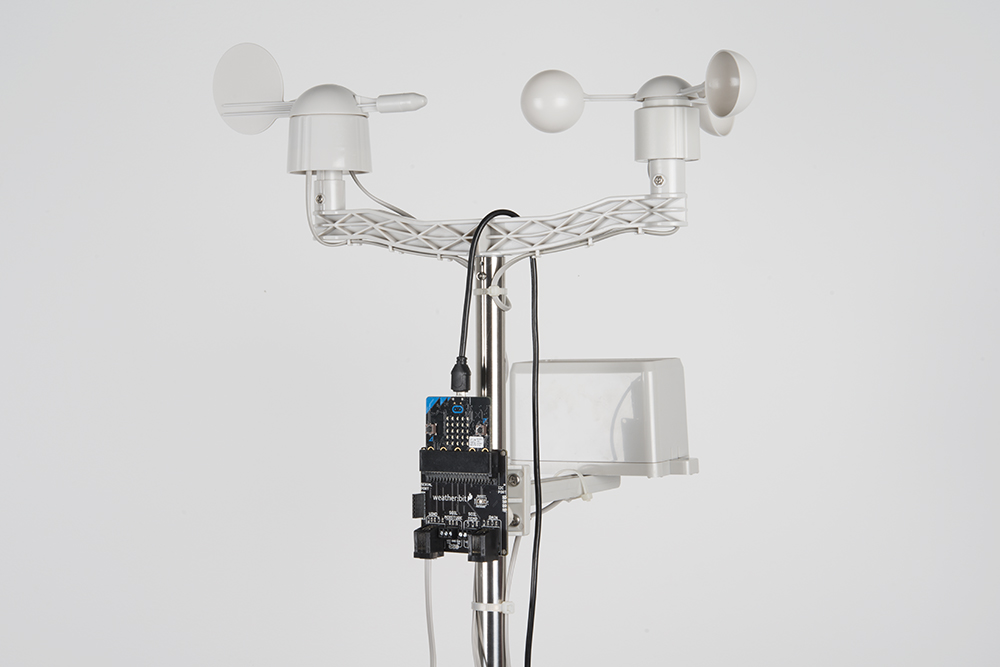
- 1x - SparkFun weather:bit — The carrier board for the micro:bit and the central component to building a weather station
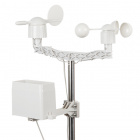
- 1x - Weather Meter —Wind speed, direction and rain gauge that connects to the SparkFun weather:bit
- 1x - SparkFun Soil Moisture Sensor — A simple probe for measuring soil moisture
- 1x - Waterproof Temperature Sensor — Waterproof temperature sensor with a long wire
- 1x - micro:bit Battery Holder --- 2xAAA (JST-PH) — Battery pack with a switch
- 1x - SparkFun OpenLog — A small widget that logs any data sent to it over a serial connection to a microSD card
- 1x - 10-Pack of M/M 12" Jumper Wires — Jumper wires for connecting things
- 1x - SparkFun Screwdriver — Great for tightening screws and screw terminals
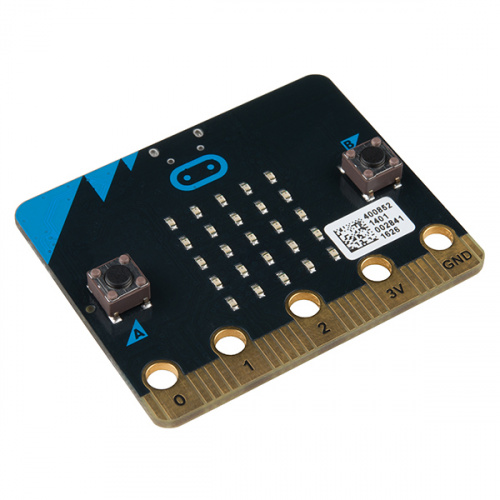
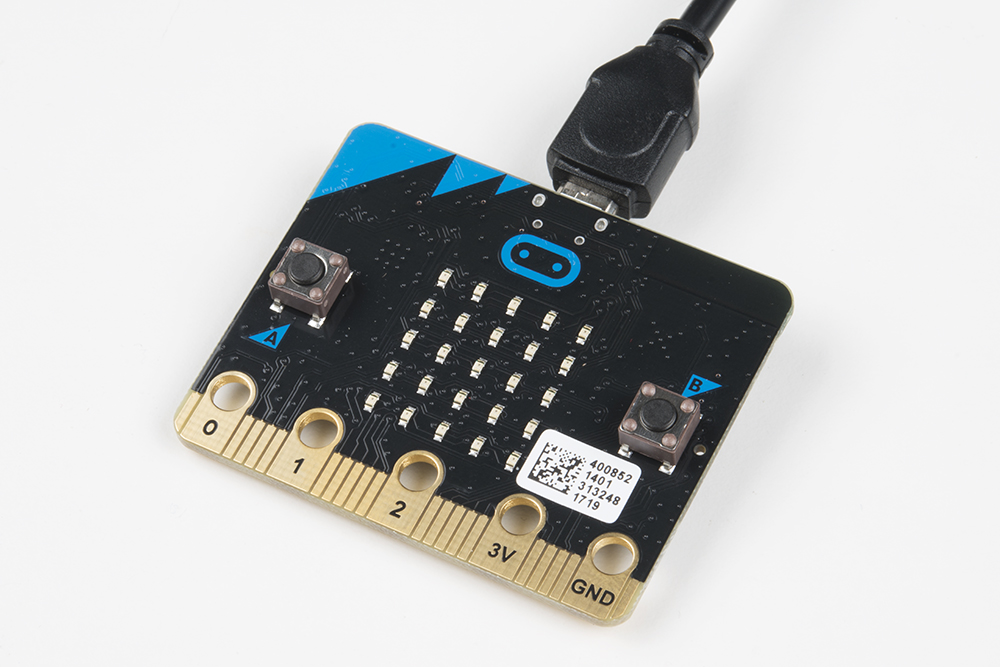
- 1x micro:bit
- 1x Micro-B USB Cable
- 1x MicroSD Card
- 1x MicroSD USB Card Reader
- 2x AAA Batteries


How to Use This Guide
Please note that this guide is designed to get you started with the weather:bit board and the SparkFun micro:climate kit in a simple, straightforward way. We demonstrate each component's functionality and the corresponding code to make it work.
While you explore this guide, we urge you to take your time and tinker with the sensors, code and ideas shared to build something tailored to your application. Our goal is to get you enough information and know-how to make you dangerous and then release you into the wild, weather station in hand, to do whatever you do with a weather station.
Be sure to share your projects with us via Twitter or Facebook! We are excited to see you get creative and Start Something!
Suggested Reading
Before continuing with this guide, we recommend you be somewhat familiar with the concepts in the following tutorials:
What is a Circuit?
Getting Started with the micro:bit
Open Source!
All of our experiments and guides are licensed under the Creative Commons Attribution Share-Alike 4.0 Unported License. Feel free to remix and reuse our work. But please, share the love and give us attribution for our hard work!
To view a copy of this license visit this link, or write: Creative Commons, 171 Second Street, Suite 300, San Francisco, CA 94105, USA.
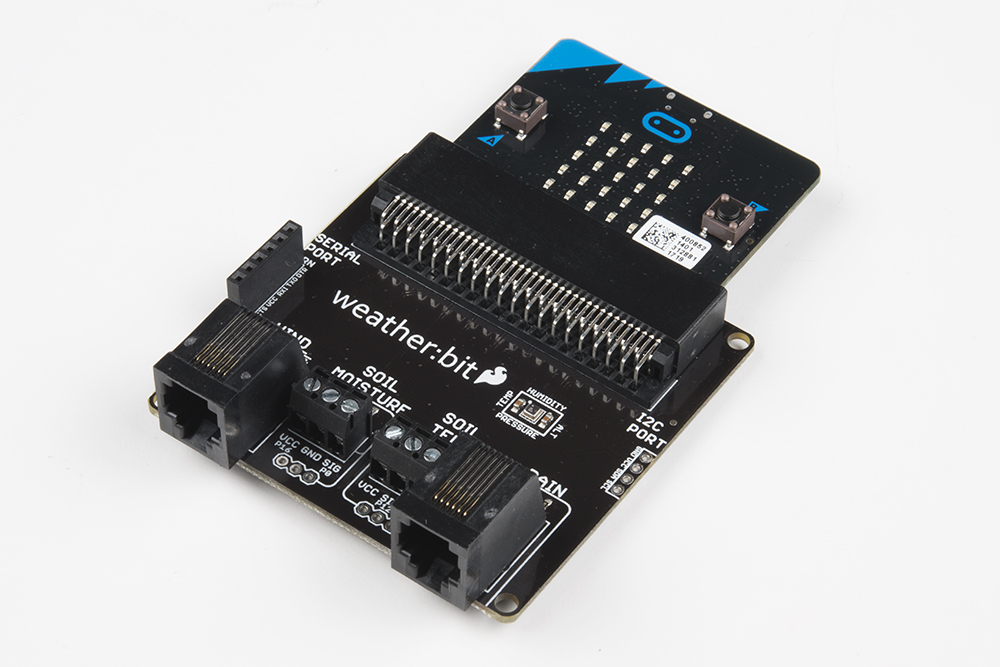
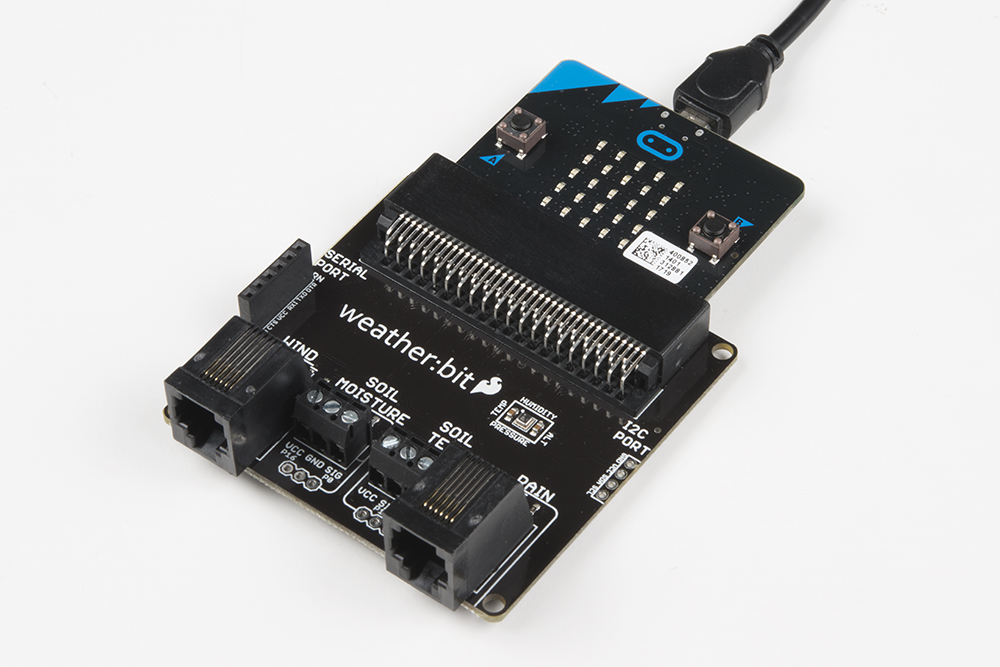
About the weather:bit
The weather:bit is a carrier board for the micro:bit. Similar to an Arduino shield, it is designed to add functionality to the micro:bit without the hassle of a number of other boards, components and all of those jumper wires.
In this case, the weather:bit takes your normal run-of-the-mill micro:bit and turns it into a full-blown weather station with a few extra parts, which you can use to measure the following:
- Air Temperature
- Relative Humidity
- Barometric Pressure
- Wind Speed
- Wind Direction
- Rain Fall
- Soil Moisture
- Soil Temperature
Phewwwww! That is a lot of data for such a tiny computer! Let's take a closer look at this board and check it out for ourselves.
 |
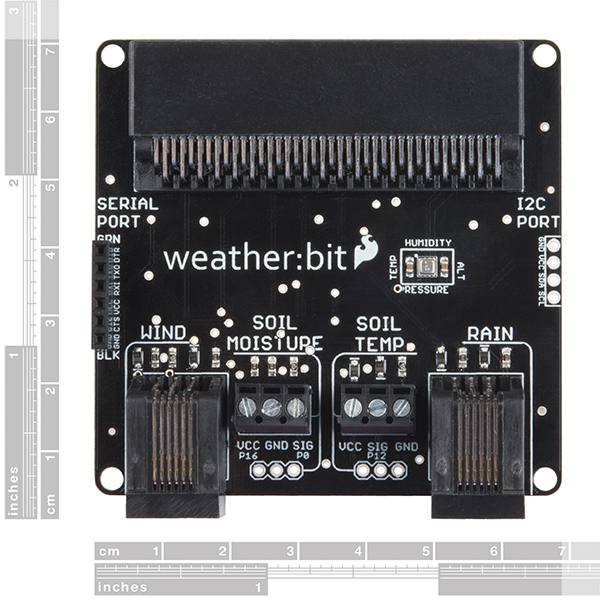 |
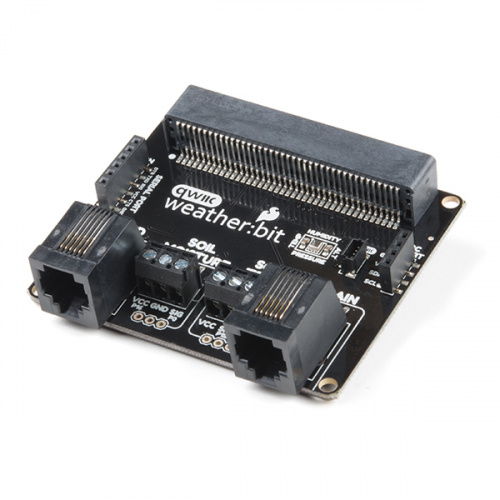
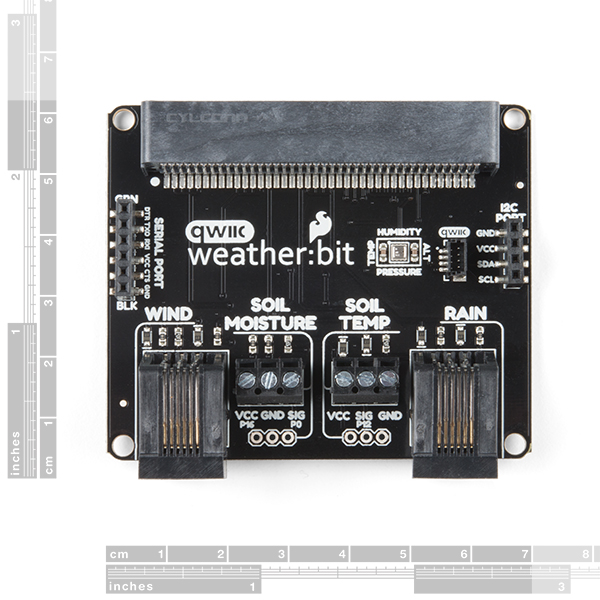
| Qwiic weather:bit [ DEV-15837 ] | weather:bit [ DEV-14214 ] |
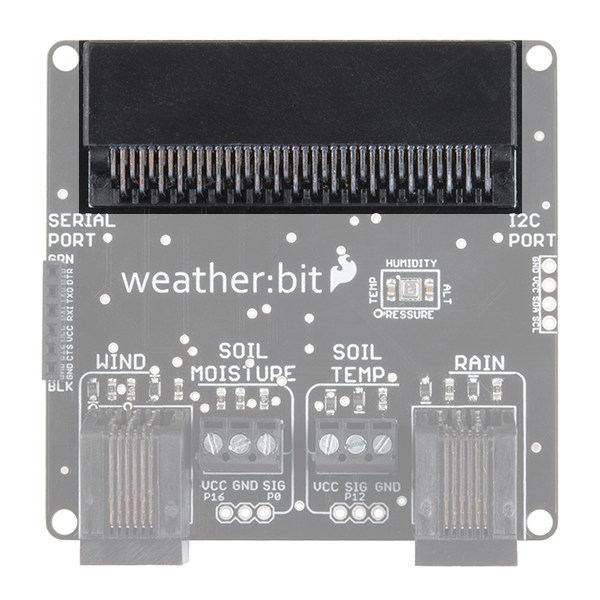
Edge Connector
The weather:bit connects to the micro:bit via an edge pin connector. This makes it handy to swap out micro:bits for programming, but also gives reliable connections to all of the different pins on the micro:bit.
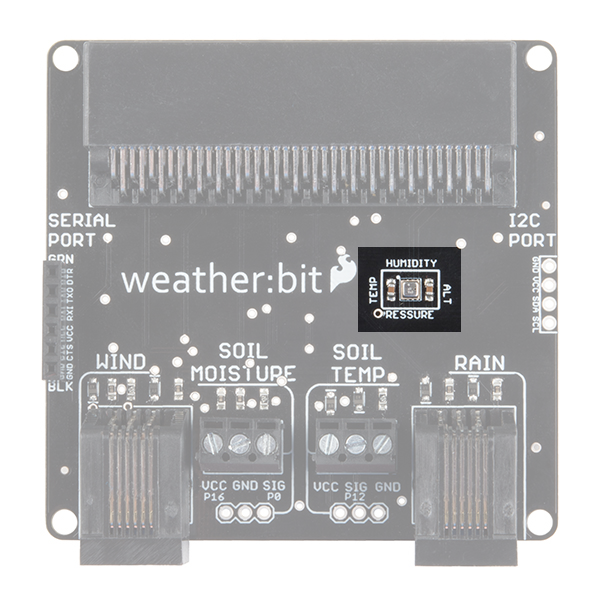
BME280 Barometric Pressure Sensor
The weather:bit has a BME280 barometric pressure sensor onboard, which can measure air temperature, humidity, barometric pressure and altitude. It communicates with the micro:bit via I2C, and the data from this sensor is easily accessible using the SparkFun weather:bit extension for MakeCode.
Weather Meter Sockets
There are two RJ11 jacks at the bottom of the weather:bit. These are used to connect our weather meters to the weather:bit.
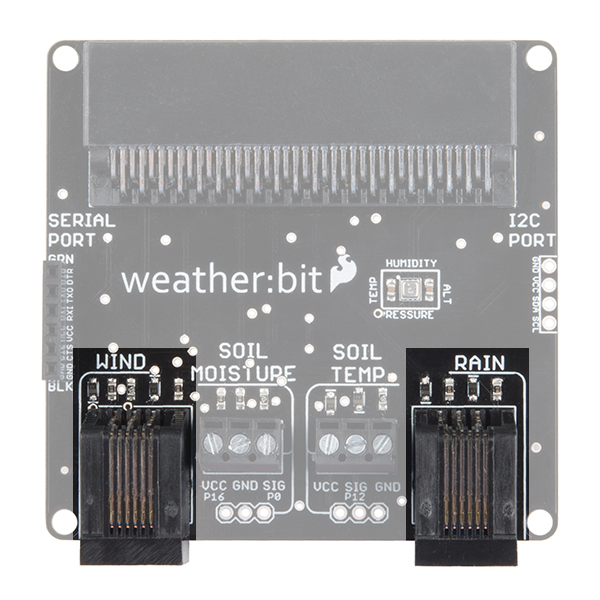
These meters enable you to measure the wind speed and direction, as well as rain fall.
Again, these are easily accessible in MakeCode via our SparkFun weather:bit extension.
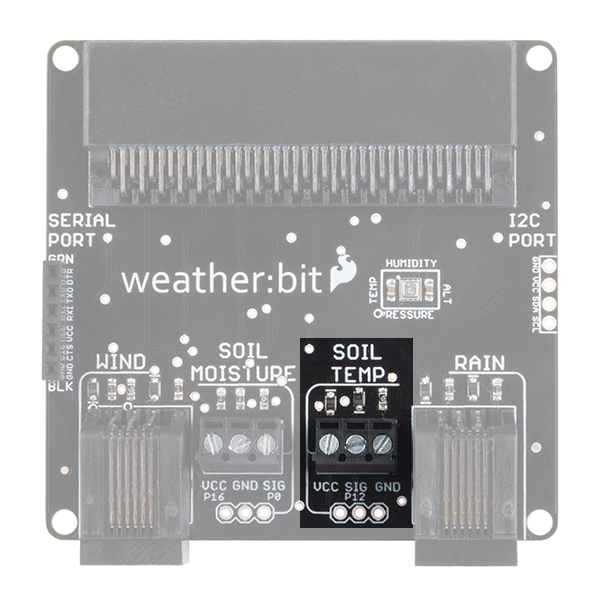
Soil Moisture and Temperature
Between the two RJ11 jacks are two sets of screw terminals sets.
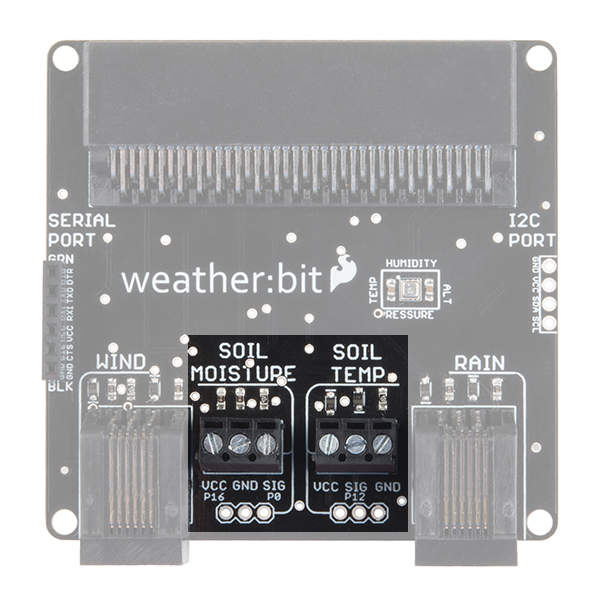
The one on the left is used to hook up a soil moisture sensor. You can use either longer jumper wires or wires cut to whatever length works for your project.

The set on the right is the soil temperature sensor. It is set up to use our waterproof temperature sensor. This sensors wire is rather long and is great for monitoring the temperature of the soil in your garden so that you know the exact moment the ground is ready for planting those tomatoes!
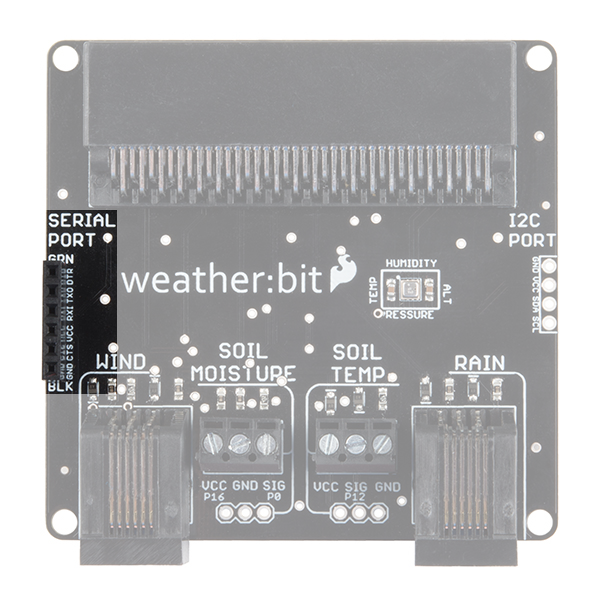
Serial Port
We have populated the serial port pins with a standard FTDI format to make it easy for you to plug in a serial widget of your choice, such as an OpenLog or Serial LCD display, or to just monitor data through an FTDI breakout and USB cable.
I2C Port
For those of you who are more adventurous and demand a way to hook up other sensors of your choice, we have added an I2C port that can be soldered to directly --- or you can add headers for plug-and-play use of your I2C sensors and actuators.

Installing the weather:bit Extension in MakeCode
To make the most out of the weather:bit with the least amount of coding, use the MakeCode extension we wrote for the weather:bit board.
Extension?
If you have used Arduino before, you probably know about a thing called a library; which is a collection of code that extends the functionality of the core programming language. MakeCode extensions work the same way.
There are some amazing differences between Arduino libraries and MakeCode extensions. One of them is that MakeCode extensions include JavaScript functions, which you can use when programming in text, as well as all of the blocks you need to program using the block method. This makes learning and using new extensions straightforward and shortens the time to awesome when setting out to build the project of your dreams.
Installing a MakeCode Extension
To install or add a new extension to your MakeCode toolbox (the list of different block groups), click on "Advanced" and then on "Add Extension."
From here you can search for "SparkFun" or "SparkFun weather-bit," and it should show up as a public extension in the list. Go ahead and click on it.

This will add all of the blocks to your toolbox. In general, this is a bit tricky as, depending on how the extension was written, it may either have its own toolbox or just add blocks to the existing ones. Take a look at your toolbox; for the weather:bit you should see...
Great! You have now installed the weather:bit extension and are ready to use the board as well as the components that come in the micro:climate kit. As a side note, for every new MakeCode project that you make, you will have to load extensions over again. Not a big deal, but noteworthy! Now, let's put this extension to good use!
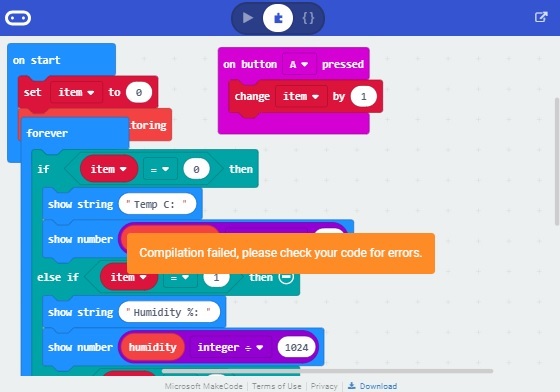
If you receive this message:
Compilation failed, please check your code for errors, you will need to delete any code block that uses the extension. Then you will need head back to Advanced > Add Extension and reinstall the extension. Once you re-add the extension, a window will pop up. Click on the Remove extension(s) and add weatherbit button to reinstall the extension.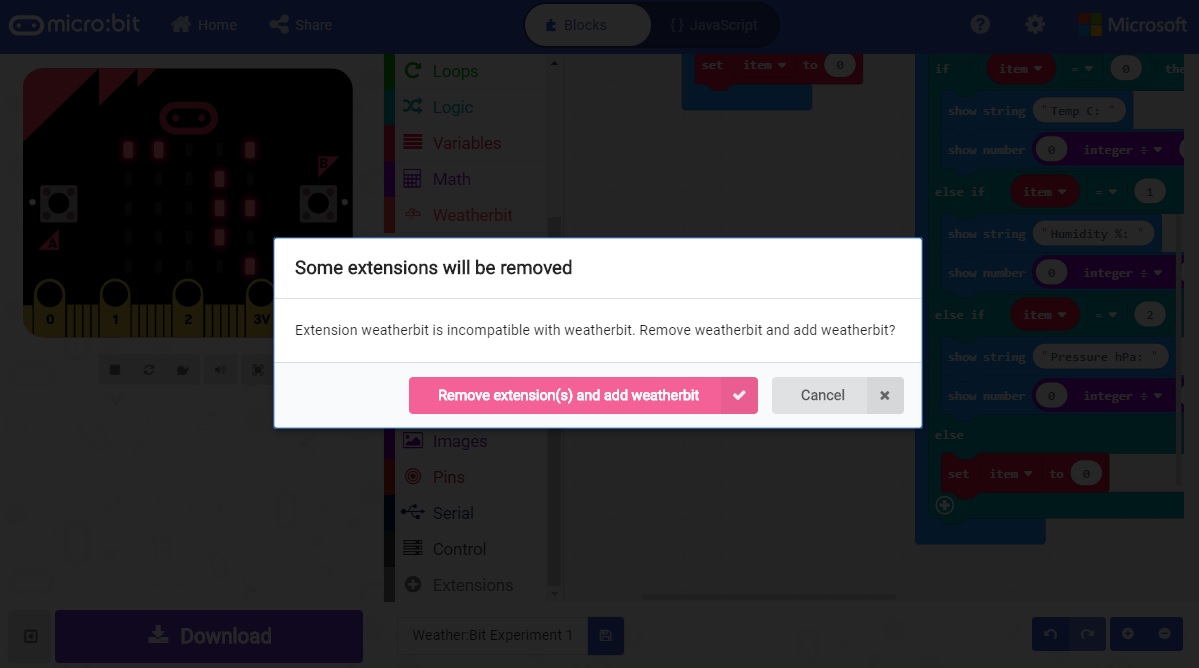
Finally, you will need to re-add the code blocks used by the extension in your code before compiling and uploading to your micro:bit.
Experiment 1: Reading the Temperature, Humidity and Pressure
Introduction
What comes to mind first when you hear the term "Atmospheric Conditions"? Well, other than the weatherman on the news, you probably think about temperature --- maybe humidity and even barometric pressure if you are a weather nerd like many of us at SparkFun. In this first experiment we will explore measuring those conditions using a micro:bit and the weather:bit carrier board.
Parts Needed
You will need the following parts:
- 1x micro:bit Board (Not Included with Kit)
- 1x Micro-B USB Cable (Not Included with Kit)
- 1x weather:bit Carrier Board
Didn't get the kit? Have no fear! Here are the parts you will need to complete this experiment. You may not need everything though depending on what you have. Add it to your cart, read through the guide, and adjust the cart as necessary.

Suggested Reading
- Getting Started with the micro:bit --- Basic hookup and programming of the micro:bit
Introduction to the BME280
The BME280 Atmospheric Sensor is an easy way to measure aspects of the atmosphere around you, including pressure, humidity and air temperature. All of this is combined into a petite package that resides on the weather:bit.
The sensor operates on 3.3V and is super power-efficient, using as little as 5µA (that’s 1/1,000,000 of an amp!) when idling and less than 1mA when it’s taking measurements. This means you can operate the board on a battery, with little thought to major power issues.
In this experiment, you will work with the BME280 to read the temperature, pressure, and humidity of the room as well as your altitude based off of the atmospheric pressure.
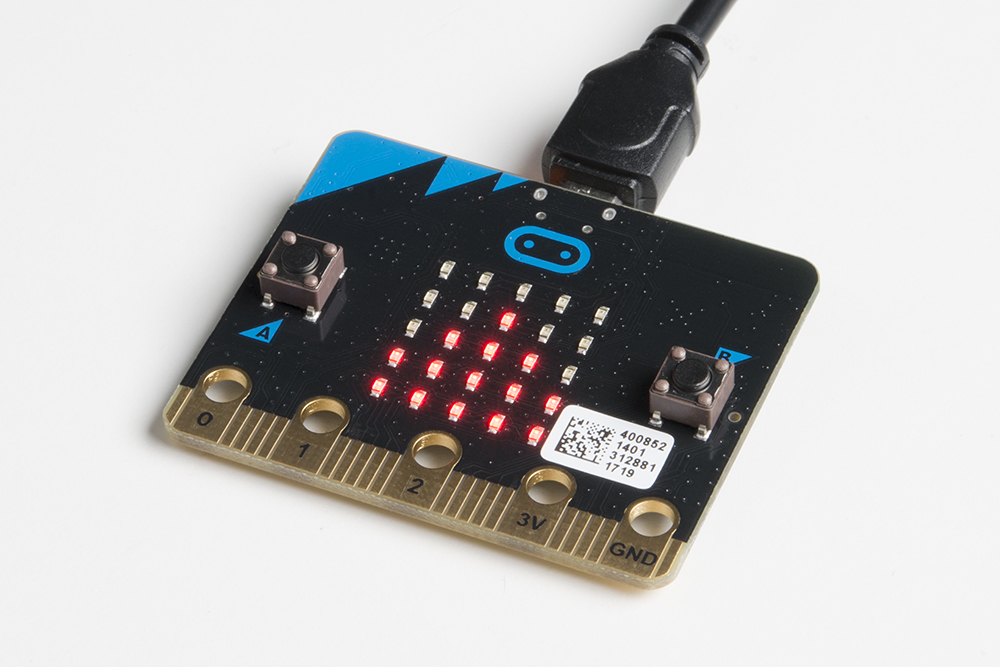
Hardware Hookup
Since the BME280 is already on the weather:bit board, this should be pretty straightforward; you have one step in hooking everything up. Insert the micro:bit into the weather:bit carrier board with the LED array facing up as shown in the image below.
Running Your Script
We are going to use Microsoft MakeCode to program the micro:bit. Please open a browser window and navigate to https://makecode.microbit.org. This should open the MakeCode environment that you used to install the weather:bit extension.
Be sure to add the weather:bit extension as instructed in the Installing the weather:bit extension in MakeCode section of this tutorial.
Now, you can either download the following example script and drag and drop it onto your micro:bit, or use it as an example and build it from scratch in MakeCode.
Code to Note
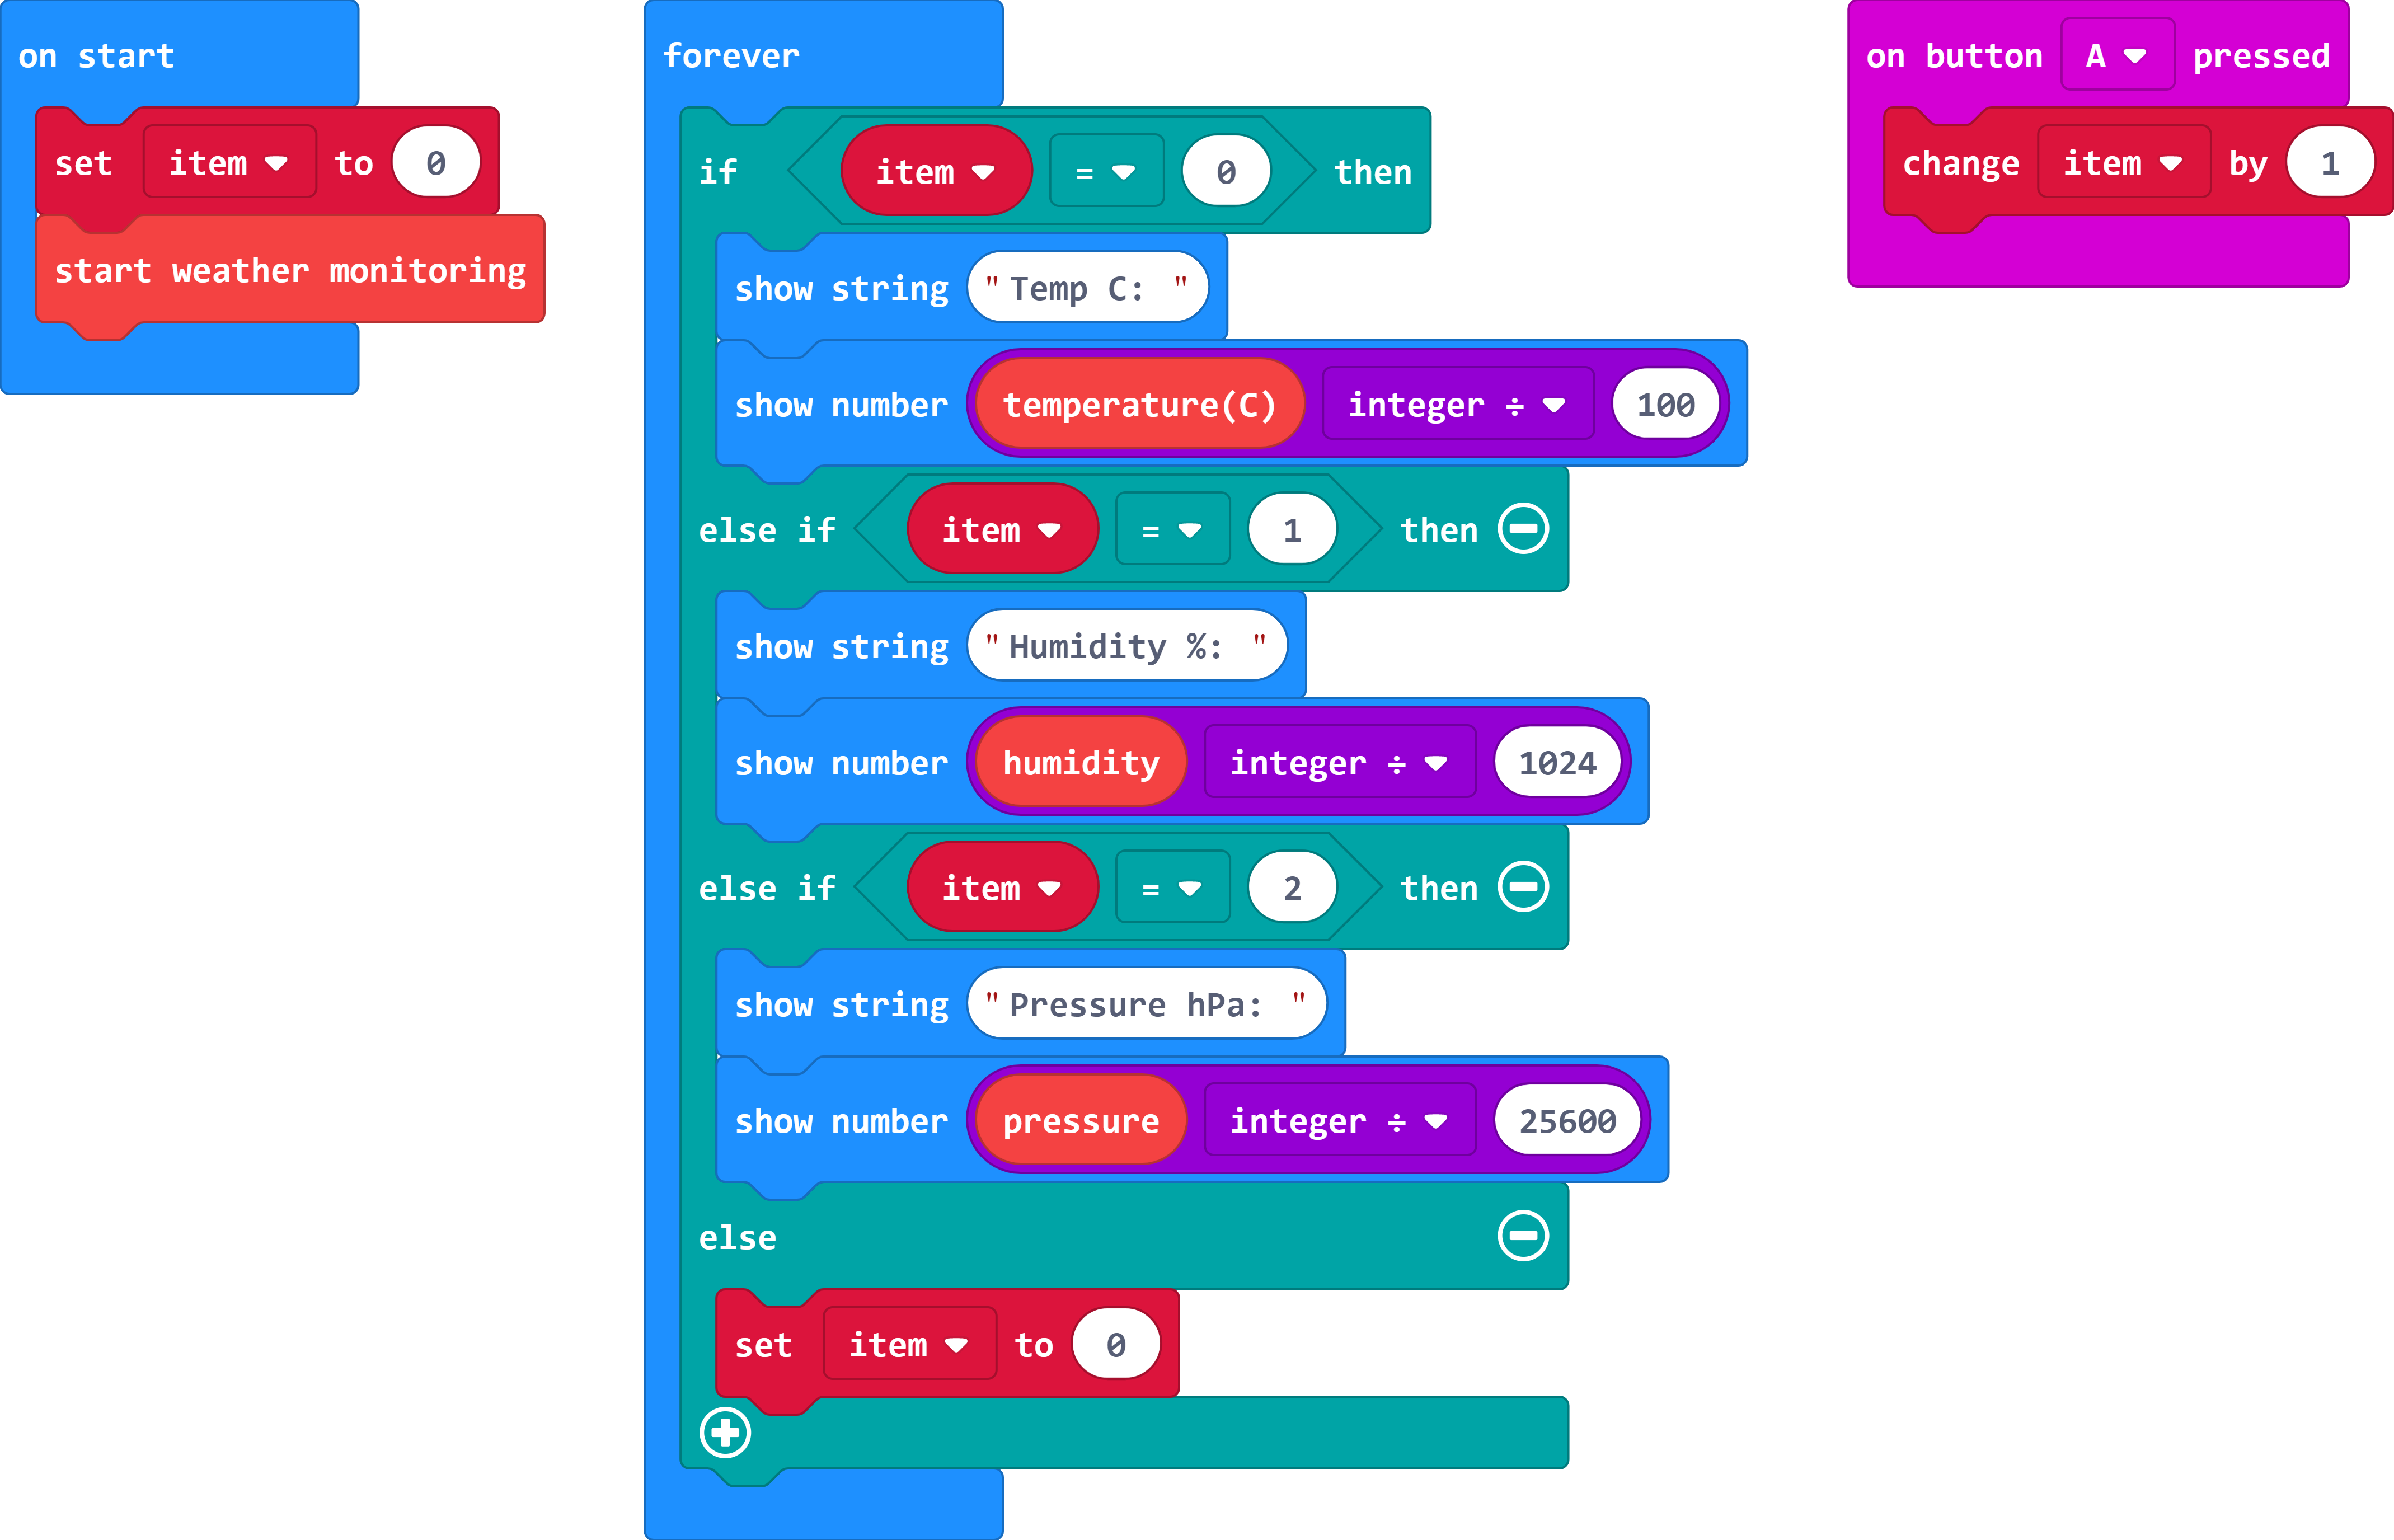
Start Weather Monitoring
When the script starts, we use this block to start or initiate the BME280 sensor and get it ready to take readings. Anytime you want to use the temperature, humidity, pressure or altitude blocks, you need to have this block in your on start block.
Set Item To
We use a variable called item to keep track of which data are being displayed on the LED array. If item is equal to 0, it shows the temperature; if 1, it shows the humidity; if 2, the pressure. If the variable goes over 2, we reset it to 0. We increment the variable by pressing the A button.
Temperature (°C)
This variable returns a number that you then have to divide by 100 to get the temperature in Celsius.
Humidity
This variable returns a number that you need to divide by 1,024 to get the relative humidity.
Pressure
This variable returns a number that you divide by 25,600 to get the atmospheric pressure in hPa.
Why All of the Math?
This is a good question! It all comes down to accuracy of the data that you receive. When the kit was initially released, MakeCode was not able to handle floating point numbers (numbers with decimal points). Which can be troublesome for getting really accurate readings from the BME280 with a single variable block. So, to as accurate of values as possible you have to do some math in the programming environment. We know, not fun! But, hey now you might pay attention in math class a bit more now. To prevent the output from displaying several decimal places on the LED array, we'll also used the integer divide block.
What You Should See
Once your code is loaded, you should start to see numbers scroll across the LED array on your micro:bit, beginning with the temperature in Celsius. If you press the left button on your micro:bit, the number will change to percent humidity; press it again, and it will be pressure. Pretty cool...well, hmmm...maybe warm?
Troubleshooting
weather:bit blocks not showing up --- Make sure you have a network connection and have added the extension to your MakeCode environment.
micro:bit not showing up --- Try unplugging the USB cable and plugging it back in. Also, be sure that you have the cable inserted all the way into your micro:bit.
atmospheric data seems odd --- Make sure that the BME280 is free from contact with sources of heat and/or moisture (for example, having your finger over the top of it).
Experiment 2: Reading the Light Level
Introduction
Light conditions are a huge part of the weather. The great thing is that the weather:bit doesn't have a light sensor. No, we didn't miss a typo! The weather:bit doesn't have a light sensor. Why not? Because the micro:bit has one already! In this experiment you will measure the light around you and have the micro:bit "graph" it
Parts Needed
You will need the following parts:
- 1x micro:bit Board (Not Included with Kit)
- 1x Micro-B USB Cable (Not Included with Kit)
- 1x weather:bit Carrier Board
Didn't get the kit? Have no fear! Here are the parts you will need to complete this experiment. You may not need everything though depending on what you have. Add it to your cart, read through the guide, and adjust the cart as necessary.
Suggested Reading
- Using LEDs as Light Sensors --- That's correct! You can use LEDs as light sensors. In fact, that is how the micro:bit does it.
Hardware Hookup
Again, the hardware hookup here is minimal! Plug your micro:bit into your computer with the USB cable, and you are good to go!
Running Your Script
Please open a browser window and navigate to makecode.microbit.org. This should open the MakeCode environment that you used to install the weather:bit extension.
Code to Note
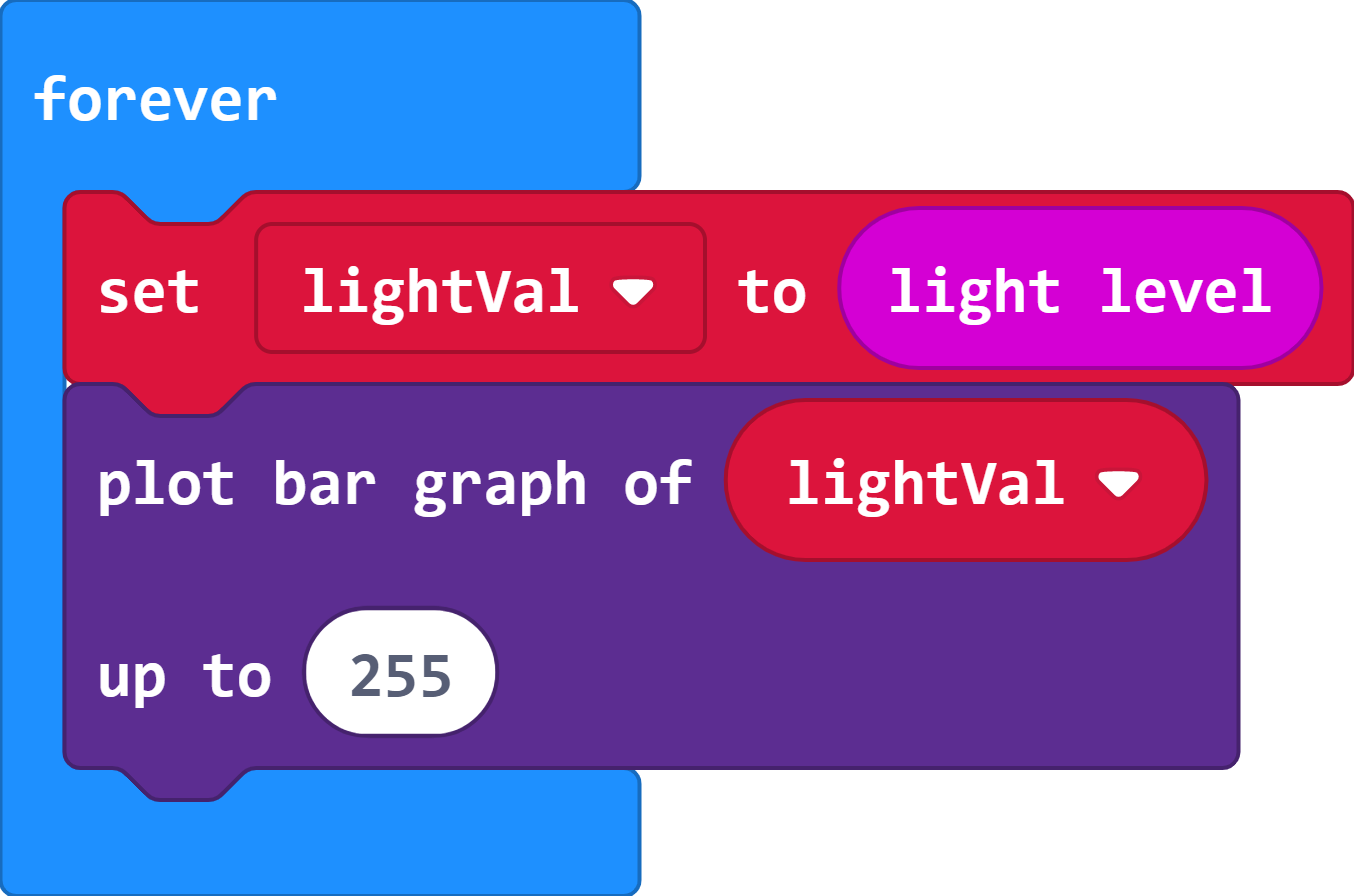
Set lightVal To
We read the light level in the area using the light level block and store it in a variable called lightVal. This is the value that we can compare against the calibration value you captured at the beginning of your script.
Plot Bar Graph Of
This block is fun! It accepts two values: the value of what you want to graph and a maximum value of that variable. In this case we want to graph lightVal, and it has a maximum value of 255. This will create a "bar graph" of the light value on your micro:bit.
What You Should See
You should see the LED array light up as a graph based on how bright it is wherever you are. Turn out the lights or pass your hand over the array, and the graph should react. Pretty sweet! You now have a way to measure the light value as well as another way to display data with the micro:bit.
Troubleshooting
odd light readings --- Make sure you are not leaning over the micro:bit, your shadow will impact the sensor reading.
The arrows threshold is odd --- Try resetting the micro:bit while you are not leaning over it or casting a shadow on it.
Experiment 3: Reading the Soil Moisture
Introduction
How wet is the ground? It is actually an important question to ask if you are thinking about growing plants, digging a hole, or even walking across your yard. Enter the soil moisture sensor. In this experiment you will hook up the soil moisture sensor and use it. You will display different images on your micro:bit based on the moisture level of the soil.
Parts Needed
You will need the following parts:
- 1x micro:bit Board (Not Included with Kit)
- 1x micro-B USB Cable (Not Included with Kit)
- 1x weather:bit Carrier Board
- 3x 12" M/M Jumper Wires
- 1x SparkFun Soil Moisture Sensor
Didn't get the kit? Have no fear! Here are the parts you will need to complete this experiment. You may not need everything though depending on what you have. Add it to your cart, read through the guide, and adjust the cart as necessary.

Suggested Reading
- Soil Moisture Sensor Hookup Guide --- How does the moisture sensor work?
- Voltage Dividers --- The moisture sensor works as a voltage divider. Dig in and see what makes it tick!
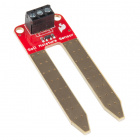
About the Moisture Sensor
The SparkFun Soil Moisture Sensor is a simple breakout board for measuring the moisture in soil and similar materials. The soil moisture sensor is straightforward to use. The two large, exposed pads function as probes for the sensor, together acting as a variable resistor. The more water that is in the soil, the better the conductivity between the pads will be, which will result in a lower resistance and a higher SIG (output voltage).

To get the SparkFun Soil Moisture Sensor functioning with your weather:bit, all you need to do is connect the VCC, GND and SIG pins to the weather:bits VCC, GND and SIG screw terminals. You will receive a SIG out, which will depend on the amount of water in the soil. Oh, and you'll also need a bit of dirt in a pot to test it all out!
One commonly known issue with soil moisture sensors is their short life span when exposed to a moist environment. To combat this, we've had the PCB coated in gold finishing (ENIG, or Electroless Nickel Immersion Gold).
Hardware Hookup
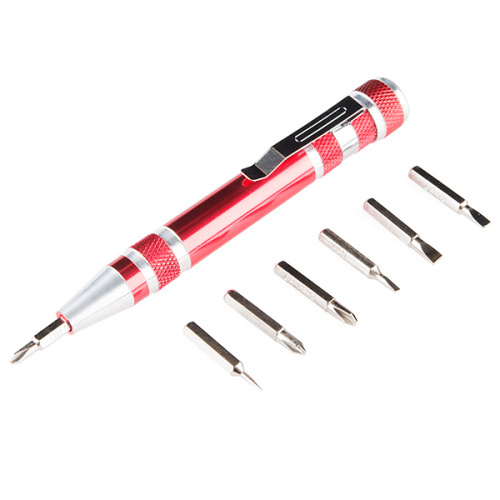
Hooking the moisture sensor up to the weather:bit is relatively easy. You will need a screwdriver with a small bit, preferably a jeweler's screwdriver or our pocket screwdriver.
Start by using the screwdriver to open the three screw terminals on the moisture sensor enough that you can insert the ends of the jumper wires into them. Next, insert three jumper wires into the screw terminals using Red for VCC, Black for GND and Yellow for SIG. Tighten the screws down so that the wires will not come loose.
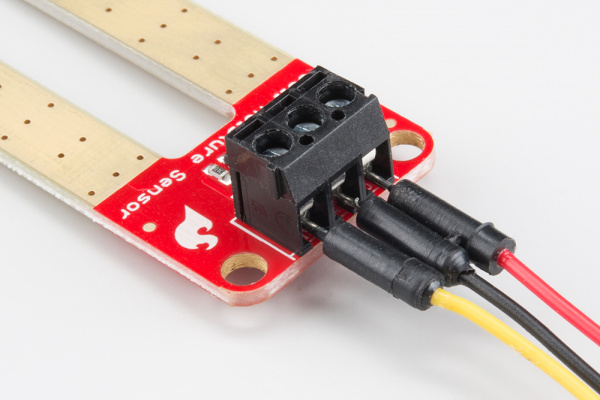
Next, do the same thing for the screw terminals for the moisture sensor port on the weather:bit. Open the screws enough that you can insert the jumper wires with Red to VCC, Black to GND and Yellow to SIG. Tighten the screws enough to hold the wires in place.
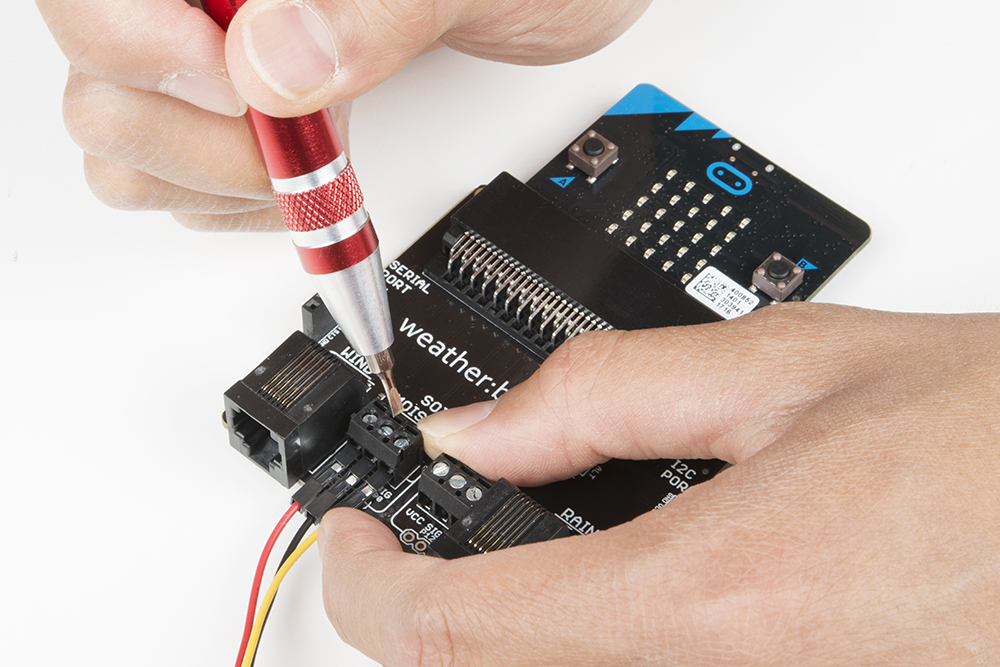
With that, you are done hooking the moisture sensor up!
Running Your Script
Please open a browser window and navigate to https://makecode.microbit.org. This should open the MakeCode environment that you used to install the weather:bit extension.
Code to Note
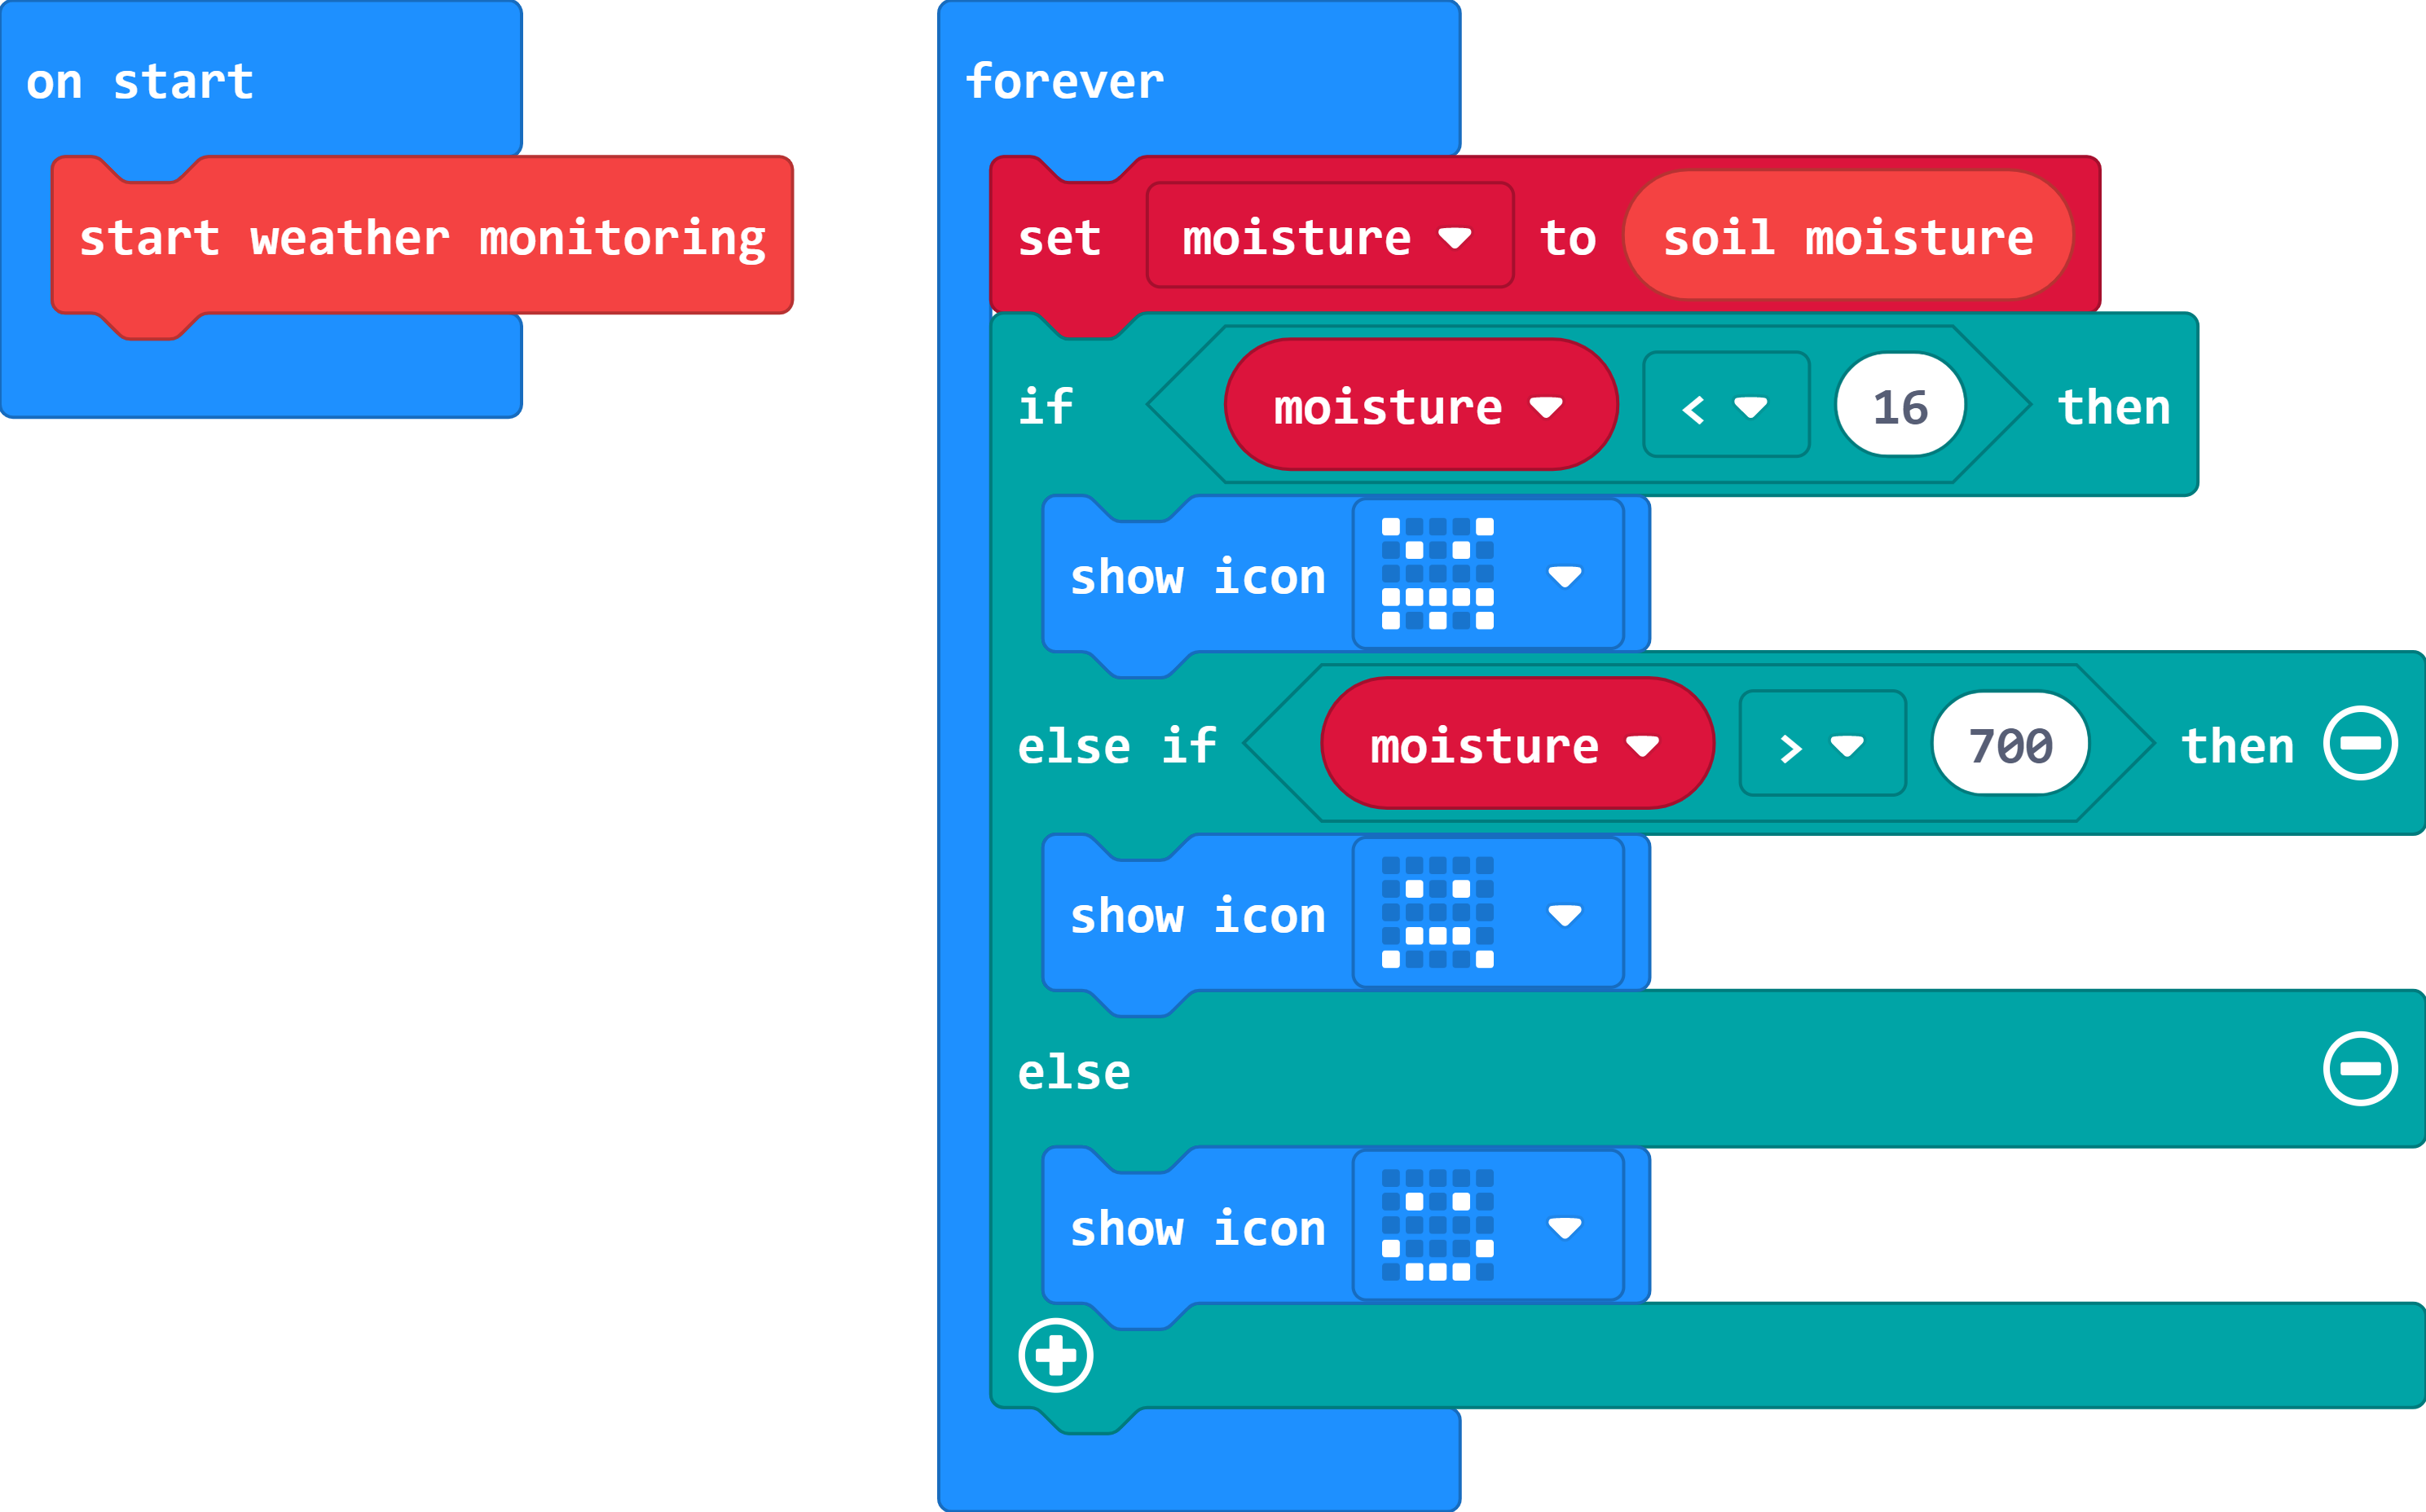
Soil Moisture
The Soil Moisture block returns an analog value range of 0 - 1023 (a 10 bit number). The lower the number is the less moisture the sensor detects. The "dryness" and "wetness" level depends on your climate, humidity, etc. so we cannot give you a concrete range of what is wet and dry, that is something you will have to fiddle with yourself.
If / Else If / Else
We used an if then block to create some logic that changes based on the soil moisture detected by the sensor. If the moisture value is low the LED array shows an angry face, if just right a smiley face and if too wet and frown.
To add more else / else if options to your if statement click on the small gear and build your state tree using the block interface presented.
Show Icon
The Show Icon block is really useful when you want to display a simple image or icon on the LED array. You can select from a number of premade images from the pull down menu in the block.
What You Should See
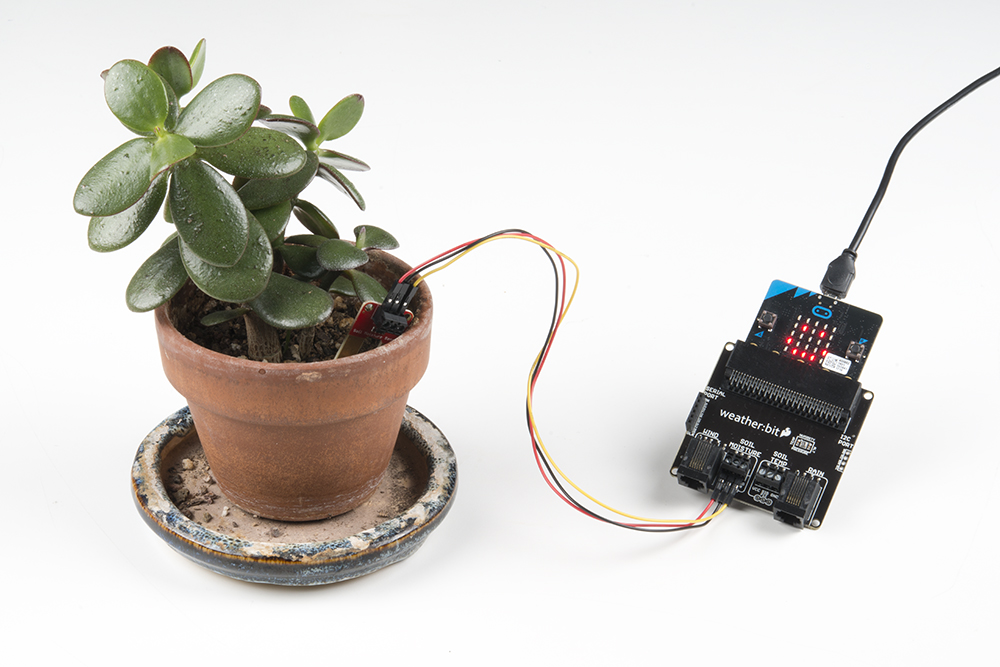
Based on our extensive testing (me pouring water into a pot of soil with the sensor stuck in it), we defined dry, damp and wet states. The image below shows the experiment powered up to test the plant's soil.
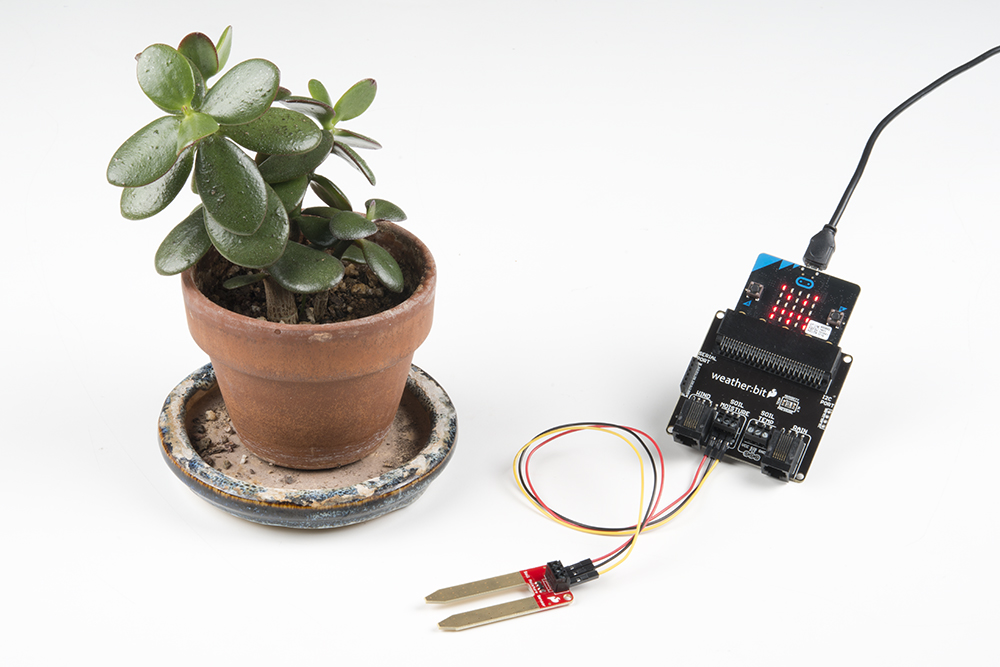
When you insert your sensor into a potted plant of your own and run your script, you will see an icon show up on your micro:bit. If you get an angry face, your soil is too dry; a sad face means it is too wet; and finally, a happy face is "moist" and just right. Water as needed to keep your plants "happy."
You may need to adjust the numbers in your code to match the state of preference for your house plants!
Troubleshooting
Odd readings --- Make sure your wiring is correct, if you wire the sensor backwards it will give backwards results.
I never get a "happy" face --- Try playing around with the threshold values in your if statements to find a range that works for your application.
It still doesn't work --- Drop us a line, we would love to help you figure it out!
Experiment 4: Reading the Soil Temperature
Introduction
When you are looking to put plants in the ground in spring, plant seed, or even track the temperature of your koi pond, you need a temperature sensor. But not just any temperature sensor...a waterproof one! In this experiment you will explore using the waterproof temperature sensor to measure ground temperature in a garden or pot.
Parts Needed
You will need the following parts:
- 1x micro:bit Board (Not Included with Kit)
- 1x Micro-b USB Cable (Not Included with Kit)
- 1x weather:bit Carrier Board
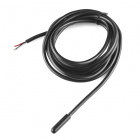
- 1x Waterproof Temperature Sensor
Didn't get the kit? Have no fear! Here are the parts you will need to complete this experiment. You may not need everything though depending on what you have. Add it to your cart, read through the guide, and adjust the cart as necessary.
Suggested Reading
- Temperature Sensor Datasheet - The nitty gritty details on the water proof temperature sensor
- Simple Sketch Video - Video demonstrating the use with Arduino
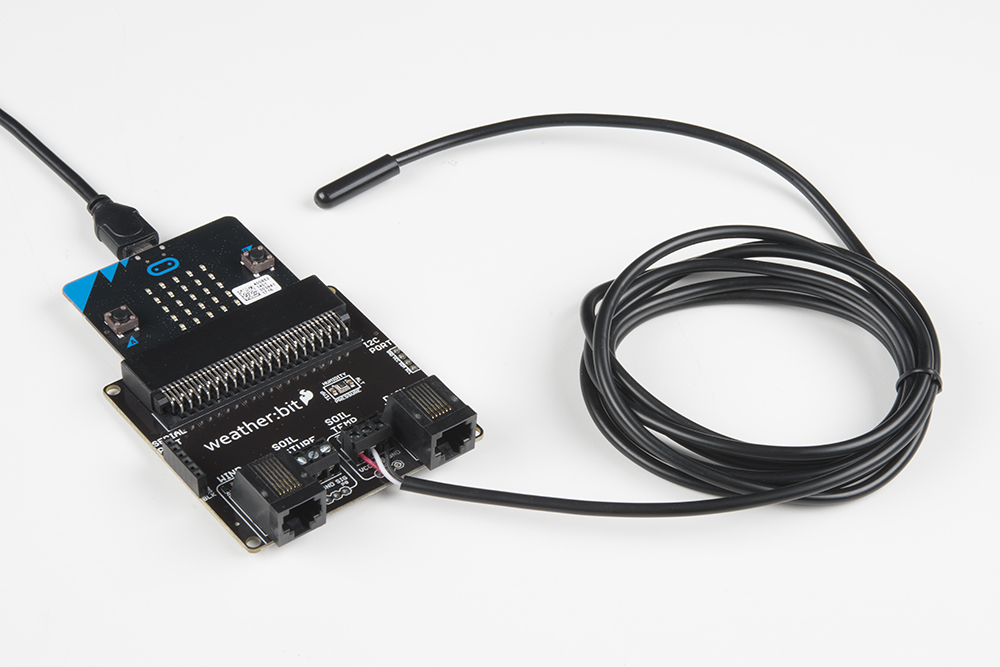
Hardware Hookup
The hookup of this sensor is much easier with the weather:bit carrier board than with any other microcontroller. We have done a lot of the leg work for you!
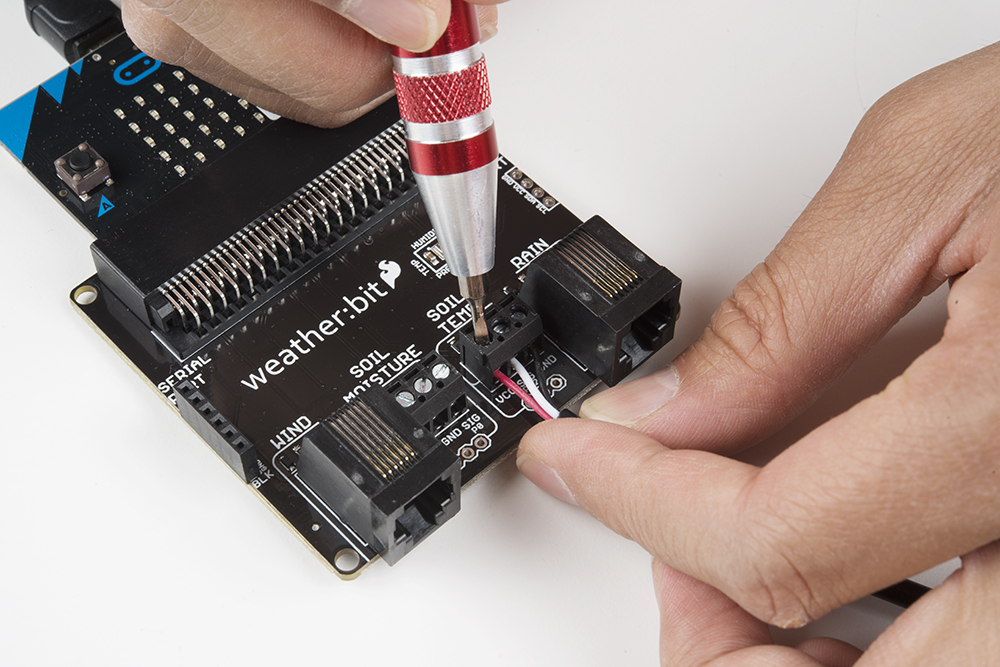
Find the screw terminals for the soil temperature on the weather:bit. Using your screwdriver, open the screw terminals a bit and insert the wires as shown in the photo below with the wires from left to right:
- Red to VCC
- White to SIG
- Black to GND
Running Your Script
Please open a browser window and navigate to https://makecode.microbit.org. This should open the MakeCode environment that you used to install the weather:bit extension.
Code to Note
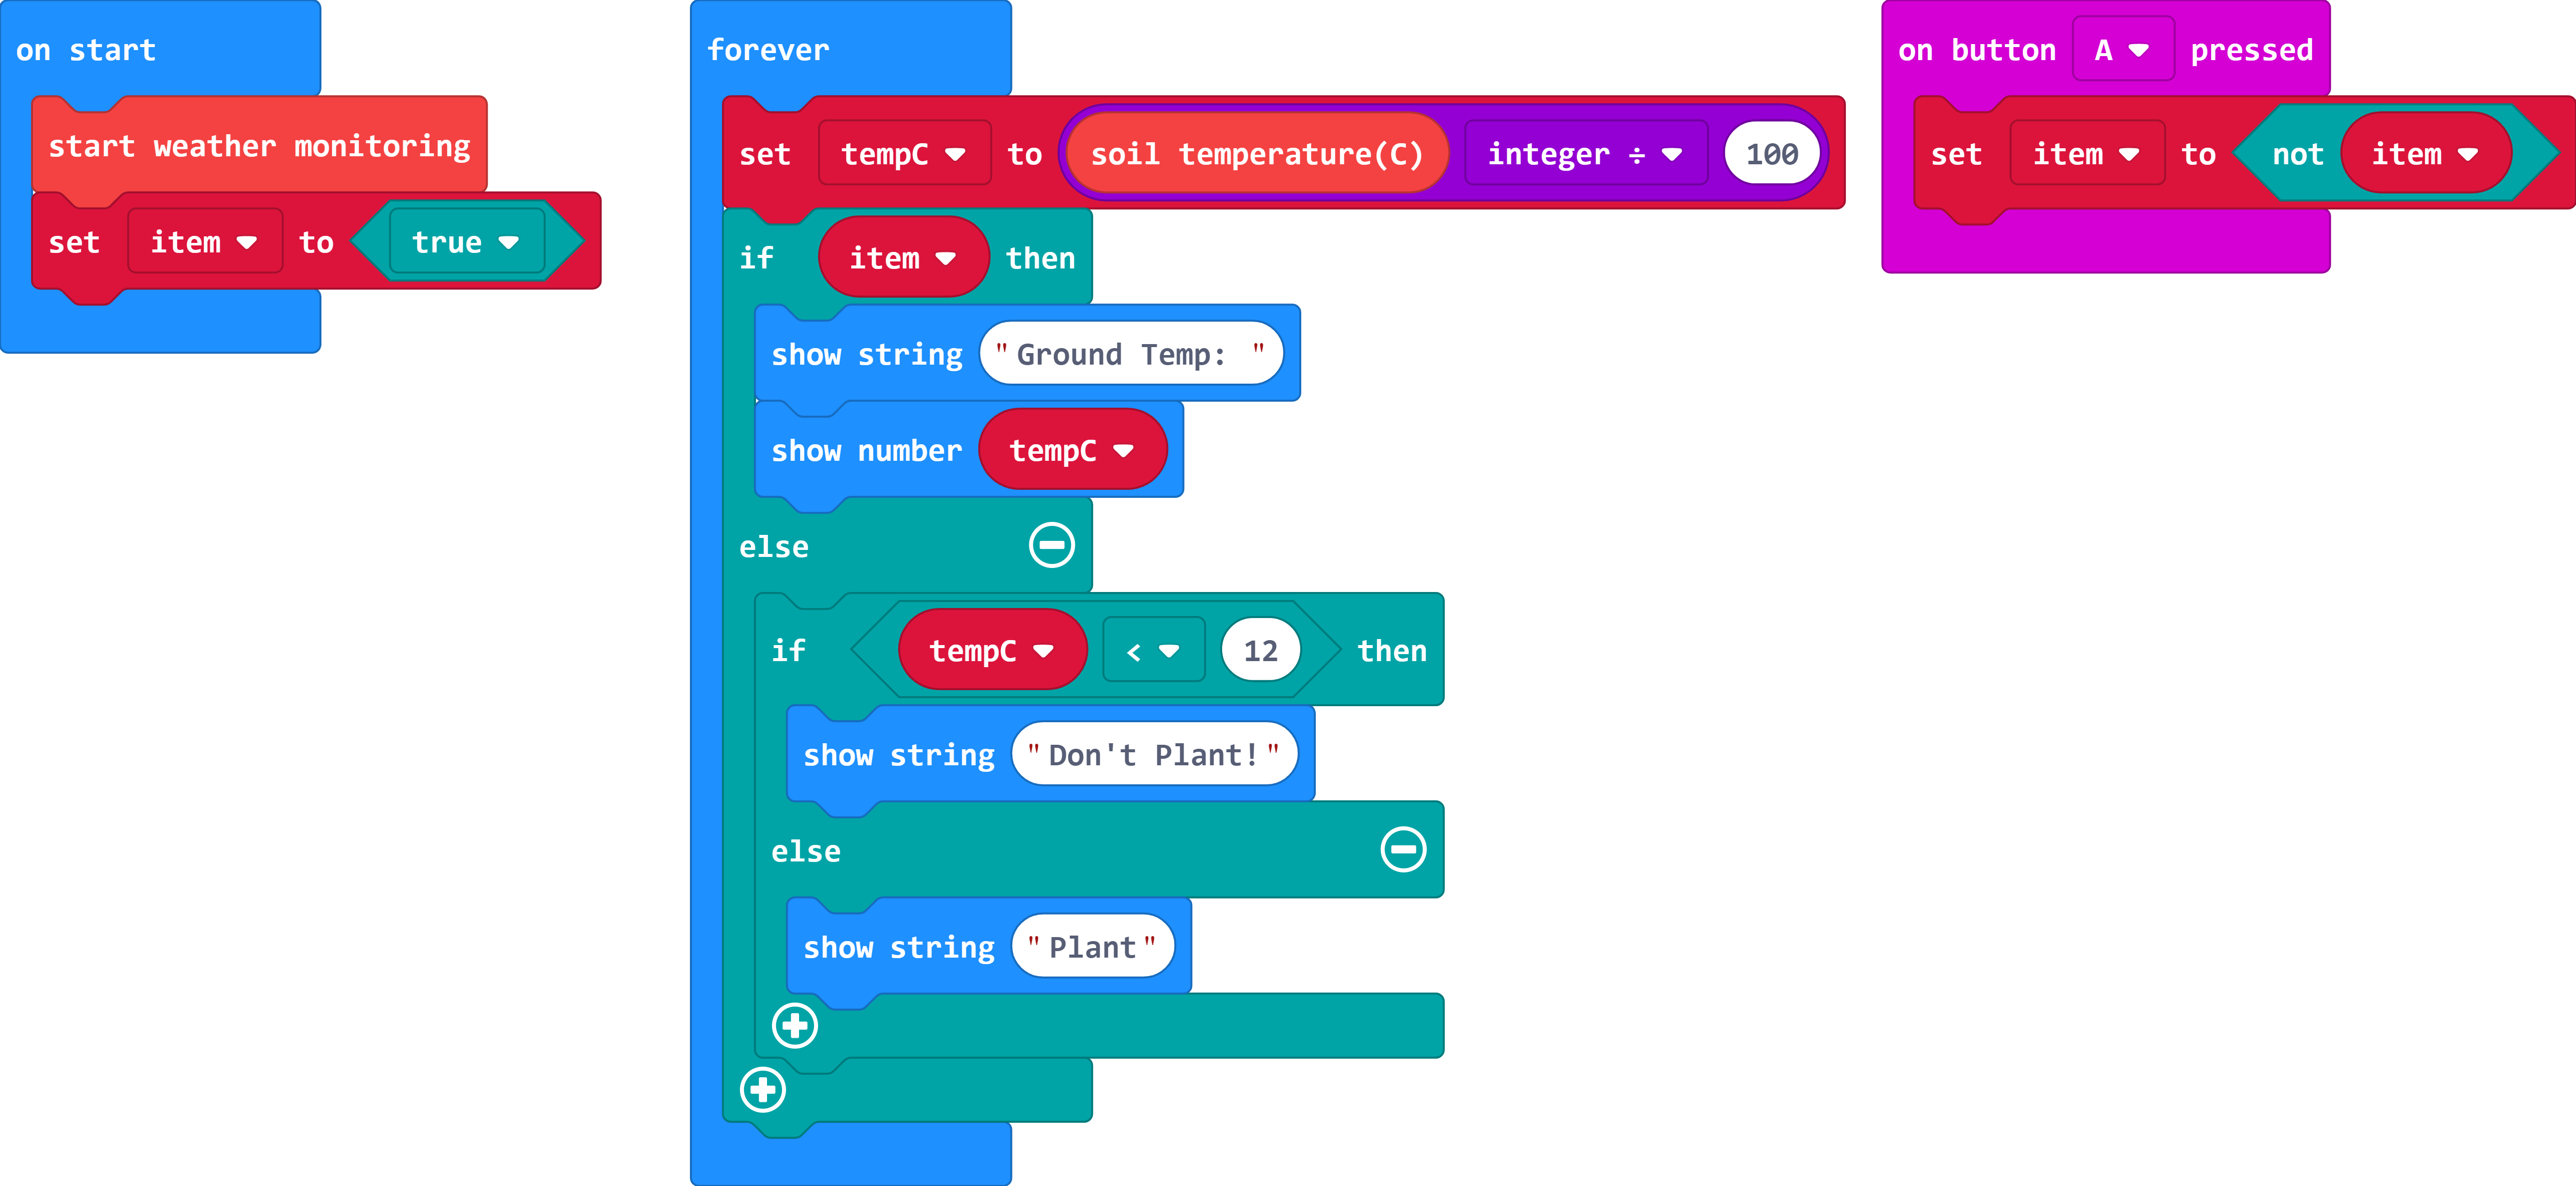
Soil Temperature
The Soil Temperature block returns the soil a value that you need to divide by 100 to get the temperature in Celcius. Like the data from the BME280 sensor in Experiment 1, this is to get you the most accurate temperature possible.
Set Item To
In this Set Item To block we use a boolean variable of true. You can then flip flop that variables to false when needed
Not
We use the not block to flip flop a boolean variable when needed. In this case when a button is pressed.
Show String
The Show String Block enables you to display a scrolling string of character across the LED array.
Show Number
As in previous experiments we use the show number block to display the temperature data from the soil temperature sensor.
What You Should See
As soon as you power up your micro:bit, you should see the ground temperature from the temperature sensor scrolling across the LED array in Celcius. If you press the A button, it will change what is scrolling to a "Plant" or "Don't Plant" depending on the temperature of the ground making it a useful tool for when to figure out when it is time to plant your tomato crop.
Troubleshooting
Odd temperature --- Make sure you are measuring with the end of the temperature sensor, that is where the actual sensor is.
Really odd temperature --- Double check your wiring and hookup!
Numbers still seem odd --- Check your math blocks! You may be missing an order of operation.
Experiment 5: Reading the Wind Direction and Speed
Introduction
The winds are a-blowin'! The question is, which direction and how hard? In this experiment you will assemble, hook up and program your weather:bit to read the weather meters --- more specifically, the wind anemometer (wind speed) and directional vane. We will again use the micro:bit's LED array to display the wind speed or the direction.
Parts Needed
You will need the following parts:
- 1x micro:bit Board (Not Included with Kit)
- 1x Micro-b USB Cable (Not Included with Kit)
- 1x weather:bit carrier board
- 1x Weather Meter
Didn't get the kit? Have no fear! Here are the parts you will need to complete this experiment. You may not need everything though depending on what you have. Add it to your cart, read through the guide, and adjust the cart as necessary.
Suggested Reading
- Reed Switch --- A tutorial about how a reed switch works.
- Weather Meter Datasheet --- The nitty-gritty details on the weather meter.
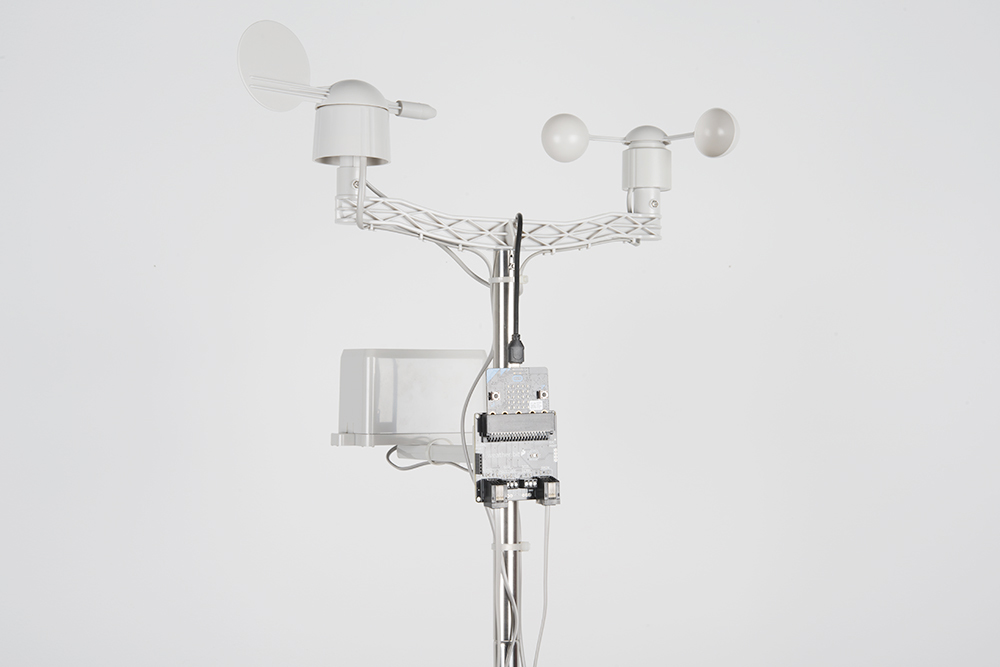
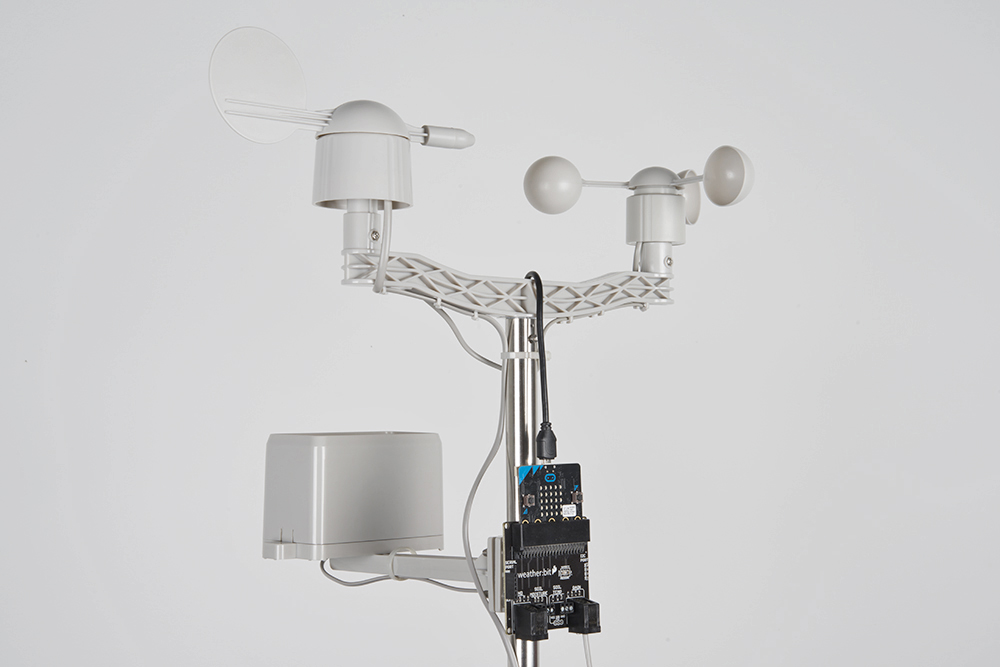
Introducing the Weather Meter (Anemometer and Vane)
The anemometer on the weather meter is the propeller-looking thing that got lost in a ping-pong ball factory.

It has three cups that catch the wind, which then cause it to spin. As the head spins, a magnet at the center of the hub travels over a reed switch that closes the circuit to the pin that the sensor is connected to for a brief moment. The faster the wind is, the faster the anemometer spins and the faster and more often the reed switch is triggered.
We count the number of times that the reed switch is triggered every second, and we can calculate the wind speed from that (1 click per second is roughly 1.5mph).
We did the hard work on this one in terms of simplifying all of this for you. All you need to know is that an anemometer is a wind-speed sensor.
The wind vane is the arrow-looking thing that spins.

When the wind blows, it catches the vane, which points in the direction that the wind is coming from. As the vane moves around, it closes a series of switches inside, which produce a different resistance at 16 different locations around the hub. Each direction has a specific value that we have mapped to the cardinal directions once you have it set in the location you want it. While the datasheet lists 16 directional degrees, we have simplified the makeCode extension such that the Wind Direction block will return eight directions (N,NE,E,SE,S,SW,W,NE) as a string. Feel free to modify your own code blocks to return all 16!
Hardware Hookup
To help you out in the assembly of your weather meter we have created this step by step assembly guide.
Once you have completed the assembly of the weather meter, find the cable for the wind sensors and plug it into the RJ-11 connector on the weather:bit labeled "wind".
With that you are ready to roll!
Running Your Script
Please open a browser window and navigate to https://makecode.microbit.org/. This should open the MakeCode environment that you used to install the weather:bit extension in.
Code to Note

Initialize Serial Output
When the code first starts, we initialize a serial output on the micro:bit to send serial to the USB. Using the serial redirect to USB code block defaults the 115200 baud. This is useful whenever we need to inspect the sensor readings and interpret the values in a serial terminal. This is not required if you are viewing the output on the micro:bit's LED display.
Start Wind Monitoring
The Start Wind Monitoring block starts all of the necessary processes to use the wind sensors that plug into the weather:bit. This block show be placed in the On Start block as it only needs to be called once at the very beginning of the program.
Show Number
The Show Number block displays/scrolls whatever number is placed inside of it across the LED array. We use it to display the wind speed in this example.
Wind Speed
The Wind Speed block is a variable block that returns the calculated wind speed from the anemometer. It is updated every 2 seconds! To prevent the micro:bit from displaying several decimal places and having to wait while the output scrolls to the end, we will use the truncate block to only display the integer.
Wind Direction
The Wind Direction block is a variable block that returns a string value of a cardinal direction that the wind vane is pointing.
Show String
The Show String block is similar to the Show Number block in that it displays/scrolls whatever string that it is passed. In this case we use it to display the wind direction. We'll abbreviate the words for speed and direction so that we do not have to wait as long for the next measurement.
Comma Delimiter
For debugging, we set up the serial. However, we will use the join block with a comma delimiter. This is useful for graphing serial data. In this case, it is used to help read data easily.
What You Should See
You can pair, upload code to the micro:bit, and view the output on the MakeCode console without having to drag and drop the file to the micro:bit after updating the firmware. For more information about using the WebUSB feature on MakeCode, make sure to check out the instructions provided by micro:bit support.
Otherwise, you can use your favorite serial terminal or program to real time, serial data plotter to graph the output.
Once you power up the micro:bit, spin the anemometer with your hand or place it in front of a fan. The speed in miles per hour should start to scroll across the LED array. If you press the A button on your micro:bit, it will change the readout to print the direction the vane is pointing as the direction the wind is coming from. If your micro:bit has a certain firmware version, you can also view the output via the MakeCode console.
Troubleshooting
odd readings --- Make sure your wiring is correct by ensuring that sensors are plugged into the correct RJ11 jack.
???--- If you are getting a???for the wind vane, this may be due to a loose connection. Make sure that the RJ11 is fully in the socket as explained above. The micro:bit also reads the voltage from the wind vane using an analog pin. The makeCode extension was written to read 8 cardinal directions for simplicity. When the magnet closes one of the reed switches inside the wind vane, the micro:bit will read a certain value. The???indicates that micro:bit read the wind vane at a certain moment when the magnet was within a small region somewhere between the 8 cardinal directions. This also may be due to a conflicting pin causing an invalid reading. Try writing a condition statement to ignore this invalid data point and taking another measurement.What is north? --- The directions produced by the weather:bit are based off of readings from the vane, you have to personally line up the orientation of your vane to north.
It still doesn't work --- Drop us a line, we would love to help you figure it out!
Experiment 6: Reading the Rain Gauge
Introduction
Rain, rain, go away; come again another day! In this experiment you will add the rain gauge to your weather meter and use it to track the amount of rain that falls. In the end you will use the micro:bit to keep track of the amount of rain, print it out over the LED array when a button is pressed and then use another button press to reset that value to 0. Ready to get wet? Us too...
Parts Needed
You will need the following parts:
- 1x micro:bit board (Not Included with Kit)
- 1x Micro-b USB Cable (Not Included with Kit)
- 1x weather:bit carrier board
- 1x Weather Meter
Didn't get the kit? Have no fear! Here are the parts you will need to complete this experiment. You may not need everything though depending on what you have. Add it to your cart, read through the guide, and adjust the cart as necessary.
Suggested Reading
- Weather Meter Datasheet --- The nitty-gritty details on the weather meter.
Introducing the Weather Meter (Rain Gauge)
In the previous experiment you met the wind sensors on the weather meter. Here you meet the rain gauge!

The rain gauge is actually quite an ingenious design. Inside of the box is a tiny bucket. When that bucket is full (0.011" of rain) it tips over, both triggering a switch and dumping out the water that is in the bucket, which then allows the bucket to come back to upright. So, for every switch press there is 0.011" of rain. In software we count these triggers and increment the rainfall value.
Hardware Hookup
If you didn't assembly your weather meter in the previous experiment we created this step by step assembly guide for you to follow!
Once you have completed the assembly of the weather meter, find the cable for the rain gauge and plug it into the RJ-11 connector on the weather:bit labeled "rain".
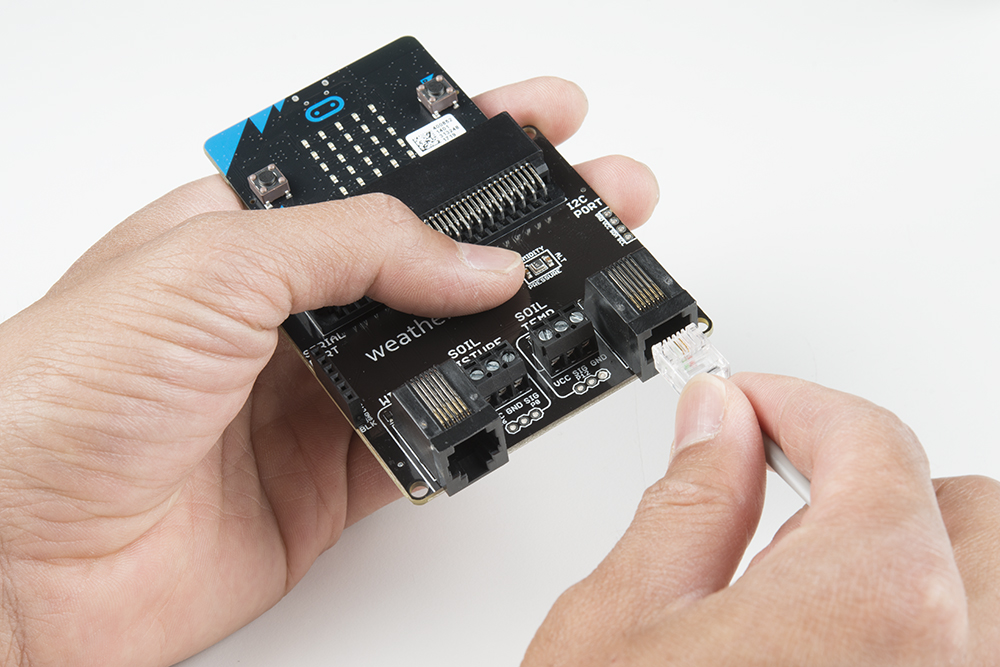
Hope you have an umbrella!
Running Your Script
Please open a browser window and navigate to https://makecode.microbit.org. This should open the MakeCode environment that you used to install the weather:bit extension.
Code to Note
Initialize Serial Output
When the code first starts, we initialize a serial output again on the micro:bit to send serial to the USB. Using the serial redirect to USB code block defaults the 115200 baud. This is useful whenever we need to inspect the sensor readings and interpret the values in a serial terminal. This is not required if you are viewing the output on the micro:bit's LED display.
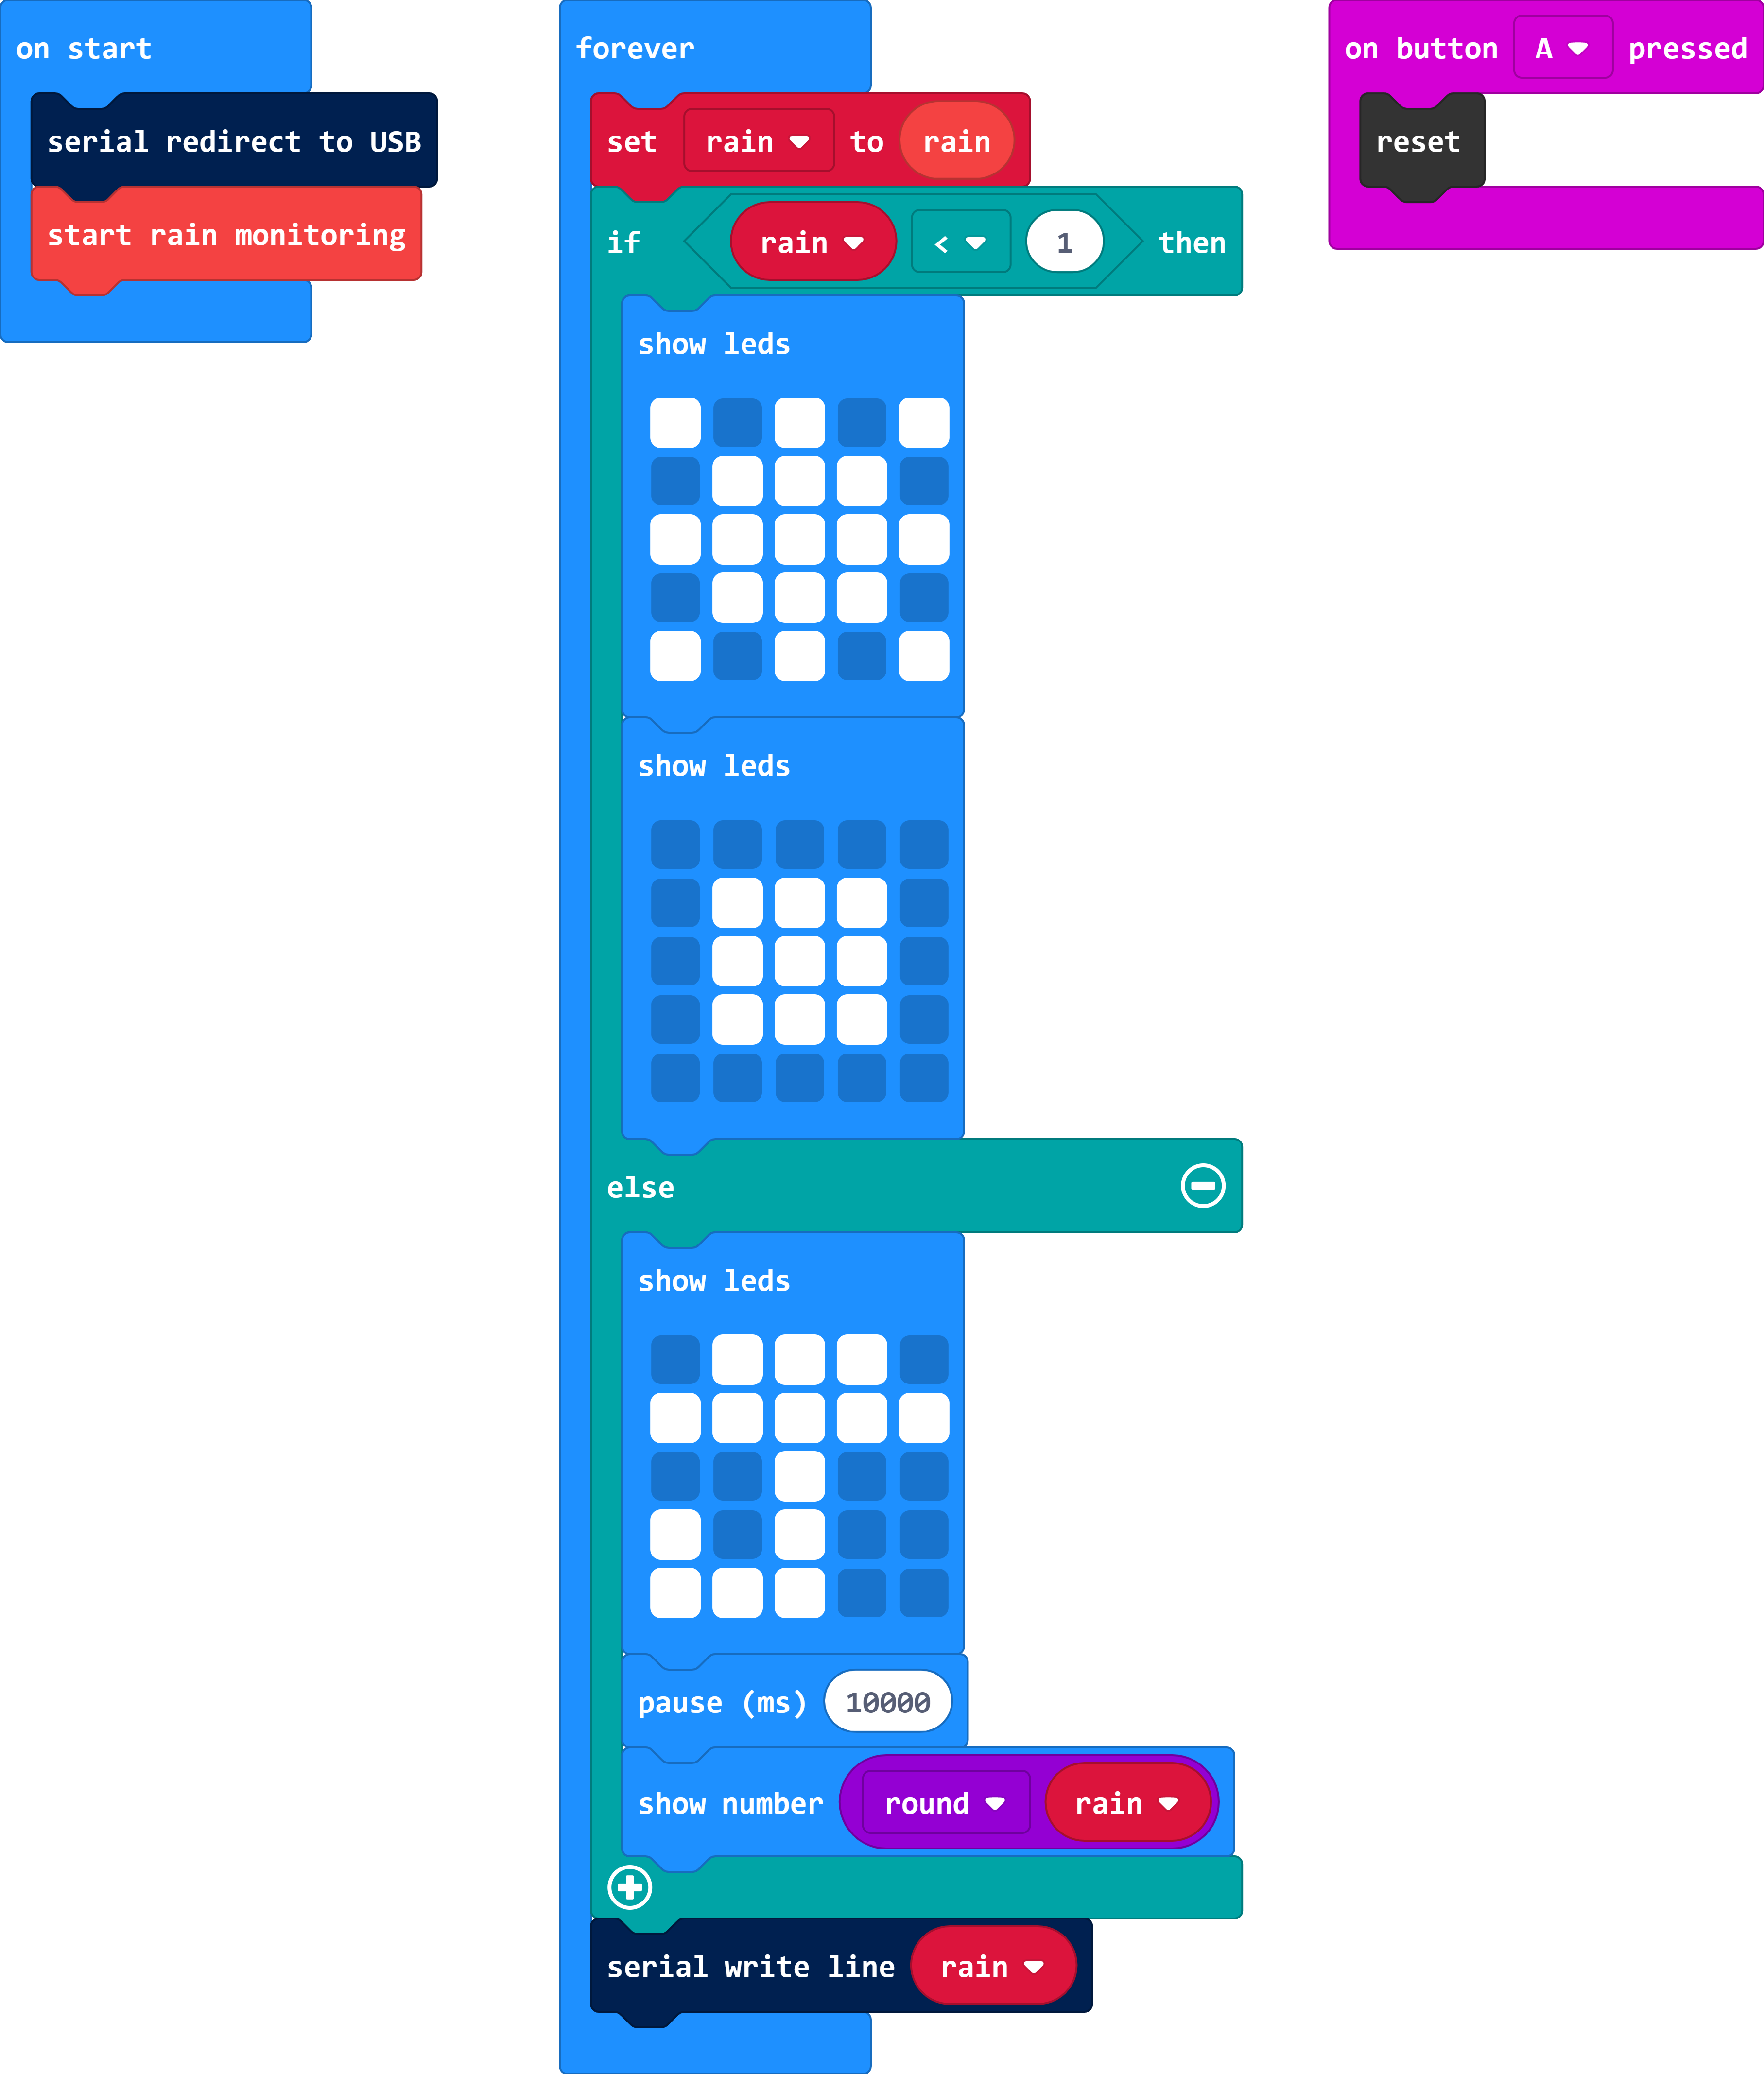
Start Rain Monitoring
To use the rain gauge you need to add the Start Rain Monitoring block to your On Start Block for it to be able to function correctly. It sets up the micro:bit hardware correctly to be able to read the rain gauge correctly.
Rain
The rain block returns the number of inches of rain that the gauge has measured as a whole number. This variable block stores that value until your micro:bit is reset or power cycled (turned off and on again).
Show LEDs
We used the Show LEDs block to draw an image of the sun. If MakeCode doesn't have just the right icon for you pre-drawn you can make your own using this method.
Reset
The reset block resets the code that you have on your micro:bit. This is the same as pressing the reset button on the back of the micro:bit, but at times it is useful to be able to do this in software. A great example would be that you couldn't reach the back of the micro:bit for some reason.
What You Should See
Once you power up your micro:bit, you should see a sun show up on the LED array. Try placing a bucket underneath the rain gauge and adding some water. Be sure to avoid getting the micro:bit and electronics wet. Once the amount of rain fallen goes over 1" the LED array will display an umbrella and every 10 seconds the number of inches of rain fall since you started your program.
To restart the counter, press the A button or, if you can reach it, the reset button on the back of the micro:bit.
Troubleshooting
I am getting a lot or rain? --- Every time the bucket tip, it is measured as rainfall. If you bump into the sensor or if it is vibrated it may trigger the sensor and you get a false reading.
Getting an Odd reading?! --- Make sure the rain gauge is plugged into the proper RJ11 jack and there is a "click" when you insert it all the way.
It still doesn't work --- Drop us a line, we would love to help you figure it out!
Experiment 7: Logging to the MicroSD Card
Introduction
We are almost done with our whirlwind series of weather experiments. In this final experiment we will look at how to log all of this amazing weather data to a microSD card using the OpenLog.
Parts Needed
- 1x micro:bit board (Not Included with Kit)
- 1x Micro-b USB Cable (Not Included with Kit)
- 1x weather:bit carrier board
- 1x OpenLog with headers
- 1x microSD Card (Not Included with Kit)
- 1x microSD Card USB Reader (Not Included with Kit)
Didn't get the kit? Have no fear! Here are the parts you will need to complete this experiment. You may not need everything though depending on what you have. Add it to your cart, read through the guide, and adjust the cart as necessary.

Suggested Reading
- OpenLog Hookup Guide --- The ups and downs of how to use the OpenLog
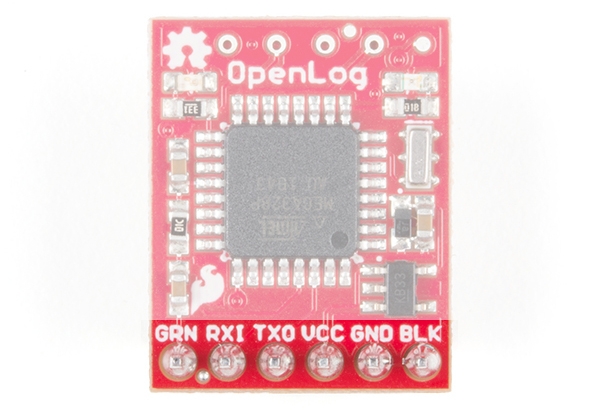
Introducing the SparkFun OpenLog
The OpenLog Data Logger is a simple-to-use open source solution for logging serial data from your projects. The OpenLog provides a simple serial interface to log data from a project to a microSD card.
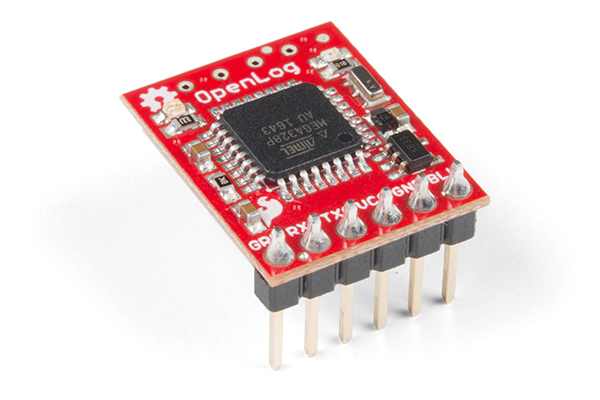
The primary interface with the OpenLog is the FTDI header on the board edge. This header is designed to plug directly into the weather:bit carrier board's serial port, which allows the micro:bit to send data over a serial connection to the OpenLog.
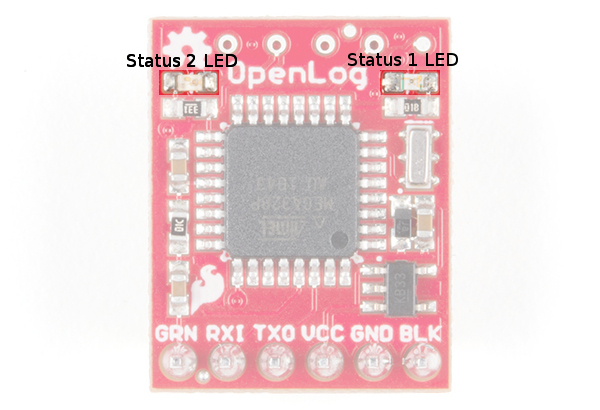
There are two status LEDs on the OpenLog to help you with troubleshooting.
- STAT1 --- This blue indicator LED toggles on/off when a new character is received. This LED blinks when serial communication is functioning.
- STAT2 --- This green LED is connected to Arduino D13 (SPI Serial Clock Line/ATmega328 PB5). This LED only blinks when the SPI interface is active. You will see it flash when the OpenLog records 512 bytes to the microSD card.
Hardware Hookup
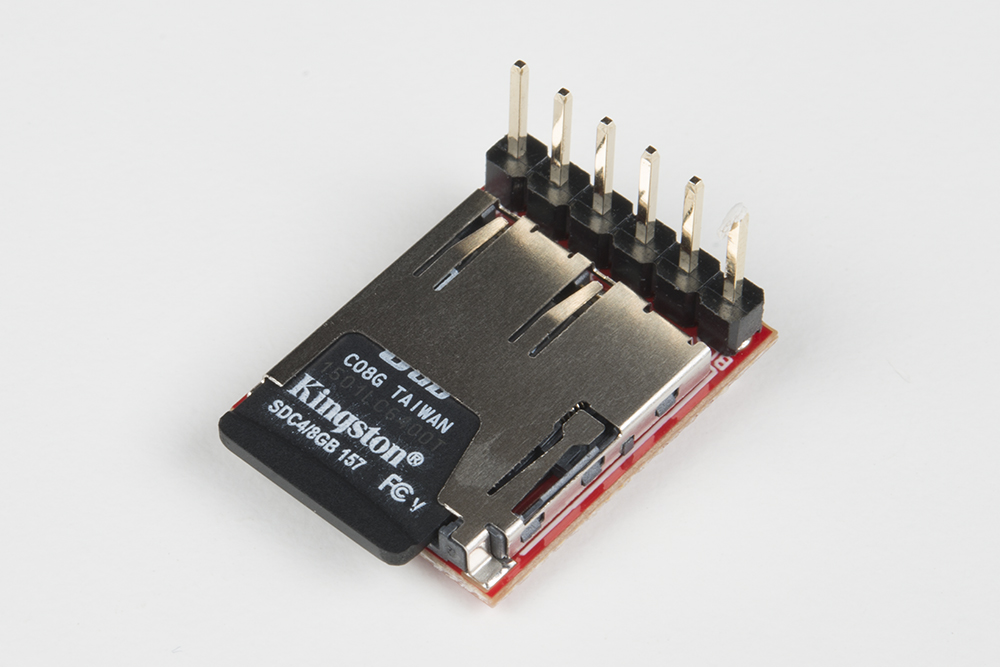
You are going to love this! First thing is that you need to insert a microSD card into the OpenLog with the text side "up" as shown in the image below.
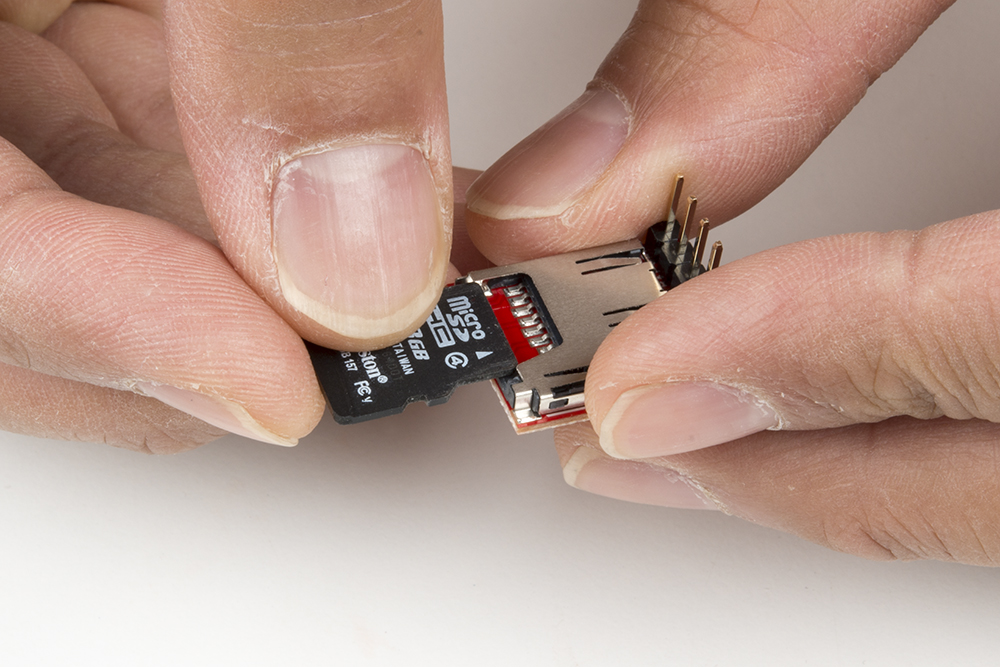
Make sure the card "clicks" into place and stays in place.
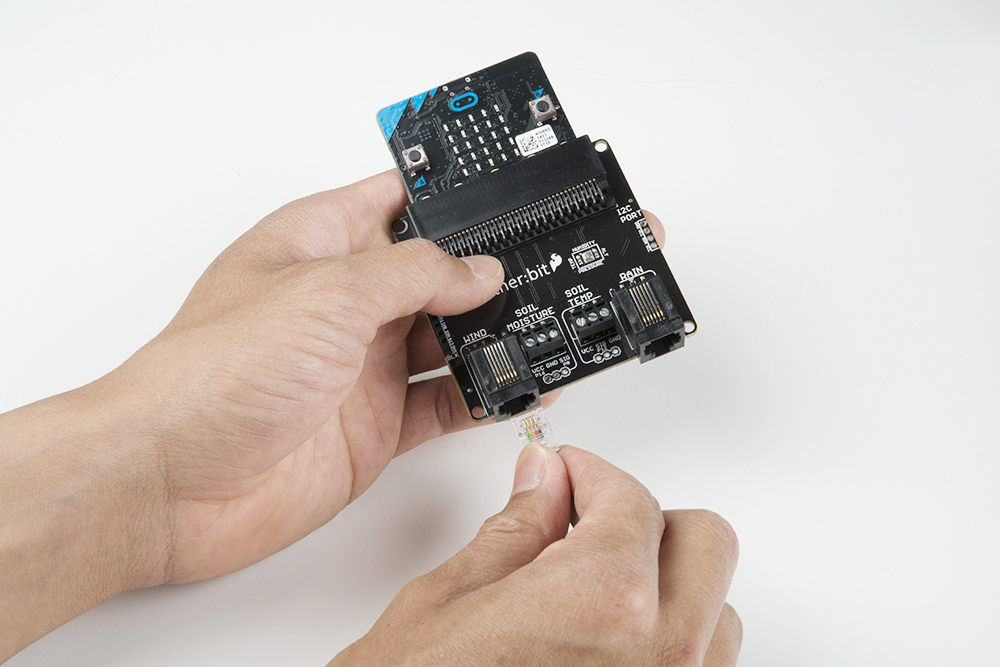
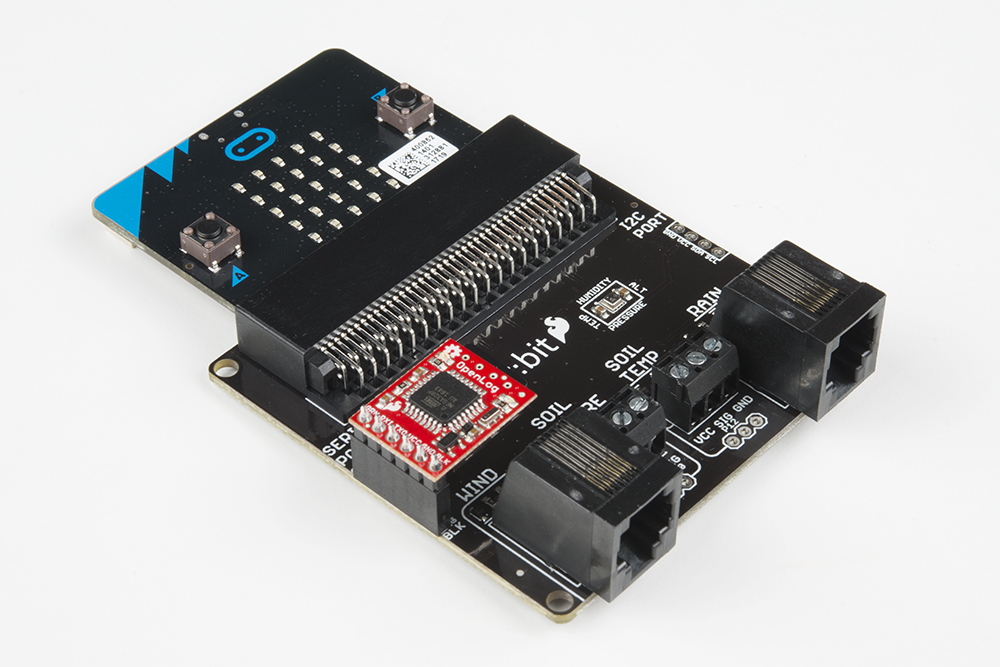
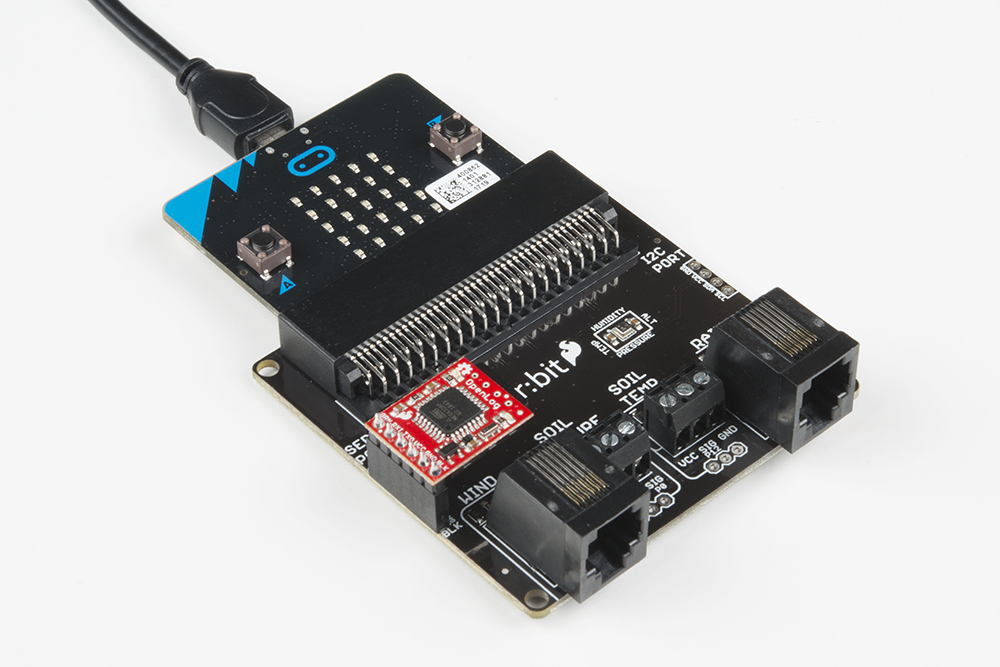
Next insert the OpenLog's pins into the serial port on the weather:bit carrier board as shown below. Make sure that all of the pins are aligned and inserted correctly. Offsetting these pins could end in damaging your OpenLog or micro:bit. Finally, if you haven't already, plug your micro:bit into the weather:bit. With that you should be good to go!
Running Your Script
Please open a browser window and navigate to https://makecode.microbit.org. This should open the MakeCode environment that you used to install the weather:bit extension.
Code to Note
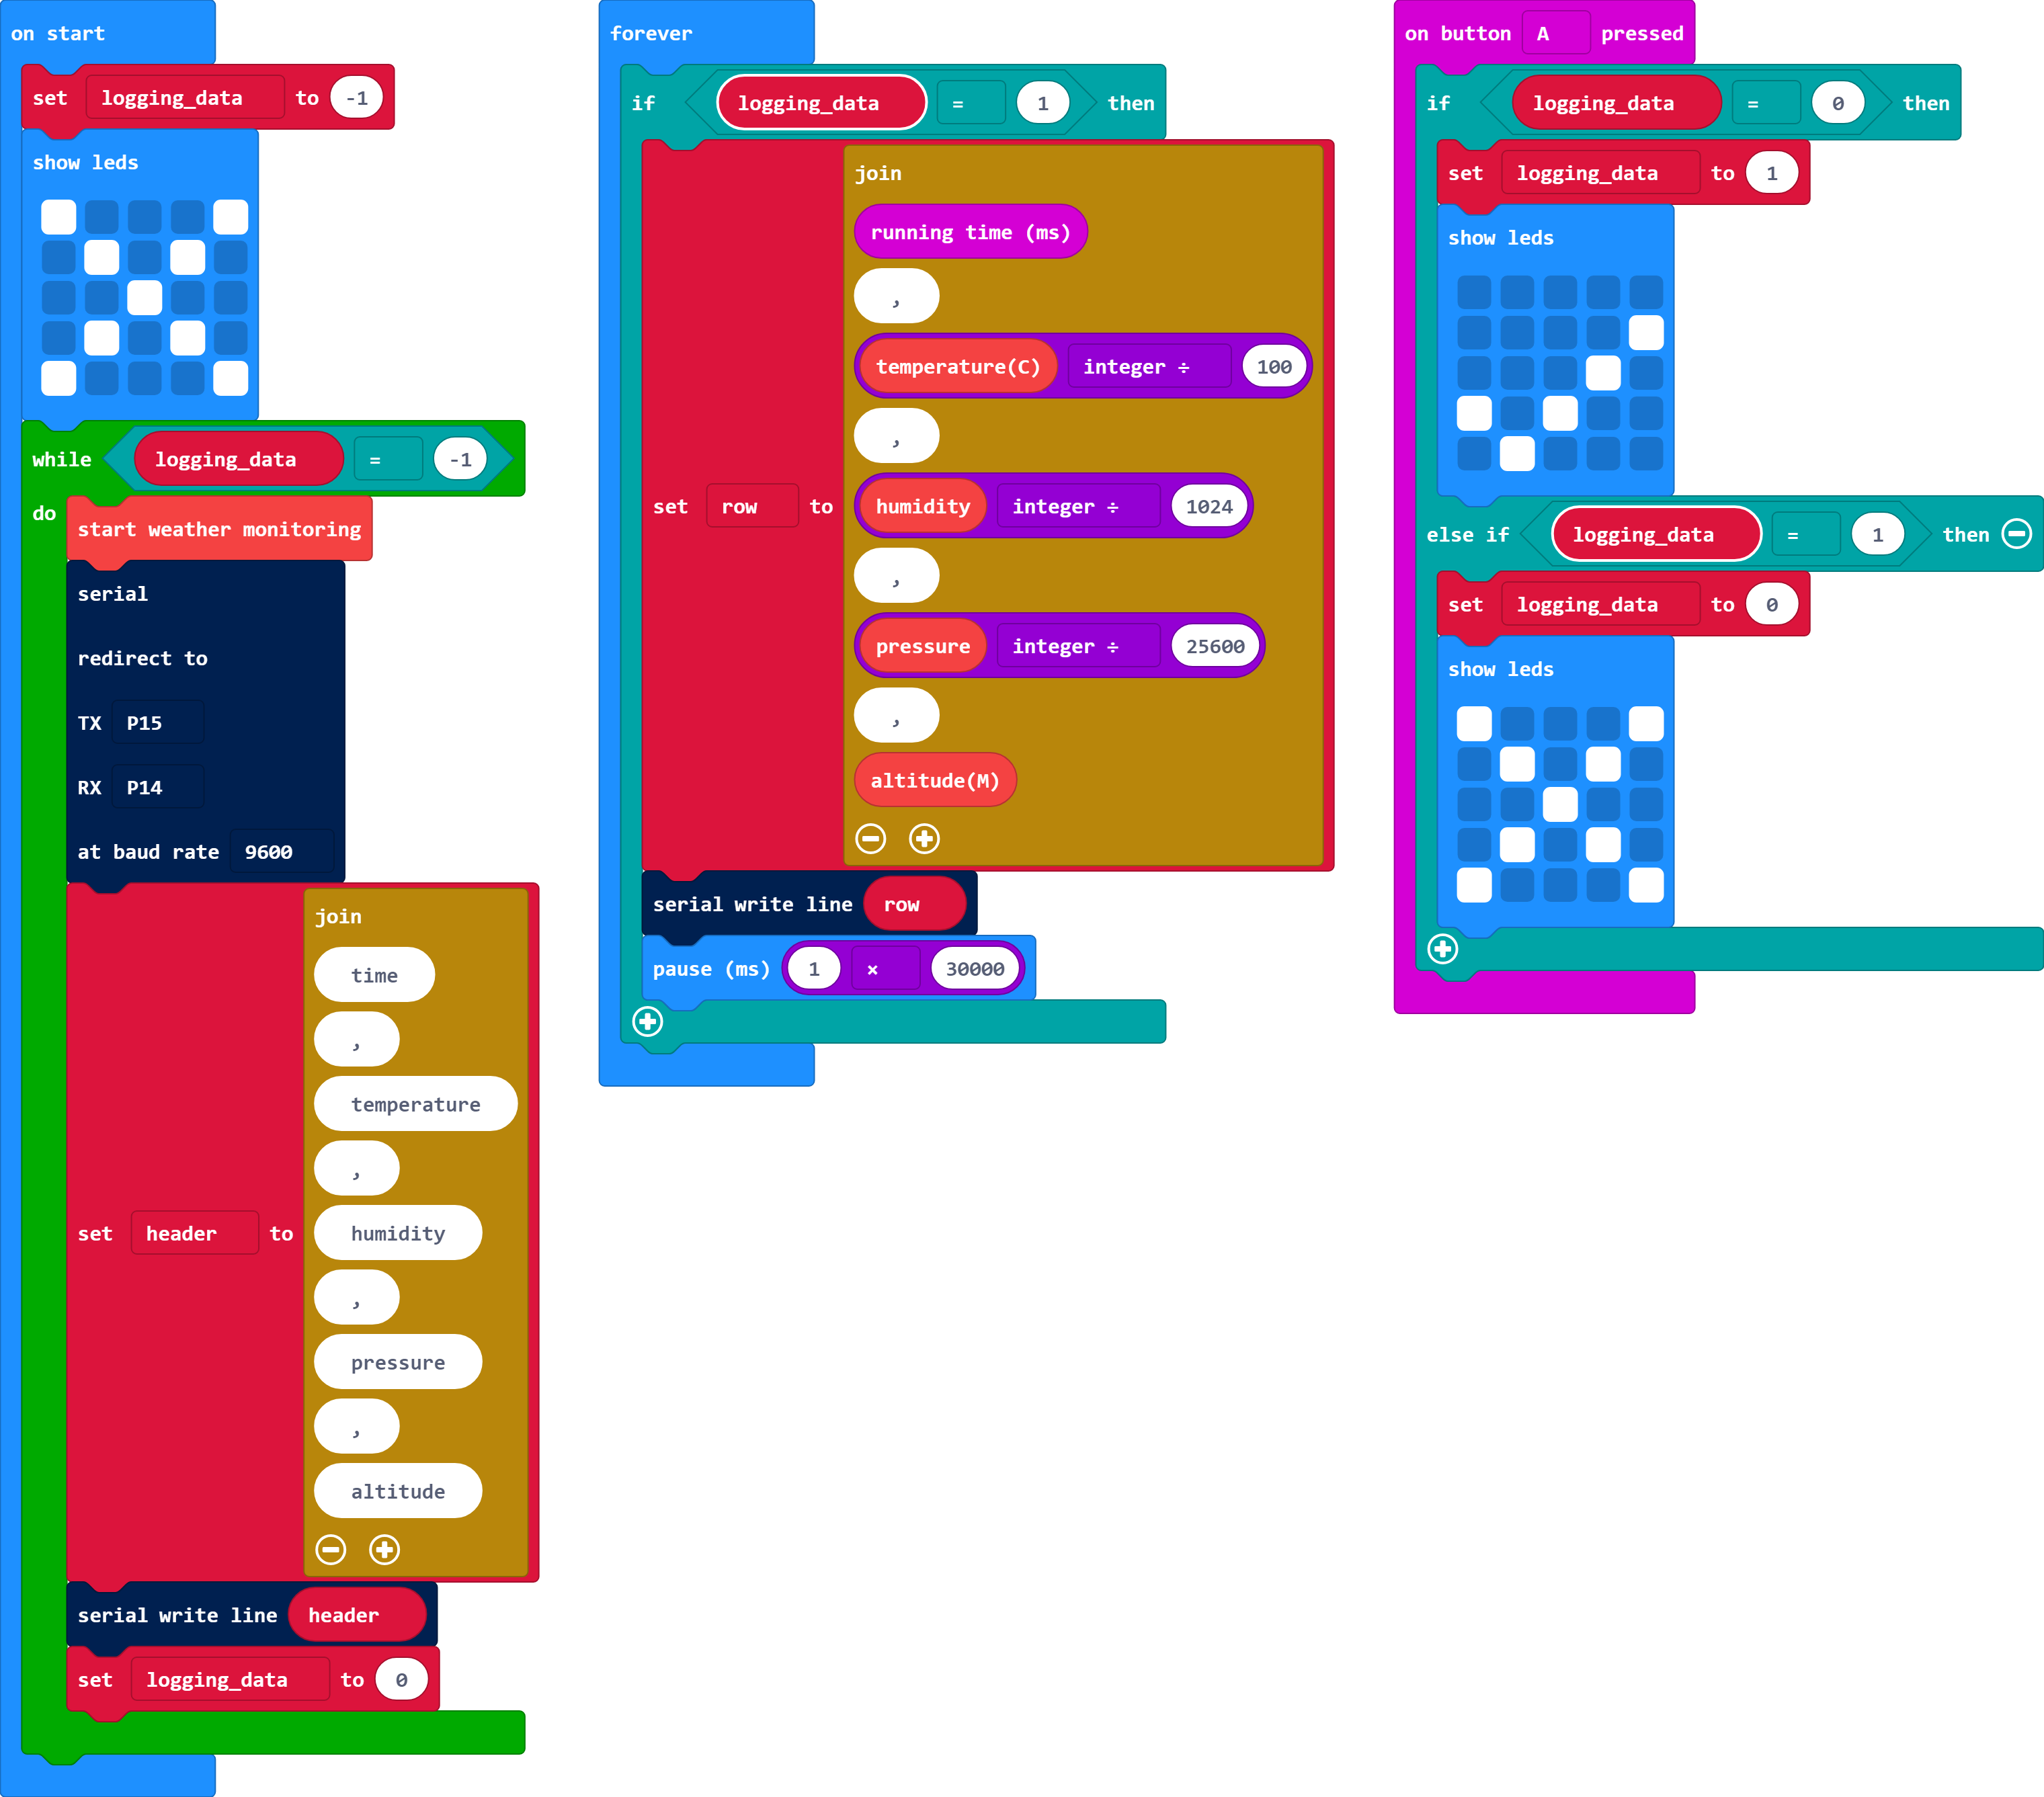
Logging_Data
We create a variable called logging_data and set it to -1 when the micro:bit starts up. For feedback, an "X" will appear in the LED array. The code will initialize and then wait until button A is pressed. After pressing on button A, we will change the variable to 1 to begin logging. For feedback, we will display a “✓".
Serial Redirect To
We use the Serial Port on the weather:bit board to write data to the SparkFun OpenLog. To do this we need to do some setup for the micro:bit to use it correctly. We do this through the Serial Redirect To block placed in our On Start block.
In the Serial Redirect To block we set the transmit (TX) and receive (RX) pins. In this case we use pins 15 and 14. We also set the baud rate which is the rate at which two devices "agree" to communicate at. The OpenLog is preprogrammed to communicate at 9600 baud, so that is what we will set it at.
Join
The join block is one of the most useful blocks out there. You use it to join pieces of data together to build a long string that you then store in a variable. For example for our header we stored comma separated names as a single variable called header. The join blocks standard size is 2 slots. To add more slots click on the gear button and drag more slots in place as you have with the if / else if statements in previous experiments.
Serial Write Line
To send data to the OpenLog we use the Serial Write Line block. This command sends whatever data you attach to it over the serial lines you have specified in your Serial Redirect to block with a carriage return at the end of it.
Running Time(ms)
The running time block returns the number of milliseconds that the micro:bit has been powered up and running the current program. We are using it as a timestamp for data logging since there is no access to a realtime clock.
Button Interrupt
The on button A pressed block will interrupt the code and change the logging_data. If the micro:bit is logging, we will set it to 0 to stop sending data to the OpenLog. If the micro:bit is not logging, we will set it to 1 to continue logging. The running time will continue counting even after we have stopped logging data.
What You Should See
When you power your micro:bit, you will eventually see an "X" on the LED array. Press the A button to start logging data every 30 seconds. A check mark will be displayed on your LED array. Let the program run for a couple of minutes and press the A button again. You will see an "X" again. It is now safe to remove the microSD card from the OpenLog.
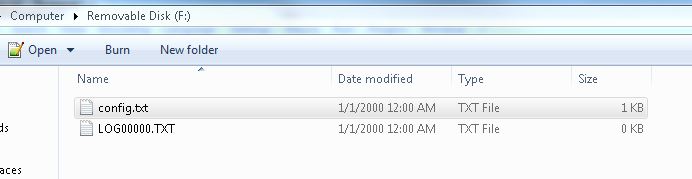
Now, using a microSD card adapter with the microSD slot on your computer or an adapter, open up the microSD card on your computer. You should see two files. One is a config file, which you can ignore. The other, which has a file name of "LOGXXXXX.txt," is what you are looking for; go ahead and open it.
The data in this text file is a Comma Separated Value (CSV) set of the data you sent it. The format is that the first line is the "header," which is the name of each "column." You see that our header is the following:
The header is followed by lines of values associated with each reading.
In fact, if you are a user of Google Sheets you can import this text file as a CSV and then graph these values pretty easily. We recommend this quick guide from Google on how to import a .txt file as a CSV into sheets.
Troubleshooting
Doesn't seem to be logging --- Make sure your openLog is oriented correctly in the Serial port.
The log has weird characters ---Make sure you have the serial baud rate set to 9600!
It still doesn't work --- Drop us a line, we would love to help you figure it out!
Bonus Experiments!
Go further by wirelessly transmitting data remotely or add a timestamp to your data using the gator:RTC! For more information, check out the tutorial below.
Wireless Remote Weather Station with micro:bit
May 11, 2020
Resources and Going Further
For more information about the weather:bit, check out the resources below:
We produce a number of other kits and carrier boards that you can hook up to your micro:bit to help take your projects to the next level. Here is some further reading that may help you along in learning more about the world of electronics.
For more information on our micro:bit ecosystem, check out these tutorials:
SparkFun Inventor's Kit for micro:bit Experiment Guide
micro:bot Kit Experiment Guide
micro:arcade Kit Experiment Guide
For more Internet-connected weather fun, check out our these other weather data tutorials. Try making an enclosure to protect the electronics from the elements. Try wirelessly transmitting data from one micro:bit to a second micro:bit and saving the data to a cloud service.