MIDI Tutorial
 Byron J.
Topologies
Now that we've looked at the types of devices that offer MIDI, and the messages they use, let's look at some of the ways they can be deployed.
Case #1: Daisy Chain
The simplest connection topology is the daisy chain, where one transmitter is connected to one or more receivers.
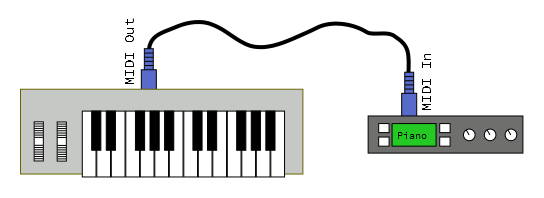
In this example, the MIDI out of a controller is connected to the MIDI in of a tone generator module. It allows the player to use the keys on the controller to play sounds from the module. The controller sends note-on, note-off and controller messages, to be interpreted into sound by the module. The communication path is unidirectional.
If the module is multitimbral, it can be set to respond on several MIDI channels, allowing the player to switch between sounds by changing the transmission channel.
We can add more downstream modules using the thru ports on the interceding devices. Thru transmits a copy of the messages received by the in port.

Depending on how the controller and modules are configured, there are several possibilities.
- The modules could simply all respond together, in unison.
- Each module could be set to respond on a different MIDI channel. By changing the channel that the controller sends, the modules can be played individually.
- Each module could be configured to respond to particular key or velocity ranges, forming splits and layers.
Case #2: Synchronization
In this example, we want to build a percussion ensemble by connecting drum machines together.
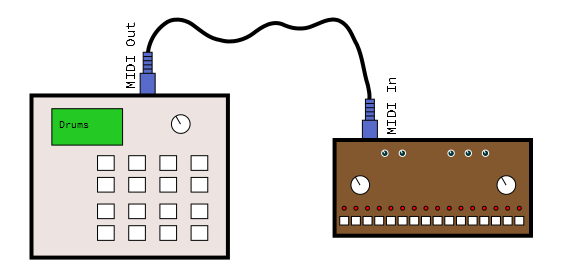
The drum machine on the left will serve as the master clock, and the one on the right is set to receive clock messages (sometimes called clock slave or external sync mode). When the operator presses "play" on the left machine, both machines will start playing. As the tempo of the left machine is adjusted, both machines accelerate and decelerate together.
System realtime messages keep the machines in sync.
- A start (0xFA) byte is sent to initiate playing, from the beginning of the sequence.
- Clock (0xF8) bytes are sent regularly, serving as a shared metronome.
- A stop (0xFC) byte halts playback.
- Continue (0xFB) can be used to start the sequence from where it was last stopped.
Clocks may be transmitted while stopped -- this allows tempo indicator LEDs to continue flashing at the correct rate.
Case #3: Computer Sequencer
The last topology we'll look at adds a personal computer in the middle of a daisy chain.
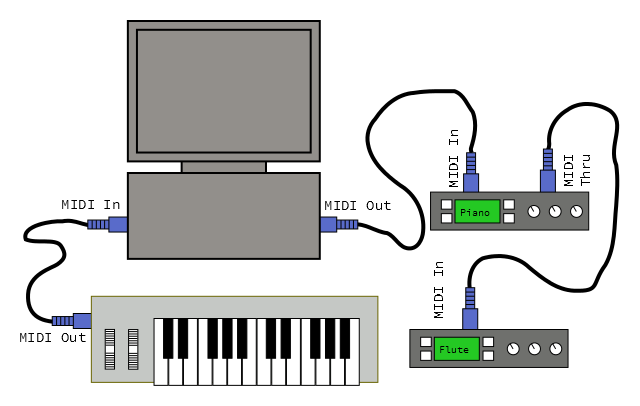
The MIDI controller keyboard is connected to the computer, and the sound generators are connected downstream from the computer. Adding a computer in the middle of the chain allows a lot of power and flexibility. MIDI sequencer software allows the user to record performances from the controller, play them back on the sound modules, and edit or arrange them into songs. Sequencers usually have tracks, which allow multiple performances to be layered. The construction of such a layered performance is known as overdubbing.
While the sequencer is recording, it receives note on and off messages from the controller. It stores them in memory, simultaneously transmitting them to the sound modules, so the performer can hear what they are playing.
During playback, the MIDI controller is unused, and the computer plays the recorded messages, again triggering the tone modules.