MP3 Player Shield Music Box
 HelloTechie
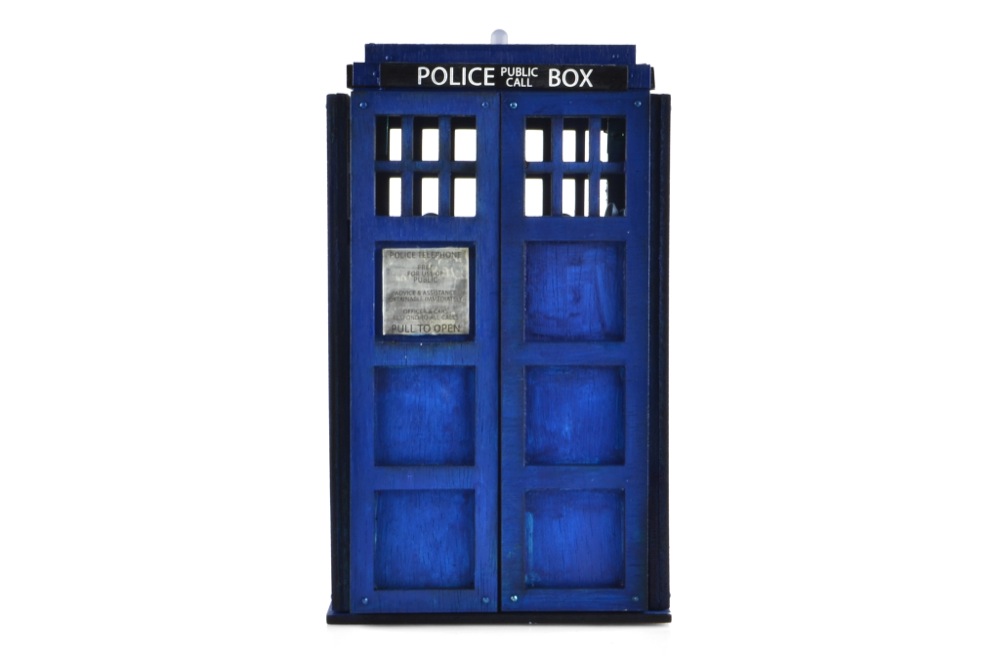
Tardis Music Box Project
Got a few favorite things that you need to keep safe? A custom music box is a fun project to house anything ranging from necklaces to sonic screwdrivers. In this tutorial, you will see the basic instructions and parts used in making this fan-made Doctor Who TARDIS (Time and Relative Dimension in Space) music box. This can be used as a starting point for your own music box, TARDIS, or mischievous creation.

Suggested Reading
Here is a list of other tutorials you might find helpful while following this tutorial:
Parts List
You will also need a box of some sort. This is where the fun starts! You can use tons of different types of materials ranging from wood to plastic. For this project, a laser cutter was used to make cut-outs from soft wood. A crafter knife would have worked too.
Circuit Diagram
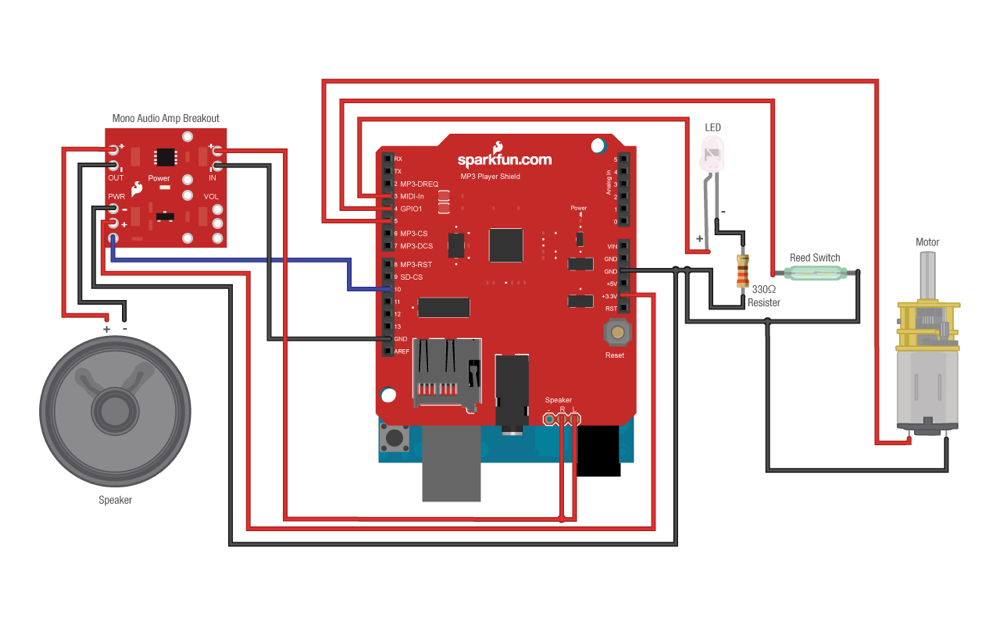
You will need to put the reed switch near the opening doors of your box/case, and a magnet on the other side, so when the box is closed the magnet and the reed switch are right next to each other. Based on your project, you may consider different types of switches instead of a reed switch. If you have a smaller box, you might want to check out the other sound modules we carry. For example: an Audio-Sound Breakout - WTV020SD with an Arduino Pro Mini 3.3V as the development board. Please keep in mind when changing the parts to get the appropriate motors and power supply.
Example Code
Before uploading code, make sure to install the SFEMP3 library.
When you are ready, copy the following code and upload it to your Arduino!
language:c
//SFEMP3Library author Bill Porter
//SFEMP3Library author Michael P. Flaga
/* MP3 Player Shield Music Box Code Example:
  SparkFun Electronics, Pamela, 1/24/2013
  Beerware License

  Hardware Connections:
  -LED = D3 on MP3 Player Shield;
  -Motor = D5 on MP3 Player Shield;
  -Reed Switch = D4 on MP3 Player Shield;
  -Mono Audio Amp Breakout Board Shutdown Pin = D10 on MP3 Player Shield;
  You will need to solder header pins to the MP3 Player Shield.
  Put the shield on top of an Arduino Uno.

  Usage:
  When the door opens, the motor will spin and a sound file will play.
  The sound file will loop.
  Then when the door closes the motor stops spinning and a new track plays one time. */

#include <SPI.h>

//Add the SdFat Libraries
#include <SdFat.h>
#include <SdFatUtil.h>
//and the MP3 Shield Library
#include <SFEMP3Shield.h>

SFEMP3Shield MP3player;

int led = 3;
int motor = 5;
int reedSwitch = 4;
int speaker = 10;

int fadeAmount = 5;
int brightness = 0;
boolean active = false;


void setup() {
  pinMode(motor, OUTPUT); //Motor
  pinMode(led, OUTPUT); // LED
  pinMode(reedSwitch, INPUT); //Reed Switch
  pinMode(speaker, OUTPUT); //Speaker Enable

  analogWrite(led, 0); //LED off
  digitalWrite(reedSwitch, HIGH); //turn on internal pullups for reed input
  digitalWrite(motor, LOW); //Motor off

  MP3player.begin();
  MP3player.SetVolume(0x00, 0x00); //set volume
}

void loop() {

  if (digitalRead(reedSwitch) == HIGH && !active)//when door opens
  {
    active = true;
    analogWrite(led, 80);
    digitalWrite(speaker, HIGH);
    digitalWrite(motor, HIGH);
    MP3player.stopTrack();
    MP3player.playTrack(3);
  }
  else if (digitalRead(reedSwitch) == LOW && active)//when door closing
  {
    active = false;
    MP3player.stopTrack();
    MP3player.playTrack(2);
    digitalWrite(motor, LOW);
    analogWrite(led, 255);
  }
  else if (digitalRead(reedSwitch) == LOW) //while door is closed
  {
    analogWrite(led, 0);
    digitalWrite(motor, LOW);
  }
  else
  {
    MP3player.playTrack(1);
    analogWrite(led, brightness);
    if (brightness == 0 || brightness == 255) {
      fadeAmount = -fadeAmount;
    }
    brightness += fadeAmount;
  }

  delay(100);
}
See it in Action!
As with any DIY project, you should always customize and tweak what you want for maximum awesomeness!
There was a lot of lessons learned in this Demo Project. The biggest one is to have patience with the wood glue. As you can see little nails were used in place due to lack of time/patience. If you are making a project like this one as a gift with limited time, remember to KISS! (Keep It Simple, Stupid!)
Resources and Going Further
If you liked this project, you might want to check out the Elevator TARDIS tutorial too!
 |
| Elevator TARDIS Tutorial |
Need some inspiration for your next project? Check out these other projects!