OLED Display Hookup Guide
This Tutorial is Retired!
This tutorial covers concepts or technologies that are no longer current. It's still here for you to read and enjoy, but may not be as useful as our newest tutorials.
 Joel_E_B
 Introduction
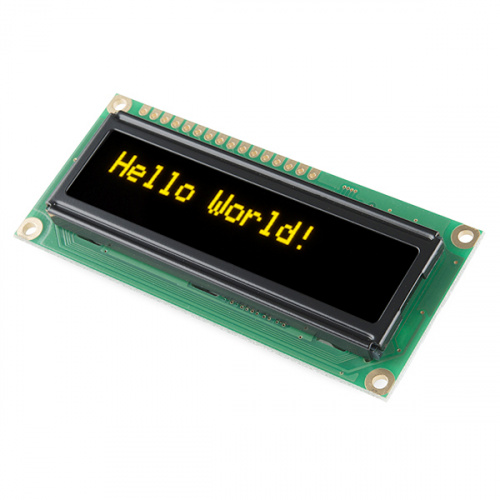
The 16x2 Character OLED Display from SparkFun is a great way to add a readable interface to your next project. In this hookup guide, we'll go over the basics to get this display up and running.
Suggested Reading
You should have a good understanding of the following concepts. If you need a refresher, head on over to one of these other tutorials.
Hardware Overview
This may look like your average LCD, but it has one major feature that stands out, an Organic LED (OLED) display. Typically, LCDs have a transparent screen on which the characters are displayed. These characters are then lit up by lighting a backlight that lives behind the screen. However, the characters in this display are made up of individual OLEDs. These tiny LEDs light up to create the characters seen as well as illuminate the screen. One of the major advantages of this method is that it takes less power to light the OLEDs than it does a traditional backlight. You also end up with a lower profile part on account of the backlight taking up a lot of space on a traditional LCD.
Power
The OLED Display should be powered at 5V, and should not be powered with more than 5.3V. The minimum supply voltage is 3V. Thus, you can get away with powering the display with 3.3V. It uses about 30mA when powered at 5V.
Pinout
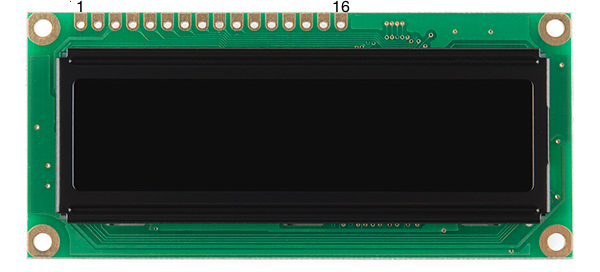
There are 16 pins total, however only nine of them are needed to power and communicate with the display. As per the datasheet, here is the pinout. Take note of this table, as it will be needed to hookup the display in the next section.
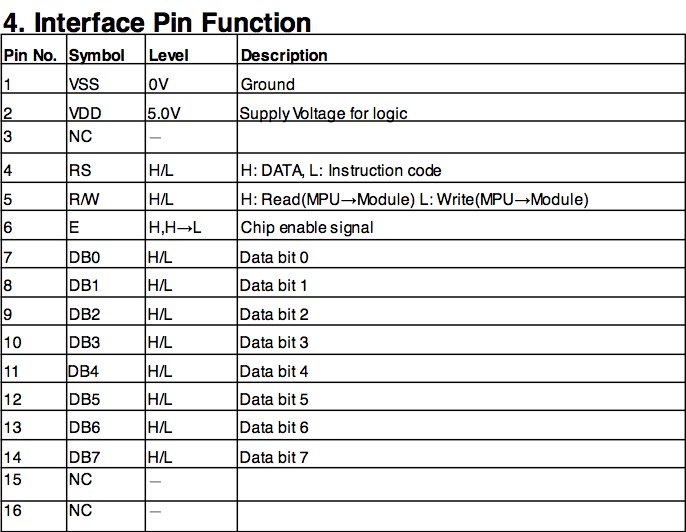
For more information about the OLED Display, please review the datasheet.
Hooking it Up
In order to use your OLED Display, the first thing you'll need to do is decide how you want to make your connections.
One option is to solder wires directly to the display. This is only recommended if you are going to be adding it to a final project.
The second, more temporary, way to hook up the display is to solder some straight male headers onto it. This will allow you to connect it to a breadboard for prototyping.

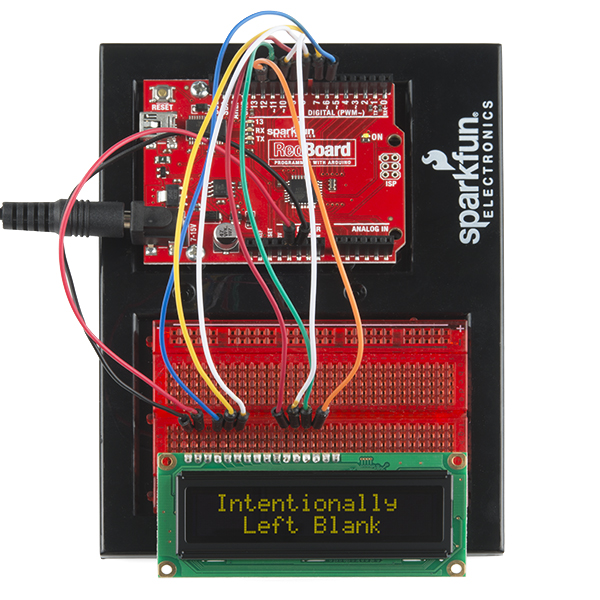
Once you have a way to connect wires to your display, you can now wire it up to your microcontroller of choice. In this example, we're going to use an Arduino Uno to control the display. You will also need some jumper wires to connect it to the Arduino.
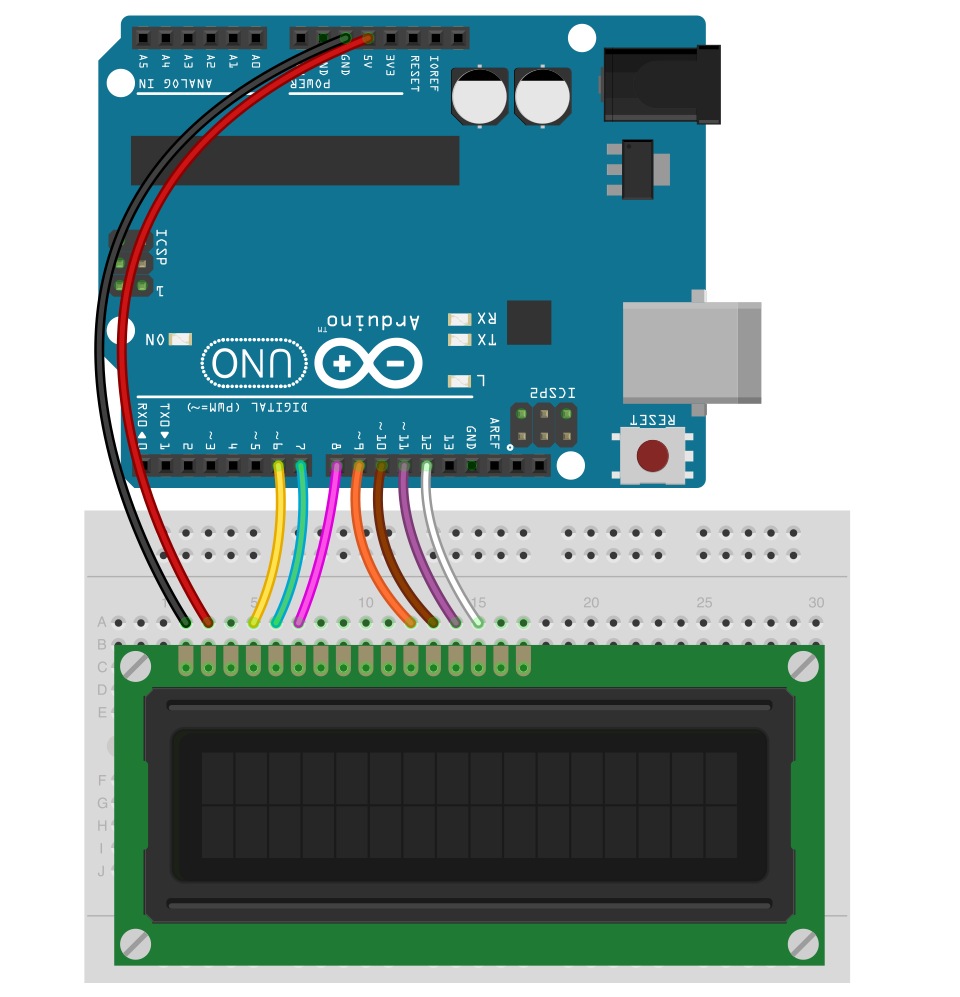
Now, let's connect the OLED Display to the Arduino. Using the table from the previous section and looking ahead to the firmware section, you'll see a table in the code. Using both, you can connect every pin used on the display to the corresponding pin on the Arduino. The following digram shows you how to wire everything.
With that, you're now ready to upload some code and get the display printing.
Firmware
For this example, we'll be using the Adafruit OLED library fork by Technobly found on GitHub.
Download the library, and copy it to your libraries folder in Arduino. If you need a refresher on how to install a library, check out our tutorial.
Once you have the library installed, you can copy this example sketch into the Arduino IDE.
language:c
/*
Based on the LiquidCrystal Library

 Demonstrates the use a SparkFun 16x2 OLED display. This OLED screen
 utilizes the RS0010 chipset instead of the HD44780 chipset which means
 the pin out will be slightly different.  You will need 7 general
 I/O pins to interface to this screen and 2 pins for power.

  The circuit:
 * GND (pin 1) to GND
 * VDD (pin 2) to 5V
 * RS (pin4) to digital pin 6
 * R/W (pin 5) to digital pin 7
 * Enable (pin 6) to digital pin 8
 * D4 (pin 11) to digital pin 9
 * D5 (pin 12) to digital pin 10
 * D6 (pin 13) to digital pin 11
 * D7 (pin 14) to digital pin 12


 There is no need for the contrast pot as used in the LCD tutorial

 Library originally added 18 Apr 2008
 by David A. Mellis
 library modified 5 Jul 2009
 by Limor Fried (http://www.ladyada.net)
 example added 9 Jul 2009
 by Tom Igoe
 modified 22 Nov 2010
 by Tom Igoe
 Library & Example Converted for OLED
 by Bill Earl 30 Jun 2012

 This example code is in the public domain.
 */

#include <Adafruit_CharacterOLED.h>//include the OLED library

// initialize the library with the OLED hardware
// version OLED_Vx and numbers of the interface pins.
// OLED_V1 = older, OLED_V2 = newer. If 2 doesn't work try 1 ;)
Adafruit_CharacterOLED lcd(OLED_V2, 6, 7, 8, 9, 10, 11, 12);

void setup()
{
  lcd.begin(16, 2);// Initialize the LCD with 16 characters and 2 lines
}

void loop()
{
  scrollingMarquee();
  counter();
  tempAndHumidity();
 }
//-------------------------------------------------------------------------------------------
void scrollingMarquee()
{
//This function scroll text across the screen on both lines
  lcd.clear(); // it's always good to clear the screen before movonh onto a new print
  for(int j = 0; j < 17; j++)
  {
    lcd.setCursor(0, 0);
    lcd.print("SPARK");
    lcd.setCursor(0, 1);
    lcd.print(" FUN ");

    lcd.scrollDisplayRight();

    delay(100);

  }
}
//-------------------------------------------------------------------------------------------
void counter()
{
  //this function prints a simple counter that counts to 10
  lcd.clear();
  for(int i = 0; i <= 10; i++)
  {
    lcd.home();// set the cursor to column 0, line 1
    lcd.print("Counter = ");
    lcd.print(i, DEC);
    delay(500);
    lcd.clear();
  }
}


//-------------------------------------------------------------------------------------------
void tempAndHumidity()
{
  //this function shows how you could read the data from a temerature and humidity
  //sensor and then print that data to the LCD.

  //these could be varaibles instead of static numbers
  float tempF = 77.0;
  float tempC = 25.0;
  float humidity = 67.0;

  lcd.clear();
  lcd.home();
  lcd.print(" Temp = ");
  lcd.print((long)tempF, DEC);
  lcd.print("F ");
  lcd.print((long)tempC, DEC);
  lcd.print("C");
  lcd.setCursor(0, 1);
  lcd.print(" Humidity = ");
  lcd.print((long)humidity, DEC);
  lcd.print("%");
  delay(2500);
}
//-------------------------------------------------------------------------------------------
This example is very similar to the example sketch that comes with the library, but it adds a few more demonstration functions. The first function scrolls some text across the screen. The second function displays a simple counter. And the third function shows how you could display data from sensors or other variables to the display. These are just a few of the functions you can use to control the OLED display. Explore the library more to see what else is possible, or create your own functions.
Resources and Going Further
Thanks for reading. You should now have a good understanding of how the OLED display works and how you can control it to add a nice, readable interface to your next project.
For more information about the OLED display, check out the resources below:
Here are some other tutorials you may want to explore:
- Want to add some text to your next project, but don't need a 16x2 character display? Try using one of our OpenSegment displays to suite your needs.
- You could build a magic 8 ball (or an Uncertain 7 cube) that uses an OLED display to tell the future.
- Make wearable projects that provide some data or feedback to the user, like the Dungeons and Dragons Dice Gauntlet.