Programming the pcDuino
This Tutorial is Retired!
This tutorial covers concepts or technologies that are no longer current. It's still here for you to read and enjoy, but may not be as useful as our newest tutorials.
 SFUptownMaker
I2C Communications
I2C communication on the pcDuino is pretty easy.
Hardware
As with serial communications, there are several I2C bus devices, but only one (/dev/i2c-2) is readily available to the user. A very, very important feature to take note of is that the I2C bus speed is fixed at 200kHz, which means that some devices may not work on the pcDuino I2C bus. The bus speed is fixed at driver compile time and cannot be changed from user space.
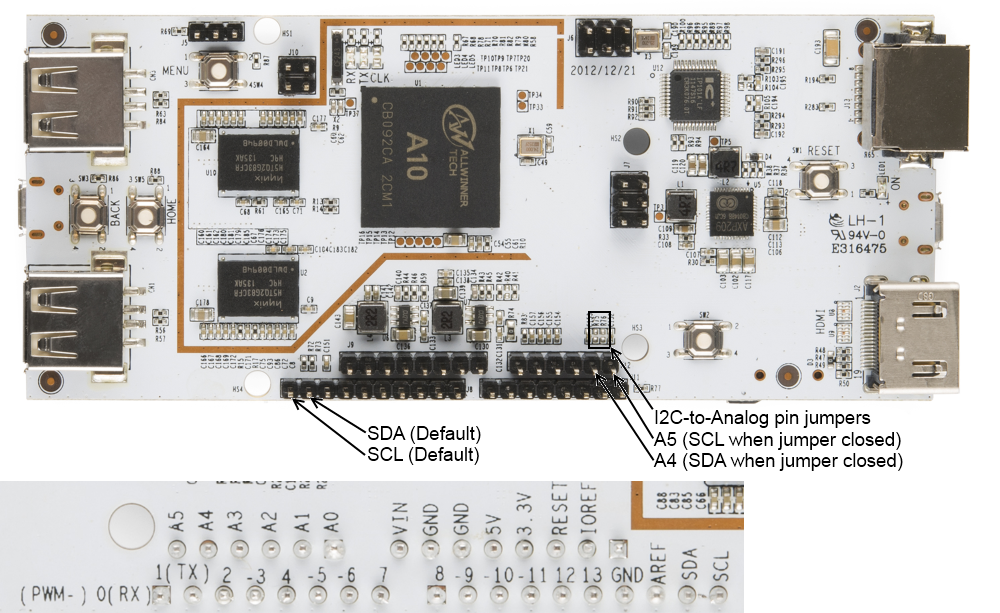
The pcDuino has on-board 2.2k pull-up resistors. These are pinned out to the Arduino-ish header, to the location typical for Arduino Uno R3 and later boards. On older boards, the pins were shared with analog inputs 4 and 5; there are solder jumpers on the pcDuino which allow you to redirect the SDA and SCL lines to those pins if you so desire. They're labeled on the image above, and they're designated R75 and R76.
There's also a lovely set of tools that allow you to twiddle around with the I2C bus a bit without writing any code. To install this toolset, open a command line and type
language:text
sudo apt-get install i2c-tools
These tools can be a valuable sanity check for your hardware, so you can verify that problems you're seeing are, in fact, in your code.
I2C Communications in C++
This simple program will connect to a couple of devices on the I2C port, read their device ID registers, and print them to the command line. The board used for the example is a SparkFun 6DOF Digital, but the principle is the same for any devices.
language:cpp
#include <stdlib.h>
#include <unistd.h>
#include <linux/i2c.h>
#include <linux/i2c-dev.h>
#include <sys/ioctl.h>
#include <fcntl.h>
#include <string.h>
#include <stdio.h>

int main(void)
{
  // Set up some variables that we'll use along the way
  char rxBuffer[32];  // receive buffer
  char txBuffer[32];  // transmit buffer
  int gyroAddress = 0x68; // gyro device address
  int xlAddress = 0x53;   // accelerometer device address
  int tenBitAddress = 0;  // is the device's address 10-bit? Usually not.
  int opResult = 0;   // for error checking of operations

  // Create a file descriptor for the I2C bus
  int i2cHandle = open("/dev/i2c-2", O_RDWR);

  // Tell the I2C peripheral that the device address is (or isn't) a 10-bit
  //   value. Most probably won't be.
  opResult = ioctl(i2cHandle, I2C_TENBIT, tenBitAddress);

  // Tell the I2C peripheral what the address of the device is. We're going to
  //   start out by talking to the gyro.
  opResult = ioctl(i2cHandle, I2C_SLAVE, gyroAddress);

  // Clear our buffers
  memset(rxBuffer, 0, sizeof(rxBuffer));
  memset(txBuffer, 0, sizeof(txBuffer));

  // The easiest way to access I2C devices is through the read/write
  //   commands. We're going to ask the gyro to read back its "WHO_AM_I"
  //   register, which contains the I2C address. The process is easy- write the
  //   desired address, the execute a read command.
  txBuffer[0] = 0x00; // This is the address we want to read from.
  opResult = write(i2cHandle, txBuffer, 1);
  if (opResult != 1) printf("No ACK bit!\n");
  opResult = read(i2cHandle, rxBuffer, 1);
  printf("Part ID: %d\n", (int)rxBuffer[0]); // should print 105

  // Next, we'll query the accelerometer using the same process- but first,
  //   we need to change the slave address!
  opResult = ioctl(i2cHandle, I2C_SLAVE, xlAddress);
  txBuffer[0] = 0x00;  // This is the address to read from.
  opResult = write(i2cHandle, txBuffer, 1);
  if (opResult != 1) printf("No ACK bit!\n");
  opResult = read(i2cHandle, rxBuffer, 1);
  printf("Part ID: %d\n", (int)rxBuffer[0]); // should print 229
}
I2C in Python
Python has a support package much like pySerial to make interfacing with I2C devices easier. To install it, open a command line and type
language:text
sudo apt-get install python-smbus
SMBus is the name given to the I2C derivative used on PC motherboards. The main differences are hardware-level and not reflected in the user coding level, so we'll ignore them and just point out that the SMBus Python package can be used here.
This code does the same thing the C++ code does: queries the two devices on a 6DOF digital and prints the result to the command line.
language:python
#!/usr/bin/env python

import smbus

## As before, we'll create an alias for our addresses, just to make things
##   a bit easier and more readable later on.
gyroAddress = 0x68
xlAddress   = 0x53

## Initialize an smbus object. The parameter passed is the number of the I2C
##   bus; for the Arduino-ish headers on the pcDuino, it will be "2".
i2c = smbus.SMBus(2)

## With both of these devices, the first byte written specifies the address of
##   the register we want to read or write; for both devices, the device ID is
##   stored in location 0. Writing that address, than issuing a read, will
##   give us our answer.
i2c.write_byte(gyroAddress, 0)
print "Device ID: " + str(i2c.read_byte(gyroAddress)) ## should be 105

i2c.write_byte(xlAddress, 0)
print "Device ID: " + str(i2c.read_byte(xlAddress)) ## should be 229