ProtoSnap LilyPad Development Simple Hookup Guide
 jimblom
Hardware Explanation
The ProtoSnap LilyPad Simple is a mish-mash of three unique LilyPad boards. Each of those boards are connected together, so you can explore, experiment, and test your Arduino programs without having to worry about wiring (or conductively sewing) any of the boards together.
LilyPad Arduino Simple Board
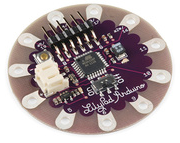
The LilyPad Arduino Simple is the brains of the ProtoSnap's operation. The heart of this board is that tiny black chip in the center – an ATmega328 microprocessor. A microprocessor is a tiny computer that can be programmed to interact with the LEDs, buzzers, and many other peripherals. The ATmega328 is one of our favorite microcontrollers - it's got a good set of inputs and outputs, lots of features, and it plays very nicely with the Arduino software.
The petals circling the LilyPad Arduino Simple board are the inputs and outputs of the microprocessor. The + and - petals are the power inputs to the chip, while the various A# and # labels are the outputs pins.
The other key components of this board are its two connectors. There's a beige, 2-pin JST connector, which mates with the included LiPo battery. The spiky, 6-pin connector facing the top of the board is the FTDI programming header. This connector interfaces with the included LilyPad FTDI Board, which we'll discuss a bit further below.
On top of that, there's a reset button, ON/OFF switch (which only works if the board is running off battery power), and two indicator LEDs (they're tiny, and hard to spot when the board is off).
LilyPad LED Boards

LEDs -- short for light-emitting diodes -- are the heart of every good, blinky electronics project. They're perfect for power indicators, debugging, or just adding a little zazz to your project.
LEDs have all sorts of light-related uses. You're no-doubt used to seeing them in light-emitting displays (clocks, traffic lights, signs, LCD backlights) or as energy-efficient light-sources (flashlights, architectural lighting), but they've also got less obvious light-related uses, like infrared remote controls, mouse-movement detectors, and they can even be hidden inside chips (optoisolators).
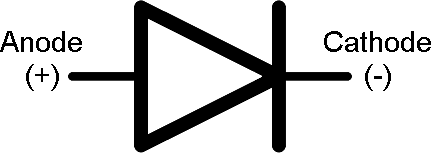
LEDs have two pins: an anode (+) and a cathode (-). When you apply the right amount of power to an LED, it will emit light.
The LilyPad LED boards have two petals labeled + and -. While the ProtoSnap remains unsnapped, the + pins each connect to a different pin on the LilyPad Arduino Simple board, while the - pins are all connected to ground.

In addition to the LED, the LilyPad LED boards also include a current limiting resistor (those tiny, little, black rectangles). An essential part to any LED circuit, these resistors help make sure you don't burn up your LEDs.
LilyPad Buzzer Board
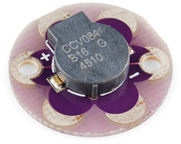
Finally we get to the buzzer. An essential piece to any project that intends to make some noise, even if that noise is the most annoying sound in the world (honestly, it's not gonna sound much better than that).
Buzzers like this can produce frequencies throughout most of our audible range. Feed it a series of tones and you can make musical melodies, special effect sounds, alarms, or whatever other sound-related application your project needs.
This buzzer board has two petals: a plus (+) and a minus (-). While living on the ProtoSnap, the - pin is tied to ground, and the + pin is tied to a pin on the LilyPad Arduino Simple. You'll be able to program the LilyPad Arduino Simple to toggle the + pin at different frequencies to create different tones.
LilyPad FTDI Basic Breakout
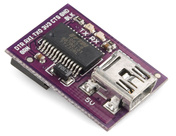
This board serves three separate purposes. First of all, it can power the LilyPad Arduino Simple. A power source for your project is one of the most important decisions you'll make. The FTDI Basic will source power from your computer's USB port, and relay it over to the LilyPad Arduino.
While powering the board is important, that's really what the battery is for. The FTDI Basic board's primary purpose is to help program your LilyPad Arduino Simple. The Arduino software interfaces with this board, which in turn interfaces with your LilyPad Simple board.
Finally, if a LiPo battery is connected to the LilyPad Arduino Simple board, power from the FTDI Basic will be used to charge that battery.
There are a couple LEDs on this board, labeled TX and RX, which will blink when data transfers from your computer to Arduino, or vice-versa. Look for them to blink like crazy when you upload code to the board.
Lithium Polymer (LiPo) Battery
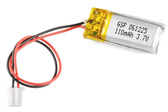
This little LiPo battery provides the power that is essential for most LilyPad projects. Instead of having to walk around with a USB cable coming out of your shorts, the battery gives you freedom to get your project running remotely.
We love LiPo batteries because they pack a lot of juice into a tiny package, they're generally easy to work with, and, best of all, they're rechargeable.
This single-cell LiPo will produce a voltage between about 3.6V and 4.2V, depending on its charge. The included battery has a rated capacity of 110mAh (that's miliamp-hours) which should be enough juice to power your project for at least three hours or so (assuming you're just blaring the LEDs and buzzer), probably much longer.
Eventually the LiPo battery will discharge to the point where it can't power the ProtoSnap. To charge the LiPo battery back up, you'll need to leave it connected to the LilyPad Arduino Simple board, while also plugging that board into an FTDI Basic Breakout (which should be connected to a USB cable...which should be connected to a computer's USB port. A lot of connecting). An orange charge LED indicator on the LilyPad Arduino Simple will turn on when the battery is charging, and will go off once the battery's full. It should take about an hour to charge the battery from dead to full.
LiPo batteries are wonderful, but they can prove dangerous if mishandled. Don't go stabbing it with an exacto knife, and only charge as detailed above.