Pushing Data to Data.SparkFun.com
This Tutorial is Retired!
This tutorial covers concepts or technologies that are no longer current. It's still here for you to read and enjoy, but may not be as useful as our newest tutorials.
 jimblom
Arduino & Ethernet Shield
The real sticking point with using Arduinos in Internet applications like this is finding a bridge between the lowly 8-bit microcontroller and the web. WiFi or Ethernet-enabling shields or breakout boards are usually the best option for that. If you don't mind being tied down by wires, Ethernet can be the faster, more reliable option of the two. The Ethernet Shield, and its variations like the PoEthernet Shield, equip your Arduino with all it needs to access a network and post data to a server over Ethernet.
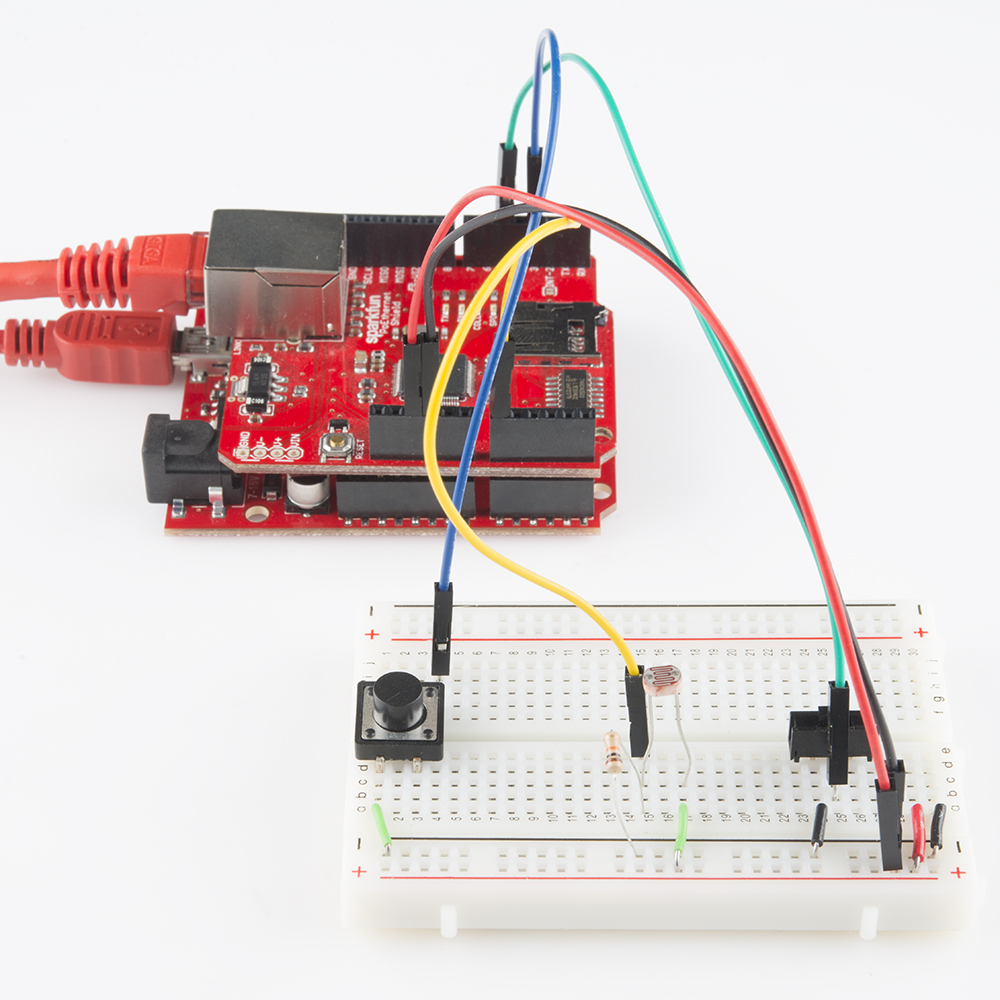
Arduino Example Circuit
We'll use this circuit for all four of the Arduino examples. A simple selection of digital and analog sensors are used to demonstrate the abilities of the Data.SparkFun.com service.
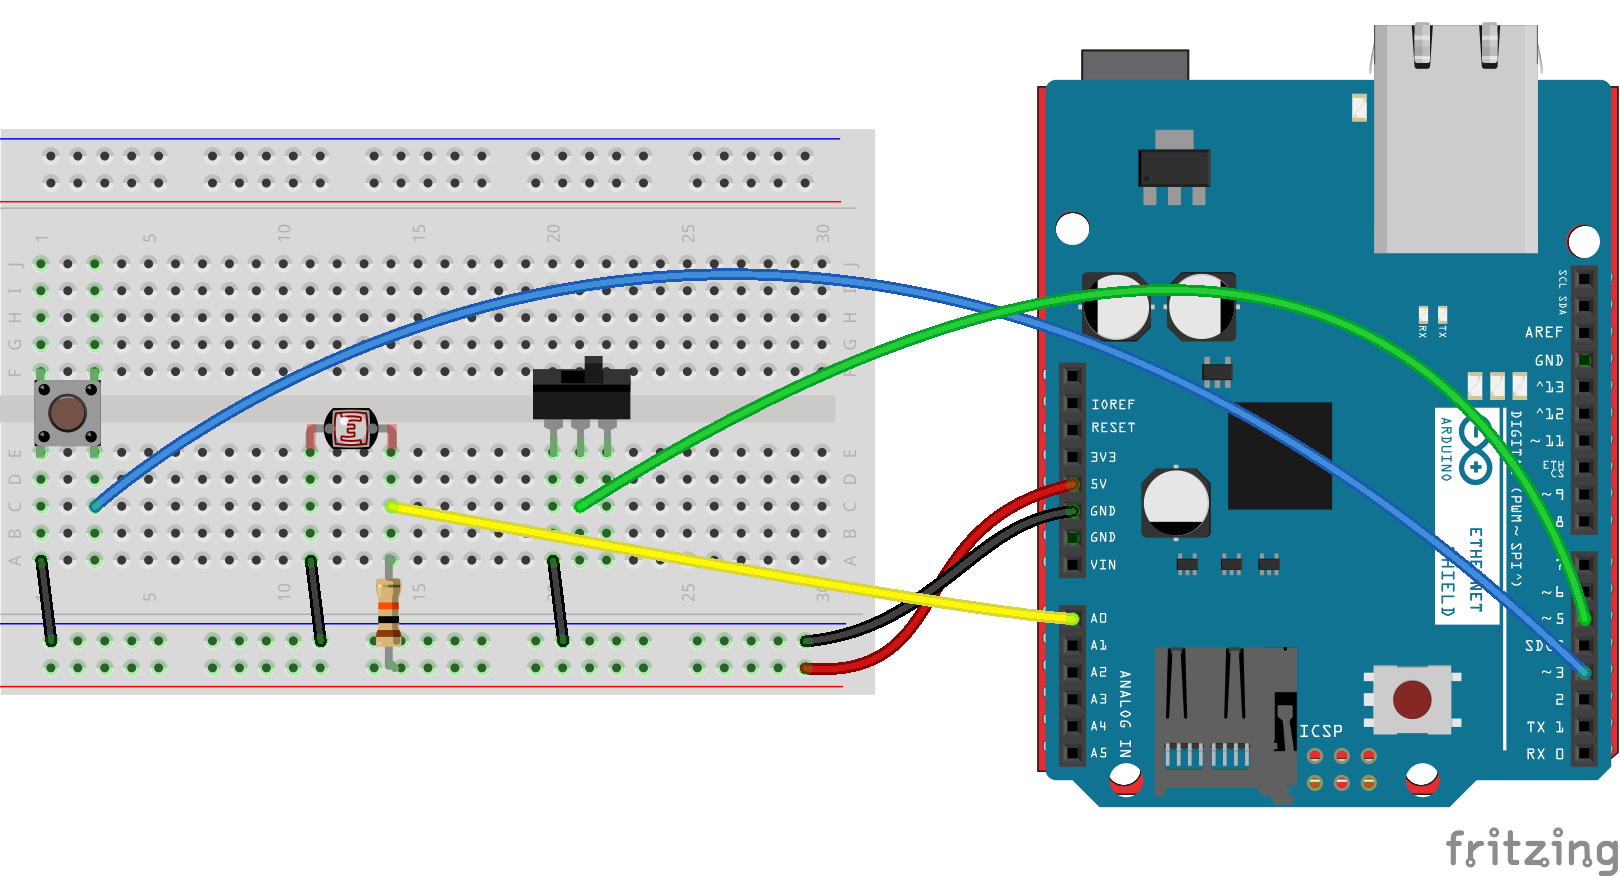
The output of a photocell (voltage divided with a 10kΩ resistor) connects to A0. A momentary push-button is connected to D3 on one end and ground on the other. And a SPDT switch can connect D5 to ground or let it float.
Ethernet Example Code
Here's an example sketch that posts data to Data.SparkFun.com using the Ethernet Shield. Copy and paste from below or click here to download the sketch.
language:c
/*****************************************************************
Phant_Ethernet.ino
Post data to SparkFun's data stream server system (phant) using
an Arduino and an Ethernet Shield.
Jim Lindblom @ SparkFun Electronics
Original Creation Date: July 3, 2014

This sketch uses an Arduino Uno to POST sensor readings to
SparkFun's data logging streams (http://data.sparkfun.com). A post
will be initiated whenever pin 3 is connected to ground.

Before uploading this sketch, there are a number of global vars
that need adjusting:
1. Ethernet Stuff: Fill in your desired MAC and a static IP, even
   if you're planning on having DCHP fill your IP in for you.
   The static IP is only used as a fallback, if DHCP doesn't work.
2. Phant Stuff: Fill in your data stream's public, private, and
data keys before uploading!

Hardware Hookup:
  * These components are connected to the Arduino's I/O pins:
    * D3 - Active-low momentary button (pulled high internally)
    * A0 - Photoresistor (which is combined with a 10k resistor
           to form a voltage divider output to the Arduino).
    * D5 - SPDT switch to select either 5V or 0V to this pin.
  * A CC3000 Shield sitting comfortable on top of your Arduino.

Development environment specifics:
    IDE: Arduino 1.0.5
    Hardware Platform: RedBoard & PoEthernet Shield

This code is beerware; if you see me (or any other SparkFun
employee) at the local, and you've found our code helpful, please
buy us a round!

Much of this code is largely based on David Mellis' WebClient
example in the Ethernet library.

Distributed as-is; no warranty is given.
*****************************************************************/
#include <SPI.h> // Required to use Ethernet
#include <Ethernet.h> // The Ethernet library includes the client
#include <Progmem.h> // Allows us to sacrifice flash for DRAM

///////////////////////
// Ethernet Settings //
///////////////////////
// Enter a MAC address for your controller below.
byte mac[] = { 0xDE, 0xAD, 0xBE, 0xEF, 0xFE, 0xED };
// if you don't want to use DNS (and reduce your sketch size)
// use the numeric IP instead of the name for the server:
//IPAddress server(54,86,132,254);  // numeric IP for data.sparkfun.com
char server[] = "data.sparkfun.com";    // name address for data.sparkFun (using DNS)
// Set the static IP address to use if the DHCP fails to assign
IPAddress ip(192,168,0,177);

// Initialize the Ethernet client library
// with the IP address and port of the server
// that you want to connect to (port 80 is default for HTTP):
EthernetClient client;

/////////////////
// Phant Stuff //
/////////////////
const String publicKey = "6JZbNolApzF4om2l9yYK";
const String privateKey = "Ww0vPW1yrkUNDqWPV9jE";
const byte NUM_FIELDS = 3;
const String fieldNames[NUM_FIELDS] = {"light", "switch", "name"};
String fieldData[NUM_FIELDS];

//////////////////////
// Input Pins, Misc //
//////////////////////
const int triggerPin = 3;
const int lightPin = A0;
const int switchPin = 5;
String name = "Ether-anon";
boolean newName = true;

void setup()
{
  Serial.begin(115200);

  // Setup Input Pins:
  pinMode(triggerPin, INPUT_PULLUP);
  pinMode(switchPin, INPUT_PULLUP);
  pinMode(lightPin, INPUT_PULLUP);

  // Set Up Ethernet:
  setupEthernet();

  Serial.println(F("=========== Ready to Stream ==========="));
  Serial.println(F("Press the button (D3) to send an update"));
  Serial.println(F("Type your name (no spaces!), followed by '!' to update name"));
}

void loop()
{
  // If the trigger pin (3) goes low, send the data.
  if (!digitalRead(triggerPin))
  {
    // Gather data:
    fieldData[0] = String(analogRead(lightPin));
    fieldData[1] = String(digitalRead(switchPin));
    fieldData[2] = name;

    Serial.println("Posting!");
    postData(); // the postData() function does all the work,
                // check it out below.

    delay(1000);
  }

  // Check for a new name input:
  if (Serial.available())
  {
    char c = Serial.read();
    if (c == '!')
    {
      newName = true;
      Serial.print("Your name is ");
      Serial.println(name);
    }
    else if (newName)
    {
      newName = false;
      name = "";
      name += c;
    }
    else
    {
      name += c;
    }
  }
}

void postData()
{
  // Make a TCP connection to remote host
  if (client.connect(server, 80))
  {
    // Post the data! Request should look a little something like:
    // GET /input/publicKey?private_key=privateKey&light=1024&switch=0&name=Jim HTTP/1.1\n
    // Host: data.sparkfun.com\n
    // Connection: close\n
    // \n
    client.print("GET /input/");
    client.print(publicKey);
    client.print("?private_key=");
    client.print(privateKey);
    for (int i=0; i<NUM_FIELDS; i++)
    {
      client.print("&");
      client.print(fieldNames[i]);
      client.print("=");
      client.print(fieldData[i]);
    }
    client.println(" HTTP/1.1");
    client.print("Host: ");
    client.println(server);
    client.println("Connection: close");
    client.println();
  }
  else
  {
    Serial.println(F("Connection failed"));
  }

  // Check for a response from the server, and route it
  // out the serial port.
  while (client.connected())
  {
    if ( client.available() )
    {
      char c = client.read();
      Serial.print(c);
    }
  }
  Serial.println();
  client.stop();
}

void setupEthernet()
{
  Serial.println("Setting up Ethernet...");
  // start the Ethernet connection:
  if (Ethernet.begin(mac) == 0) {
    Serial.println(F("Failed to configure Ethernet using DHCP"));
    // no point in carrying on, so do nothing forevermore:
    // try to congifure using IP address instead of DHCP:
    Ethernet.begin(mac, ip);
  }
  Serial.print("My IP address: ");
  Serial.println(Ethernet.localIP());
  // give the Ethernet shield a second to initialize:
  delay(1000);
}
No library additions are required, since the Ethernet library used here is included with Arduino.
Unmodified, this example sketch should post to our example stream whenever you press the button connected to D3.
Modifying Ethernet and Phant Settings
Before uploading the sketch there are a few global variables you'll need to adjust. First off, depending on your network, you may need to adjust some Ethernet-specific values. These are listed under the "Ethernet Settings" heading:
language:c
///////////////////////
// Ethernet Settings //
///////////////////////
// Enter a MAC address for your controller below.
byte mac[] = { 0xDE, 0xAD, 0xBE, 0xEF, 0xFE, 0xED };
// if you don't want to use DNS (and reduce your sketch size)
// use the numeric IP instead of the name for the server:
//IPAddress server(54,86,132,254);  // numeric IP for data.sparkfun.com
char server[] = "data.sparkfun.com";    // name address for data.sparkFun (using DNS)
// Set the static IP address to use if the DHCP fails to assign
IPAddress ip(192,168,0,177);
The mac array -- a list of six HEX bytes -- can be changed to any value you require. Newer Ethernet shields may even have MAC address printed on them. Just make sure your MAC address is unique!
Unless your using something else, leave the server variable set to "data.sparkfun.com". Customize your IP address to match compatible values on your network -- this only becomes necessary if DHCP fails; the static IP is a fallback plan.
Next, you'll want to modify your data stream keys and fields. Those in the example sketch should work, feel free to post to our example stream, at least temporarily. To set it to your data stream, adjust the variables under the "Phant Stuff" heading:
language:c
/////////////////
// Phant Stuff //
/////////////////
const String publicKey = "6JZbNolApzF4om2l9yYK";
const String privateKey = "Ww0vPW1yrkUNDqWPV9jE";
const byte NUM_FIELDS = 3;
const String fieldNames[NUM_FIELDS] = {"light", "switch", "name"};
String fieldData[NUM_FIELDS];
The publicKey and privateKey variables will be given to you when you create your stream. You can also adjust the number of data fields and their names here as well. The values in the fieldNames string array should match exactly what you typed when you created the stream.
Running the Sketch
After you've fixed the WiFi and datastream settings, upload the sketch. Then open the Serial Monitor and set the baud rate to 115200 bps. Some debug messages will flow by at the start. Once you see your IP address printed, your Arduino is connected and you're ready to post some data.

One of the fields in this example pushes a name to the server. If you want to update the name value, type in your name into the Serial Monitor and terminate it with a '!'.
To push your data to the server, simply press the button tied to D3 (or just short that pin to ground). A few serial lines will quickly be printed. Check to make sure HTTP/1.1 200 OK is somewhere among those lines -- that means the server accepted your request.
Going Further
To further customize the sketch, you'll want to mess around with the "gathering data" stage. In this example, a trio of lines load data into the fieldData array, converting each into a string beforehand. Those values from fieldData are later used in the postData() function when the HTTP GET string is formulated.
Most of the importatnt stuff happens in the postData() function. Here you'll find an example for creating an HTTP GET, and routing it out to the server. Check out the comments for a line-by-line dissection of the code.