Pushing Data to Data.SparkFun.com
This Tutorial is Retired!
This tutorial covers concepts or technologies that are no longer current. It's still here for you to read and enjoy, but may not be as useful as our newest tutorials.
 jimblom
Raspberry Pi (Python)
The multi-talented Raspberry Pi has no shortage of tools for posting data to web servers. You could use a shell script and cURL, similar to what we did on the Yun, but in this example we'll use Python, which pairs nicely with the Pi's RPi.GPIO module.
If you haven't used Python on the Pi to read-and-write to I/O pins, check out our Raspberry gPIo tutorial. This tutorial leans on that to read the status of a couple input pins.
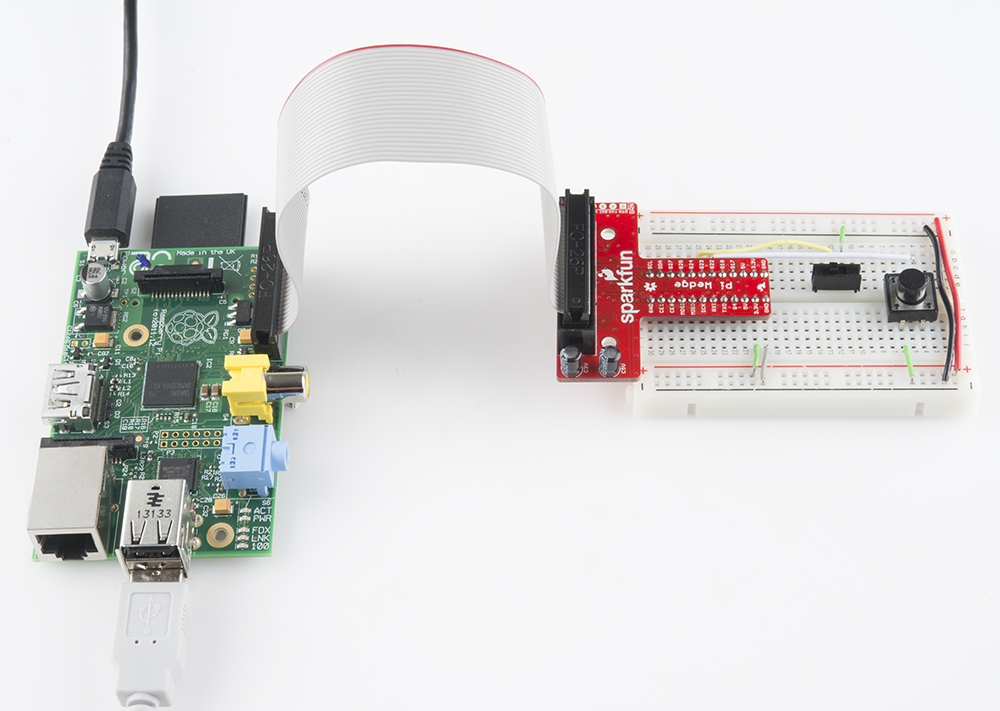
Example Circuit
Our simple example circuit changes a little bit in this case. The Pi doesn't have analog inputs, so we can't plug the photocell in, but we'll still use a button and switch:
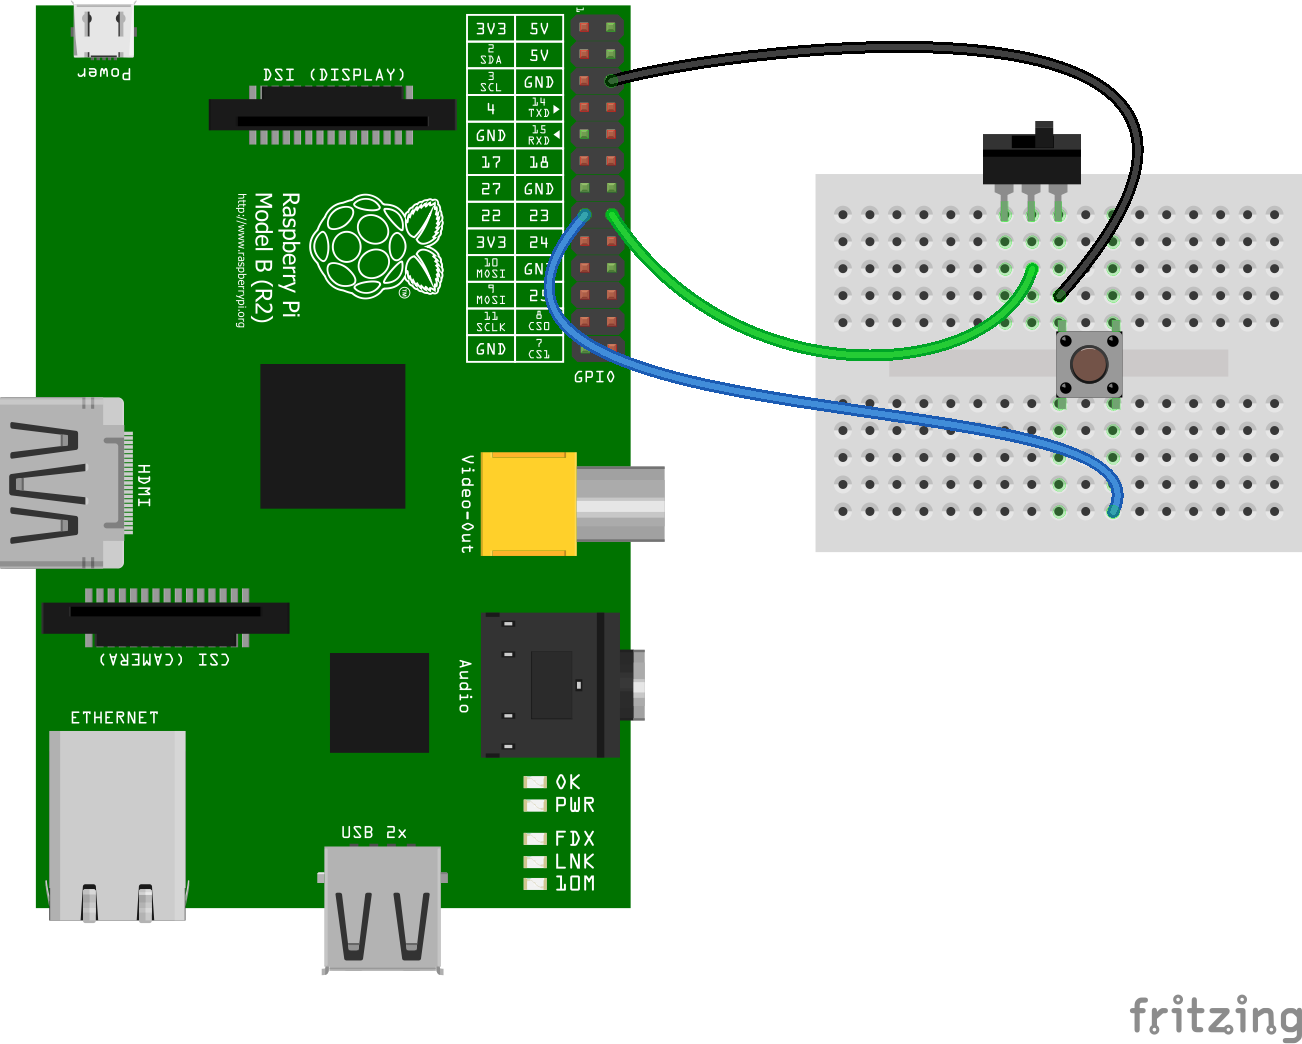
The button is connected to the Pi's pin 22 (that's the Broadcom chip pin), and the switch output is connected to pin 23.
If you have a Pi Wedge, it makes the job of wiring to the Pi much easier.
Example Script
Right-click and Save Link As to download the example python script, or copy and paste from below. We've named our file phant-raspi.py, if you're making the file on your own. Place it in an easily-accesible directory on your Pi.
language:c
########################################################################
# phant-raspi.py
# Raspberry Pi Phant Example
# Jim Lindblom @ SparkFun Electronics
# July 7, 2014
#
# This example demonstrates how to post data to a phant server (e.g.
#   data.sparkfun.com) using python on a Raspberry Pi.
#   The RPi.GPIO module is used to enable I/O reading and writing.
#   Before running this script, make sure to update your public and
#   private keys (publicKey and privateKey vars).
#
# Development environment specifics:
#   Raspberry Pi rev 2
#
# This code is beerware; if you see me (or any other SparkFun employee)
# at the local, and you've found our code helpful, please buy us a round!
# Distributed as-is; no warranty is given.
########################################################################

import RPi.GPIO as GPIO  # RPi.GPIO used for GPIO reading/writing
import time              # time used for delays
import httplib, urllib   # http and url libs used for HTTP POSTs
import socket            # socket used to get host name/IP

#################
## Phant Stuff ##
#################
server = "data.sparkfun.com" # base URL of your feed
publicKey = "6JZbNolApzF4om2l9yYK" # public key, everyone can see this
privateKey = "Ww0vPW1yrkUNDqWPV9jE"  # private key, only you should know
fields = ["light", "switch", "name"] # Your feed's data fields

######################
## I/O Stuff & Misc ##
######################
buttonPin = 22 # Active-low button connected to Broadcom pin 22
switchPin = 23 # SPST switch connected to Broadcom pin 23
myname = socket.gethostname() # Send local host name as one data field

##############
## I/O Setup #
##############
GPIO.setmode(GPIO.BCM) # Broadcom pin-numbering scheme
GPIO.setup(buttonPin, GPIO.IN, pull_up_down=GPIO.PUD_UP) # Button pin set as input w/ pull-up
GPIO.setup(switchPin, GPIO.IN, pull_up_down=GPIO.PUD_UP) # Switch set as input w/ pull-up

##########
## Loop ##
##########
print("Here we go! Press CTRL+C to exit")
try:
    # Loop until CTRL+C is pressed
    while 1:
        # If the button is pressed, we'll send our data. It's active-low
        # so we need to check if it's 0.
        if not (GPIO.input(buttonPin)):
            print("Sending an update!")
            # Our first job is to create the data set. Should turn into
            # something like "light=1234&switch=0&name=raspberrypi"
            data = {} # Create empty set, then fill in with our three fields:
            # Field 0, light, gets the local time:
            data[fields[0]] = time.strftime("%A %B %d, %Y %H:%M:%S %Z")
            # Field 1, switch, gets the switch status:
            data[fields[1]] = GPIO.input(switchPin)
            # Field 2, name, gets the pi's local name:
            data[fields[2]] = myname
            # Next, we need to encode that data into a url format:
            params = urllib.urlencode(data)

            # Now we need to set up our headers:
            headers = {} # start with an empty set
            # These are static, should be there every time:
            headers["Content-Type"] = "application/x-www-form-urlencoded"
            headers["Connection"] = "close"
            headers["Content-Length"] = len(params) # length of data
            headers["Phant-Private-Key"] = privateKey # private key header

            # Now we initiate a connection, and post the data
            c = httplib.HTTPConnection(server)
            # Here's the magic, our reqeust format is POST, we want
            # to send the data to data.sparkfun.com/input/PUBLIC_KEY.txt
            # and include both our data (params) and headers
            c.request("POST", "/input/" + publicKey + ".txt", params, headers)
            r = c.getresponse() # Get the server's response and print it
            print r.status, r.reason

            time.sleep(1) # delay for a second

except KeyboardInterrupt: # If CTRL+C is pressed, exit cleanly:
    GPIO.cleanup() # cleanup all GPIO
Now open up the terminal, and navigate to the directory where your script lives, and run it like this:
pi@raspberrypi ~/code/phant-pi $ sudo python phant-raspi.py
With the script running, when you connect the button pin (22) to ground it should send an update. A handful of messages will appear each time a message is sent. You want to see "200 OK" after the "Sending an Update!" message. That should indicate that the HTTP POST was succesfully sent.
To customize it to your own Phant stream, edit the public, private, and field keys in this section:
language:python
#################
## Phant Stuff ##
#################
server = "data.sparkfun.com" # base URL of your feed
publicKey = "6JZbNolApzF4om2l9yYK" # public key, everyone can see this
privateKey = "Ww0vPW1yrkUNDqWPV9jE"  # private key, only you should know
fields = ["light", "switch", "name"] # Your feed's data fields
You may also want to modify how the data for those fields is gathered. That happens near the very beginning of the lone if statement. Field 0 ("light") contains the current time/date, field 1 ("switch") contains the status of our switch, and field 2 ("name") contains the localhost name of your Pi.