Python GUI Guide: Introduction to Tkinter
 Shawn Hymel
Experiment 1: Temperature Converter
Before we connect any hardware, it can be helpful to try a more complicated example to get a feel for laying out a GUI and using Tkinter to build your vision. We'll start with a simple example: a Celsius-to-Fahrenheit temperature converter.
The Vision
Before writing any code, pull out a piece of paper and a pencil (or dry erase board and marker). Sketch out how you want your GUI to look: where should labels go? Do you want text entry fields at the top or the bottom? Should you have a "Quit" button, or let the user click the window's "Close" button?
Here is what I came up with for our simple converter application. Note that we can divide it into a simple 3x3 grid, as shown by the red lines (more or less--we might need to nudge some of the widgets to fit into their respective cells).
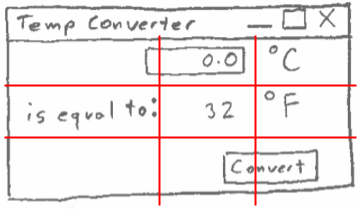
As a result, we can determine that using the grid manager would be the best for this layout.
Implementation
Copy the following code into your Python editor.
language:python
import tkinter as tk

# Declare global variables
temp_c = None
temp_f = None

# This function is called whenever the button is pressed
def convert():

    global temp_c
    global temp_f

    # Convert Celsius to Fahrenheit and update label (through textvariable)
    try:
        val = temp_c.get()
        temp_f.set((val * 9.0 / 5) + 32)
    except:
        pass

# Create the main window
root = tk.Tk()
root.title("Temperature Converter")

# Create the main container
frame = tk.Frame(root)

# Lay out the main container, specify that we want it to grow with window size
frame.pack(fill=tk.BOTH, expand=True)

# Allow middle cell of grid to grow when window is resized
frame.columnconfigure(1, weight=1)
frame.rowconfigure(1, weight=1)

# Variables for holding temperature data
temp_c = tk.DoubleVar()
temp_f = tk.DoubleVar()

# Create widgets
entry_celsius = tk.Entry(frame, width=7, textvariable=temp_c)
label_unitc = tk.Label(frame, text="°C")
label_equal = tk.Label(frame, text="is equal to")
label_fahrenheit = tk.Label(frame, textvariable=temp_f)
label_unitf = tk.Label(frame, text="°F")
button_convert = tk.Button(frame, text="Convert", command=convert)

# Lay out widgets
entry_celsius.grid(row=0, column=1, padx=5, pady=5)
label_unitc.grid(row=0, column=2, padx=5, pady=5, sticky=tk.W)
label_equal.grid(row=1, column=0, padx=5, pady=5, sticky=tk.E)
label_fahrenheit.grid(row=1, column=1, padx=5, pady=5)
label_unitf.grid(row=1, column=2, padx=5, pady=5, sticky=tk.W)
button_convert.grid(row=2, column=1, columnspan=2, padx=5, pady=5, sticky=tk.E)

# Place cursor in entry box by default
entry_celsius.focus()

# Run forever!
root.mainloop()
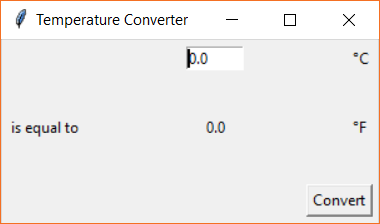
Give it a name like tkinter_temp_converter.py, and run it. You should see a new window appear with an area to type in a number (representing degrees Celsius). Press the "Convert" button, and the equivalent temperature in Fahrenheit should appear in the label next to "°F."

Code to Note
Let's break down some of the code we saw in the previous example. After importing Tkinter, we define our convert() function. This is a callback, as we pass the function as an argument to our button, and Tkinter calls our function whenever a button press event occurs (i.e. we never call convert() directly).
While not completely necessary, you'll notice that we declared temp_c and temp_f as global variables, as we want to be able to access them from within the function, and they were not passed in as parameters. Additionally, you'll see that we calculate temp_f within a try/except block. If the user enters a string (instead of numbers), our conversion will fail, so we just tell Python to ignore the exception and don't perform any calculation on the incorrectly typed data.
The next thing we do is create a frame within our main window and use the fill and expand parameters to allow it to grow with the window size.
language:python
# Create the main container
frame = tk.Frame(root)

# Lay out the main container, specify that we want it to grow with window size
frame.pack(fill=tk.BOTH, expand=True)
In our previous examples, we had been placing our widgets directly in the main window. This is generally not considered good practice, so we pack a frame within the window first, and then put our widgets within the frame. By doing this, we can more easily control how the widgets behave when we resize the window.
Before creating our widgets, we tell the frame that it should expand with the window if the user resizes it:
language:python
# Allow middle cell of grid to grow when window is resized
frame.columnconfigure(1, weight=1)
frame.rowconfigure(1, weight=1)
Note that because we used the pack() manager for the frame, we must tell column/rowconfigure that the location of the cell is (1, 1). If were were using these methods with a grid() manager, we could specify different rows and columns. The weight parameter tells the geometry manager how it should resize the given row/column proportionally to all the others. By setting this to 1 for each configure method, we're telling Tkinter to just resize the whole frame to fill the window. To learn more, see the Handling Resize section of this TkDocs article.
After that, we create our Tkinter Variables, temp_c and temp_f and create all of our widgets that belong in the frame. Note that we assign our convert() function to our button with command=convert parameter assignment. By doing this, we tell Tkinter that we want to call the convert() function whenever the button is pressed.
We then lay out each of the widgets using the grid geometry manager. We go through each widget and assign it to a cell location. There is nothing in the top-left cell (0, 0), so we leave it blank. We put the text entry widget in the next column over (0, 1) followed by the units (0, 2). We replicate this process for the next row (row 1) with the label for "is equal to," the solution, and the units for Fahrenheit. Finally, we add the convert button to the bottom-right. However, because the button is wider than the unit labels, we have it take up two cells: (2, 1) and (2, 2). We do that with columnspan=2, which works like the "merge" command in most modern spreadsheet programs.
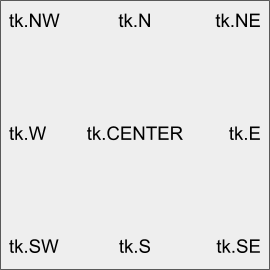
Note that in some of the .grid() layout calls, we use the sticky parameter. This tells the geometry manager how to put the widget in its cell. By default (i.e. not using sticky), the widget will be centered within the cell. tk.W says that the widget should be left-aligned in its cell, and tk.E says it should be right-alighted. You can use the following anchor constants to align your widget:
Finally, before running our mainloop, we tell Tkinter that the Entry box should have focus.
language:python
# Place cursor in entry box by default
entry_celsius.focus()
This places the cursor in the entry box so the user can immediately begin typing without having to click on the Entry widget.