Python GUI Guide: Introduction to Tkinter
 Shawn Hymel
Hello, World!
Let's start with a basic example. If you don't have a Raspberry Pi, you can install Python on your computer to run this demo and the "Temperature Converter" experiment.
Run the Program
Copy the following into a new file. Save it, and give it a name like tkinter_hello.py.
language:python
import tkinter as tk

# Create the main window
root = tk.Tk()
root.title("My GUI")

# Create label
label = tk.Label(root, text="Hello, World!")

# Lay out label
label.pack()

# Run forever!
root.mainloop()
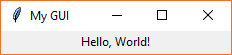
Run the program from the command line with python tkinter_hello.py. You should see a new window pop up with the phrase "Hello, World!" If you expand the window, you should see the phrase "My GUI" set in the title bar (you might have to expand the window to see it).
Code to Note
Let's break down the relatively simple program. In the first line,
language:python
import tkinter as tk
we import the Tkinter module and shorten the name to tk. We do this to save us some typing in the rest of the code: we just need to type tk instead of tkinter.
In other Tkinter guides, you might see the import written as from tkinter import *. This says to import all classes, functions, and variables from the Tkinter package into the global space. While this might make typing easier (e.g. you would only need to type Tk() instead of tk.Tk()), it has the downside of cluttering your global workspace. In a larger application, you would need to keep track of all these global variables in your head, which can be quite difficult! For example, Tkinter has a variable named E (which we'll see in a later example), and it's much easier to remember that you mean Tkinter's version of E (rather than E from another module) by having to write tk.E.
Next, we create a root window by calling Tkinter's constructor, tk.Tk().
language:python
root = tk.Tk()
This automatically creates a graphical window with the necessary title bar, minimize, maximize, and close buttons (the size and location of these are based on your operating system's preferences). We save a handle to this window in the variable root. This handle allows us to put other things in the window and reconfigure it (e.g. size) as necessary. For example, we can change the name in the title bar by calling the title method in the root window:
language:python
root.title("My GUI")
In this window, we can add various control elements, known as widgets. Widgets can include things like buttons, labels, text entry boxes, and so on. Here, we create a Label widget:
language:python
label = tk.Label(root, text="Hello, World!")
Notice that when we create any widget, we must pass it a reference to its parent object (the object that will contain our new widget). In this example, we want the root window to be the parent object of our label (i.e. root will own your label object). We also set the default message in the label to be the classic "Hello, World!"
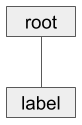
When it comes to creating GUIs with Tkinter, it's generally a good idea to create your widgets first and then lay out your widgets together within the same hierarchy. In this example, root is at the top of our hierarchy followed by our label object under that.
After creating our label, we lay it out using the pack() geometry manager.
language:python
label.pack()
A geometry manager is a piece of code that runs (as part of the Tkinter framework--we don't see the backend parts) to organize our widgets based on criteria that we set. pack() just tells the geometry manager to put widgets in the same row or column. It's usually the easiest to use if you just want one or a few widgets to appear (and not necessarily be nicely organized).
Finally, we tell Tkinter to start running:
language:python
root.mainloop()
Note that if we don't call mainloop(), nothing will appear on our screen. This method says to take all the widgets and objects we created, render them on our screen, and respond to any interactions (such as button pushes, which we'll cover in the next example). When we exit out of the main window (e.g. by pressing the close window button), the program will exit out of mainloop().