Python GUI Guide: Introduction to Tkinter
 Shawn Hymel
Tkinter Overview
This section is meant to give you an overview of the "building blocks" that are available in Tkinter and is in no way a complete list of classes, functions, and variables. The official Python docs and TkDocs offer a more comprehensive overview of the Tkinter package. Examples will be discussed in more details throughout this tutorial, but feel free to refer back to these reference tables as you build your own application.
Widgets
A widget is a controllable element within the GUI, and all Tkinter widgets have a shared set of methods. The Tkinter guide on effbot.org offers an easy-to-read reference for the core widget methods (these are the methods that all widgets have access to, regardless of which individual widget you might be using).
The following table shows all the core widgets with an example screenshot. Click on the widget name to view its reference documentation from effbot.org.
| Widget | Description | Example |
|---|---|---|
| Button | Clickable area with text that calls an associated function whenever the user clicks in the area. | 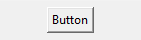 |
| Canvas | General purpose widget that can display simple graphics or provide an area to implement a custom widget. | 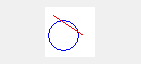 |
| Checkbutton | Allows a user to read and select between two distinct values (e.g. on/off). Also known as a "checkbox." |  |
| Entry | Area that allows the user to enter one line of text. For entering multiple lines, use the Text widget. |  |
| Frame | A container for other widgets. A Frame can be useful for grouping other widgets together in a complex layout. |  |
| Label | Used to display text or an image that may not be edited by the user. |  |
| LabelFrame | A rectangular area that contains other widgets, but unlike a Frame, a border and label may be added to help group widgets together. | 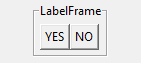 |
| Listbox | Displays a list of text alternatives. The user can choose (highlight) one or more options. | 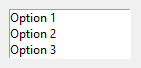 |
| Menu | Used to create menus and submenus within an interface. Can be used to create the always-shown "menu bar" popular in many GUI applications. |  |
| Menubutton | Obsolete as of Tk 8.0. Use Menu widget instead. | See Menu |
| Message | Used to display static text, like Label, but allows for multiple lines, text wrapping, and maintaining aspect ratios. |  |
| OptionMenu | Drop-down (or pop-up) menu that allows users to select one option from several options. | 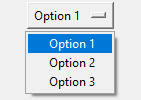 |
| PanedWindow | Container for one or more widgets split into multiple "panes." These panes can be resized by the user by dragging the serparator line(s) (known as "sashes"). |  |
| Radiobutton | Several Radiobuttons can be used together to allow the user to select one option out of a group of options. | 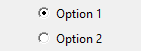 |
| Scale | User can select a numerical value by moving a slider. | 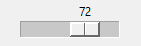 |
| Scrollbar | Paired with a Canvas, Entry, Listbox, or Text widget to allow for scrolling within that widget. | 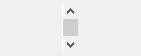 |
| Spinbox | Allows the user to select only one option out of a list of options. |  |
| Text | Area used to display and edit multiple lines of text. Can be used as a full text editor by the user. |  |
| Toplevel | A container for other widgets (much like the Frame widget) that appears in its own window. It can be useful for creating other application windows or pop-up notifications. | 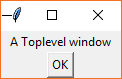 |
The code below was used to create the example widgets in the above table. Note that they are for demonstration purposes only, as much of the functionality has not been implemented (e.g. no functions for button pushes).
language:python
import tkinter as tk

# Create the main window
root = tk.Tk()
root.title("My GUI")

# Create a set of options and variable for the OptionMenu
options = ["Option 1", "Option 2", "Option 3"]
selected_option = tk.StringVar()
selected_option.set(options[0])

# Create a variable to store options for the Radiobuttons
radio_option = tk.IntVar()

###############################################################################
# Create widgets

# Create widgets
button = tk.Button(root, text="Button")
canvas = tk.Canvas(root, bg='white', width=50, height=50)
checkbutton = tk.Checkbutton(root, text="Checkbutton")
entry = tk.Entry(root, text="Entry", width=10)
frame = tk.Frame(root)
label = tk.Label(root, text="Label")
labelframe = tk.LabelFrame(root, text="LabelFrame", padx=5, pady=5)
listbox = tk.Listbox(root, height=3)
menu = tk.Menu(root)
# Menubutton: deprecated, use Menu instead
message = tk.Message(root, text="Message", width=50)
optionmenu = tk.OptionMenu(root, selected_option, *options)
panedwindow = tk.PanedWindow(root, sashrelief=tk.SUNKEN)
radiobutton_1 = tk.Radiobutton( root,
                                text="Option 1",
                                variable=radio_option,
                                value=1)
radiobutton_2 = tk.Radiobutton( root,
                                text="Option 2",
                                variable=radio_option,
                                value=2)
scale = tk.Scale(root, orient=tk.HORIZONTAL)
scrollbar = tk.Scrollbar(root)
spinbox = tk.Spinbox(root, values=(0, 2, 4, 10))
text = tk.Text(root, width=15, height=3)
toplevel = tk.Toplevel()

# Lay out widgets
button.pack(padx=5, pady=5)
canvas.pack(padx=5, pady=5)
checkbutton.pack(padx=5, pady=5)
entry.pack(padx=5, pady=5)
frame.pack(padx=5, pady=10)
label.pack(padx=5, pady=5)
labelframe.pack(padx=5, pady=5)
listbox.pack(padx=5, pady=5)
# Menu: See below for adding the menu bar at the top of the window
# Menubutton: deprecated, use Menu instead
message.pack(padx=5, pady=5)
optionmenu.pack(padx=5, pady=5)
panedwindow.pack(padx=5, pady=5)
radiobutton_1.pack(padx=5)
radiobutton_2.pack(padx=5)
scale.pack(padx=5, pady=5)
scrollbar.pack(padx=5, pady=5)
spinbox.pack(padx=5, pady=5)
text.pack(padx=5, pady=5)
# Toplevel: does not have a parent or geometry manager, as it is its own window

###############################################################################
# Add stuff to the widgets (if necessary)

# Draw something in the canvas
canvas.create_oval(5, 15, 35, 45, outline='blue')
canvas.create_line(10, 10, 40, 30, fill='red')

# Add a default value to the Entry widgets
entry.insert(0, "Entry")

# Create some useless buttons in the LabelFrame
button_yes = tk.Button(labelframe, text="YES")
button_no = tk.Button(labelframe, text="NO")

# Lay out buttons in the LabelFrame
button_yes.pack(side=tk.LEFT)
button_no.pack(side=tk.LEFT)

# Put some options in the Listbox
for item in ["Option 1", "Option 2", "Option 3"]:
    listbox.insert(tk.END, item)

# Add some options to the menu
menu.add_command(label="File")
menu.add_command(label="Edit")
menu.add_command(label="Help")

# Add the menu bar to the top of the window
root.config(menu=menu)

# Create some labels to add to the PanedWindow
label_left = tk.Label(panedwindow, text="LEFT")
label_right = tk.Label(panedwindow, text="RIGHT")

# Add the labels to the PanedWindow
panedwindow.add(label_left)
panedwindow.add(label_right)

# Put some default text into the Text widgets
text.insert(tk.END, "I am a\nText widget")

# Create some widgets to put in the Toplevel widget (window)
top_label = tk.Label(toplevel, text="A Toplevel window")
top_button = tk.Button(toplevel, text="OK", command=toplevel.destroy)

# Lay out widgets in the Toplevel pop-up window
top_label.pack()
top_button.pack()

###############################################################################
# Run!

root.mainloop()
Geometry Managers
Just instantiating (creating) a widget does not necessarily mean that it will appear on the screen (with the exception of Toplevel(), which automatically creates a new window). To get the widget to appear, we need to tell the parent widget where to put it. To do that, we use one of Tkinter's three geometery managers (also known as layout managers).
A geometry manager is some code that runs on the backend of Tkinter (we don't interact with the geometry managers directly). We simply choose which geometry manager we want to use and give it some parameters to work with.
The three geometry managers are: grid, pack, and place. You should never mix geometry managers within the same hierarchy, but you can embed different managers within each other (for example, you can lay out a frame widget with grid in a Toplevel and then use pack to put different widgets within the frame).
Here is a table showing examples of the different geometry managers:
| Manager | Description | Example |
|---|---|---|
| Grid | The grid manager places widgets in a table format with rows and columns. It will avoid overlapping widgets and will resize rows/columns as necessary to fit the widgets. | 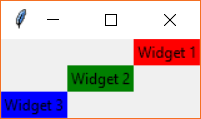 |
| Pack | Pack is often the easiest geometry manager to use, as it just puts widgets in a single row or column (default). It "packs" the widgets by putting them side-by-side (or top-to-bottom). | 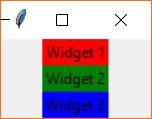 |
| Place | The place geometry manager offers the most control but can be the most difficult to use. It allows you to specify the absolute or relative positions of the widgets in a window (or parent widget). | 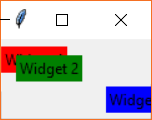 |
The code below was used to create the examples shown in the above table. Note that it creates 3 windows (1 with the Tk() constructor call and 2 others with Toplevel()) and uses different geometry managers to lay out 3 widgets in each.
language:python
import tkinter as tk

###############################################################################
# Grid layout example

# Create the main window (grid layout)
root = tk.Tk()
root.title("Grid")

# Create widgets
label_grid_1 = tk.Label(root, text="Widget 1", bg='red')
label_grid_2 = tk.Label(root, text="Widget 2", bg='green')
label_grid_3 = tk.Label(root, text="Widget 3", bg='blue')

# Lay out widgets in a grid
label_grid_1.grid(row=0, column=2)
label_grid_2.grid(row=1, column=1)
label_grid_3.grid(row=2, column=0)

###############################################################################
# Pack layout example

# Create another window for pack layout
window_pack = tk.Toplevel()
window_pack.title("Pack")

# Create widgets
label_pack_1 = tk.Label(window_pack, text="Widget 1", bg='red')
label_pack_2 = tk.Label(window_pack, text="Widget 2", bg='green')
label_pack_3 = tk.Label(window_pack, text="Widget 3", bg='blue')

# Lay out widgets with pack
label_pack_1.pack()
label_pack_2.pack()
label_pack_3.pack()

###############################################################################
# Place layout example

# Create another window for pack layout
window_place = tk.Toplevel()
window_place.title("Place")

# Create widgets
label_place_1 = tk.Label(window_place, text="Widget 1", bg='red')
label_place_2 = tk.Label(window_place, text="Widget 2", bg='green')
label_place_3 = tk.Label(window_place, text="Widget 3", bg='blue')

# Lay out widgets with pack
label_place_1.place(relx=0, rely=0.1)
label_place_2.place(relx=0.1, rely=0.2)
label_place_3.place(relx=0.7, rely=0.6)

###############################################################################
# Run!

root.mainloop()
Variables
If you want to dynamically change a widget's displayed value or text (e.g. change the text in a Label), you need to use one of Tkinter's Variables. This is because Python has no way of letting Tkinter know that a variable has been changed (known as tracing). As a result, we need to use a wrapper class for these variables.
Each Tkinter Variable has a get() and set() method so you can read and change with the Variable's value. This page also gives you a list of other methods available to each Variable. You must choose the appropriate Variable for the values you plan to work with, and this table shows you which Variables you have available:
| Manager | Description | Examples |
|---|---|---|
| BooleanVar | Works with Boolean values. | True, False |
| DoubleVar | Works with floating point values. | -68.0, 2.718281 |
| IntVar | Works with integer values. | -3, 0, 42 |
| StringVar | Works with strings. | "Hello", "world!" |
If you want to see this in action, run the following code:
language:python
import tkinter as tk

# Declare global variables
counter = None

# This function is called whenever the button is pressed
def count():

    global counter

    # Increment counter by 1
    counter.set(counter.get() + 1)

# Create the main window
root = tk.Tk()
root.title("Counter")

# Tkinter variable for holding a counter
counter = tk.IntVar()
counter.set(0)

# Create widgets (note that command is set to count and not count() )
label_counter = tk.Label(root, width=7, textvariable=counter)
button_counter = tk.Button(root, text="Count", command=count)

# Lay out widgets
label_counter.pack()
button_counter.pack()

# Run forever!
root.mainloop()
You should see a window appear with a number and button. Try pressing the button a few times to watch the number increment.
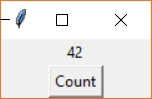
In the program, we create a button that calls the count() function whenever it is pressed. We also create an IntVar named counter and set its initial value to 0. Take a look at where we create the label:
language:python
label_counter = tk.Label(root, width=7, textvariable=counter)
You'll notice that we assign our IntVar (counter) to the textvariable parameter. This tells Tkinter that whenever the counter variable is changed, the Label widget should automatically update its displayed text. This saves us from having to write a custom loop where we manually update all the displayed information!
From here, all we need to do is worry about updating the counter variable each time the button is pressed. In the count() function, we do that with:
language:python
counter.set(counter.get() + 1)
Notice that we can't get the IntVar's value by the normal means, and we can't set it with the equals sign (=). We need to use the get() and set() methods, respectively.