Qwiic Atmospheric Sensor (BME280) Hookup Guide
 QCPete, santaimpersonator
 Introduction
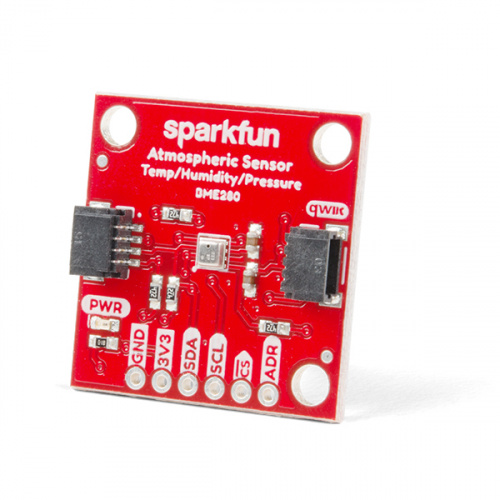
The new Qwiic Atmospheric Sensor (BME280) is an updated board revision of our Atmospheric Sensor Breakout- BME280 to make it Qwiic compatible. The Qwiic connector system reduces the hassle of interfacing to the sensor via I2C, by utilizing polarized cables that are simple to use. The BME280 is great for measuring humidity, temperature, and barometric pressure.
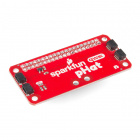
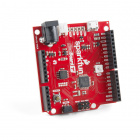
In addition, we now provide a Python library for compatibility with single board computer (SBC) platforms like the Raspberry Pi boards. The Arduino library is shared from the preexisting hardware. The examples below, will demonstrate how to use the Qwiic Atmospheric Sensor with a RedBoard Qwiic; and a Raspberry Pi with the Qwiic pHAT (and additional accessories) utilizing the Qwiic connection system.
Don't forget to check out this great video of Rob playing his sparxophone thanks to the help of the BME280!
Required Materials
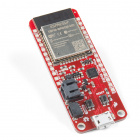
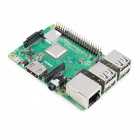
The Qwiic Atmospheric Sensor does need a few additional items for you to get started. The RedBoard Qwiic is for the Arduino examples and the Qwiic pHAT is for the Raspberry Pi example (see note below). You may already have a few of these items, so feel free to modify your cart based on your needs. Additionally, there are also alternative parts options that are available as well (click button below to toggle options).


Suggested Reading
If you're unfamiliar with jumper pads, I2C, Qwiic, or Python be sure to checkout some of these foundational tutorials. Also included, in this list, are past tutorials involving the BME280 sensor.
Serial Peripheral Interface (SPI)
How to Work with Jumper Pads and PCB Traces
Raspberry Pi SPI and I2C Tutorial
Python Programming Tutorial: Getting Started with the Raspberry Pi
Qwiic pHAT for Raspberry Pi Hookup Guide
SparkFun BME280 Breakout Hookup Guide
CCS811/BME280 (Qwiic) Environmental Combo Breakout Hookup Guide
RedBoard Qwiic Hookup Guide
The Qwiic Atmospheric Sensor utilizes the Qwiic connect system. We recommend familiarizing yourself with the Logic Levels and I2C tutorials before using it. Click on the banner above to learn more about our Qwiic products.
Hardware Overview
Power
There is a power status LED to help make sure that your Qwiic Atmospheric Sensor is getting power. You can power the board either through the polarized Qwiic connector system or the breakout pins (3.3V and GND) provided. This Qwiic system is meant to use 3.3V, be sure that you are NOT using another voltage when using the Qwiic system.
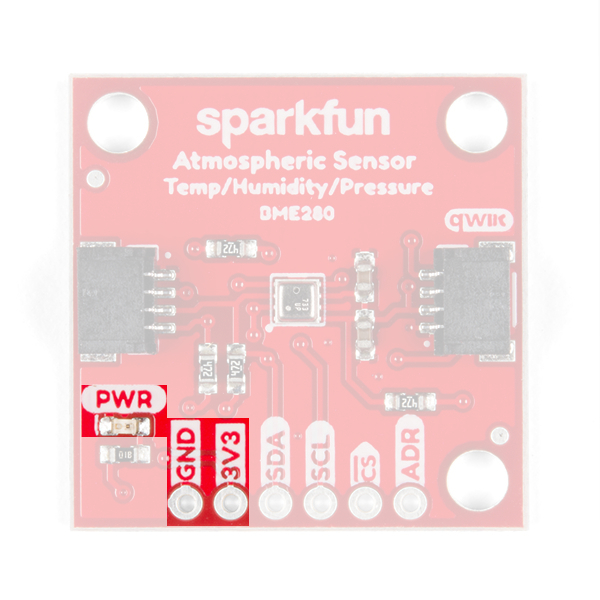
If you want to conserve power, there is an available jumper on the back of the board labeled LED to cut power to the LED (see Jumpers section below).
BME280 Sensor
The Bosch BME280 is the atmospheric sensor used on this board. It measures three different atmospheric properties: ambient temperature, (relative) humidity, and barometric pressure.
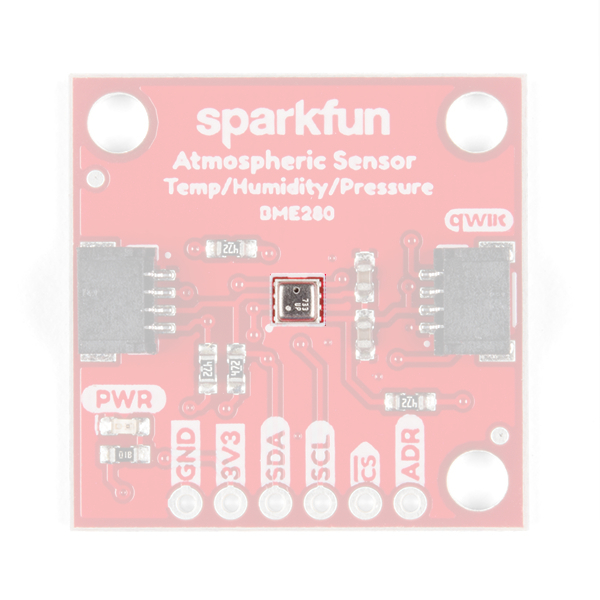
The BME280 uses three modes of operation: sleep mode, forced mode and normal mode. These modes dictate how the sensor performs measurement cycles. The BME280 can be interfaced via I2C (used with Qwiic connections) or SPI communication. In the table below, are some of the characteristics of the BME280 sensor from the datasheet:
| Characteristic | Description |
|---|---|
| Operating Voltage (VDD) | 1.71V to 3.6V (Default on Qwiic System: 3.3V) |
| Operational Modes | Sleep (Default), Normal, and Forced (low power; single measurement) |
| Data Output |
16-bit output from ADC (*IIR filter and oversampling can increase this to 20-bit; excludes humidity data.) |
| Current Consumption (Typical) |
Sleep: 0.3 µA Standby: 0.5 µA (inactive period of normal mode) Humidity Measurements: 340 µA (peaks at 85°C) Pressure Measurements: 714 µA (peaks at -40°C) Temperature Measurements: 350 µA (peaks at 85°C) |
Humidity Parameters |
Range: 0 to 100 %RH Absolute Accuracy: ±3 %RH (from 20 - 80 %RH) Resolution: 0.008 %RH Forced Mode Current Consumption: 2.8 µA (max) |
| Pressure Parameters |
Range: 300 to 1100 hPa (30,000 - 110,000 Pa or approx. 4.35 - 15.95 PSI) Absolute Accuracy: ±(1 - 1.7) hPa Resolution: 0.18 Pa Forced Mode Current Consumption: 4.2 µA (max) |
| Temperature Parameters |
Range: 0°C to 65°C (32°F to 149°F) Absolute Accuracy: ±(0.5 - 1.5)°C Resolution: 0.01°C Forced Mode Current Consumption: 1.0 µA (typical) |
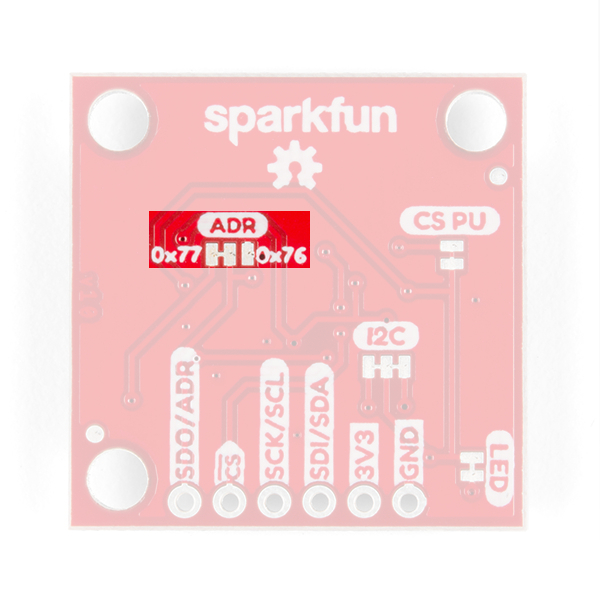
| I2C Address | 0x77 (Default) or 0x76 |
Modes of Operation
The BME280 offers three modes of operation:
- Sleep mode (Default): No operation, all registers accessible, lowest power, selected after startup.
- Forced mode (low power operation): Performs one measurement, store results and return to sleep mode.
- Normal mode (active measurements): Perpetual cycling of measurements and inactive periods.
For more details, refer to sections 3.3.2-4 in the datasheet. Additionally, in section 3.5 the are a set of recommended sensor settings for various applications or operations.
Measurements
All measurements can be skipped or enabled. When enabled, there are several oversampling options; with oversampling, it is possible to reduce the noise.
For more details, refer to sections 3-4 in the datasheet.
Humidity
The resolution of the humidity measurement is fixed at 16-bit ADC output. A graph of the operational range for the humidity sensor (shaded in grey) is shown below; the sensor will not report and/or operate properly outside of this range.

Pressure and Temperature
For temperature and pressure readings, the resolution of the data will be dependent on if the infinite impulse response (IIR) filter is enabled and the oversampling setting register setting (osrs):
- When the IIR filter is enabled, the measurement resolution is 20-bit.
- When the IIR filter is disabled, the measurement resolution is [16 + (osrs–1)]-bit.
- e.g. The temperature measurement is 18-bit when osrs_t is set to ‘3’.
(*Note: The temperature value depends on the PCB temperature, sensor element self-heating and ambient temperature and is typically just above ambient temperature.)
Data Analysis
Below are other important attributes of the sensor. For most users, this information is will either be outside their scope or trivial. However for those that are interested, these topics have been briefly summarized or quoted directly from the datasheet. For full details, please refer to the datasheet; additionally, some of the comments in the library may help.
Infinite Impulse Response Filter
- It is recommended that the internal IIR filter be implemented to dampen rapid data fluctuations from external influences like wind blowing, closing doors, etc.
Noise
- The expected noise in the measurement data is dependent on the oversampling setting. For pressure and temperature readings, it is also dependent on the IIR filter setting used.
Trimming Parameters
- The trimming parameters are programmed into the devices’ non-volatile memory (NVM) during production and cannot be altered by users. These are used for the calibration/compensation parameters.
Compensation formulas
- It is strongly advised (by the manufacturer) to use the API available from Bosch Sensortec to perform readout and compensation.
Qwiic or I2C
I2C Address
The BME280 has 2 available I2C addresses, which are set by the address pin, ADR. On the Qwiic Atmospheric sensor, the default peripheral address of the BME280 is 0x77 (HEX).
Default I2C Peripheral Address: 0x77
I2C Registers
The BME280 register (memory) map is detail in section 5.3 of the datasheet.
| Address | Description |
|---|---|
| 0xD0 | ID: The chip identification number. |
| 0xE0 | Soft Reset: If the value 0xB6 is written to the register, the device is reset using the complete power-on-reset procedure |
| 0xF2 | ctrl_hum: Sets the humidity data acquisition options of the device. Changes to this register only become effective after a write operation to ctrl_meas. |
| 0xF3 |
status: Indicate the status of the device.
Whether a conversion is running or the results have been transferred to the data registers.
Whether NVM data are being copied to image registers. |
| 0xF4 | ctrl_meas: Sets the pressure and temperature data acquisition options of the device. The register needs to be written after changing ctrl_hum for the changes to become effective./td>
|
| 0xF5 | config: Sets the rate, filter and interface options of the device. Writes to the config register in normal mode may be ignored. In sleep mode writes are not ignored. |
| 0xF7 to 0xF9 | press: The raw pressure measurement data. |
| 0xFA to 0xFC | temp: The raw temperature measurement data. |
| 0xFD to 0xFE | hum: The raw humidity measurement data. |
|
0xE1 to 0xF0 0x88 to 0xA1 |
Calibration Data: Holds Trimming Parameters. |
Connections
The simplest way to use the Qwiic ADC is through the Qwiic connect system. The connectors are polarized for the I2C connection and power. (*They are tied to their corresponding breakout pins.)
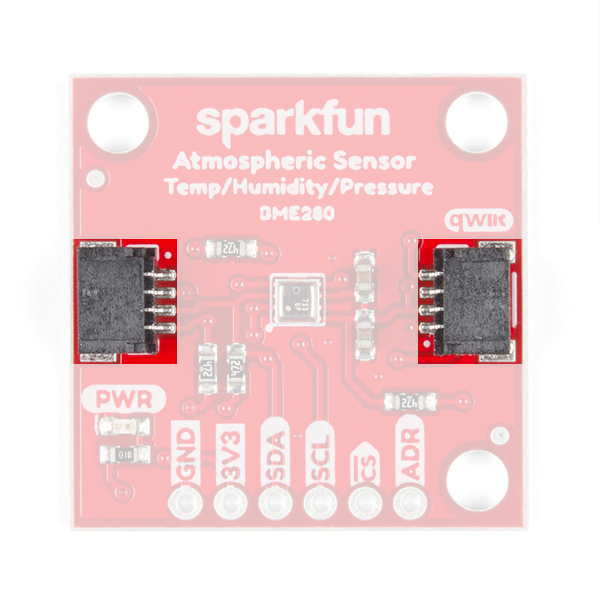
However, the board also provides six labeled breakout pins. You can connect these lines to the I2C bus of your microcontroller and power pins (3.3V and GND), if it doesn't have a Qwiic connector. Otherwise, the breakout pins can also be used for an SPI connection.
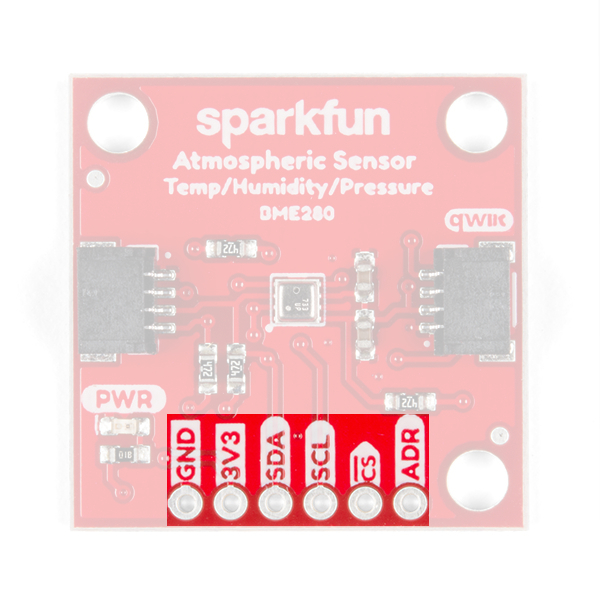
| Pin Label | Pin Function | Input/Output | Notes |
|---|---|---|---|
| 3.3V | Power Supply | Input | 3.3V on Qwiic system (should be stable) |
| GND | Ground | Input | Ground and Single-Ended Reference Voltage for ADC. |
| SDA | I2C Data Signal | Bi-directional | Bi-directional data line. Voltage should not exceed power supply (e.g. 3.3V). |
| SCL | I2C Clock Signal | Input | Clock signal. Voltage should not exceed power supply (e.g. 3.3V). |
SPI Connection
There are two options for an SPI connection 3-wire or 4-wire. For a 3-wire connection, users will need to cut the ADR jumper on the board. For a 4-wire connection users can cut the ADR, I2C, and CS jumpers to remove the load from the SPI lines, but it is not necessary. For more details, check out the notes in the schematic.
This tutorial will not go into detail about using an SPI connection as the Python library can only be used with an I2C connection. However, for users seeking an SPI setup, they can refer to the hookup guide for the original BME280 Sensor Breakout board.
| Pin Label | Pin Function | Input/Output | Notes |
|---|---|---|---|
| 3.3V | Power Supply | Input | Supply voltage for sensor. SHould be regulated between 1.8 and 3.6 V |
| GND | Ground | Input | Ground |
| SCK | Clock Signal | Input | Clock signal. Voltage should not exceed power supply (max. 3.6V). |
| SDI | Data In | Input | Data incoming to the BME280. Voltage should not exceed power supply (max. 3.6V). |
| SDO | Data Out | Output | Data coming from the BME280. |
| CS |
Chip Select |
Input | Used to select device communication on 4-wire connections (active low). Voltage should not exceed power supply (max. 3.6V). |
Jumpers
There are 4 separate jumpers on the board for various hardware related functions. For more notes, check out the hardware schematic. Not sure how to modify a jumper? Read here!
LED Power
If you want to conserve power, the jumper labeled LED will allow users to isolate power to the power status indicator LED.

I2C Address
If you want to change the I2C address for the sensor, the jumper labeled ADR will allow users to change the I2C address from the default (0x77) to 0x76.
Pull-Up Resistors
There are two jumpers (well technically three) for the pull-up resistors attached to specific pins on the sensor.
I2C Pull-Ups
The first set of pull-up resistors are tied to the SDA and SCL lines for an I2C connection. Cutting the I2C jumper will remove the 4.7kΩ pull-up resistors from the I2C bus. If you have many devices on your I2C bus you may want to remove these jumpers. (When there are multiple devices on the bus with pull-up resistors, the equivalent parallel resistance may create too strong of a pull-up for the bus to operate correctly.)

CS (and SPI) Pull-Ups
The last pull-up resistor is tied to CS pin for an SPI connection. Cutting the CS jumper will remove the 4.7kΩ pull-up resistor.
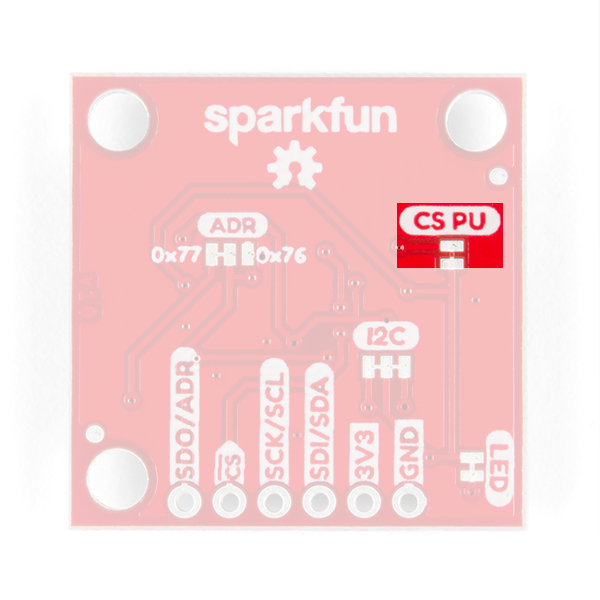
Keep in mind that the rest of the SPI pins are shared with other pins (see the note above on the SPI connection or the schematic). For a 3-wire connection, users will need to cut the ADR jumper for the SDO line. For a 4-wire connection users can cut the ADR, I2C, and CS jumpers to remove the load from the SPI lines, but it is not necessary.
Hardware Assembly
Arduino Examples
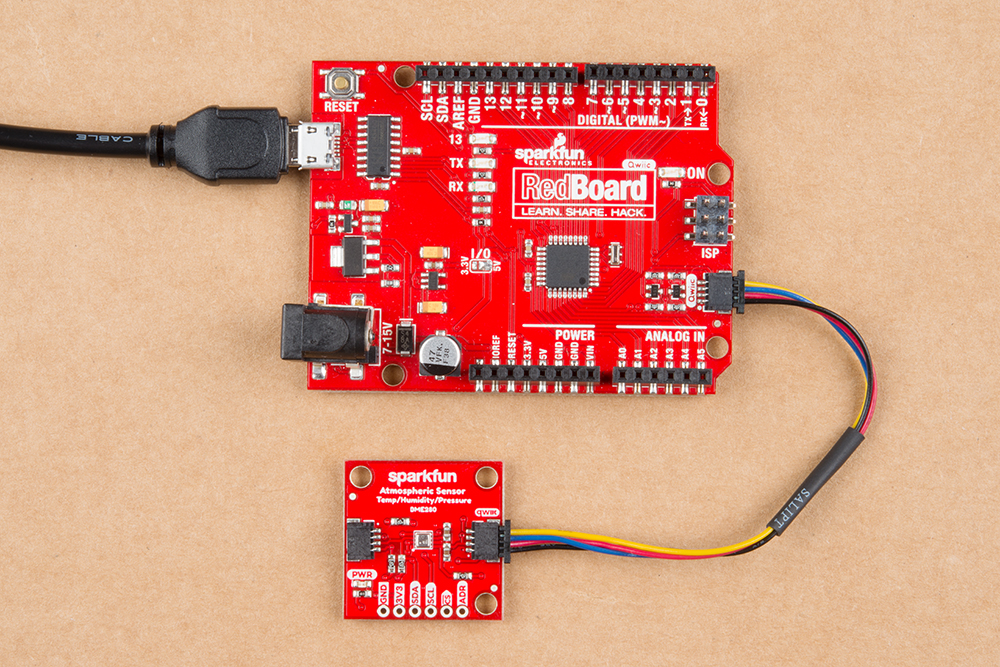
With the Qwiic connector system, assembling the hardware is simple. All you need to do is connect your Qwiic Atmospheric Sensor (BME280) to the RedBoard Qwiic with a Qwiic cable. Otherwise, you can use the I2C pins of your microcontroller; just be aware of logic levels.
Note: This tutorial assumes you are familiar with Arduino products and you are using the latest stable version of the Arduino IDE on your desktop. If this is your first time using the Arduino IDE, please review our tutorial on installing the Arduino IDE.
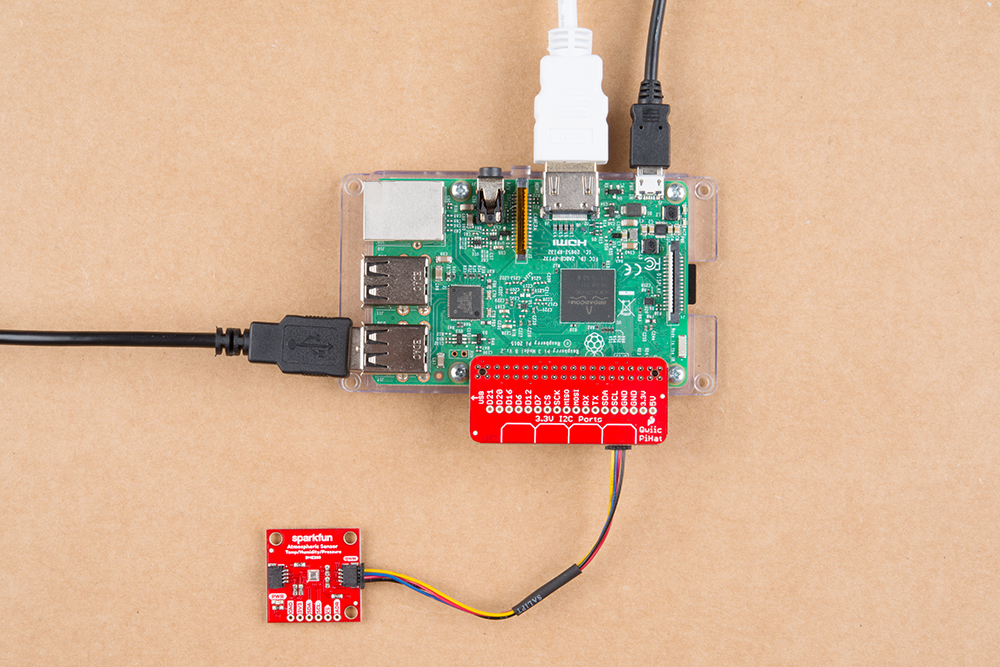
Raspberry Pi Example
With the Qwiic connector system, assembling the hardware is simple. In addition to the Qwiic Atmospheric Sensor (BME280), you will need: a Qwiic cable, a SparkFun Qwiic pHAT for Raspberry Pi, and a Raspberry Pi setup with the Raspbian OS, monitor, and standard peripherals. (*If you are unfamiliar with the Qwiic pHAT, you can find the Hookup Guide here.)
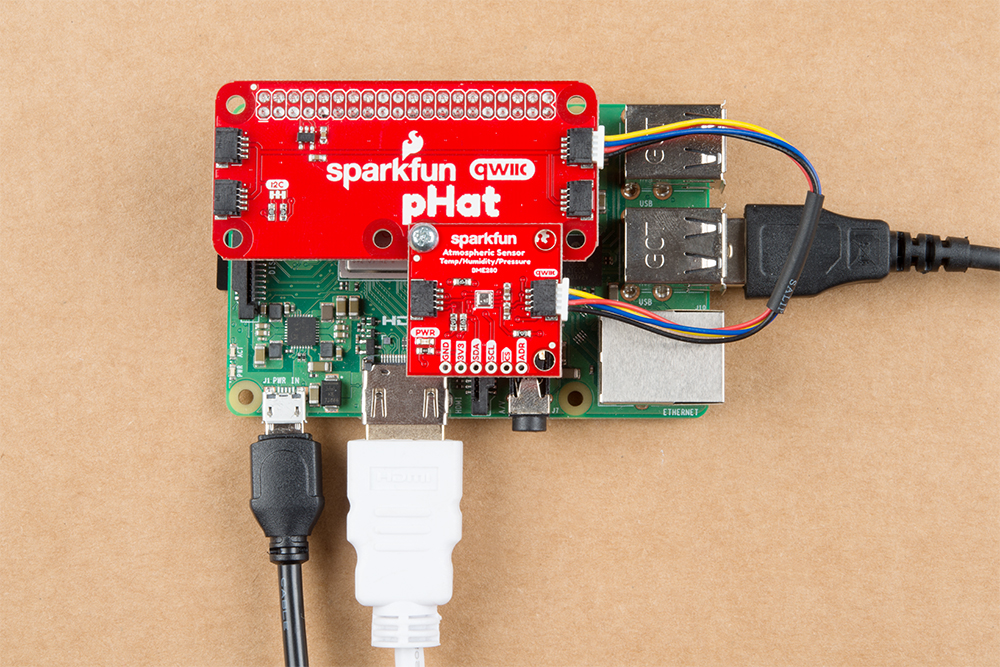
Alternatively, you can also use a Raspberry Pi 3 and the Qwiic HAT instead.
Note: This tutorial assumes you are familiar with using a Raspberry Pi and you have the latest (full... with recommended software) version of Raspbian OS your Raspberry Pi. You can download the latest version of the Raspbian OS from the Raspberry Pi Foundation website. As of Feb. 13th 2019, we recommend the Raspbian Stretch with desktop and recommended software option.
If this is your first time using a Raspberry Pi, please head over to the Raspberry Pi Foundation website to use their quickstart guides. We have listed a few of them here:
Arduino Library Overview
Note: This example assumes you are using the latest version of the Arduino IDE on your desktop. If this is your first time using Arduino, please review our tutorial on installing the Arduino IDE. If you have not previously installed an Arduino library, please check out our installation guide.
We've written a library to easily get setup and take readings from the Qwiic Atmospheric Sensor. However, before we jump into getting data from the sensor, let's take a closer look at the available functions in the library. You can install this library through the Arduino Library Manager. Search for SparkFun BME280 Arduino Library and you should be able to install the latest version. If you prefer manually downloading the libraries from the GitHub repository, you can grab them here:
Let's get started by looking at the functions that set up the Qwiic Atmospheric Sensor:
Class
In the global scope, construct your sensor object (such as mySensor or pressureSensorA) without arguments.
BME280 mySensor;
Object Parameters and setup()
Rather than passing a bunch of data to the constructor, configuration is accomplished by setting the values of the BME280 type in the setup() function. They are exposed by being public: so use the myName.aVariable = someValue; syntax.
Settable variables of the class BME280:
language:c
//Main Interface and mode settings
uint8_t commInterface;
uint8_t I2CAddress;
uint8_t chipSelectPin;

uint8_t runMode;
uint8_t tStandby;
uint8_t filter;
uint8_t tempOverSample;
uint8_t pressOverSample;
uint8_t humidOverSample;
Functions
.begin();
Initialize the operation of the BME280 module with the following steps:
- Starts up the wiring library for I2C by default
- Checks/Validates BME280 chip ID
- Reads compensation data
- Sets default settings from table
- Sets operational mode to Normal Mode
Returns the BME280 chip ID stored in the ID register.
.beginSPI(uint8_t csPin);
Begins communication with the BME280 over an SPI connection.
csPin: Digital pin used for the CS.
Output: BooleanTrue: Connected to sensor.
False: Unable to establish connection.
.beginI2C(TwoWire &wirePort); or .beginI2C(SoftwareWire &wirePort);
Begins communication with the BME280 over an I2C connection. If #ifdef SoftwareWire_h is defined, then a software I2C connection is used.
&wirePort: Port for the I2C connection.
Output: BooleanTrue: Connected to sensor.
False: Unable to establish connection.
.setMode(uint8_t mode);
Sets the operational mode of the sensor. This function can be set with the predefined variables: MODE_SLEEP, MODE_FORCED, and MODE_NORMAL. (For more details, see section 3.3 of the datasheet.)
0: Sleep Mode
1: Forced Mode
3: Normal Mode
.getMode();
Returns the operational mode of the sensor.
0: Sleep Mode
1: Forced Mode
3: Normal Mode
.setStandbyTime(uint8_t timeSetting);
Sets the standby time of the cycle time. (For more details, see section 3.3 and Table 27 of the datasheet.)
0: 0.5ms
1: 62.5ms
2: 125ms
3: 250ms
4: 500ms
5: 1000ms
6: 10ms
7: 20ms
.setFilter(uint8_t filterSetting)
Sets the time constant of the IIR filter, which slows down the response time of the sensor inputs based on the number of samples required. (For more details, see section 3.4.4, Table 6, and Figure 7 of the datasheet.)
0: filter off
1: coefficient of 2
2: coefficient of 4
3: coefficient of 8
4: coefficient of 16
.setTempOverSample(uint8_t overSampleAmount);
Sets the oversampling option (osrs_t) for the temperature measurements. (Directly influences the noise and resolution of the data.)
0: turns off temperature sensing
1: oversampling ×1
2: oversampling ×2
4: oversampling ×4
8: oversampling ×8
16: oversampling ×16
Other: Bad Entry, sets to oversampling ×1 by default.
.setPressureOverSample(uint8_t overSampleAmount);
Sets the oversampling option (osrs_p) for the pressure measurements. (Directly influences the noise and resolution of the data.)
0: turns off pressure sensing
1: oversampling ×1
2: oversampling ×2
4: oversampling ×4
8: oversampling ×8
16: oversampling ×16
Other: Bad Entry, sets to oversampling ×1 by default.
.setHumidityOverSample(uint8_t overSampleAmount);
Sets the oversampling option (osrs_h) for the humidity measurements. (Directly influences the noise of the data.)
0: turns off humidity sensing
1: oversampling ×1
2: oversampling ×2
4: oversampling ×4
8: oversampling ×8
16: oversampling ×16
Other: Bad Entry, sets to oversampling ×1 by default.
.setI2CAddress(uint8_t address);
Changes the I2C address stored in the library to access the sensor.
address: The new I2C address.
.isMeasuring();
Checks the measuring bit of the status register for if the device is taking measurement.
True: A conversion is running.
False: The results have been transferred to the data registers.
.reset();
Soft resets the sensor. (If called, the begin function must be called before using the sensor again.)
.readFloatPressure();
Reads raw pressure data stored in register and applies output compensation (For more details on the data compensation, see section 4.2 of the datasheet.)
Returns pressure in Pa.
.readFloatHumidity();
Reads raw humidity data stored in register and applies output compensation (For more details on the data compensation, see section 4.2 of the datasheet.)
Returns humidity in %RH.
.readTempC();
Reads raw temperature data stored in register and applies output compensation (For more details on the data compensation, see section 4.2 of the datasheet.)
Returns temperature in Celsius.
.readTempF();
Reads raw temperature data stored in register and applies output compensation (For more details on the data compensation, see section 4.2 of the datasheet.)
Returns temperature in Fahrenheit.
Arduino Example Code
The examples can be found in the the drop-down menu (File > Examples > SparkFun BME280 > ...) of the Arduino IDE. They can also be downloaded from the GitHub repositoryand then ran on their own. These are just a few samples of the available selection of examples.
Below are a sample readouts from the Serial Monitor for each of the examples. The baud rate for all of the examples default to 9600 baud.
Example 1: Basic Readings
This basic example configures an BME280 on the I2C bus and reports out the data.

Example 3: CSV Output
If you want to use the BME280 to record data as a function of time, this example is for you! It outputs text as CSV (comma separated vales) that can be copy-pasted into a textfile or spreadsheet app for graphing.
A note on accuracy: This sketch use "delay(50);" to wait 50ms between reads. The units of the 'sample' column are in (50ms + time-to-read) periods.
Example 5: Read All Registers
Here's an example that prints out the registers as well as the internally concatenated calibration words. It can be used to check the state of the BME280 after a particular configuration or can be implanted in your own sketch where you need to debug.

Example 6: Low Power
Here is an example with a low power operation, utilizing the sleep mode functionality. This is similar to Example 1, except the sensor is in sleep mode and data is taken at specific intervals.
Python Package Overview
Note: This example assumes you are using the latest version of Python 3. If this is your first time using Python or I2C hardware on a Raspberry Pi, please checkout our tutorial on Python Programming with the Raspberry Pi and the Raspberry Pi SPI and I2C Tutorial.
We've written a Python package to easily get setup and take readings from the Qwiic Atmospheric Sensor. However, before we jump into getting data from the sensor, let's take a closer look at the available functions in the Python package. You can install the sparkfun-qwiic-bme280 Python package hosted by PyPi. However, if you prefer to manually download and build the libraries from the GitHub repository, you can grab them here (*Please be aware of any package dependencies. You can also check out the repository documentation page, hosted on Read the Docs.):
Installation
Note: Don't forget to double check that the hardware I2C connection is enabled on your Raspberry Pi or other single board computer.
PyPi Installation
This repository is hosted on PyPi as the sparkfun-qwiic-bme280 package. On systems that support PyPi installation via pip3 (use pip for Python 2) is simple, using the following commands:
For all users (note: the user must have sudo privileges):
language:bash
sudo pip3 install sparkfun-qwiic-bme280
For the current user:
language:bash
pip3 install sparkfun-qwiic-bme280
Local Installation
To install, make sure the setuptools package is installed on the system.
Direct installation at the command line (use python for Python 2):
language:bash
python3 setup.py install
To build a package for use with pip3:
language:bash
python3 setup.py sdist
A package file is built and placed in a subdirectory called dist. This package file can be installed using pip3.
language:bash
cd dist
pip3 install sparkfun_qwiic_bme280-<version>.tar.gz
Python Package Operation
Below is a description of the basic functionality of the Python package. This includes the package organization, built-in methods, and their inputs and/or outputs. For more details on how the Python package works, check out the source code and the sensor datasheet.
Dependencies
This Python package has a very few dependencies in the code, listed below:
language:python
from __future__ import print_function
import math
import qwiic_i2c
Default Variables
The default variables, in the code, for this Python package are listed below:
language:python
#The name of this device
_DEFAULT_NAME = "Qwiic BME280"

_AVAILABLE_I2C_ADDRESS = [0x77, 0x76]

#Default Setting Values
_settings = {"runMode" : 3,         \
            "tStandby" : 0,         \
            "filter"   : 0,         \
            "tempOverSample"  : 1,  \
            "pressOverSample" : 1,  \
            "humidOverSample" : 1,  \
            "tempCorrection"  : 0.0}

#define our valid chip IDs
_validChipIDs = [0x58, 0x60]
Class
QwiicBme280() or QwiicBme280(i2caddr)
This Python package operates as a class object, allowing new instances of that type to be made. An __init__() constructor is used that creates a connection to an I2C device over the I2C bus using the default or specified I2C address.
The Constructor
A constructor is a special kind of method used to initialize (assign values to) the data members needed by the object when it is created.
__init__(address=None, i2c_driver=None):
_AVAILABLE_I2C_ADDRESS variable. The other available address is 0x76 (set by the jumper on the bottom side of the board).qwiic_i2c.getI2CDriver(). Users should use the default I2C driver and leave this field blank.True: Connected to I2C device on the default (or specified) address.
False: No device found or connected.
Functions
A function that is an attribute of the class, which defines a method for instances of that class. In simple terms, they are objects for the operations (or methods) of the class.
.is_connected()
Determines if the BME280 device is connected to the system.
True: Connected to I2C device on the default (or specified) address.
False: No device found or connected.
.begin()
Initialize the operation of the BME280 module with the following steps:
- Checks/Validates BME280 chip ID
- Reads compensation data
- Sets default settings from table
- Sets operational mode to Normal Mode
True: The initialization was successful.
False: Invalid chip ID.
.set_mode(mode)
Sets the operational mode of the sensor. .mode is also a property that can be set with the instance variables: MODE_SLEEP, MODE_FORCED, or MODE_NORMAL. (For more details, see section 3.3 of the datasheet.)
0: Sleep Mode
1: Forced Mode
3: Normal Mode
.get_mode()
Returns the operational mode of the sensor.
0: Sleep Mode
1: Forced Mode
3: Normal Mode
.set_standby_time(timeSetting)
Sets the standby time of the cycle time. (For more details, see section 3.3 and Table 27 of the datasheet.)
0: 0.5ms
1: 62.5ms
2: 125ms
3: 250ms
4: 500ms
5: 1000ms
6: 10ms
7: 20ms
.set_filter(filterSetting)
Sets the time constant of the IIR filter, which slows down the response time of the sensor inputs based on the number of samples required. (For more details, see section 3.4.4, Table 6, and Figure 7 of the datasheet.)
0: filter off
1: coefficient of 2
2: coefficient of 4
3: coefficient of 8
4: coefficient of 16
.set_tempature_oversample(overSampleAmount)
Sets the oversampling option (osrs_t) for the temperature measurements. (Directly influences the noise and resolution of the data.)
0: turns off temperature sensing
1: oversampling ×1
2: oversampling ×2
4: oversampling ×4
8: oversampling ×8
16: oversampling ×16
Other: Bad Entry, sets to oversampling ×1 by default.
.set_pressure_oversample(overSampleAmount)
Sets the oversampling option (osrs_p) for the pressure measurements. (Directly influences the noise and resolution of the data.)
0: turns off pressure sensing
1: oversampling ×1
2: oversampling ×2
4: oversampling ×4
8: oversampling ×8
16: oversampling ×16
Other: Bad Entry, sets to oversampling ×1 by default.
.set_humidity_oversample(overSampleAmount)
Sets the oversampling option (osrs_h) for the humidity measurements. (Directly influences the noise of the data.)
0: turns off humidity sensing
1: oversampling ×1
2: oversampling ×2
4: oversampling ×4
8: oversampling ×8
16: oversampling ×16
Other: Bad Entry, sets to oversampling ×1 by default.
.is_measuring()
Checks the measuring bit of the status register for if the device is taking measurement.
True: A conversion is running.
False: The results have been transferred to the data registers.
.reset()
Soft resets the sensor. (If called, the begin method must be called before using the sensor again.)
.read_pressure()
Reads raw pressure data stored in register and applies output compensation (For more details on the data compensation, see section 4.2 of the datasheet.)
Returns pressure in Pa.
.read_humidity()
Reads raw humidity data stored in register and applies output compensation (For more details on the data compensation, see section 4.2 of the datasheet.)
Returns humidity in %RH.
.get_temperature_celsius()
Reads raw temperature data stored in register and applies output compensation (For more details on the data compensation, see section 4.2 of the datasheet.)
Returns temperature in Celsius.
.get_temperature_fahrenheit()
Reads raw temperature data stored in register and applies output compensation (For more details on the data compensation, see section 4.2 of the datasheet.)
Returns temperature in Fahrenheit.
Upgrading the Package
In the future, changes to the Python package might be made. Updating the installed packages has to be done individually for each package (i.e. sub-modules and dependencies won't update automatically and must be updated manually). For the sparkfun-qwiic-bme280 Python package, use the following command (use pip for Python 2):
For all users (note: the user must have sudo privileges):
language:bash
sudo pip3 install --upgrade sparkfun-qwiic-bme280
For the current user:
language:bash
pip3 install --upgrade sparkfun-qwiic-bme280
Python Example Code
The following examples are available in the GitHub repository. To run the examples, simple download or copy the code into a file. Then, open/save the example file (if needed) and execute the code in your favorite Python IDE.
For example, with the default Python IDLE click Run > Run Module or use the F5 key. To terminate the example use the Ctrl + C key combination.
Note: Yes, there is an altitude_feet function in the library that is available. However, that content is omitted from the Library Overview section due to the amount of confusion that was generated with the previous hookup guide. Some users were misinterpreting the reported "altitude" from the function as an exact value; when it actually is calculated from the (barometric) pressure measurement to report the equivalent pressure altitude based on an atmospheric model. If you want more details on this subject, look into how an altimeter works.
Example 1
This example uses the default configuration settings for the sensor. The temperature (°F), humidity (%RH), pressure (Pa), and calculated pressure altitude (ft.) are reported repeatedly.
language:python
#!/usr/bin/env python
#-----------------------------------------------------------------------------
# qwiic_env_bme280_ex1.py
#
# Simple Example for the Qwiic BME280 Device
#------------------------------------------------------------------------
#
# Written by  SparkFun Electronics, May 2019
#
# This python library supports the SparkFun Electroncis qwiic
# qwiic sensor/board ecosystem on a Raspberry Pi (and compatable) single
# board computers.
#
# More information on qwiic is at https://www.sparkfun.com/qwiic
#
# Do you like this library? Help support SparkFun. Buy a board!
#
#==================================================================================
# Copyright (c) 2019 SparkFun Electronics
#
# Permission is hereby granted, free of charge, to any person obtaining a copy
# of this software and associated documentation files (the "Software"), to deal
# in the Software without restriction, including without limitation the rights
# to use, copy, modify, merge, publish, distribute, sublicense, and/or sell
# copies of the Software, and to permit persons to whom the Software is
# furnished to do so, subject to the following conditions:
#
# The above copyright notice and this permission notice shall be included in all
# copies or substantial portions of the Software.
#
# THE SOFTWARE IS PROVIDED "AS IS", WITHOUT WARRANTY OF ANY KIND, EXPRESS OR
# IMPLIED, INCLUDING BUT NOT LIMITED TO THE WARRANTIES OF MERCHANTABILITY,
# FITNESS FOR A PARTICULAR PURPOSE AND NONINFRINGEMENT. IN NO EVENT SHALL THE
# AUTHORS OR COPYRIGHT HOLDERS BE LIABLE FOR ANY CLAIM, DAMAGES OR OTHER
# LIABILITY, WHETHER IN AN ACTION OF CONTRACT, TORT OR OTHERWISE, ARISING FROM,
# OUT OF OR IN CONNECTION WITH THE SOFTWARE OR THE USE OR OTHER DEALINGS IN THE
# SOFTWARE.
#==================================================================================
# Example 1
#

from __future__ import print_function
import qwiic_bme280
import time
import sys

def runExample():

    print("\nSparkFun BME280 Sensor  Example 1\n")
    mySensor = qwiic_bme280.QwiicBme280()

    if mySensor.connected == False:
        print("The Qwiic BME280 device isn't connected to the system. Please check your connection", \
            file=sys.stderr)
        return

    mySensor.begin()

    while True:
        print("Humidity:\t%.3f" % mySensor.humidity)

        print("Pressure:\t%.3f" % mySensor.pressure)

        print("Altitude:\t%.3f" % mySensor.altitude_feet)

        print("Temperature:\t%.2f" % mySensor.temperature_fahrenheit)

        print("")

        time.sleep(1)


if __name__ == '__main__':
    try:
        runExample()
    except (KeyboardInterrupt, SystemExit) as exErr:
        print("\nEnding Example 1")
sys.exit(0)

Experiment 4
This example configures the settings for the sensor before the temperature (°F), humidity (%RH), pressure (Pa), and calculated pressure altitude (ft.) are reported repeatedly.
language:python
#!/usr/bin/env python
#-----------------------------------------------------------------------------
# qwiic_env_bme280_ex4.py
#
# Simple Example for the Qwiic BME280 Device
#------------------------------------------------------------------------
#
# Written by  SparkFun Electronics, May 2019
#
# This python library supports the SparkFun Electroncis qwiic
# qwiic sensor/board ecosystem on a Raspberry Pi (and compatable) single
# board computers.
#
# More information on qwiic is at https:# www.sparkfun.com/qwiic
#
# Do you like this library? Help support SparkFun. Buy a board!
#
#==================================================================================
# Copyright (c) 2019 SparkFun Electronics
#
# Permission is hereby granted, free of charge, to any person obtaining a copy
# of this software and associated documentation files (the "Software"), to deal
# in the Software without restriction, including without limitation the rights
# to use, copy, modify, merge, publish, distribute, sublicense, and/or sell
# copies of the Software, and to permit persons to whom the Software is
# furnished to do so, subject to the following conditions:
#
# The above copyright notice and this permission notice shall be included in all
# copies or substantial portions of the Software.
#
# THE SOFTWARE IS PROVIDED "AS IS", WITHOUT WARRANTY OF ANY KIND, EXPRESS OR
# IMPLIED, INCLUDING BUT NOT LIMITED TO THE WARRANTIES OF MERCHANTABILITY,
# FITNESS FOR A PARTICULAR PURPOSE AND NONINFRINGEMENT. IN NO EVENT SHALL THE
# AUTHORS OR COPYRIGHT HOLDERS BE LIABLE FOR ANY CLAIM, DAMAGES OR OTHER
# LIABILITY, WHETHER IN AN ACTION OF CONTRACT, TORT OR OTHERWISE, ARISING FROM,
# OUT OF OR IN CONNECTION WITH THE SOFTWARE OR THE USE OR OTHER DEALINGS IN THE
# SOFTWARE.
#==================================================================================
# Example 4 - port of the Arduino example 4
#

from __future__ import print_function
import qwiic_bme280
import time
import sys

def runExample():

    print("\nSparkFun BME280 Sensor  Example 4\n")
    mySensor = qwiic_bme280.QwiicBme280()

    if mySensor.connected == False:
        print("The Qwiic BME280 device isn't connected to the system. Please check your connection", \
            file=sys.stderr)
        return

    mySensor.begin()

    # setup the sensor
    mySensor.filter = 1         # 0 to 4 is valid. Filter coefficient. See 3.4.4
    mySensor.standby_time = 0   # 0 to 7 valid. Time between readings. See table 27.

    mySensor.over_sample = 1            # 0 to 16 are valid. 0 disables temp sensing. See table 24.
    mySensor.pressure_oversample = 1    # 0 to 16 are valid. 0 disables pressure sensing. See table 23.
    mySensor.humidity_oversample = 1    # 0 to 16 are valid. 0 disables humidity sensing. See table 19.
    mySensor.mode = mySensor.MODE_NORMAL # MODE_SLEEP, MODE_FORCED, MODE_NORMAL is valid. See 3.3

    while True:
        print("Humidity:\t%.3f" % mySensor.humidity)

        print("Pressure:\t%.3f" % mySensor.pressure)

        print("Altitude:\t%.3f" % mySensor.altitude_feet)

        print("Temperature:\t%.2f\n" % mySensor.temperature_fahrenheit)

        time.sleep(1)


if __name__ == '__main__':
    try:
        runExample()
    except (KeyboardInterrupt, SystemExit) as exErr:
        print("\nEnding Example 4")
sys.exit(0)
Experiment 5
This last example reports configuration the settings and calibration values from the memory map. Then, the temperature (°F), humidity (%RH), pressure (Pa), and calculated pressure altitude (ft.) are reported repeatedly.
language:python
#!/usr/bin/env python
#-----------------------------------------------------------------------------
# qwiic_env_bme280_ex5.py
#
# Simple Example for the Qwiic BME280 Device
#------------------------------------------------------------------------
#
# Written by  SparkFun Electronics, May 2019
#
# This python library supports the SparkFun Electroncis qwiic
# qwiic sensor/board ecosystem on a Raspberry Pi (and compatable) single
# board computers.
#
# More information on qwiic is at https:# www.sparkfun.com/qwiic
#
# Do you like this library? Help support SparkFun. Buy a board!
#
#==================================================================================
# Copyright (c) 2019 SparkFun Electronics
#
# Permission is hereby granted, free of charge, to any person obtaining a copy
# of this software and associated documentation files (the "Software"), to deal
# in the Software without restriction, including without limitation the rights
# to use, copy, modify, merge, publish, distribute, sublicense, and/or sell
# copies of the Software, and to permit persons to whom the Software is
# furnished to do so, subject to the following conditions:
#
# The above copyright notice and this permission notice shall be included in all
# copies or substantial portions of the Software.
#
# THE SOFTWARE IS PROVIDED "AS IS", WITHOUT WARRANTY OF ANY KIND, EXPRESS OR
# IMPLIED, INCLUDING BUT NOT LIMITED TO THE WARRANTIES OF MERCHANTABILITY,
# FITNESS FOR A PARTICULAR PURPOSE AND NONINFRINGEMENT. IN NO EVENT SHALL THE
# AUTHORS OR COPYRIGHT HOLDERS BE LIABLE FOR ANY CLAIM, DAMAGES OR OTHER
# LIABILITY, WHETHER IN AN ACTION OF CONTRACT, TORT OR OTHERWISE, ARISING FROM,
# OUT OF OR IN CONNECTION WITH THE SOFTWARE OR THE USE OR OTHER DEALINGS IN THE
# SOFTWARE.
#==================================================================================
# Example 5 - port of the Arduino example 5
#

from __future__ import print_function
import qwiic_bme280
import time
import sys

def runExample():

    print("\nSparkFun BME280 Sensor  Example 5\n")
    mySensor = qwiic_bme280.QwiicBme280()

    if mySensor.connected == False:
        print("The Qwiic BME280 device isn't connected to the system. Please check your connection", \
            file=sys.stderr)
        return

    mySensor.begin()

    print("ID(0xD0): 0x%.2x" % mySensor._i2c.readByte(mySensor.address, mySensor.BME280_CHIP_ID_REG))
    print("Reset register(0xE0): 0x%.2x" % mySensor._i2c.readByte(mySensor.address, mySensor.BME280_RST_REG))
    print("ctrl_meas(0xF4): 0x%.2x" % mySensor._i2c.readByte(mySensor.address, mySensor.BME280_CTRL_MEAS_REG))
    print("ctrl_hum(0xF2): 0x%.2x\n" % mySensor._i2c.readByte(mySensor.address, mySensor.BME280_CTRL_HUMIDITY_REG))

    print("Displaying all regs:")
    memCounter = 0x80
    for row in range(8,16):
        print("0x%.2x 0:" % row, end='')
        for column in range(0,16):
            tempReadData = mySensor._i2c.readByte(mySensor.address, memCounter)
            print("0x%.2x " % tempReadData, end='')

            memCounter += 1
        print("")


    print("Displaying concatenated calibration words:")
    print("dig_T1, uint16: %d" % mySensor.calibration["dig_T1"])
    print("dig_T2, int16: %d" % mySensor.calibration["dig_T2"])
    print("dig_T3, int16: %d" % mySensor.calibration["dig_T3"])
    print("dig_P1, uint16: %d" % mySensor.calibration["dig_P1"])
    print("dig_P2, int16: %d" % mySensor.calibration["dig_P2"])
    print("dig_P3, int16: %d" % mySensor.calibration["dig_P3"])
    print("dig_P4, int16: %d" % mySensor.calibration["dig_P4"])
    print("dig_P5, int16: %d" % mySensor.calibration["dig_P5"])
    print("dig_P6, int16: %d" % mySensor.calibration["dig_P6"])
    print("dig_P7, int16: %d" % mySensor.calibration["dig_P7"])
    print("dig_P8, int16: %d" % mySensor.calibration["dig_P8"])
    print("dig_P9, int16: %d" % mySensor.calibration["dig_P9"])
    print("dig_H1, uint8: %d" % mySensor.calibration["dig_H1"])
    print("dig_H2, int16: %d" % mySensor.calibration["dig_H2"])
    print("dig_H3, uint8: %d" % mySensor.calibration["dig_H3"])
    print("dig_H4, int16: %d" % mySensor.calibration["dig_H5"])
    print("dig_H6, int8: %d" % mySensor.calibration["dig_H6"])
    while True:

        print("Humidity:\t%.3f" % mySensor.humidity)

        print("Pressure:\t%.3f" % mySensor.pressure)

        print("Altitude:\t%.3f" % mySensor.altitude_feet)

        print("Temperature:\t%.2f\n" % mySensor.temperature_fahrenheit)

        time.sleep(1)

if __name__ == '__main__':
    try:
        runExample()
    except (KeyboardInterrupt, SystemExit) as exErr:
        print("\nEnding Example 5")
sys.exit(0)
Troubleshooting Tips
Here are a few tips for troubleshooting this device.
Power
If you are not using the Qwiic system, make sure your supply voltage is within the electrical specifications of the BME280.
No Available Devices
Double check your connections. On a Raspberry Pi, you may get this is indicated with an OSError: [Errno 121] Remote I/O error readout.
On a Raspberry Pi, also make sure that the I2C hardware is enabled. This is usually indicated with an Error: Failed to connect to I2C bus 1. readout.
Checking Your I2C Connection
A simple method to check if your Raspberry Pi can communicate over I2C with the BME280 sensor, is to ping the I2C bus. On the latest releases of Raspbian Stretch, the i2ctools package should come pre-installed. If it isn't run the following command in the terminal:
sudo apt-get install i2ctools
Once the i2ctools package is installed, you can ping the I2C bus with the following command in the terminal:
i2cdetect -y 1
You should see a table printed out in the terminal. If the BME280 is connected/working properly you should see the address space for 0x77 marked with 77.
SPI Setup
As mentioned earlier, this tutorial does not go into detail about using an SPI connection as the Python library can only be used with an I2C connection. However, for users seeking an SPI setup, they can refer to the hookup guide for the original BME280 Sensor Breakout board.
If you still have questions or issues with this product, please create a post on our forum.
Resources and Going Further
For more product information, check out the resources below:
- Schematic (PDF)
- Eagle Files (ZIP)
- BME280 Datasheet
- SparkFun BME280 Arduino Library
- SparkFun BME280 Python Library
- GitHub Hardware Repo
- Product Video
Need help getting started with Arduino and I2C? Check out these resources here:
- Arduino I2C Scanner Example
- Arduino Wire Library Reference Page
- Arduino Wire Library (In-Depth) Reference
Need help getting started with your Raspberry Pi? Check out these resources here:
- Setting up your Raspberry Pi
- Using your Raspberry Pi
- Documentation:
Need help getting started with Python and I2C? Check out these resources here:
- Python Programming Tutorial: Getting Started with the Raspberry Pi
- Raspberry Pi SPI and I2C Tutorial
Need some inspiration for your next project? Check out some of these other Qwiic product tutorials:
AS726X NIR/VIS Spectral Sensor Hookup Guide
Advanced Autonomous Kit for Sphero RVR Assembly Guide
SparkFun Indoor Air Quality Sensor - ENS160 (Qwiic) Hookup Guide
Qwiic Kit for Raspberry Pi V2 Hookup Guide
Need some inspiration for your next project? Check out some of these other weather related tutorials: