Favorited
Favorite
0
Introduction
The Grid-EYE from Panasonic is an 8x8 thermopile array. This means you have a square array of 64 pixels each capable of independent temperature detection. It’s like having thermal camera (or Predator’s vision), just in really low resolution. It's part of SparkFun's Qwiic system, so it is easier to connect to get your low-resolution infrared image.
In stock
SEN-14607
The SparkFun Grid-EYE Infrared Array Breakout board is an 8x8 thermopile array, giving you a square of 64 pixels capable of i…
2
In this hookup guide, we'll connect our sensor up to our microcontroller of choice and read the array simply as 0's and 1's in an Arduino Serial Monitor. We'll also read the interrupt array to find out which pixels are detecting a value higher than a certain threshold. We'll go over how to check the temperature of the chip itself using the built in thermistor. Once we figure out how to interface with the GRID-Eye in our Arduino IDE, we'll move over to Processing to get some neat visuals from our pixel array, and actually get a nice looking thermal camera.
Required Materials
To get started, you'll need a microcontroller to control everything in your project.
In stock
DEV-13975
The SparkFun RedBoard combines the simplicity of the UNO's Optiboot bootloader, the stability of the FTDI, and the shield com…
49
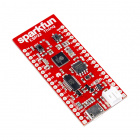
In stock
DEV-13907
The SparkFun ESP32 Thing is a comprehensive development platform for Espressif’s ESP32, their super-charged version of the …
69
Retired
WRL-13774
Particle's IoT (Internet of Things) hardware development board, the Photon, provides everything you need to build a connected…
32
Retired
Retired
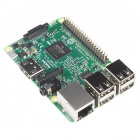
DEV-13825
Everyone knows and loves Raspberry Pi, but what if you didn't need additional peripherals to make it wireless. The Raspberry …
92
Retired
Now to get your microcontroller into the Qwiic ecosystem, the key will be one of the following Qwiic shields to match your preference of microcontroller:
In stock
DEV-14459
The SparkFun Qwiic HAT for Raspberry Pi is the quickest and easiest way to make your way into the Qwiic ecosystem and still u…
5
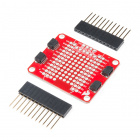
In stock
DEV-14352
The SparkFun Qwiic Shield is an easy-to-assemble board that provides a simple way to incorporate the Qwiic Connect System wit…
9
Retired
DEV-14477
The SparkFun Qwiic Shield for Photon is an easy-to-assemble board that provides a simple way to incorporate the Qwiic System …
Retired
You will also need a Qwiic cable to connect the shield to your GRID-Eye, choose a length that suits your needs.
In stock
PRT-14426
This is a 50mm long 4-conductor cable with 1mm JST termination. It’s designed to connect Qwiic enabled components together …
In stock
PRT-14427
This is a 100mm long 4-conductor cable with 1mm JST termination. It’s designed to connect Qwiic enabled components together…
Retired
PRT-14429
This is a 500mm long 4-conductor cable with 1mm JST termination. It’s designed to connect Qwiic enabled components together…
1
Retired
Retired
PRT-14428
This is a 200mm long 4-conductor cable with 1mm JST termination. It’s designed to connect Qwiic enabled components together…
Retired
Suggested Reading
If you aren't familiar with our new Qwiic system, we recommend reading here for an overview. We would also recommend taking a look at the hookup guide for the Qwiic Shield if you haven't already. Brushing up on your skills in I2C is also recommended, as all Qwiic sensors are I2C. Since we'll also be using Processing in one of these demos, we'd recommend looking up the tutorial on hooking your Arduino up to Processing.
I2C
An introduction to I2C, one of the main embedded communications protocols in use today.
 Englandsaurus
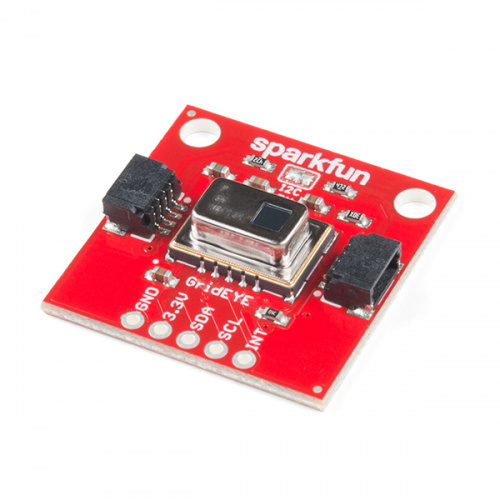


