Qwiic Kit for Raspberry Pi Hookup Guide
This Tutorial is Retired!
View the updated tutorial: Qwiic Kit for Raspberry Pi V2 Hookup Guide
 M-Short,
  bboyho
Python
Python is a great language, we actually have a great tutorial on getting started with Python programming on a Raspberry Pi that covers everything from picking an editor and getting the code to run, to syntax and error messages. I highly recommend reading it if you plan on writing your own code. If you just plan on running the example code and maybe making a few changes, we'll go through a few basic things here.
Python Programming Tutorial: Getting Started with the Raspberry Pi
June 27, 2018
Indentation
In many programming languages, we indent things to make things easier to read. In Python, those indents are part of the code. Instead of putting brackets around your loop or if() statements, you just indent that entire chunk with a leading whitespace. In other words, you have to make sure your indents are correct. I also recommend not using your keyboard's TAB button to indent as various programs will read it differently (and usually incorrectly).
Commenting
Another thing to keep in mind is comments. In Python, the symbol "#" is used to denote that the line is a comment. Unlike many other languages there is no official multi-line comment available. So you'll just have to get use to typing # for each line when writing large comments.
Python Versions and Installing PIP
There are also 2 commonly used Python versions. Even after Python 3 came out many people continued to use 2.7 for many years. Part of the reason is that Python 3 improved on some things and in the process made it not backwards compatible. For our example we will be using Python 3.7 (and the code will not run on 2.7). To see what version of Python your Pi is using, open a command line and type each of the following commands individually to check.
language:bash
python --version
python -m pip --version
If you are not using Python 3, then we'll need to open the *.bashrc file and add an alias.
First, you will need to update the python installation package by running the following command to install pip for Python 3. Execute the following commands.
language:bash
sudo apt-get install python3-pip
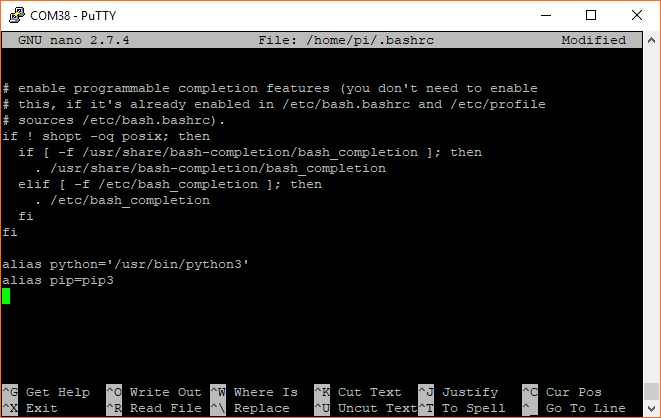
Type the following command to open the file.
language:bash
nano ~/.bashrc
Then add the following lines at the end. That should tell the computer whenever you want to run python to look for the file located at /usr/bin/python3.
language:bash
alias python='/usr/bin/python3'
alias pip=pip3
To exit nano type CTRL + X and then hit Y when it asks you if you want to save and then ENTER. You can now either reboot or type the following to force the Pi to run the */.bashrc file again.
language:bash
source ~/.bashrc
Once adjusted, type the following command to ensure that pip is up to date.
language:bash
python -m pip install --upgrade pip