Raspberry Pi 3 Starter Kit Hookup Guide
 MTaylor
Methods of Working with the Pi
Once the Pi is configured, there are a few methods of using it depending on if you want to use it like a desktop or manage it remotely.
This section covers using the Pi in the following ways
- Using HDMI-out -- Operate your Pi like a desktop computer.
- Using the serial terminal -- some functionality but buggy in the latest Raspbian release.
- Using SSH -- Operate through a network linked to another computer.
Using HDMI-out
Noobs 1.8.0, with Raspbian, automatically logs in and starts a graphical user interface.
If configured to boot to shell, log in with pi as the user name and raspberry as the password. Then, enter startx in the command line to enter a graphical environment where you are presented with a desktop-type menu-driven operating system.
If you need to get back to text land, you can either
- log off through the Task Bar Menu -- drops back to the shell, closing down the X window system
- open xterm from the Task Bar -- opens a shell in a graphical window
- Use CTRL-ALT-1 through CTRL-ALT-8 -- gives you a number of shells, with 7 being the graphic environment (if loaded).
Remember, shutdown with the menu item or enter sudo shutdown -h now from a shell, and wait for the system to halt before removing power.
Using the Serial Terminal without a Monitor
Connect the FTDI (or any USB-to-serial converter) to the mini-usb cable and plug into a usb port on your computer.
Set the terminal settings to 72000 baud, 8 bit, no parity, 1 stop and no flow control. This is an odd rate that is 1.6 times slower than before. Also, CPU frequency effects the symbol rate so be careful if using this interface, and plan for administering by a different method.
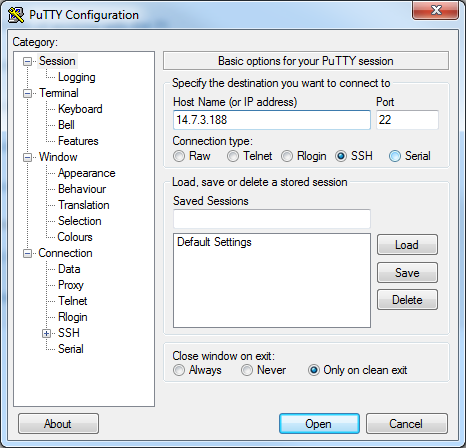
Using SSH
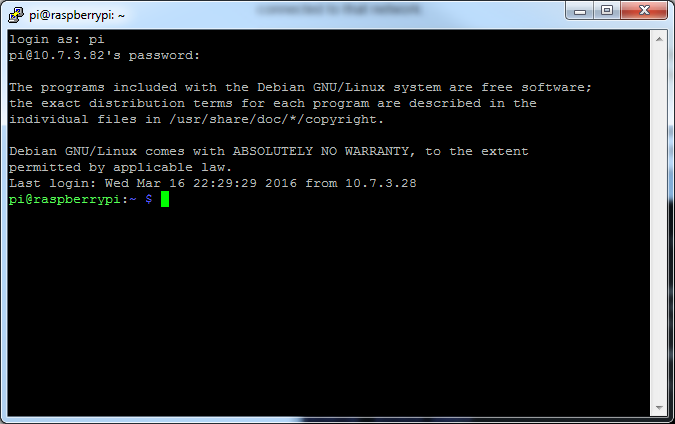
A good way to operate a Pi is to attach it to the local network somewhere, then manage it from another computer connected to that same network.
To do this, download PuTTY or a similar SSH terminal for your system and connect to the Internet port used by the pi. The TTY interface gives you a serial-like interface but with colors that make it a little nicer to use.
To obtain your IP address, get to a terminal, and use the command ifconfig. Alternately, hover the mouse pointer over the network icon on the task bar.
With Ethernet and wireless attached, ifconfig returns something like the following:
language:bash
pi@raspberrypi:~$ ifconfig
eth0      Link encap:Ethernet  HWaddr b8:a8:3b:56:1a:f7
        inet addr:14.7.3.188  Bcast:14.7.3.255  Mask:255.255.255.0
        UP BROADCAST RUNNING MULTICAST  MTU:1500  Metric:1
        RX packets:3026 errors:0 dropped:0 overruns:0 frame:0
        TX packets:462 errors:0 dropped:0 overruns:0 carrier:0
        collisions:0 txqueuelen:1000
        RX bytes:229516 (224.1 KiB)  TX bytes:60888 (59.4 KiB)

lo        Link encap:Local Loopback
        inet addr:127.0.0.1  Mask:255.0.0.0
        UP LOOPBACK RUNNING  MTU:65536  Metric:1
        RX packets:8 errors:0 dropped:0 overruns:0 frame:0
        TX packets:8 errors:0 dropped:0 overruns:0 carrier:0
        collisions:0 txqueuelen:0
        RX bytes:1104 (1.0 KiB)  TX bytes:1104 (1.0 KiB)

wlan0     Link encap:Ethernet  HWaddr 74:df:21:5b:a3:9c
        inet addr:32.8.0.142  Bcast:32.8.0.255  Mask:255.255.255.0
        UP BROADCAST RUNNING MULTICAST  MTU:1500  Metric:1
        RX packets:120 errors:0 dropped:40 overruns:0 frame:0
        TX packets:12 errors:0 dropped:4 overruns:0 carrier:0
        collisions:0 txqueuelen:1000
        RX bytes:20955 (20.4 KiB)  TX bytes:9956 (9.7 KiB)
If it looks similar but the IP addresses aren't present, that network link hasn't been established.
In this example, we know our Ethernet is on IP 14.7.3.188 and our wireless on 32.8.0.142. These can be entered into the PuTTY configuration window to begin the session. From here, it just works like the serial link!